深度学习系列53:mmdetection上手
1. 安装
使用openmim安装:
pip install -U openmim
mim install "mmengine>=0.7.0"
mim install "mmcv>=2.0.0rc4"
2. 测试案例
下载代码和模型:
git clone https://github.com/open-mmlab/mmdetection.git
mkdir ./checkpoints
mim download mmdet --config rtmdet_tiny_8xb32-300e_coco --dest ./checkpoints
运行代码,核心是定义inferencer和使用inferencer进行推理两行:
from mmdet.apis import DetInferencer

# Choose to use a config
model_name = 'rtmdet_tiny_8xb32-300e_coco'
# Setup a checkpoint file to load
checkpoint = './checkpoints/rtmdet_tiny_8xb32-300e_coco_20220902_112414-78e30dcc.pth'

# Set the device to be used for evaluation
device = 'cpu'

# Initialize the DetInferencer
inferencer = DetInferencer(model_name, checkpoint, device)

# Use the detector to do inference
img = 'demo.jpg'
result = inferencer(img, out_dir='./output')

# Show the structure of result dict
from rich.pretty import pprint
pprint(result, max_length=4)

# Show the output image
from PIL import Image
Image.open('./output/vis/demo.jpg')
3. 自定义数据进行训练
3.1 准备数据
建议使用coco格式,参见https://cocodataset.org/#format-data。文件从头至尾按照顺序分为以下段落:
{
“info”: info,
“licenses”: [license],
“images”: [image],
“annotations”: [annotation],
“categories”: [category]
}
下面是从instances_val2017.json文件中摘出的一个annotation的实例,这里的segmentation就是polygon格式:
{
“segmentation”: [[510.66,423.01,511.72,420.03,510.45…]],
“area”: 702.1057499999998,
“iscrowd”: 0,
“image_id”: 289343,
“bbox”: [473.07,395.93,38.65,28.67],
“category_id”: 18,
“id”: 1768
},
从instances_val2017.json文件中摘出的2个category实例如下所示:
{
“supercategory”: “person”,
“id”: 1,
“name”: “person”
},
{
“supercategory”: “vehicle”,
“id”: 2,
“name”: “bicycle”
},
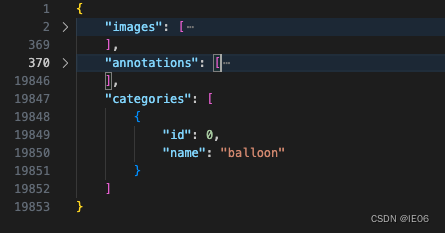
我们来看测试案例的例子,包含三个大字段,其中categories非常简单,只有一个balloon(我们需要训练的目标)

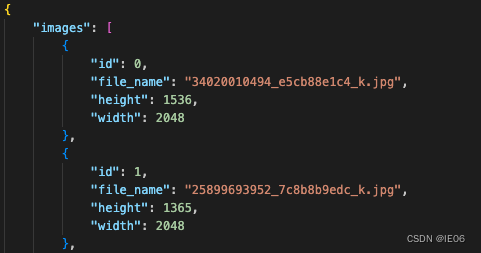
images则是如下的清单:

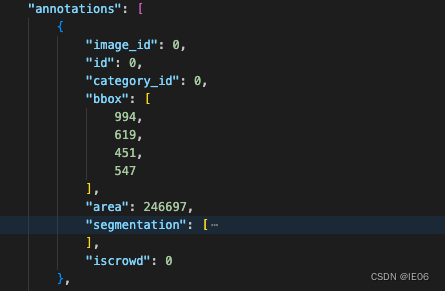
annotations如下:

3.2 配置config文件
config文件中需要定义数据,模型,训练参数,优化器等各种参数。测试案例如下:
config_balloon = """
# Inherit and overwrite part of the config based on this config
_base_ = './rtmdet_tiny_8xb32-300e_coco.py'

data_root = 'data/balloon/' # dataset root

train_batch_size_per_gpu = 4
train_num_workers = 2

max_epochs = 20
stage2_num_epochs = 1
base_lr = 0.00008


metainfo = {
    'classes': ('balloon', ),
    'palette': [
        (220, 20, 60),
    ]
}

train_dataloader = dict(
    batch_size=train_batch_size_per_gpu,
    num_workers=train_num_workers,
    dataset=dict(
        data_root=data_root,
        metainfo=metainfo,
        data_prefix=dict(img='train/'),
        ann_file='train.json'))

val_dataloader = dict(
    dataset=dict(
        data_root=data_root,
        metainfo=metainfo,
        data_prefix=dict(img='val/'),
        ann_file='val.json'))

test_dataloader = val_dataloader

val_evaluator = dict(ann_file=data_root + 'val.json')

test_evaluator = val_evaluator

model = dict(bbox_head=dict(num_classes=1))

# learning rate
param_scheduler = [
    dict(
        type='LinearLR',
        start_factor=1.0e-5,
        by_epoch=False,
        begin=0,
        end=10),
    dict(
        # use cosine lr from 10 to 20 epoch
        type='CosineAnnealingLR',
        eta_min=base_lr * 0.05,
        begin=max_epochs // 2,
        end=max_epochs,
        T_max=max_epochs // 2,
        by_epoch=True,
        convert_to_iter_based=True),
]

train_pipeline_stage2 = [
    dict(type='LoadImageFromFile', backend_args=None),
    dict(type='LoadAnnotations', with_bbox=True),
    dict(
        type='RandomResize',
        scale=(640, 640),
        ratio_range=(0.1, 2.0),
        keep_ratio=True),
    dict(type='RandomCrop', crop_size=(640, 640)),
    dict(type='YOLOXHSVRandomAug'),
    dict(type='RandomFlip', prob=0.5),
    dict(type='Pad', size=(640, 640), pad_val=dict(img=(114, 114, 114))),
    dict(type='PackDetInputs')
]

# optimizer
optim_wrapper = dict(
    _delete_=True,
    type='OptimWrapper',
    optimizer=dict(type='AdamW', lr=base_lr, weight_decay=0.05),
    paramwise_cfg=dict(
        norm_decay_mult=0, bias_decay_mult=0, bypass_duplicate=True))

default_hooks = dict(
    checkpoint=dict(
        interval=5,
        max_keep_ckpts=2,  # only keep latest 2 checkpoints
        save_best='auto'
    ),
    logger=dict(type='LoggerHook', interval=5))

custom_hooks = [
    dict(
        type='PipelineSwitchHook',
        switch_epoch=max_epochs - stage2_num_epochs,
        switch_pipeline=train_pipeline_stage2)
]

# load COCO pre-trained weight
load_from = './checkpoints/rtmdet_tiny_8xb32-300e_coco_20220902_112414-78e30dcc.pth'

train_cfg = dict(type='EpochBasedTrainLoop', max_epochs=max_epochs, val_interval=1)
visualizer = dict(vis_backends=[dict(type='LocalVisBackend'),dict(type='TensorboardVisBackend')])
"""

with open('../configs/rtmdet/rtmdet_tiny_1xb4-20e_balloon.py', 'w') as f:
    f.write(config_balloon)
3.3 开始训练
使用Mac M2芯片需要修改3个地方。首先是需要设置
export PYTORCH_ENABLE_MPS_FALLBACK=1
其次是mmcv中的nms需要转到cpu上计算,打开mmcv/ops/nms.py,将class NMSop(torch.autograd.Function)中的inds = ext_module.nms(bboxes, scores…)改为inds = ext_module.nms(bboxes.cpu(), scores.cpu()…)
运行后会出现一个assert报错,找到源代码,把那一行assert删掉即可。
运行完成后,可以查看tensorboard:
%load_ext tensorboard

# see curves in tensorboard
%tensorboard --logdir ./work_dirs
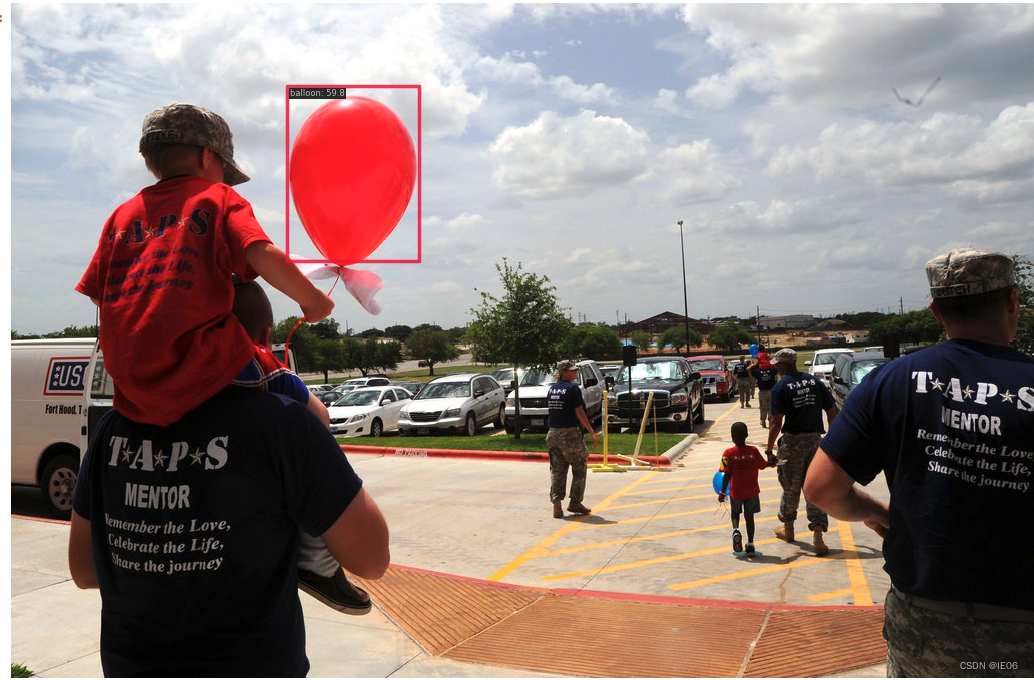
然后查看测试结果
from mmdet.apis import DetInferencer
import glob

# Choose to use a config
config = '../configs/rtmdet/rtmdet_tiny_1xb4-20e_balloon.py'
# Setup a checkpoint file to load
checkpoint = glob.glob('./work_dirs/rtmdet_tiny_1xb4-20e_balloon/best_coco*.pth')[0]

# Set the device to be used for evaluation
device = 'cpu'

# Initialize the DetInferencer
inferencer = DetInferencer(config, checkpoint, device)

# Use the detector to do inference
img = './data/balloon/val/4838031651_3e7b5ea5c7_b.jpg'
result = inferencer(img, out_dir='./output')
# Show the output image
Image.open('./output/vis/4838031651_3e7b5ea5c7_b.jpg')

4. 其他
MMYOLO:传统的目标检测库
MMRotate:旋转检测库
MMDetection3D:三维检测库
下面几期一一介绍。
