Spring Boot - 自定义注解来记录访问路径以及访问信息,并将记录存储到MySQL
1、准备阶段
application.properties;yml 可通过yaml<互转>properties
spring.datasource.url=jdbc:mysql://localhost:3306/study_annotate
spring.datasource.username=root
spring.datasource.password=123321
spring.datasource.driver-class-name=com.mysql.cj.jdbc.Driver
spring.jpa.hibernate.ddl-auto=update
依赖(以 jpa 为例,简化代码方便举例):
<dependency>
    <groupId>org.springframework.boot</groupId>
    <artifactId>spring-boot-starter-data-jpa</artifactId>
</dependency>
<dependency>
    <groupId>mysql</groupId>
    <artifactId>mysql-connector-java</artifactId>
    <version>8.0.28</version>
</dependency>
2、自定义注解
import java.lang.annotation.ElementType;
import java.lang.annotation.Retention;
import java.lang.annotation.RetentionPolicy;
import java.lang.annotation.Target;

@Target(ElementType.METHOD) // 因为路径在方法上所以作用目标为 METHOD
@Retention(RetentionPolicy.RUNTIME) // 运行时:通过反射在运行时读取注解信息
public @interface AccessLog {
    String value() default "";
}
3、先来定义一个实体类
import lombok.Data;

import javax.persistence.Entity;
import javax.persistence.GeneratedValue;
import javax.persistence.GenerationType;
import javax.persistence.Id;
import java.time.LocalDateTime;

@Entity
@Data
public class AccessLogEntity {

    @Id
    @GeneratedValue(strategy = GenerationType.IDENTITY)
    private Long id;

    private String logMessage;
    private String ipAddress;
    private LocalDateTime timestamp;


    public AccessLogEntity() {
        this.timestamp = LocalDateTime.now();
    }

    public AccessLogEntity(String logMessage, String ipAddress) {
        this();
        this.logMessage = logMessage;
        this.ipAddress = ipAddress;
    }

}
4、接着dao
import com.lfsun.demolfsunstudyannotate.entity.AccessLogEntity;
import org.springframework.data.jpa.repository.JpaRepository;
import org.springframework.stereotype.Repository;

@Repository
public interface AccessLogRepository extends JpaRepository<AccessLogEntity, Long> {
    // 这里可以定义一些自定义的查询方法,根据需要进行扩展
}
5、然后service
import com.lfsun.demolfsunstudyannotate.dao.AccessLogRepository;
import com.lfsun.demolfsunstudyannotate.entity.AccessLogEntity;
import org.springframework.beans.factory.annotation.Autowired;
import org.springframework.stereotype.Service;

@Service
public class AccessLogService {

    @Autowired
    private AccessLogRepository accessLogRepository;

    public void saveLog(String logMessage, String ipAddress) {
        // 在这里实现将日志信息保存到MySQL数据库的逻辑
        AccessLogEntity logEntity = new AccessLogEntity(logMessage, ipAddress);
        accessLogRepository.save(logEntity);
    }
}
6、该切面了
import com.lfsun.demolfsunstudyannotate.annotate.AccessLog;
import com.lfsun.demolfsunstudyannotate.service.AccessLogService;
import com.lfsun.demolfsunstudyannotate.util.IpUtil;
import org.aspectj.lang.JoinPoint;
import org.aspectj.lang.annotation.Aspect;
import org.aspectj.lang.annotation.Before;
import org.springframework.beans.factory.annotation.Autowired;
import org.springframework.stereotype.Component;

import javax.servlet.http.HttpServletRequest;

@Aspect
@Component
public class AccessLogAspect {

    @Autowired
    private AccessLogService accessLogService;

    @Before("@annotation(accessLog)")
    public void logAccess(JoinPoint joinPoint, AccessLog accessLog) {
        String methodName = joinPoint.getSignature().toShortString();
        String logMessage = accessLog.value().isEmpty() ? methodName : accessLog.value();
        String ipAddress = IpUtil.getClientIpAddress();

        // 在这里将日志信息记录到MySQL数据库
        accessLogService.saveLog(logMessage, ipAddress);
    }

}
7、controller
import com.lfsun.demolfsunstudyannotate.annotate.AccessLog;
import org.springframework.web.bind.annotation.GetMapping;
import org.springframework.web.bind.annotation.RequestMapping;
import org.springframework.web.bind.annotation.RestController;

@RestController
@RequestMapping("/")
public class HelloController {

    @AccessLog("/hello")
    @GetMapping("/hello")
    public String hello() {
        return "hello lfsun!";
    }
}
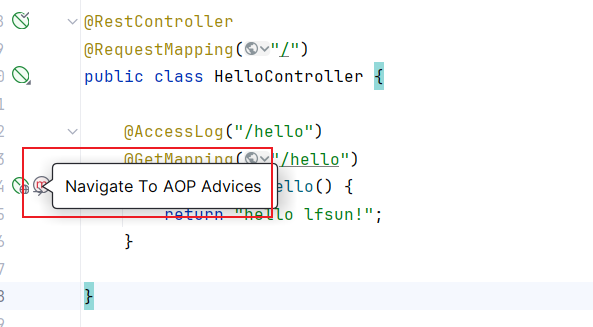
如果观察仔细的话可以看到:点下就回到刚刚定义的切面了!

8、补个IpUtil ,获取ip的工具类
import lombok.extern.slf4j.Slf4j;
import org.springframework.web.context.request.RequestContextHolder;
import org.springframework.web.context.request.ServletRequestAttributes;

import javax.servlet.http.HttpServletRequest;
import java.util.Objects;

@Slf4j
public class IpUtil {

    private static final String X_FORWARDED_FOR_HEADER = "X-Forwarded-For";
    private static final String PROXY_CLIENT_IP_HEADER = "Proxy-Client-IP";
    private static final String WL_PROXY_CLIENT_IP_HEADER = "WL-Proxy-Client-IP";

    /**
     * 获取客户端真实IP地址,考虑了代理服务器的情况。
     *
     * @param request HttpServletRequest对象
     * @return 客户端真实IP地址
     */
    public static String getClientIpAddress(HttpServletRequest request) {
        String xForwardedForHeader = request.getHeader(X_FORWARDED_FOR_HEADER);
        if (xForwardedForHeader != null && !xForwardedForHeader.isEmpty()) {
            // 如果有多个IP地址,取第一个
            return xForwardedForHeader.split(",")[0].trim();
        } else if (request.getHeader(PROXY_CLIENT_IP_HEADER) != null) {
            return request.getHeader(PROXY_CLIENT_IP_HEADER);
        } else if (request.getHeader(WL_PROXY_CLIENT_IP_HEADER) != null) {
            return request.getHeader(WL_PROXY_CLIENT_IP_HEADER);
        } else {
            // 如果以上都不存在,直接获取RemoteAddr
            String remoteAddr = request.getRemoteAddr();
            log.warn("使用 remoteAddr 无法确定客户端 IP 地址: {}", remoteAddr);
            return remoteAddr;
        }
    }

    /**
     * 获取客户端真实IP地址,使用Spring的RequestContextHolder。
     *
     * @return 客户端真实IP地址
     */
    public static String getClientIpAddress() {
        try {
            HttpServletRequest request = ((ServletRequestAttributes) Objects.requireNonNull(RequestContextHolder.getRequestAttributes())).getRequest();
            return getClientIpAddress(request);
        } catch (NullPointerException e) {
            log.error("无法从 RequestContextHolder 获取 HttpServletRequest.", e);
            return "unknown";
        }
    }

}
项目启动并测试
1、从本地浏览器访问查看日志

2、从内网穿透的url访问查看日志

3、从内网穿透的url然后再开着梯子访问查看日志

吐槽一下 这是断网了吗 ~ ^ ~

