SpringBoot——自定义start
优质博文:IT-BLOG-CN
一、Mybatis 实现 start 的原理
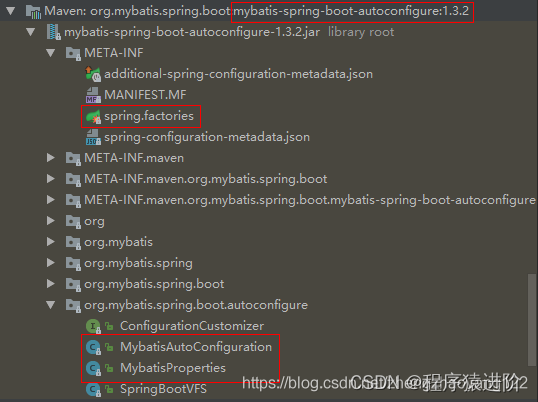
首先在写一个自定义的start之前,我们先参考下Mybatis是如何整合SpringBoot:mybatis-spring-boot-autoconfigure依赖包:
<dependency>
	<groupId>org.mybatis.spring.boot</groupId>
	<artifactId>mybatis-spring-boot-starter</artifactId>
	<version>1.3.2</version>
</dependency>
mybatis依赖包展示: 重要文件:spring.factories、MybatisAutoConfiguration、MybatisProperties

:::tip
starters 命名:Spring Boot 官方的启动器都是以 spring-boot-starter-命名的,代表了一个特定的应用类型。第三方的启动器不能以 spring-boot开头命名,它们都被 Spring Boot官方保留。一般第三方应该这样命名,像 mybatis 的 mybatis-spring-boot-starter。
:::
【1】查看spring.factories文件: 配置自动配置类MybatisAutoConfiguration。spring.factories会引导springboot哪个是自动配置类。
org.springframework.boot.autoconfigure.EnableAutoConfiguration=\
org.mybatis.spring.boot.autoconfigure.MybatisAutoConfiguration
【2】进入MybatisAutoConfiguration.class类:下面@EnableConfigurationProperties(MybatisProperties.class)引入了配置文件MybatisProperties.class。之后就可以利用这个配置文件里的参数实例化一个对象完成整个mybatis的创建。
在 Spring开发过程中我们常使用到 @ConfigurationProperties注解,通常是用来将 properties和 yml配置文件属性转化为 Bean对象使用和修改。在获取这些 Bean之前,首先需要使用 @EnableConfigurationProperties({ConfigBean.class}) 注解的作用是开启 @ConfigurationProperties注解,当满足 Condition 条件的时候才执行。
@Configuration
@ConditionalOnClass({SqlSessionFactory.class, SqlSessionFactoryBean.class})
@ConditionalOnBean({DataSource.class})
/**
 * @ConfigurationProperties注解主要用来把properties配置文件转化为bean来使用的,
 * 而@EnableConfigurationProperties注解的作用是@ConfigurationProperties注解生效。
 * 如果只配置@ConfigurationProperties注解,在IOC容器中是获取不到properties配置文件转化的bean的。
 */
@EnableConfigurationProperties({MybatisProperties.class})
@AutoConfigureAfter({DataSourceAutoConfiguration.class})
public class MybatisAutoConfiguration {
    private static final Logger logger = LoggerFactory.getLogger(MybatisAutoConfiguration.class);
    private final MybatisProperties properties;
    private final Interceptor[] interceptors;
    private final ResourceLoader resourceLoader;
    private final DatabaseIdProvider databaseIdProvider;
    private final List<ConfigurationCustomizer> configurationCustomizers;

    public MybatisAutoConfiguration(MybatisProperties properties, ObjectProvider<Interceptor[]> interceptorsProvider, ResourceLoader resourceLoader, ObjectProvider<DatabaseIdProvider> databaseIdProvider, ObjectProvider<List<ConfigurationCustomizer>> configurationCustomizersProvider) {
        this.properties = properties;
        this.interceptors = (Interceptor[])interceptorsProvider.getIfAvailable();
        this.resourceLoader = resourceLoader;
        this.databaseIdProvider = (DatabaseIdProvider)databaseIdProvider.getIfAvailable();
        this.configurationCustomizers = (List)configurationCustomizersProvider.getIfAvailable();
    }
//......
}
【3】进入 MybatisProperties: 这里所有的属性,就是之后我们在properties配置文件中配置的项,而@ConfigurationProperties(prefix = "mybatis")定义了前缀。举个栗子:我们一般会在application.yml或者application.properties中xml映射文件的路径:mybatis.mapperLocations=classpath:mapping/*.xml就是以mybatis作为前缀的。
mybatis正是这个MybatisProperties的@ConfigurationProperties配置的前缀而mapperLocations就是我们这个MybatisProperties.class的其中一个成员变量 !
@ConfigurationProperties(
    prefix = "mybatis"
)
public class MybatisProperties {
    public static final String MYBATIS_PREFIX = "mybatis";
    private String configLocation;
    private String[] mapperLocations;
    private String typeAliasesPackage;
    private String typeHandlersPackage;
    private boolean checkConfigLocation = false;
    private ExecutorType executorType;
    private Properties configurationProperties;
    @NestedConfigurationProperty
    private Configuration configuration;

    public MybatisProperties() {
    }
//......
}
【4】现在来看最后一个问题:spring.factories文件什么时候加载,我们定位到我们的启动类,进入@SpringBootApplication注解,点进去之后是一个@EnableAutoConfiguration注解,再点进去可以看到一个叫做AutoConfigurationImportSelector.class的类,就是这里了再点进去,在这个类的源码里搜索spring.factories

原来springboot会去META-INF目录下找到这个spring.factories文件,到现在为止我们已经理清楚了整个start加载的流程:
【1】去META-INF目录下找到这个spring.factories文件;
【2】通过文件内指定的类路径,找到配置类;
【3】配置类加载进属性类;
【4】配置类通过属性类的参数构建一个新的Bean;
二、用户自定义 start
就按照这个Mybatis的格式,自己写一个redis的start由于spring.factories是指定入口的我们可以放在最后写。下面创建一个普通的springboot工程。
【1】编写属性类: 添加@ConfigurationProperties注解和前缀redis。之后我们就可以在properties或yml中 使用redis.port=指定参数了;
@ConfigurationProperties(prefix = "redis")
public class RedisProperties {
    private Integer port;
    private String host;
    private String password;
    private int index;
    //省略了get set 方法
}
【2】编写配置类: 添加配置类注解 @Configuration 和加载条件,以及 @EnableConfigurationProperties(RedisProperties.class) 引入属性类,注入到 IOC 容器中。
@Configuration
//只有当Jedis 存在的时候 才执行,就是说一定要引入了Jedis的依赖才会执行这个配置
@ConditionalOnClass(Jedis.class)
//引入属性类
@EnableConfigurationProperties(RedisProperties.class)
public class RedisAutoConfiguration {
    @Bean
    //当这个bean不存在的时候才执行,防止重复加载bean
    @ConditionalOnMissingBean
    public Jedis jedis(RedisProperties redisProperties) {
        Jedis jedis = new Jedis(redisProperties.getHost(), redisProperties.getPort());
        jedis.auth(redisProperties.getPassword());
        jedis.select(redisProperties.getIndex());
        return jedis;
    }
}
【3】编写spring.factories文件: 在resources目录下创建入口文件,编写内容:指定配置文件的全路径。随后通过mvn install打到本地仓库。
org.springframework.boot.autoconfigure.EnableAutoConfiguration
    =com.yintong.myjedis.RedisAutoConfiguration
【4】测试: 然后我们新建一个springboot项目,在pom中加入依赖:
<dependency>
	<groupId>com.yintong</groupId>
	<artifactId>redis-start</artifactId>
	<version>0.0.1-SNAPSHOT</version>
</dependency>
【5】测试类: @Resource的作用相当于@Autowired,只不过@Autowired按byType自动注入,而@Resource默认按byName自动注入罢了。下面如果你能成功输出就成功了!
@RunWith(SpringRunner.class)
@SpringBootTest
public class TestStartApplicationTests {
    @Resource
    private Jedis jedis;
    @Test
    public void contextLoads() {
        jedis.set("test","测试成功");
        String test = jedis.get("test");
        System.out.println(test);
    }
}
