visual Studio MFC 平台实现拉普拉斯和拉普拉斯与直方图均衡化与中值滤波相结合实现比较
拉普拉斯变换的原理与应用
本文使用visual Studio MFC 平台实现图像增强中的拉普拉斯变换,同时拉普拉斯一般不会单独使用,与其他平滑操作相结合,本文使用了拉普拉斯与直方图均衡化以及与中值滤波相结合,也对三种方式进行了对比
关于基础工程的创建可以参考
01-Visual Studio 使用MFC 单文档工程绘制单一颜色直线和绘制渐变颜色的直线02-visual Studio MFC 绘制单一颜色三角形、渐变颜色边框三角形、渐变填充三角形、边框渐变的正方形与填充渐变的正方形实例
03-visual Studio MFC 平台实现图像增强中的线性变换(负变换)和非线性变换(对数与幂律)
04-MFC实现图像增强–分段式变换(灰度级切片,对比度拉伸,Bit-plane slicing)
05-visual Studio MFC 平台实现对灰度图添加椒盐噪声,并进行均值滤波与中值滤波
文章目录
- 拉普拉斯变换的原理与应用
- 一、 拉普拉斯变换的原理
- 二、 拉普拉斯实现
- 2.1单独拉普拉斯实现代码
- 单独拉普拉斯实现效果
- 2.2 拉普拉斯与直方图均衡化相结合实现代码
- 拉普拉斯与直方图均衡化相结合实现效果
- 2.3 拉普拉斯与中值滤波相结合实现
- 中值滤波与拉普拉斯相结合实现效果
一、 拉普拉斯变换的原理
拉普拉斯变换的原理如下:
拉普拉斯变换是图像处理中一种用于增强图像边缘的技术。它可以通过高通滤波来突出图像中的边缘特征。拉普拉斯变换的离散形式通常通过卷积运算实现。
- 离散拉普拉斯运算符: 在离散图像中,拉普拉斯运算符可以表示为:
∇ 2 f ( x , y ) = f ( x + 1 , y ) + f ( x − 1 , y ) + f ( x , y + 1 ) + f ( x , y − 1 ) − 4 f ( x , y ) \nabla^2 f(x, y) = f(x+1, y) + f(x-1, y) + f(x, y+1) + f(x, y-1) - 4f(x, y) ∇2f(x,y)=f(x+1,y)+f(x−1,y)+f(x,y+1)+f(x,y−1)−4f(x,y)
其中, f ( x , y ) f(x, y) f(x,y) 是图像在位置 ( x , y ) (x, y) (x,y)处的灰度值。
对于离散图像,拉普拉斯变换可以使用以下的卷积核来实现:
  0  -1   0
 -1   4  -1
  0  -1   0
这个卷积核对图像进行卷积运算,计算每个像素与其周围像素的差异,从而强调了图像中的边缘。在卷积运算中,将卷积核与图像的每个像素进行乘法,然后将结果相加。这个过程在整个图像上进行,产生一个新的图像,其中强调了边缘。
2. 连续拉普拉斯运算符: 在连续图像中,拉普拉斯运算符可以表示为:
∇ 2 f ( x , y ) = ∂ 2 f ∂ x 2 + ∂ 2 f ∂ y 2 \nabla^2 f(x, y) = \frac{\partial^2 f}{\partial x^2} + \frac{\partial^2 f}{\partial y^2} ∇2f(x,y)=∂x2∂2f+∂y2∂2f
它表示图像中各个点的强度与其周围点的强度之差的二阶导数。
- 应用: 对图像应用拉普拉斯变换将突出显示图像中的边缘和细节,因为这些区域通常具有灰度变化。拉普拉斯变换后的图像可以通过以下公式得到:
LaplacianImage = OriginalImage − SmoothedImage \text{LaplacianImage} = \text{OriginalImage} - \text{SmoothedImage} LaplacianImage=OriginalImage−SmoothedImage
这里,
SmoothedImage
\text{SmoothedImage}
SmoothedImage 是原始图像经过平滑处理(如高斯模糊)后的图像。
在实际应用中,拉普拉斯变换通常用于边缘检测或图像锐化。然而,由于它对噪声敏感,常常需要与其他技术一起使用,例如高斯滤波,以减小噪声的影响。
在数字图像处理中,通常使用卷积操作来实现拉普拉斯变换。卷积核的选择影响着变换的效果。拉普拉斯变换对于边缘检测和图像增强等任务非常有用。
二、 拉普拉斯实现
2.1单独拉普拉斯实现代码
 // 定义拉普拉斯核
 int laplacianKernel[3][3] = {
  { -1, -1, -1 },
  { -1,  8, -1 },
  { -1, -1, -1 }
 };

 // 应用卷积运算
 for (int y = 1; y < bmpHeight - 1; ++y) {
  for (int x = 1; x < bmpWidth - 1; ++x) {
   int sum = 0;
   for (int i = -1; i <= 1; ++i) {
    for (int j = -1; j <= 1; ++j) {
     sum += laplacianKernel[i + 1][j + 1] * gray_data[(y + i) * bmpWidth + (x + j)];
    }
   }
   laplacian_data[y * bmpWidth + x] = static_cast<unsigned char>(sum);
  }
 }
 CClientDC dc(this);
 CDC* pDC = &dc;

 m_pBmp->drawGrayBmp(pDC, laplacian_data, bmpWidth, bmpHeight, offset_left, offset_top +4 * bmpHeight+30);

 // 释放临时数组内存
 delete[] laplacian_data;
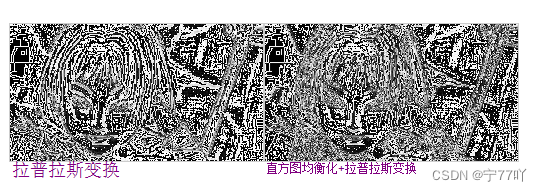
单独拉普拉斯实现效果

2.2 拉普拉斯与直方图均衡化相结合实现代码
// 计算直方图
int histogram[256] = { 0 };
for (int i = 0; i < bmpWidth * bmpHeight; ++i) {
 histogram[gray_data[i]]++;
}

// 计算累积分布函数(CDF)
int cdf[256] = { 0 };
cdf[0] = histogram[0];
for (int i = 1; i < 256; ++i) {
 cdf[i] = cdf[i - 1] + histogram[i];
}

// 映射灰度级别到临时变量
unsigned char* temp_data = new unsigned char[bmpWidth * bmpHeight];
int min_cdf = cdf[0];
for (int i = 0; i < bmpWidth * bmpHeight; ++i) {
 temp_data[i] = static_cast<unsigned char>(255 * (cdf[gray_data[i]] - min_cdf) / (bmpWidth * bmpHeight - min_cdf));
}

// 应用拉普拉斯变换
unsigned char* laplacian_data = new unsigned char[bmpWidth * bmpHeight];
int laplacianKernel[3][3] = {
 { -1, -1, -1 },
 { -1,  8, -1 },
 { -1, -1, -1 }
};
for (int y = 1; y < bmpHeight - 1; ++y) {
 for (int x = 1; x < bmpWidth - 1; ++x) {
  int sum = 0;
  for (int i = -1; i <= 1; ++i) {
   for (int j = -1; j <= 1; ++j) {
    sum += laplacianKernel[i + 1][j + 1] * temp_data[(y + i) * bmpWidth + (x + j)];
   }
  }
  laplacian_data[y * bmpWidth + x] = static_cast<unsigned char>(sum);
 }
}

// 绘制均衡化后的图像
//m_pBmp->drawGrayBmp(pDC, temp_data, bmpWidth, bmpHeight, offset_left + 900, offset_top);

// 绘制经拉普拉斯变换后的图像
m_pBmp->drawGrayBmp(pDC, laplacian_data, bmpWidth, bmpHeight, offset_left+bmpWidth, offset_top + 4* bmpHeight + 30);
拉普拉斯与直方图均衡化相结合实现效果

2.3 拉普拉斯与中值滤波相结合实现
// 中值滤波
for (int y = 1; y < bmpHeight - 1; ++y) {
 for (int x = 1; x < bmpWidth - 1; ++x) {
  // 获取3x3邻域内的像素值
  unsigned char neighborhood[9] = {
   gray_data[(y - 1) * bmpWidth + x - 1], gray_data[(y - 1) * bmpWidth + x], gray_data[(y - 1) * bmpWidth + x + 1],
   gray_data[y * bmpWidth + x - 1], gray_data[y * bmpWidth + x], gray_data[y * bmpWidth + x + 1],
   gray_data[(y + 1) * bmpWidth + x - 1], gray_data[(y + 1) * bmpWidth + x], gray_data[(y + 1) * bmpWidth + x + 1]
  };

  // 对邻域内像素值进行排序
  std::sort(neighborhood, neighborhood + 9);

  // 取中值作为当前像素值
  temp_data[y * bmpWidth + x] = neighborhood[4];
 }
}

// 拉普拉斯变换
int laplacianKernel[3][3] = {
 { -1, -1, -1 },
 { -1,  8, -1 },
 { -1, -1, -1 }
};

// 应用卷积运算
for (int y = 1; y < bmpHeight - 1; ++y) {
 for (int x = 1; x < bmpWidth - 1; ++x) {
  int sum = 0;
  for (int i = -1; i <= 1; ++i) {
   for (int j = -1; j <= 1; ++j) {
    sum += laplacianKernel[i + 1][j + 1] * temp_data[(y + i) * bmpWidth + (x + j)];
   }
  }
  median_laplacian_data[y * bmpWidth + x] = static_cast<unsigned char>(sum);
 }
}

CClientDC dc(this);
CDC* pDC = &dc;

// 显示结果
//m_pBmp->drawGrayBmp(pDC, temp_data, bmpWidth, bmpHeight, offset_left, offset_top);
m_pBmp->drawGrayBmp(pDC, median_laplacian_data, bmpWidth, bmpHeight, offset_left + 2*bmpWidth, offset_top + 4 * bmpHeight + 30);
中值滤波与拉普拉斯相结合实现效果

可以观看出在添加一些平滑操作后,与单独进行拉普拉斯变换还是有一些区别的,当然最后实现的效果可以调节拉普拉斯算子进行调节,以达到相应的效果。
