用23种设计模式打造一个cocos creator的游戏框架----(四)装饰器模式
1、模式标准
模式名称:装饰器模式
模式分类:结构型
模式意图:动态地给一个对象添加一些额外的职责。就增加功能来说,装饰器模式比生成子类更为灵活。
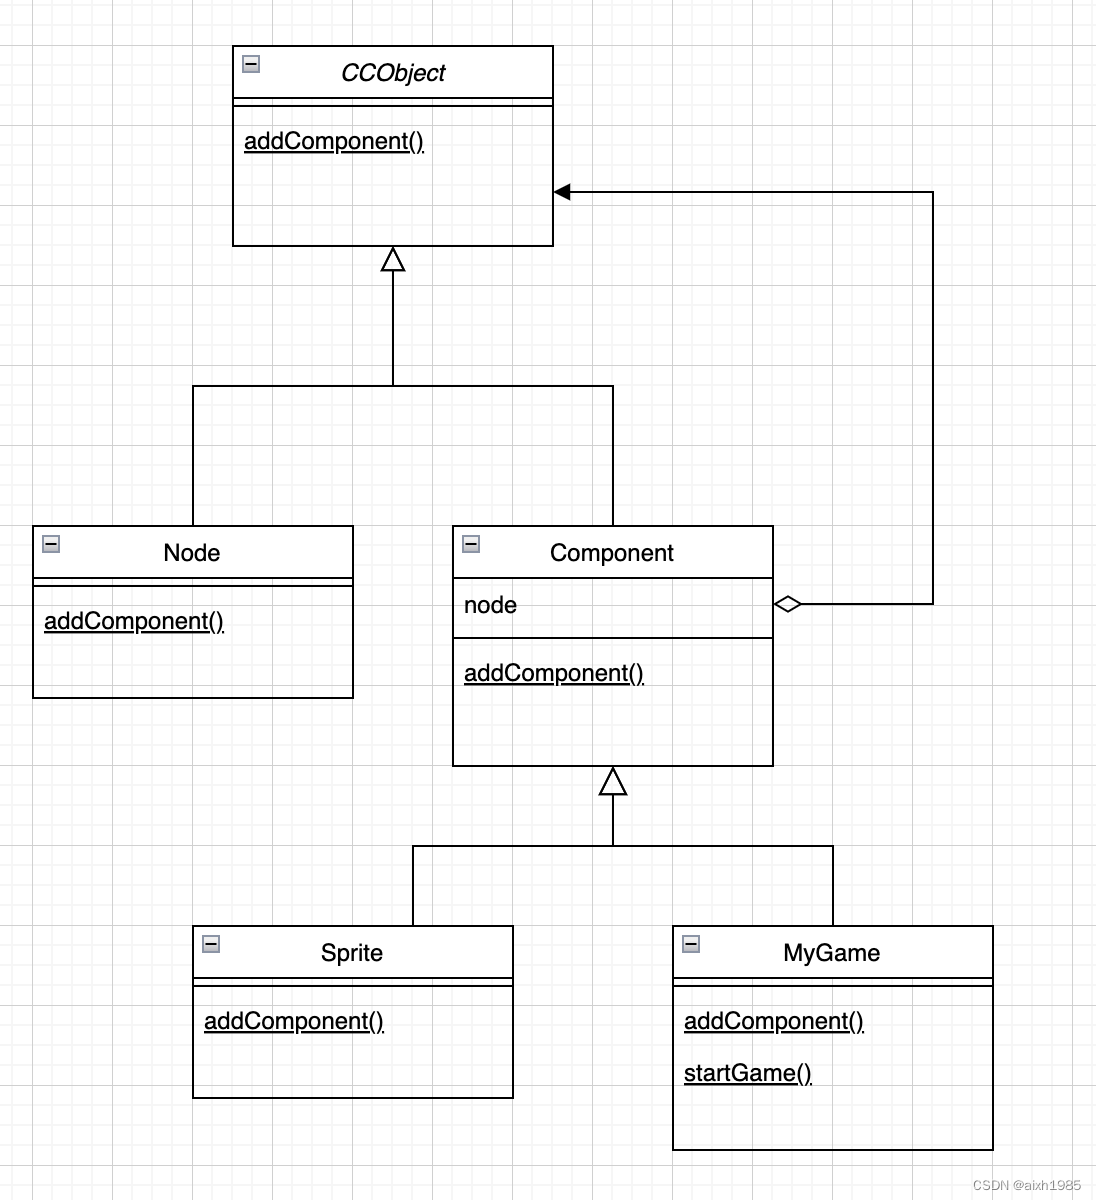
结构图:

适用于:
- 当需要给一个对象在运行时添加更多的责任时。
- 当需要通过组合和封装来添加功能,而不是通过继承来添加功能时。
主要成员
-
抽象组件(Component):这是一个接口,定义了一个对象可以接受额外责任的方式。它是所有对象(主对象以及装饰器对象)共享的接口。
-
具体组件(Concrete Component):这是抽象组件的具体实现。它定义了一个具体的对象,可以给这个对象添加一些职责。
-
抽象装饰类(Decorator):这是所有装饰器类的基类,它定义了一个与抽象组件接口一致的接口,这样它就可以装饰所有的具体组件。抽象装饰类通常有一个成员变量,用来保存一个抽象组件的引用。
-
具体装饰类(Concrete Decorator):具体装饰类是抽象装饰类的子类,它定义了具体的装饰效果。每个具体装饰类都增加了一些新的行为或状态。具体装饰类可以通过调用抽象组件的方法,并添加新的行为或状态,来扩展抽象组件的功能。
2、分析与设计
在开发web应用时,用惯了mvc,但开发游戏时,才发现mvc不够用了。web开发,只要处理完用户的当前请求,就完事了。但游戏开发不同,游戏里是一个迷你世界,和我们现实有很多相似之处。现实世界里面有各种各样的系统,每个生物都借助外部系统或内部系统进行着各项活动。前辈们把它们抽象成 ecs( entity实体 component组件 system系统 ),这的确大大简化了游戏开发。比如:给玩家添加一个登录组件,玩家就有了登录功能,登录完成后,卸载组件释放资源。给玩家添加一个遥感组件,玩家就有了操控摇杆的功能,游戏结束时移除摇杆组件等等。
回到我们的设计模式,ecs算装饰器模式吗?看适用性上是非常相似的
看看GPT是如何回答的
实体组件系统(Entity-Component-System,ECS)模式和装饰器模式在某些方面有一些相似之处,尤其是在它们都允许在运行时动态添加和删除对象的行为方面。然而,它们的核心目标和实现方式是不同的,所以它们并不完全相同。
ECS模式是一种常用于游戏开发的架构模式,它的核心思想是通过组合而非继承来实现对象的行为。在ECS模式中,实体(Entity)是一个标识符,组件(Component)包含数据,系统(System)则包含行为。实体通过添加或删除组件来改变其行为,而系统则负责处理具有特定组件的实体。这种模式的主要优点在于它的灵活性和可扩展性,因为你可以通过简单地添加或删除组件来改变实体的行为。
装饰器模式的目标是允许我们在运行时向对象添加新的行为,而不改变其类的定义。它通过将对象封装在装饰器对象中来实现这一点,装饰器对象实现了与原对象相同的接口,并在调用原对象的方法之前或之后添加新的行为。
所以,尽管ECS模式和装饰器模式都允许动态改变对象的行为,但它们的实现方式和目标是不同的。在ECS模式中,实体没有固定的行为,而是由其组件和系统决定的。而在装饰器模式中,对象的基本行为是由其类定义的,装饰器只是添加或修改这些行为。此外,ECS模式中的实体并不需要实现与其组件一致的接口,这是它与装饰器模式的另一个主要区别。
从GPT的分析中已经给出了,ecs模式是给一个实体(标识符)添加和删除组件来改变其行为。装饰器模式,对象本身是一个类,且有其基本的行为,装饰器只是在其基础上拓展功能。
细心点的人可能早已发现装饰器模式在cocos creator中其实已有通过的node,component为其实现了,需要什么功能挂载一个组件,这不就是装饰器吗?接下来就修改一下我们的意图。
意图:动态地给一个对象(cc.node)添加一些额外的职责(功能component)。相关的功能也可以随着需求的变化而从对象(cc.node)中删除。
3、开始打造

export namespace CCObject {
        export enum Flags {
            ....
        }
        export let __props__: string[];
        export let __values__: string[];
}
export class Node extends CCObject implements ISchedulable, CustomSerializable {
addComponent<T extends Component>(classConstructor: __private._types_globals__Constructor<T>): T;
}export class Component extends CCObject {
node: Node;
addComponent<T extends Component>(classConstructor: __private._types_globals__Constructor<T>): T | null;
}4、开始使用
用过cocos creator ,相信大家都应该很熟悉cocos的组件使用了
这里举几个和设计模式结构图类似的例子
this.node.getComponent(Label).string = '123'
this.node.getChildByName('progress').getComponent(ProgressBar).progress = 456
this.getComponent(UnitItem).addComponent(Label).string = '789'
5、其他-打造ECS
因为是游戏框架且打算使用ecs模式,就在装饰器模式的下面贴出一个简易的ecs(虽然ecs和装饰器模式不完全相同,只是相似)
在ECS模式中,实体(Entity)是一个标识符,组件(Component)包含数据,系统(System)则包含行为。
从概念上实体只是一个标识符没有具体的行为,实体通过添加或删除组件来改变其行为,而系统则负责处理具有特定组件的实体。
import { Comp } from "./Comp";

export class Entity {
    private static _entities: Map<number, Entity> = new Map();
    private static nextEntityId = 0;
    // 添加一个公共的 getter 方法来获取 entities
    static get entities(): Map<number, Entity> {
        return this._entities;
    }
    static createEntity(): Entity {
        const entity = new Entity();
        this.entities.set(entity.id, entity);
        return entity;
    }

    static removeEntity(entity: Entity): void {
        for (let component of entity.components.values()) {
            Comp.removeComp(component)
        }
        this.entities.delete(entity.id);
    }

    static getEntity(entityId: number): Entity | undefined {
        return this.entities.get(entityId);
    }

    static generateEntityId(): number {
        return this.nextEntityId++;
    }

    /** 单实体上挂载的组件 */
    public components: Map<new () => any, Comp> = new Map();
    /** 实体id */
    public readonly id: number;

    constructor() {
        this.id = Entity.generateEntityId();
        this.components = new Map();
    }

    /** 单实体上挂载组件 */
    attachComponent<T extends Comp>(componentClass: new () => T): T {
        const hascomponent = this.components.get(componentClass) as T;
        if (hascomponent) {
            console.error('已存在组件,不会触发挂载事件')
            return hascomponent;
        } else {
            const component = Comp.createComp(componentClass, this);
            this.components.set(componentClass, component);
            // console.log('实体挂载了组件', this.components, this)
            return component;
        }
    }

    /** 单实体上卸载组件 */
    detachComponent<T extends Comp>(componentClass: new () => T): void {
        const component = this.components.get(componentClass);
        if (component) {
            this.components.delete(componentClass);
            Comp.removeComp(component)
            // console.log('实体卸载了组件', this.components, this)
        }
    }

    getComponent<T extends Comp>(componentClass: new () => T): T | undefined {
        return this.components.get(componentClass) as T;
    }

}
import { Entity } from "./Entity";
/**
* 组件
*/
export abstract class Comp {
/**
* 组件池
*/
private static compsPool: Map<new () => any, Comp[]> = new Map();
/**
* 创建组件
* @param compClass
* @returns
*/
public static createComp<T extends Comp>(compClass: new () => T, entity: Entity): T {
// 获取对应组件类的池子
let pool = this.compsPool.get(compClass);
// 如果池子不存在,为组件类创建一个新的空池子
if (!pool) {
pool = [];
this.compsPool.set(compClass, pool);
}
// 如果池子中有实例,则取出并返回;否则创建一个新实例并返回
let comp = pool.length > 0 ? pool.pop() as T : new compClass();
comp.entity = entity
setTimeout(() => {
comp.onAttach(entity); // 延迟0,防止属性数据未初始化赋值就已经执行挂载
}, 0)
return comp
}
static removeComp(comp: Comp) {
comp.onDetach(comp.entity);
comp.entity = null
comp.reset();
// 获取组件实例的构造函数
const compClass = comp.constructor as new () => Comp;
// 从组件池中找到对应的构造函数对应的池子
const pool = this.compsPool.get(compClass);
// 如果池子存在,将组件实例放回池子中
if (pool) {
pool.push(comp);
} else {
// 如果池子不存在,创建一个新的池子并将组件实例放入
this.compsPool.set(compClass, [comp]);
}
}
/**
* 单体组件的实体
*/
public entity: Entity | null = null;
/**
* 组件挂载并初始化后的回调
*/
abstract callback: Function;
/** 监听挂载到实体 */
abstract onAttach(entity: Entity): void
/** 监听从实体卸载 */
abstract onDetach(entity: Entity): void
/** 重置 */
abstract reset(): void
}
export abstract class System {
    update?(dt: number);
    // 为了简化系统,系统内方法都是静态方法,直接调用
}
6、其他-使用ECS
main.ts 挂载在root下面
    onLoad() {
        window['xhgame'] = xhgame // 方便console中查看全局
        const gameDesign = new GameDesign();
        switch (this.gameCode) {
            case 'demo': // demo
                gameDesign.setGameBuilder(new DemoGameBuilder(this));
                gameInstance.game = gameDesign.buildGame<DemoGame>()
                break;
        }
        gameInstance.game.start()
        // 添加有update的系统(临时放置)
        xhgame.game.updateSystems.push(GameMoveSystem)

    }


    protected update(dt: number): void {
        if (xhgame.game && xhgame.game.updateSystems.length > 0) {
            for (const system of xhgame.game.updateSystems) {
                const _system = system as System
                _system.update && _system.update(dt);
            }
        }
    }
// 创建一个player实体
const player_entity = Entity.createEntity();
ooxh.game.playerEntity = player_entity
player_entity.attachComponent(PlayerStateComp) // 状态组件
player_entity.attachComponent(PlayerLoginComp) // 登录组件
player_entity.attachComponent(PlayerTouchMoveComp) // 触控组件export class BattleInitSystem extends System {
// 开始初始化战役
static startInit(comp: BattleInitComp, callback: Function) {
this.showUnit() // 单位
callback && callback()
}
// 显示各种单位
static showUnit() {
...
}
}
export class BattleInitComp extends Comp {
callback: Function = null
reset() {
this.callback = null
}
onAttach(entity: Entity) {
BattleInitSystem.startInit(this, () => {
this.callback && this.callback()
})
}
onDetach(entity: Entity) {
}
}ooxh.game.battleEntity.attachComponent(BattleInitComp).callback = () => {
ooxh.game.battleEntity.detachComponent(BattleInitComp)
}