【文件上传系列】No.0 利用 FormData 实现文件上传、监控网路速度和上传进度(原生前端,Koa 后端)
利用 FormData 实现文件上传
基础功能:上传文件
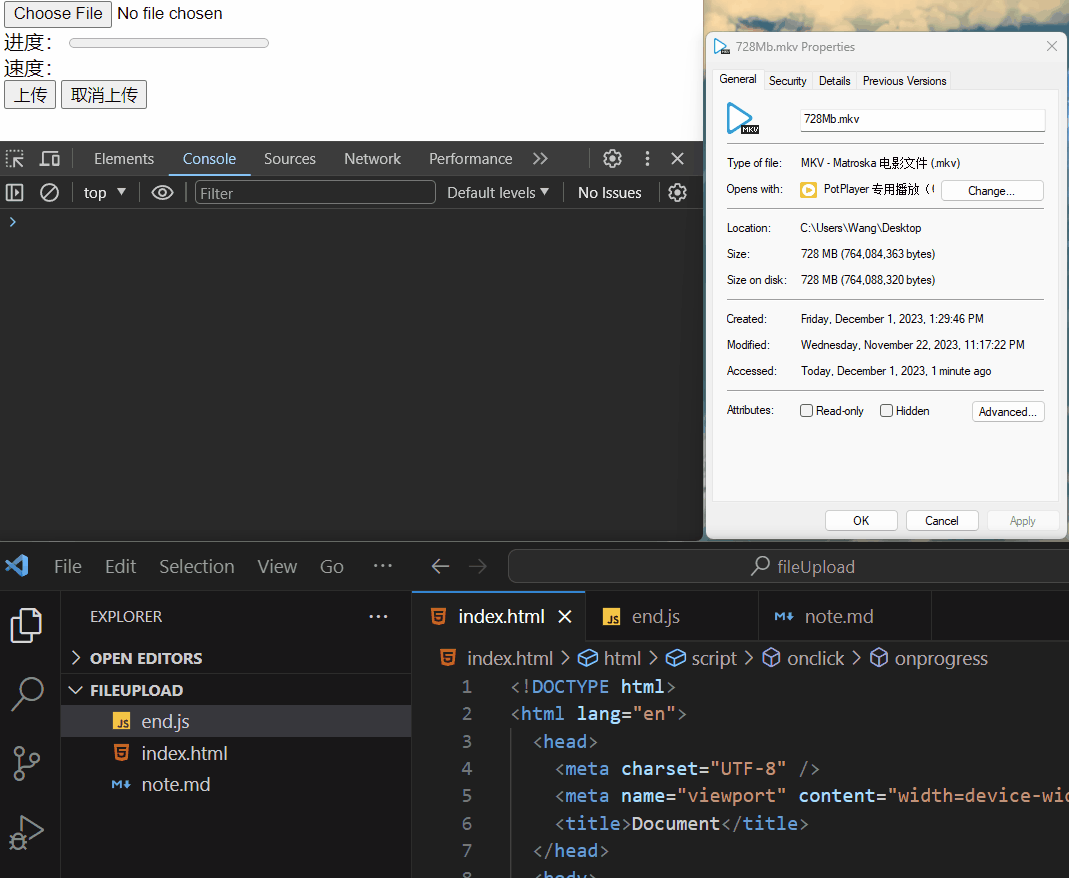
演示如下:
概括流程:
- 前端:把文件数据获取并
append到FormData对象中- 后端:通过
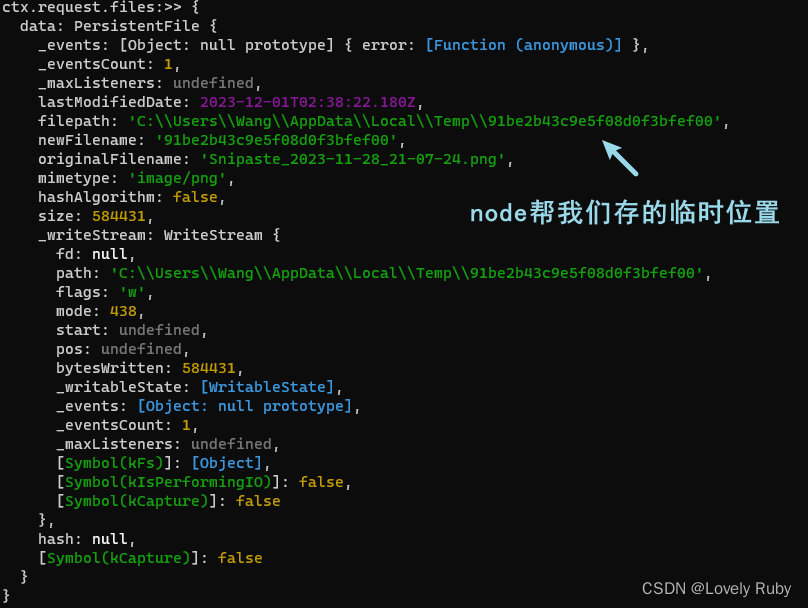
ctx.request.files对象拿到二进制数据,获得node暂存的文件路径
前端
前端的工作就是把页面写好,ajax 和 FormData 组装好,发送给后端。
基础功能:组装 FormData 和 XHR
前端这边代码如下:
<!DOCTYPE html>
<html lang="en">
  <head>
    <meta charset="UTF-8" />
    <meta name="viewport" content="width=device-width, initial-scale=1.0" />
    <title>Document</title>
  </head>
  <body>
    <input type="file" name="file" id="file" />
    <button id="btn">点我上传</button>
  </body>
  <script>
    const btn = document.getElementById('btn');
    btn.onclick = function () {
      let file = document.querySelector('#file').files[0];
      console.log(file);
      // 组装好 formData
      // 文件传输是通过正文传输的,所以要用 post
      let formData = new FormData(); // 这里的 new formData() 会自动帮我设置 content-type
      formData.append('data', file);
      formData.append('name', '文件');
      formData.append('年龄', 20);

      // 组装好 xhr
      let xhr = new XMLHttpRequest();
      xhr.open('post', '/upload');
      xhr.onload = function () {
        console.log(xhr.responseText);
      };
      xhr.send(formData);
    };
  </script>
</html>
基础:xhr.upload 上传钩子函数
大概有如下几个钩子(比较常用的)
xhr.upload.onprogress = (event) => {
    console.log('上传过程');
}
xhr.upload.onload = () => {
    console.log('上传成功');
}
xhr.upload.onloadend = () => {
    console.log('上传完成');
}
xhr.upload.onabort = () => {
    console.log('取消上传');
}
onprogress 这个函数是在上传过程中不断循环被执行的,其中有事件因子 event,里面会有上传中的信息
如果想要监控速度和进度的话,可以在上传的过程中计算出来
如果想要取消上传,就把 xhr.abort() 即可。
document.getElementById('cancelBtn').addEventListener('click', function () {
    // 取消上传
    xhr.abort();
});
基础:利用钩子函数计算下载速度和进度
速度:思路就是求出一段时间的下载量(
byte)和一段时间(s),然后做除法
s p e e d = d 单位数据包大小 b y t e d 单位时间 s b y t e / s speed = \frac{{\rm d}单位数据包大小 byte}{{\rm d }单位时间 s}{byte/s} speed=d单位时间sd单位数据包大小bytebyte/s
let oldDataSize;
let oldTime;
xhr.onload = function () {
    let responseText = xhr.responseText;
    console.log("上传成功", responseText);
};
xhr.upload.onloadstart = () => {
    console.log("上传开始!");
    oldLoaded = 0;
    oldTime = new Date().getTime();
};
xhr.upload.onprogress = (enent) => {
    // 计算单位时间文件加载大小
    let duringLoaded = event.loaded - oldLoaded;
    // 计算单位时间差
    let duringTime = (new Date().getTime() - oldTime) / 1000; // 时间戳,默认单位是毫秒

    // 记录旧的数据,下次循环的时候需要用的
    oldTime = new Date().getTime();
    oldLoaded = event.loaded;

    console.log("上传中:>>", event);
};
进度:已经上传的数据
loaded与总数据total的比值
p r o g r e s s = 已上传数据包大小 b y t e 总文件大小 b y t e ∗ 100 % progress= \frac{已上传数据包大小 byte}{总文件大小 byte} { * } {100}{\%} progress=总文件大小byte已上传数据包大小byte∗100%
完善:添加进度条以及速度标识
整体代码如下:
<!DOCTYPE html>
<html lang="en">
  <head>
    <meta charset="UTF-8" />
    <meta name="viewport" content="width=device-width, initial-scale=1.0" />
    <title>Document</title>
  </head>
  <body>
    <input type="file" name="file" id="file" />
    <div>进度: <progress value="0" max="100" id="progress"></progress></div>
    <div>速度: <span id="speed"></span> <span id="unit"></span></div>
    <button id="btn">上传</button>
    <button id="cancelBtn">取消上传</button>
  </body>
  <script>
    const btn = document.getElementById('btn');
    let xhr = new XMLHttpRequest();
    let oldDataSize;
    let oldTime;
    btn.onclick = function () {
      let file = document.querySelector('#file').files[0];
      console.log(file);
      // 组装好 formData
      // 文件传输是通过正文传输的,所以要用 post
      let formData = new FormData(); // 这里的 new formData() 会自动帮我设置 content-type
      formData.append('data', file);
      formData.append('name', '文件');
      formData.append('年龄', 20);

      // 组装好 xhr
      xhr.open('post', '/upload');
      xhr.onload = function () {
        console.log(xhr.responseText);
      };
      xhr.upload.onloadstart = (event) => {
        console.log('开始上传');
        oldLoaded = 0;
        oldTime = new Date();
      };
      // onprogress 钩子函数会不停地被调用
      xhr.upload.onprogress = (event) => {
        console.log('正在上传:>>', event);

        // 计算速度
        let duringLoaded = (event.loaded - oldLoaded) / 1024;
        let duringTime = (new Date() - oldTime) / 1000; // 时间戳,默认单位是毫秒

        // 记录旧的数据,下次循环的时候需要用的
        oldTime = new Date();
        oldLoaded = event.loaded;
        let speed = duringLoaded / duringTime; // 单位是 bt/s
        let unit = 'b/s';
        if (speed > 1024) {
          speed = speed / 1024;
          unit = 'kb/s';
        }
        if (speed > 1024) {
          speed = speed / 1024;
          unit = 'mb/s';
        }
        if (speed > 1024) {
          speed = speed / 1024;
          unit = 'gb/s';
        }
        if (speed > 1024) {
          speed = speed / 1024;
          unit = 'tb/s';
        }
        document.getElementById('speed').innerHTML = `${speed}`;
        document.getElementById('unit').innerHTML = `${unit}`;

        // 计算进度
        const { total, loaded } = event;
        let progress = ((loaded / total) * 100).toFixed(0);
        document.getElementById('progress').value = progress;
      };
      xhr.upload.onload = () => {
        console.log('上传成功');
      };
      xhr.upload.onloadend = () => {
        console.log('上传完成');
      };
      xhr.upload.onabort = () => {
        console.log('取消上传');
      };

      xhr.send(formData);
    };

    document.getElementById('cancelBtn').addEventListener('click', function () {
      // 取消上传
      xhr.abort();
    });
  </script>
</html>
后端
后端获取相应数据的方式如下:
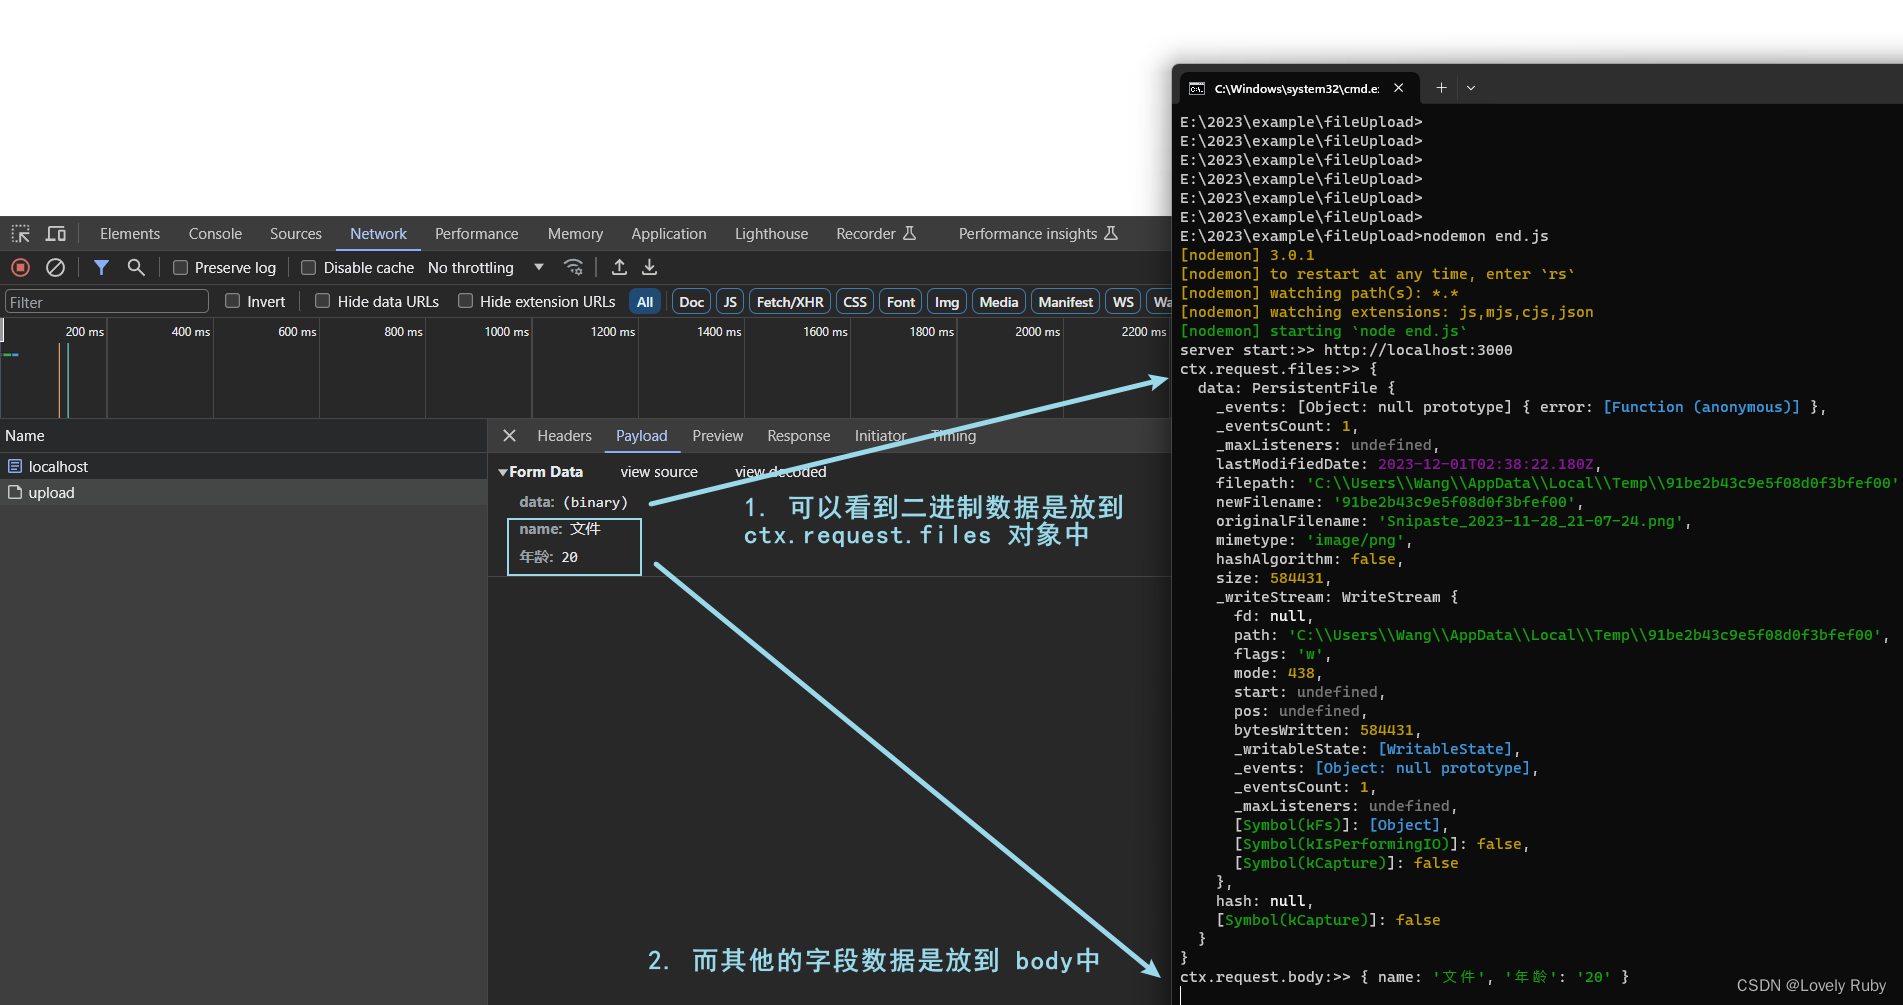
router.post('/upload', ctx => {
    console.log(ctx.request.body);  // 接收文字
    console.log(ctx.request.files); // 接收文件信息
})
node 会帮我们把二进制文件存储到临时地址,我们可以通过 fs 模块拿到文件,然后写到自己想要的位置
基本功能:拿到二进制数据并转存文件
后端接收注意要在 KoaBody 这里允许上传文件,具体的知识点可以阅读一下这篇博文:理解 HTTP 中的 multipart/form-data
app.use(KoaBody({
    multipart: true
}))
后端代码如下:
const Koa = require('koa');
const View = require('koa-views');
const Router = require('koa-router');
const { koaBody } = require('koa-body');
const Static = require('koa-static');
const fs = require('fs');
const app = new Koa();
const router = new Router();
app.use(View(__dirname));
app.use(Static(__dirname));
app.use(koaBody({ multipart: true }));
// 异步函数
router.get('/', async (ctx, next) => {
  await ctx.render('index.html');
});

// 异步函数
router.post('/upload', async (ctx, next) => {
  console.log('ctx.request.files:>>', ctx.request.files);
  console.log('ctx.request.body:>>', ctx.request.body);
  const filePath = ctx.request.files.data.filepath;
  const readFile = fs.readFileSync(filePath);
  fs.writeFileSync('static/' + ctx.request.files.data.originalFilename, readFile);
  ctx.body = '请求成功';
});

app.use(router.routes());
app.listen(3000, () => {
  console.log('server start:>>', 'http://localhost:3000');
});
优化:文件夹的判断以及错误处理
可以检测文件夹是否存在,如果文件夹不存在的话自然会报错,完善后的代码如下
/**
 * 说明:
 * fs.exists() 已弃用,但 fs.existsSync() 不是。
 * fs.exists() 的 callback 参数接受与其他 Node.js 回调不一致的参数。 fs.existsSync() 不使用回调
 * 参考地址:https://nodejs.cn/api/fs/fs_existssync_path.html
 */
router.post('/upload', async (ctx, next) => {
  try {
    //   console.log('ctx.request.files:>>', ctx.request.files);
    //   console.log('ctx.request.body:>>', ctx.request.body);
    const data = ctx.request.files.data;
    const { filepath, originalFilename } = data;
    if (!fs.existsSync(`static`)) {
      fs.mkdirSync('static');
    }
    const readFile = fs.readFileSync(filepath);
    fs.writeFileSync(`static/${originalFilename}`, readFile);
    ctx.body = '请求成功';
  } catch (err) {
    console.log(err);
  }
});
断点续传
Q & A
Error: options.maxFileSize (209715200 bytes) exceeded, received 209731427 bytes of file data
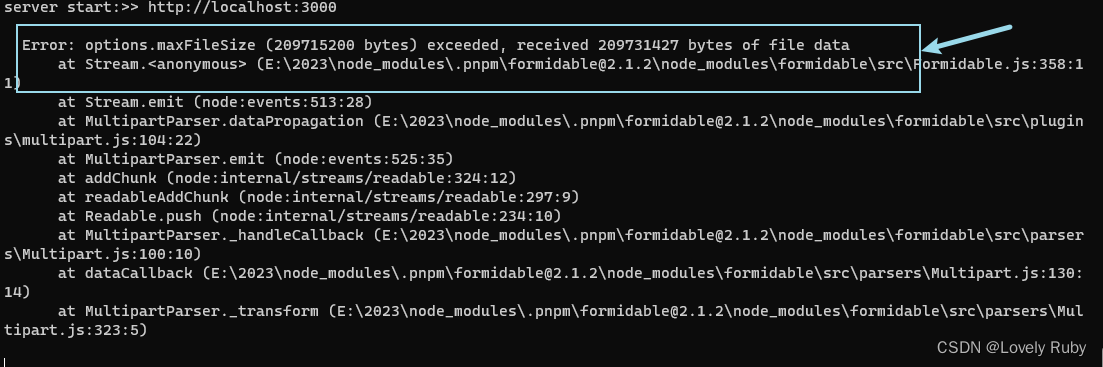
这是后端有上传文件大小限制的问题,在 koa-body 配置中把文件改的大一些,默认是 200mb,点我查看源文档
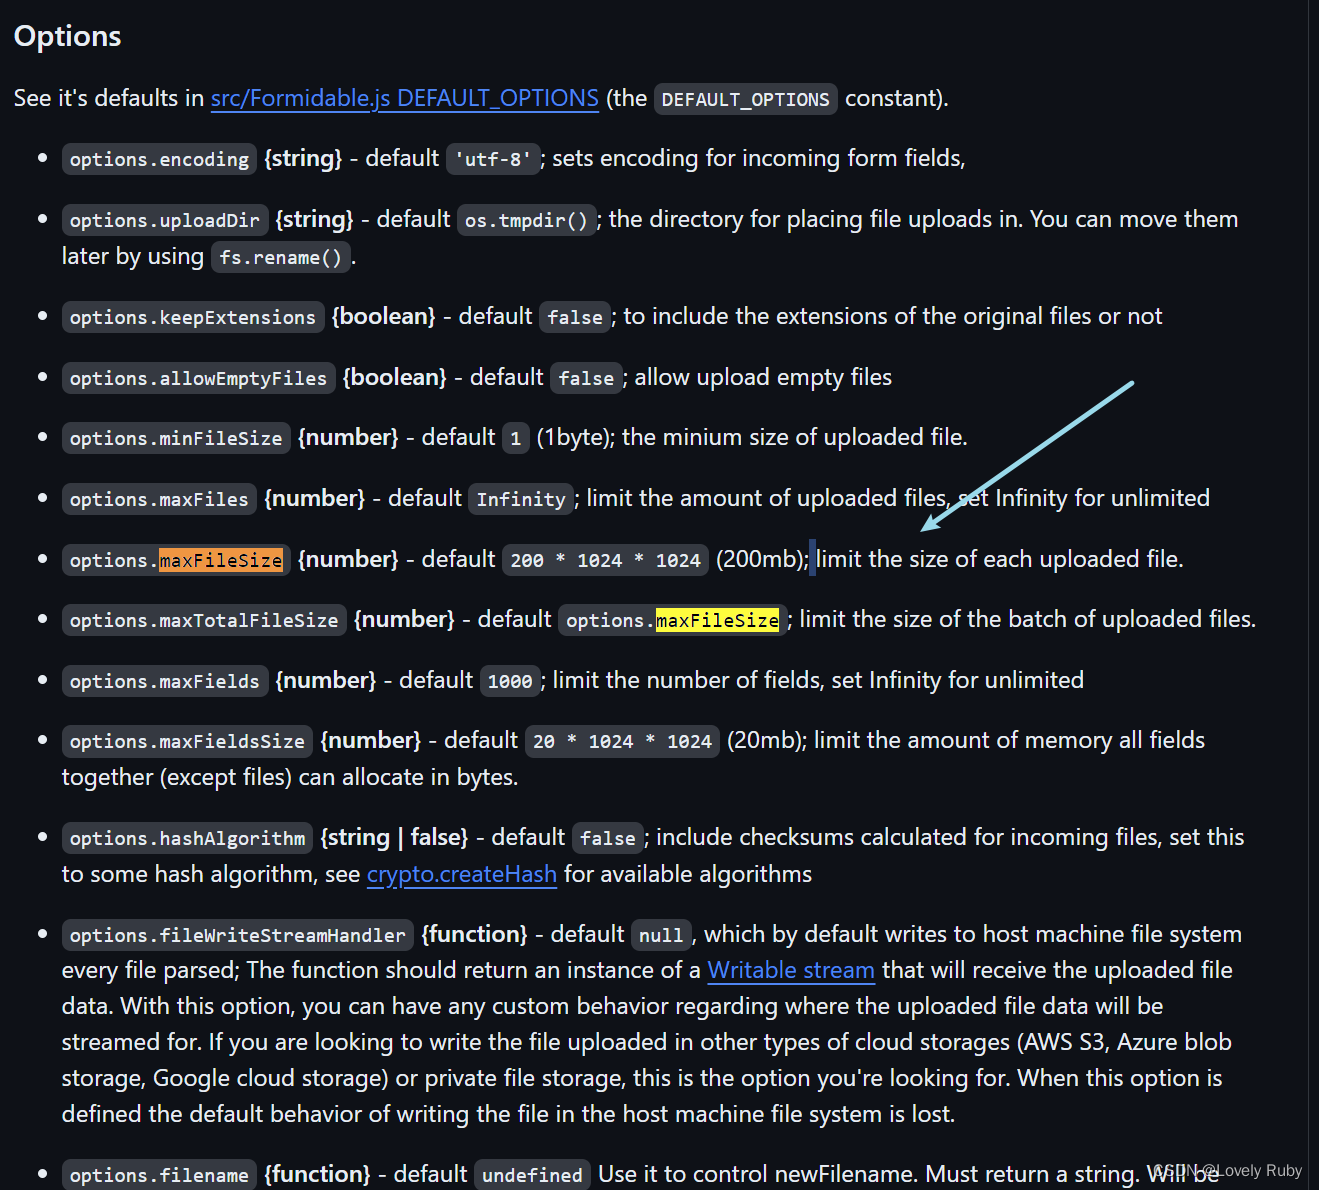
/**
 * 设置上传文件大小最大限制,默认1000M
 * https://github.com/node-formidable/formidable
 */
app.use(
  koaBody({
    multipart: true,
    formidable: {
      maxFileSize: 1000 * 1024 * 1024,
    },
  })
);