MX6ULL学习笔记 (八) platform 设备驱动实验
前言:
什么是 Linux 下的 platform 设备驱动
Linux下的字符设备驱动一般都比较简单,只是对IO进行简单的读写操作。但是I2C、SPI、LCD、USB等外设的驱动就比较复杂了,需要考虑到驱动的可重用性,以避免内核中存在大量重复代码,为此人们提出了驱动的分离与分层的思路,演化并诞生出了platform设备驱动。
一、驱动的分层分离
1. 驱动的分离
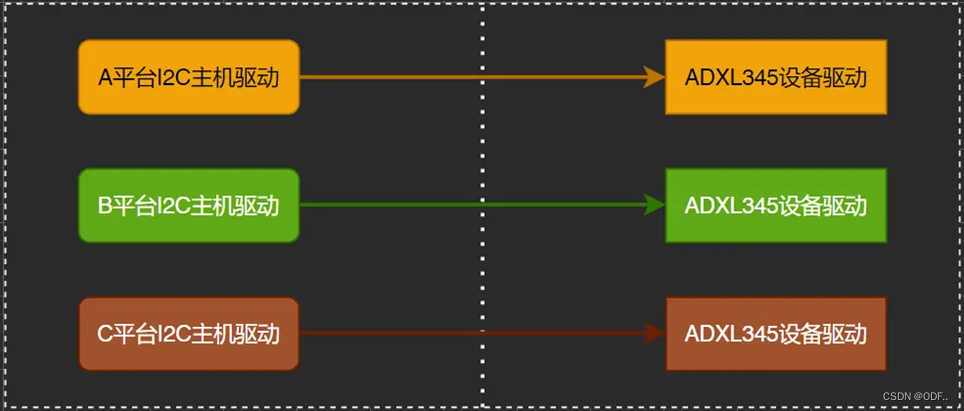
以I2C接口的三轴加速度传感器为例,传统的设备驱动如下图示:每个平台都有一个ADXL345的驱动,因此设备驱动要重复编写三次。
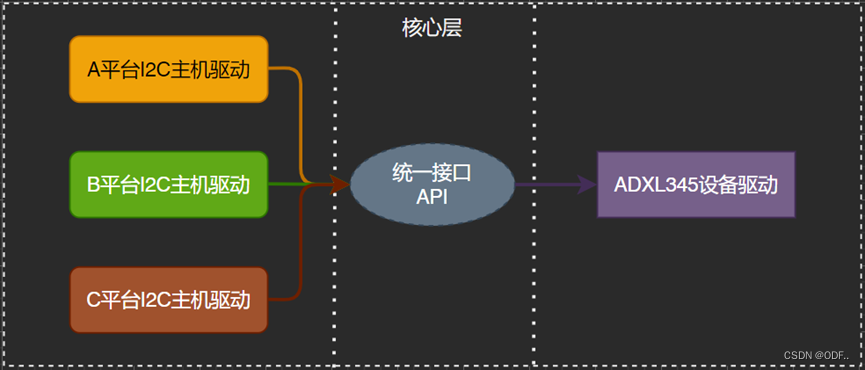
各平台的主机驱动是不同的,但是ADXL345是一样的,因此上图可以精简为一个ADXL345驱动和统一的接口API。
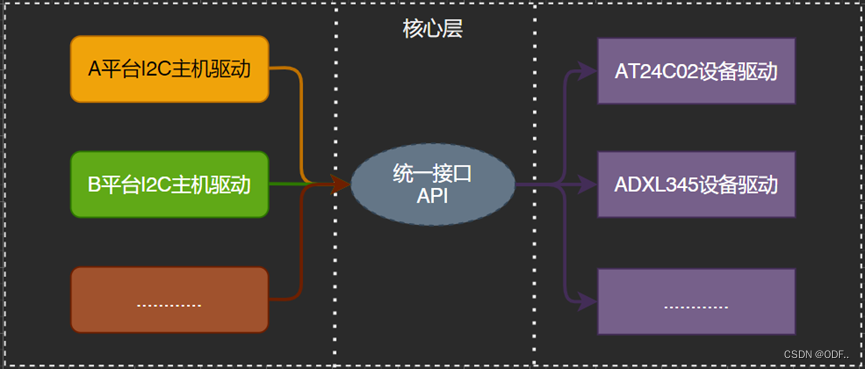
 实际上,除了ADXL345还有AT24C02、MPU6050等I2C设备,因此实际的驱动框架图如下示
驱动的分离即将主机驱动和设备驱动分隔开来,实际开发中,主机驱动一般由半导体厂家提供,设备驱动也会由器件厂家写好,我们只需要提供设备信息即可。也就是将设备信息从设备驱动中剥离开来,设备驱动使用标准方法获取到设备信息,然后根据获取到的设备信息来初始化设备
因此驱动只负责驱动,设备只负责设备,想办法将两者进行匹配即可。这就是Linux中的总线-驱动-设备模型,也就是常说的驱动分离

如上图示,当向系统注册一个驱动时,总线会在右侧的设备中查找,看看有没有与之匹配的设备,有的话就将两者联系起来;当向系统中注册一个设备时,总线会在左侧的驱动中查找,看有没有与之匹配的驱动,有的话也联系起来。
2. 驱动的分层
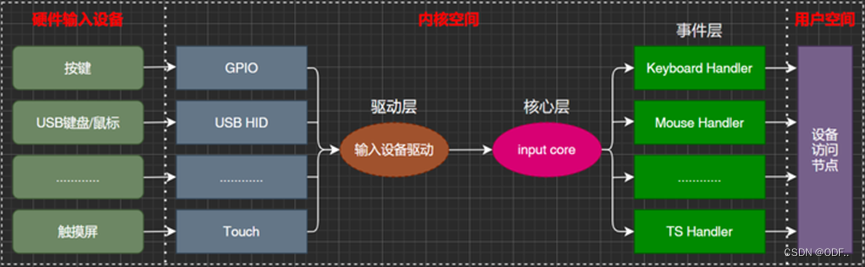
Linux下的驱动也是分层的,分层的目的是为了在不同的层处理不同的内容。以input输入子系统为例,input子系统负责管理所有跟输入有关的驱动,包括键盘、鼠标、触摸等。
- 驱动层:获取输入设备的原始值,获取到的输入事件上报给核心层
- 核心层:处理各种IO模型,并且提供file_operations操作集合
- 事件层:和用户空间进行交互
3. platform平台驱动模型
根据总线-驱动-设备驱动模型,IIC、SPI、USB这样实实在在的总线是完全匹配的,但是要有一些外设是没法归结为具体的总线:比如定时器、RTC、LCD等。为此linux内核创造了一个虚拟的总线:platform总线,以及platform驱动、platform设备模型。
①platform总线:Linux内核使用bus_type结构体表示总线。
其定义在文件include/linux/device.h中
②platform驱动:platform驱动由platform_driver结构体表示。
此结构体定义在文件include/linux/platform_device.h中。
编写platform驱动时,先要定义一个platform_driver结构体变量,然后实现结构体中的各个成员变量,重点是实现匹配方法以及probe函数。当驱动和设备匹配成功以后probe函数就会执行,具体的驱动程序在probe函数里面编写。之后通过以下函数向内核注册platform驱动或卸载platform驱动
③platform设备:platform_device结构体用来表示platform设备。
注意若内核支持设备树的话,就无需使用该结构体来描述设备,而改用设备树了。该结构体定义在文件include/linux/platform_device.h中,在不支持设备树的Linux版本中,用户需要编写platform_device变量来描述设备信息,然后使用以下函数将设备信息注册到Linux内核中或从内核中注销掉,这里我们使用的linux是新版本的了,也就直接使用设备树就好了。
二、platform框架分析
1.platform总线注册
和字符型驱动一样,我们要使用platform总线之前,也需要告诉一下内核,也就是注册。使用platform_bus_init函数去进行注册,既然要注册,那么我们也得告诉内核我们的一些信息。
注册的内容就是:
struct bus_type platform_bus_type = {

       .name           = "platform",

       .dev_groups   = platform_dev_groups,

       .match           = platform_match,

       .uevent          = platform_uevent,

       .pm        = &platform_dev_pm_ops,

}
对于platform平台而言,platform_match函数就是月老,负责驱动和设备的匹配。
2.platform驱动
在注册platform驱动之前要定义一个结构体,为platform_driver,结构体内容为:
struct platform_driver {

       int (*probe)(struct platform_device *);

       int (*remove)(struct platform_device *);

       void (*shutdown)(struct platform_device *);

       int (*suspend)(struct platform_device *, pm_message_t state);

       int (*resume)(struct platform_device *);

       struct device_driver driver;

//-> const struct of_device_id    *of_match_table;

//-> const char             *name;

       const struct platform_device_id *id_table;

       bool prevent_deferred_probe;

};
然后使用platform_driver_register函数向内核注册platform驱动。向内核注册platform驱动的时候,如果驱动和设备匹配成功,最终会执行platform_driver的probe函数。
3.platform设备
1、无设备树的时候,此时需要驱动开发人员编写设备注册文件,使用platform_device_register函数注册设备。使用platform_device_register函数注册设备也同样需要告诉内核一些注册信息。也就是需要定义个结构体:
结构体platform_device:
struct platform_device {
	const char	*name;
	int		id;
	bool		id_auto;
	struct device	dev;
	u32		num_resources;
	struct resource	*resource;

	const struct platform_device_id	*id_entry;
	char *driver_override; /* Driver name to force a match */

	/* MFD cell pointer */
	struct mfd_cell *mfd_cell;

	/* arch specific additions */
	struct pdev_archdata	archdata;
};
2,有设备树,修改设备树的设备节点即可。使用兼容性列表,当设备与platform的驱动匹配以后,就会执行platform_driver->probe函数。
三、编写 platform 驱动流程
接下来我们就来学习一下如何在设备树下编写 platform 驱动流程:
1.在设备树中创建设备节点
由于我们使用的linux是支持设备树的,那么毫无疑问,我们肯定要先在设备树中创建设备节点来描述设备信息,重点是要设置好 compatible 属性的值,因为 platform 总线需要通过设备节点的 compatible 属性值来匹配驱动!这点要切记。
2、编写platfrom的驱动兼容表:
1)建立of_device_id 表,也就是驱动的兼容表:
static const struct of_device_id leds_of_match[] = {

    { .compatible = "atkalpha-gpioled" },     /* 兼容属性 */

    { /* Sentinel */ }

};3、建立platform_driver结构体:
static struct platform_driver leds_platform_driver = {

    .driver = {

       .name = "imx6ul-led",

       .of_match_table = leds_of_match,

        },

     .probe = leds_probe,

     .remove = leds_remove,

};1)设置 platform_driver 中的 of_match_table 匹配表为上面创建的 leds_of_match
2)向总线注册驱动的时候,会检查当前总线下的所有设备,有没有与此驱动匹配的设备,如果有的话就执行驱动里面的probe函数。
3)卸载驱动的时候,会执行驱动里面的remove函数。
4、编写probe函数:
函数原型:
static int led_probe(struct platform_device *dev);5、编写remove函数:
函数原型
static int led_remove(struct platform_device *dev);四、实验程序编写
1.在设备树中创建设备节点
2.引入字符设备框架
这里直接引入我们之前写过的字符设备框架,在这份驱动的基础上来进行修改,如果没有看过之前那篇也没关系,下面也会贴出完整代码。
3.编写platfrom的驱动兼容表
/* 匹配列表 */
static const struct of_device_id led_of_match[] = {
	{ .compatible = "led-gpio" },
	{ /* Sentinel */ }
};
4.建立platform_driver结构体
/*platform_driver结构体*/
static struct platform_driver led_driver = {
    .driver = {
        .name = "imx6ul-led",
        .of_match_table = led_of_match,
    },
    .probe  =  led_probe,
    .remove =  led_remove,
};
5.编写probe函数:
当设备和驱动兼容表匹配上的时候就会运行peobe函数:
/*当谁列表的设备和驱动匹配上后执行的peobe函数*/
static int led_probe(struct platform_device *dev)
{
    /* 动态注册字符设备的流程一般如下:
	1.调用 alloc_chrdev_region() 函数申请设备编号。
	2.使用 cdev_init() 函数初始化设备描述结构体。
	3.使用 cdev_add() 函数将设备号与设备描述结构体关联起来,注册字符设备驱动。
	4.使用 class_create() 函数创建一个设备类.
	5.使用 device_create() 函数创建一个设备
	*/
    int ret = 0;
    /*进入这个函数就表明匹配成功了*/
	printk("led driver and device was matched!\r\n");
	/*1 创建设备号
	   根据是否定义了设备号,通过条件判断选择不同的创建方式。
	   如果定义了设备号,则使用MKDEV宏将主设备号和次设备号合成为设备号,并调用register_chrdev_region()函数注册字符设备号。
	   如果没有定义设备号,则使用alloc_chrdev_region()函数动态分配设备号,并通过MAJOR和MINOR宏获取分配得到的主设备号和次设备号。*/
	if(gpioled.major){
        gpioled.devid = MKDEV(gpioled.major,0);
        register_chrdev_region(gpioled.devid,DEVICE_CNT,DEVICE_NAME);
    }
    else{
        alloc_chrdev_region(&gpioled.devid,0,DEVICE_CNT,DEVICE_NAME);
        gpioled.major = MAJOR(gpioled.devid);
        gpioled.minor = MINOR(gpioled.devid);
    }

	/* 2 初始化cdev
	   设置cdev结构体的拥有者为当前模块(THIS_MODULE),然后使用 cdev_init() 函数初始化cdev结构体。
	   参数包括待初始化的cdev结构体和用于操作该设备的file_operations结构体(hello_drv) */
	gpioled.cdev.owner= THIS_MODULE;
    cdev_init(&gpioled.cdev,&gpioled_fops);

    /* 3、添加一个cdev */
    cdev_add(&gpioled.cdev,gpioled.devid,DEVICE_CNT);

	/*4 创建设备类
	   使用 class_create() 函数创建一个设备类,设备类用于在/sys/class目录下创建子目录,以组织同一类设备的相关信息。
	   该函数的参数包括所属的模块(THIS_MODULE)和设备类的名称(DEVICE_NAME)。
	   如果创建失败,IS_ERR() 函数将返回true,表示出错,此时使用 PTR_ERR() 函数返回错误码。 */
    gpioled.class = class_create(THIS_MODULE,DEVICE_NAME);
    if(IS_ERR(gpioled.class))
    {
        printk("newchr fail!\r\n");
        return PTR_ERR(gpioled.class);
    }

	/*5 创建设备
	   使用 device_create() 函数创建一个设备,并在/dev目录下创建相应的设备节点。
	   参数包括设备所属的类(newchr.class)、父设备(NULL,如果没有父设备)、设备号(newchr.devid)、设备私有数据(NULL,一般为设备驱动程序提供一个指针)和设备名称(DEVICE_NAME)。
	   如果创建失败,IS_ERR() 函数将返回true,表示出错,此时使用 PTR_ERR() 函数返回错误码。 */
	gpioled.device = device_create(gpioled.class, NULL, gpioled.devid, NULL, DEVICE_NAME);
    if(IS_ERR(gpioled.device))
    {
        printk("newchr fail!\r\n");
        return PTR_ERR(gpioled.device);
    }

    ret = myled_init(&gpioled);   //初始化ledgpio
    return 0;
}
6.编写remove函数:
static int led_remove(struct platform_device *dev)
{
    gpio_set_value(gpioled.led_gpio,1);
    gpio_free(gpioled.led_gpio);

	printk("%s %s line %d\n", __FILE__, __FUNCTION__, __LINE__);
    /*在模块卸载时,使用 cdev_del() 函数注销字符设备驱动,并使用 unregister_chrdev_region() 函数释放设备号资源。*/
	/* 注销字符设备驱动 */
	cdev_del(&gpioled.cdev);/*  删除cdev */
	unregister_chrdev_region(gpioled.devid, DEVICE_CNT); /* 注销设备号 */
	device_destroy(gpioled.class, gpioled.devid);// 销毁设备,删除相应的设备节点
	class_destroy(gpioled.class);// 销毁设备类,释放相关资源
	printk("gpioled exit!\r\n");
    return 0;
}
完整代码:
/**************头文件区域*********************************************************/
#include <linux/ide.h>
#include <linux/fs.h>
#include <linux/init.h>
#include <linux/module.h>
#include <linux/cdev.h>
#include <linux/types.h>
#include <linux/kernel.h>
#include <linux/errno.h>

#include <linux/of.h>
#include <linux/of_address.h>
#include <linux/of_gpio.h>
#include <linux/irq.h>
#include <linux/poll.h>
#include <linux/platform_device.h>
#include <linux/fcntl.h>

#include <asm/mach/map.h>
#include <asm/uaccess.h>
#include <linux/io.h>
/**********************************************************************************/

/************************函数定义-begin***********************************************/
static int gpioled_release(struct inode *inode, struct file *file);
static ssize_t gpioled_read(struct file *file, char __user *buf, size_t size, loff_t *ptr);
static ssize_t gpioled_write(struct file *file, const char __user *buf, size_t size, loff_t *ptr);
static int gpioled_open(struct inode *inode , struct file *file);
static int led_probe(struct platform_device *dev);
static int led_remove(struct platform_device *dev);
/************************函数定义-end********************************************/


/************************宏定义-begin***********************************************/
#define DEVICE_NAME "dtsplatled"
#define DEVICE_CNT  1
#define LED_ON     1
#define LED_OFF    0
/************************宏定义-end********************************************/

/************************结构体定义-begin***********************************************/
/* dtsled设备信息结构体 */
struct dtsled_dev
{
	dev_t devid;			/* 设备号 	 */
	struct cdev cdev;		/* cdev 	*/
	struct class *class;	/* 类 		*/
	struct device *device;	/* 设备 	 */
	int major;				/* 主设备号	  */
	int minor;				/* 次设备号   */
	struct device_node *nd; /* 设备节点 */
    int led_gpio; /* led 所使用的 GPIO 编号 */
};
struct dtsled_dev gpioled; /* led设备 */

/* 设备操作函数结构体 */
static const struct file_operations gpioled_fops = {
	.owner		= THIS_MODULE,
	.open		= gpioled_open,
	.read		= gpioled_read,
    .write      = gpioled_write,
    .release    = gpioled_release
};


/* 匹配列表 */
static const struct of_device_id led_of_match[] = {
	{ .compatible = "led-gpio" },
	{ /* Sentinel */ }
};


static struct platform_driver led_driver = {
    .driver = {
        .name = "imx6ul-led",
        .of_match_table = led_of_match,
    },
    .probe  =  led_probe,
    .remove =  led_remove,
};
/************************结构体定义-end***********************************************/


/************************file_operations操作函数-begin***********************************************/
static int gpioled_release(struct inode *inode, struct file *file)
{
    printk("%s %s line %d\n", __FILE__, __FUNCTION__, __LINE__);
	return 0;
}
static ssize_t gpioled_read(struct file *file, char __user *buf, size_t size, loff_t *ptr)
{
    printk("%s %s line %d\n", __FILE__, __FUNCTION__, __LINE__);
	return 0;
}
static ssize_t gpioled_write(struct file *file, const char __user *buf, size_t size, loff_t *ptr)
{
    int ret;
    unsigned char databuf[1];
    unsigned char ledstate;
    struct dtsled_dev *dev = file->private_data;

    ret = __copy_from_user(databuf,buf,size);

    if(ret < 0)
    {
        return -EFAULT;
    }

    ledstate = databuf[0];

    if(ledstate == LED_OFF){
        gpio_set_value(dev->led_gpio,1);
    }
    else if(ledstate == LED_ON){
        gpio_set_value(dev->led_gpio,0);
    }

	return 0;
}
static int gpioled_open(struct inode *inode , struct file *file)
{
    printk("%s %s line %d\n", __FILE__, __FUNCTION__, __LINE__);
    file->private_data = &gpioled; /* 设置私有数据 */
	return 0;
}
/************************file_operations操作函数-end***********************************************/

/*****************led初始化函数************************/
static int myled_init(struct dtsled_dev *dev)
{
    int ret = 0;
   /* 1、设置 LED 所使用的 GPIO */
    dev->nd = of_find_node_by_path("/gpioled");
    if(dev->nd == NULL){
        printk("gpioled node cant not found!\r\n");
        return -EINVAL;
    }
    else{
        printk("gpioled node hase been found!\r\n");
    }

    /* 2、 获取设备树中的 gpio 属性,得到 LED 所使用的 LED 编号 */
    dev->led_gpio =  of_get_named_gpio(dev->nd,"gpios",0);
    if(dev->led_gpio < 0)
    {
		printk("can't get led-gpio\r\n");
        return -EINVAL;
    }
    printk("led-gpio num = %d\r\n", dev->led_gpio);
    /* 3、设置 GPIO1_IO03 为输出,并且输出高电平,默认关闭 LED 灯 */
    ret = gpio_request(dev->led_gpio,"led0");
    if(ret < 0){
        printk("led-gpio request fail\r\n");
        return -EINVAL;
    }
    gpio_direction_output(dev->led_gpio,1);

    return ret;
}

/************************platfrom操作函数-begin***********************************************/
/*当谁列表的设备和驱动匹配上后执行的peobe函数*/
static int led_probe(struct platform_device *dev)
{
    /* 动态注册字符设备的流程一般如下:
	1.调用 alloc_chrdev_region() 函数申请设备编号。
	2.使用 cdev_init() 函数初始化设备描述结构体。
	3.使用 cdev_add() 函数将设备号与设备描述结构体关联起来,注册字符设备驱动。
	4.使用 class_create() 函数创建一个设备类.
	5.使用 device_create() 函数创建一个设备
	*/
    int ret = 0;
    /*进入这个函数就表明匹配成功了*/
	printk("led driver and device was matched!\r\n");
	/*1 创建设备号
	   根据是否定义了设备号,通过条件判断选择不同的创建方式。
	   如果定义了设备号,则使用MKDEV宏将主设备号和次设备号合成为设备号,并调用register_chrdev_region()函数注册字符设备号。
	   如果没有定义设备号,则使用alloc_chrdev_region()函数动态分配设备号,并通过MAJOR和MINOR宏获取分配得到的主设备号和次设备号。*/
	if(gpioled.major){
        gpioled.devid = MKDEV(gpioled.major,0);
        register_chrdev_region(gpioled.devid,DEVICE_CNT,DEVICE_NAME);
    }
    else{
        alloc_chrdev_region(&gpioled.devid,0,DEVICE_CNT,DEVICE_NAME);
        gpioled.major = MAJOR(gpioled.devid);
        gpioled.minor = MINOR(gpioled.devid);
    }

	/* 2 初始化cdev
	   设置cdev结构体的拥有者为当前模块(THIS_MODULE),然后使用 cdev_init() 函数初始化cdev结构体。
	   参数包括待初始化的cdev结构体和用于操作该设备的file_operations结构体(hello_drv) */
	gpioled.cdev.owner= THIS_MODULE;
    cdev_init(&gpioled.cdev,&gpioled_fops);

    /* 3、添加一个cdev */
    cdev_add(&gpioled.cdev,gpioled.devid,DEVICE_CNT);

	/*4 创建设备类
	   使用 class_create() 函数创建一个设备类,设备类用于在/sys/class目录下创建子目录,以组织同一类设备的相关信息。
	   该函数的参数包括所属的模块(THIS_MODULE)和设备类的名称(DEVICE_NAME)。
	   如果创建失败,IS_ERR() 函数将返回true,表示出错,此时使用 PTR_ERR() 函数返回错误码。 */
    gpioled.class = class_create(THIS_MODULE,DEVICE_NAME);
    if(IS_ERR(gpioled.class))
    {
        printk("newchr fail!\r\n");
        return PTR_ERR(gpioled.class);
    }

	/*5 创建设备
	   使用 device_create() 函数创建一个设备,并在/dev目录下创建相应的设备节点。
	   参数包括设备所属的类(newchr.class)、父设备(NULL,如果没有父设备)、设备号(newchr.devid)、设备私有数据(NULL,一般为设备驱动程序提供一个指针)和设备名称(DEVICE_NAME)。
	   如果创建失败,IS_ERR() 函数将返回true,表示出错,此时使用 PTR_ERR() 函数返回错误码。 */
	gpioled.device = device_create(gpioled.class, NULL, gpioled.devid, NULL, DEVICE_NAME);
    if(IS_ERR(gpioled.device))
    {
        printk("newchr fail!\r\n");
        return PTR_ERR(gpioled.device);
    }

    ret = myled_init(&gpioled);

#if 0
    /* 5、设置 LED 所使用的 GPIO */
    gpioled.nd = of_find_node_by_path("/gpioled");
    if(gpioled.nd == NULL){
        printk("gpioled node cant not found!\r\n");
        return -EINVAL;
    }
    else{
        printk("gpioled node hase been found!\r\n");
    }

    /* 2、 获取设备树中的 gpio 属性,得到 LED 所使用的 LED 编号 */
    gpioled.led_gpio =  of_get_named_gpio(gpioled.nd,"gpios",0);
    if(gpioled.led_gpio < 0)
    {
		printk("can't get led-gpio\r\n");
        return -EINVAL;
    }
    printk("led-gpio num = %d\r\n", gpioled.led_gpio);
    /* 3、设置 GPIO1_IO03 为输出,并且输出高电平,默认关闭 LED 灯 */
    gpio_request(gpioled.led_gpio,"led0");
    gpio_direction_output(gpioled.led_gpio,1);
#endif
    return 0;
}
static int led_remove(struct platform_device *dev)
{
    gpio_set_value(gpioled.led_gpio,1);
    gpio_free(gpioled.led_gpio);

	printk("%s %s line %d\n", __FILE__, __FUNCTION__, __LINE__);
    /*在模块卸载时,使用 cdev_del() 函数注销字符设备驱动,并使用 unregister_chrdev_region() 函数释放设备号资源。*/
	/* 注销字符设备驱动 */
	cdev_del(&gpioled.cdev);/*  删除cdev */
	unregister_chrdev_region(gpioled.devid, DEVICE_CNT); /* 注销设备号 */
	device_destroy(gpioled.class, gpioled.devid);// 销毁设备,删除相应的设备节点
	class_destroy(gpioled.class);// 销毁设备类,释放相关资源
	printk("gpioled exit!\r\n");
    return 0;
}
/************************platfrom操作函数-endn***********************************************/


static int __init gpioled_init(void)
{
    return platform_driver_register(&led_driver);
}

static void __exit gpioled_exit(void)
{
    platform_driver_unregister(&led_driver);
}


module_init(gpioled_init);
module_exit(gpioled_exit);
MODULE_LICENSE("GPL");
MODULE_AUTHOR("oudafa");
五 、运行测试
1.编写 Makefile 文件
编写完使用make命令编译驱动程序。
KERN_DIR = /home/odf/linux-imx/linux-imx

all:
	clear
	make -C $(KERN_DIR) M=`pwd` modules
	$(CROSS_COMPILE)gcc -o dtsplatledApp dtsplatledApp.c

clean:
	clear
	make -C $(KERN_DIR) M=`pwd` modules clean
	rm -rf modules.order
	rm -f dtsplatledApp


obj-m += dtsplatled.o
2.使用nfs挂载到开发板上。
将编译出来 dtsplatled.ko 和dtsplatledApp 拷贝到 rootfs/lib/modules/4.1.15 目录中,
sudo cp dtsplatled.ko dtsplatledApp /home/odf/nfs_rootfs/rootfs/lib/modules/4.1.15/ 驱动模块加载完成以后到/sys/bus/platform/drivers/目录下查看驱动是否存在,我们在
dtsplatled.c 中设置 led_driver (platform_driver 类型)的 name 字段为“imx6ul-led”,因此会在
/sys/bus/platform/drivers/目录下存在名为“imx6ul-led”这个文件
重启开发板,进 入到目录 lib/modules/4.1.15 中,输入如下命令加载 dtsplatled.ko 这个驱动模块。
insmod dtsplatled.ko驱动和模块都存在,当驱动和设备匹配成功以后就会输出如图一行语句:

3.测试:
驱动和设备匹配成功以后就可以测试 LED 灯驱动了,输入如下命令打开 LED 灯:
./ledApp /dev/dtsplatled 1 输入如下命令关闭 LED 灯:
./ledApp /dev/dtsplatled 0