【三维几何学习】从零开始网格上的深度学习-3:Transformer篇(Pytorch)
本文参加新星计划人工智能(Pytorch)赛道:https://bbs.csdn.net/topics/613989052
从零开始网格上的深度学习-3:Transformer篇
- 引言
- 一、概述
- 二、核心代码
- 2.1 位置编码
- 2.2 网络框架
- 三、基于Transformer的网格分类
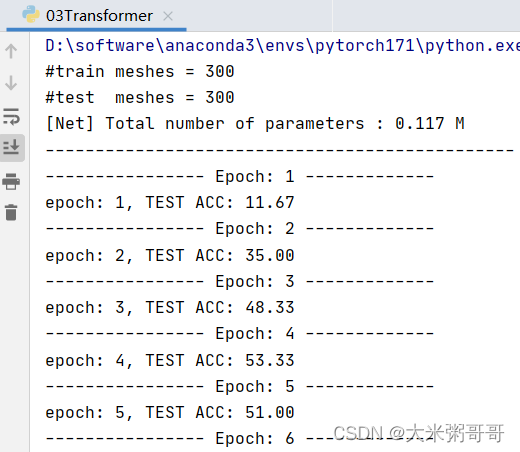
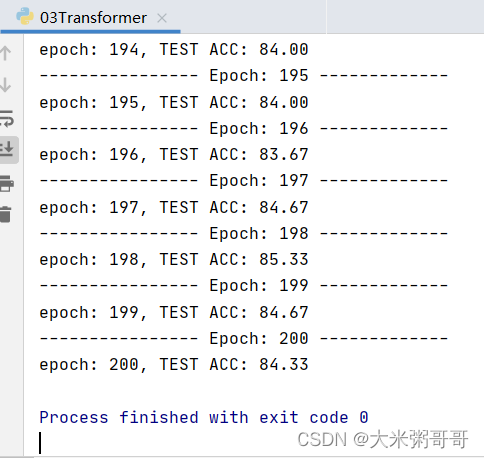
- 3.1 分类结果
- 3.2 全部代码
引言
本文主要内容如下:
- 简述网格上的位置编码
- 参考点云上的Transformer-1:PCT:Point cloud transformer,构造网格分类网络
一、概述

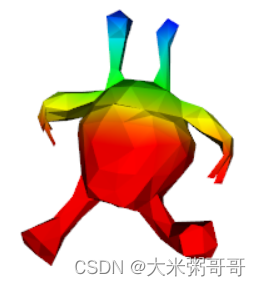
个人认为对于三角形网格来说,想要将Transformer应用到其上较为重要的一步是位置编码。三角网格在3D空间中如何编码每一个元素的位置,能尽可能保证的泛化性能? 以xyz坐标为例,最好是模型经过对齐的预处理,使朝向一致。或者保证网格水密的情况下使用谱域特征,如热核特征。或者探索其他位置编码等等… 上图为一个外星人x坐标的位置编码可视化
- 使用简化网格每一个面直接作为一个Token即可,高分辨率的网格(考虑输入特征计算、训练数据对齐等)并不适合深度学习(
个人认为) - 直接应用现有的Tranformer网络框架、自注意力模块等,
细节或参数需要微调
二、核心代码
2.1 位置编码
使用每一个网格面的中心坐标作为位置编码,计算代码在DataLoader中:
- 需要平移到坐标轴原点,并进行尺度归一化
# xyz
xyz_min = np.min(vs[:, 0:3], axis=0)
xyz_max = np.max(vs[:, 0:3], axis=0)
xyz_move = xyz_min + (xyz_max - xyz_min) / 2
vs[:, 0:3] = vs[:, 0:3] - xyz_move
# scale
scale = np.max(vs[:, 0:3])
vs[:, 0:3] = vs[:, 0:3] / scale
# 面中心坐标
xyz = []
for i in range(3):
    xyz.append(vs[faces[:, i]])
xyz = np.array(xyz)  # 转为np
mean_xyz = xyz.sum(axis=0) / 3
2.2 网络框架

- 参考上图PCT框架,修改了部分细节,如减少了Attention模块数量等

- 参考上图自注意力模块,
个人感觉图中应该有误. 从一个共享权重的Linear里出来了 Q 、 K 、 V Q、K、V Q、K、V三个矩阵,但 V V V的维度和 Q 、 K Q、K Q、K不一致,少画了一个Linear?
class SA(nn.Module):
    def __init__(self, channels):
        super().__init__()
        self.q_conv = nn.Conv1d(channels, channels // 4, 1, bias=False)
        self.k_conv = nn.Conv1d(channels, channels // 4, 1, bias=False)
        self.q_conv.weight = self.k_conv.weight
        self.v_conv = nn.Conv1d(channels, channels, 1, bias=False)
        self.trans_conv = nn.Conv1d(channels, channels, 1)
        self.after_norm = nn.BatchNorm1d(channels)
        self.act = nn.GELU()
        self.softmax = nn.Softmax(dim=-1)

    def forward(self, x):
        x_q = self.q_conv(x).permute(0, 2, 1)
        x_k = self.k_conv(x)
        x_v = self.v_conv(x)
        energy = x_q @ x_k
        attention = self.softmax(energy)
        attention = attention / (1e-9 + attention.sum(dim=1, keepdims=True))
        x_r = x_v @ attention
        x_r = self.act(self.after_norm(self.trans_conv(x - x_r)))
        x = x + x_r
        return x


class TriTransNet(nn.Module):
    def __init__(self, dim_in, classes_n=30):
        super().__init__()
        self.conv_fea = FaceConv(6, 128, 4)
        self.conv_pos = FaceConv(3, 128, 4)
        self.bn_fea = nn.BatchNorm1d(128)
        self.bn_pos = nn.BatchNorm1d(128)
        self.sa1 = SA(128)
        self.sa2 = SA(128)
        self.gp = nn.AdaptiveAvgPool1d(1)
        self.linear1 = nn.Linear(256, 128, bias=False)
        self.bn1 = nn.BatchNorm1d(128)
        self.linear2 = nn.Linear(128, classes_n)
        self.act = nn.GELU()

    def forward(self, x, mesh):
        x = x.permute(0, 2, 1).contiguous()
        # 位置编码 放到DataLoader中比较好
        pos = [m.xyz for m in mesh]
        pos = np.array(pos)
        pos = torch.from_numpy(pos).float().to(x.device).requires_grad_(True)

        batch_size, _, N = x.size()
        x = self.act(self.bn_fea(self.conv_fea(x, mesh).squeeze(-1)))
        pos = self.act(self.bn_pos(self.conv_pos(pos, mesh).squeeze(-1)))
        x1 = self.sa1(x + pos)
        x2 = self.sa2(x1 + pos)
        x = torch.cat((x1, x2), dim=1)
        x = self.gp(x)
        x = x.view(batch_size, -1)
        x = self.act(self.bn1(self.linear1(x)))
        x = self.linear2(x)
        return x
三、基于Transformer的网格分类
数据集是SHREC’11 可参考三角网格(Triangular Mesh)分类数据集 或 MeshCNN
3.1 分类结果


准确率太低… 可以尝试改进的点:
- 尝试不同的位置编码(
谱域特征),不同的位置嵌入方式 (sum可改为concat) 数据集较小的情况下Transformer略难收敛,加入更多CNN可加速且提升明显 (或者加入降采样)- 打印loss进行分析,是否
欠拟合,尝试增加网络参数?
基于Transformer的网络在网格分割上的表现会很好,仅用少量参数即可媲美甚至超过基于面卷积的分割结果,个人感觉得益于其近乎全局的感受野…
3.2 全部代码
DataLoader代码请参考2:从零开始网格上的深度学习-1:输入篇(Pytorch)
FaceConv代码请参考3:从零开始网格上的深度学习-2:卷积网络CNN篇
import torch
import torch.nn as nn
import numpy as np
from CNN import FaceConv
from DataLoader_shrec11 import DataLoader
from DataLoader_shrec11 import Mesh


class SA(nn.Module):
    def __init__(self, channels):
        super().__init__()
        self.q_conv = nn.Conv1d(channels, channels // 4, 1, bias=False)
        self.k_conv = nn.Conv1d(channels, channels // 4, 1, bias=False)
        self.q_conv.weight = self.k_conv.weight
        self.v_conv = nn.Conv1d(channels, channels, 1, bias=False)
        self.trans_conv = nn.Conv1d(channels, channels, 1)
        self.after_norm = nn.BatchNorm1d(channels)
        self.act = nn.GELU()
        self.softmax = nn.Softmax(dim=-1)

    def forward(self, x):
        x_q = self.q_conv(x).permute(0, 2, 1)
        x_k = self.k_conv(x)
        x_v = self.v_conv(x)
        energy = x_q @ x_k
        attention = self.softmax(energy)
        attention = attention / (1e-9 + attention.sum(dim=1, keepdims=True))
        x_r = x_v @ attention
        x_r = self.act(self.after_norm(self.trans_conv(x - x_r)))
        x = x + x_r
        return x


class TriTransNet(nn.Module):
    def __init__(self, dim_in, classes_n=30):
        super().__init__()
        self.conv_fea = FaceConv(6, 128, 4)
        self.conv_pos = FaceConv(3, 128, 4)
        self.bn_fea = nn.BatchNorm1d(128)
        self.bn_pos = nn.BatchNorm1d(128)
        self.sa1 = SA(128)
        self.sa2 = SA(128)
        self.gp = nn.AdaptiveAvgPool1d(1)
        self.linear1 = nn.Linear(256, 128, bias=False)
        self.bn1 = nn.BatchNorm1d(128)
        self.linear2 = nn.Linear(128, classes_n)
        self.act = nn.GELU()

    def forward(self, x, mesh):
        x = x.permute(0, 2, 1).contiguous()
        # 位置编码 放到DataLoader中比较好
        pos = [m.xyz for m in mesh]
        pos = np.array(pos)
        pos = torch.from_numpy(pos).float().to(x.device).requires_grad_(True)

        batch_size, _, N = x.size()
        x = self.act(self.bn_fea(self.conv_fea(x, mesh).squeeze(-1)))
        pos = self.act(self.bn_pos(self.conv_pos(pos, mesh).squeeze(-1)))
        x1 = self.sa1(x + pos)
        x2 = self.sa2(x1 + pos)
        x = torch.cat((x1, x2), dim=1)
        x = self.gp(x)
        x = x.view(batch_size, -1)
        x = self.act(self.bn1(self.linear1(x)))
        x = self.linear2(x)
        return x


if __name__ == '__main__':
    # 输入
    data_train = DataLoader(phase='train')         # 训练集
    data_test = DataLoader(phase='test')           # 测试集
    print('#train meshes = %d' % len(data_train)) # 输出训练模型个数
    print('#test  meshes = %d' % len(data_test))  # 输出测试模型个数

    # 网络
    net = TriTransNet(data_train.input_n, data_train.class_n)    # 创建网络 以及 优化器
    optimizer = torch.optim.Adam(net.parameters(), lr=0.001, betas=(0.9, 0.999))
    net = net.cuda(0)
    loss_fun = torch.nn.CrossEntropyLoss(ignore_index=-1)
    num_params = 0
    for param in net.parameters():
        num_params += param.numel()
    print('[Net] Total number of parameters : %.3f M' % (num_params / 1e6))
    print('-----------------------------------------------')

    # 迭代训练
    for epoch in range(1, 201):
        print('---------------- Epoch: %d -------------' % epoch)
        for i, data in enumerate(data_train):
            # 前向传播
            net.train(True)        # 训练模式
            optimizer.zero_grad()  # 梯度清零
            face_features = torch.from_numpy(data['face_features']).float()
            face_features = face_features.to(data_train.device).requires_grad_(True)
            labels = torch.from_numpy(data['label']).long().to(data_train.device)
            out = net(face_features, data['mesh'])     # 输入到网络

            # 反向传播
            loss = loss_fun(out, labels)
            loss.backward()
            optimizer.step()              # 参数更新

        # 测试
        net.eval()
        acc = 0
        for i, data in enumerate(data_test):
            with torch.no_grad():
                # 前向传播
                face_features = torch.from_numpy(data['face_features']).float()
                face_features = face_features.to(data_test.device).requires_grad_(False)
                labels = torch.from_numpy(data['label']).long().to(data_test.device)
                out = net(face_features, data['mesh'])
                # 计算准确率
                pred_class = out.data.max(1)[1]
                correct = pred_class.eq(labels).sum().float()
            acc += correct
        acc = acc / len(data_test)
        print('epoch: %d, TEST ACC: %0.2f' % (epoch, acc * 100))
PCT:Point cloud transformer ↩︎
从零开始网格上的深度学习-1:输入篇(Pytorch) ↩︎
从零开始网格上的深度学习-2:卷积网络CNN篇 ↩︎
