[BeginCTF]真龙之力
安装程序
双击安装
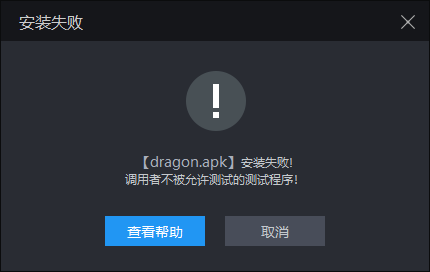
出现了安装失败的标签,开发者不允许测试。
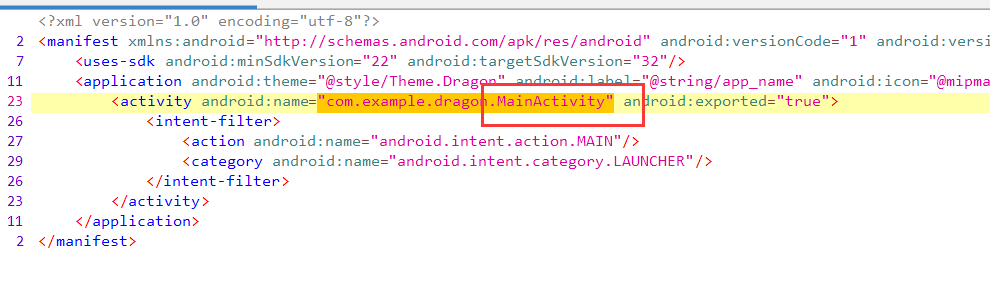
查看Mainfest入口文件
<?xml version="1.0" encoding="utf-8"?>
<manifest xmlns:android="http://schemas.android.com/apk/res/android" android:versionCode="1" android:versionName="1.0" android:compileSdkVersion="32" android:compileSdkVersionCodename="12" package="com.example.dragon" platformBuildVersionCode="32" platformBuildVersionName="12">
    <uses-sdk android:minSdkVersion="22" android:targetSdkVersion="32"/>
    <application android:theme="@style/Theme.Dragon" android:label="@string/app_name" android:icon="@mipmap/ic_launcher" android:debuggable="true" android:testOnly="true" android:allowBackup="true" android:supportsRtl="true" android:fullBackupContent="@xml/backup_rules" android:roundIcon="@mipmap/ic_launcher_round" android:appComponentFactory="androidx.core.app.CoreComponentFactory" android:dataExtractionRules="@xml/data_extraction_rules">
        <activity android:name="com.example.dragon.MainActivity" android:exported="true">
            <intent-filter>
                <action android:name="android.intent.action.MAIN"/>
                <category android:name="android.intent.category.LAUNCHER"/>
            </intent-filter>
        </activity>
    </application>
</manifest>
可以发现android:testOnly:“true”,也就是导致我们无法安装的主要原因。
AndroidKiller修改Mainfest文件进行安装。

在AndroidKiller中将Mainfest文件修改成android:testOnly:"flase"或者直接删除这一句,然后编译签名安装就可以了。
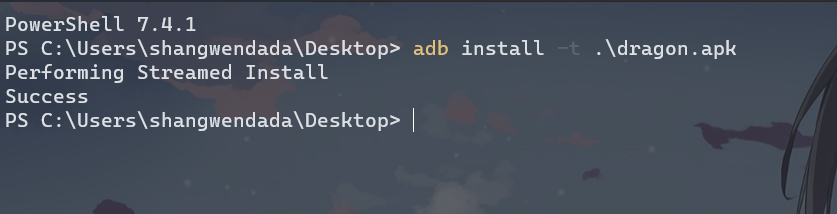
abd直接安装
adb install -t .\dragon.apk
使用-t参数直接测试安装。
分析程序源代码
入口是MainActivity直接进入查看
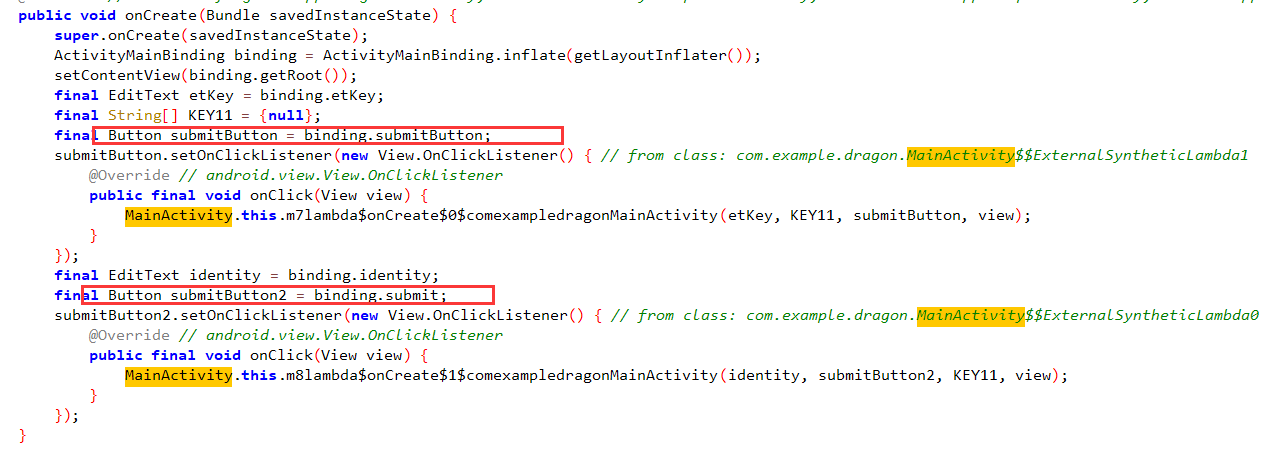
两个按钮的监听事件,
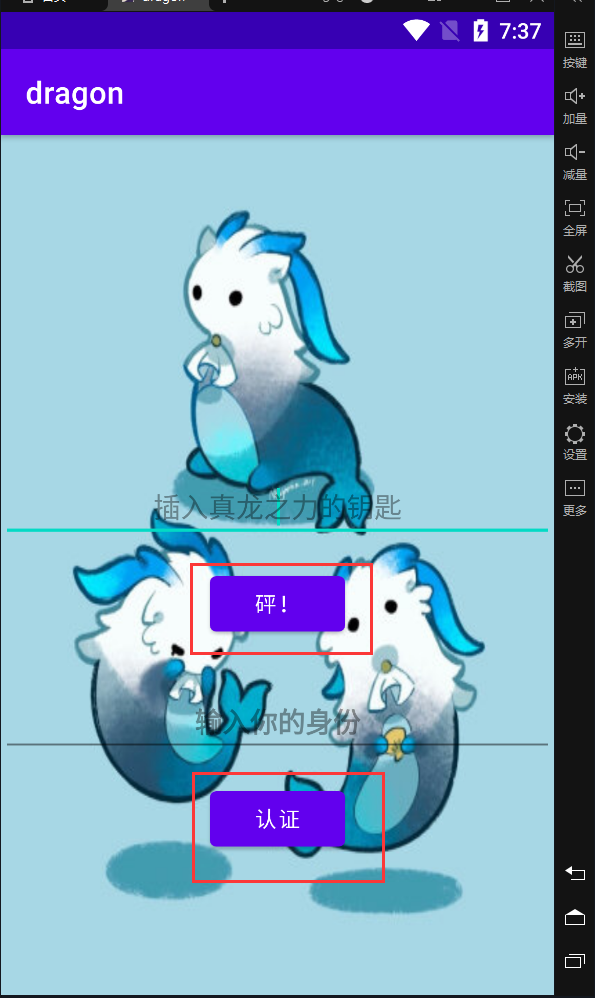
button1
点击后直接如下类
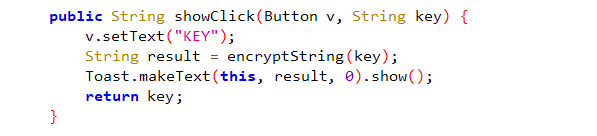
这个encryptString()方法在最开始被注册,来自于native层

也就是在native层验证KEY是否正确
button2
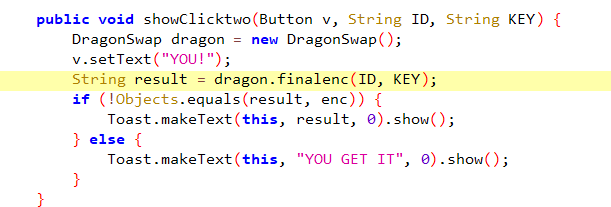
使用了一系列算法如下
package com.example.dragon;

import java.util.Arrays;
import java.util.function.ToIntFunction;

/* compiled from: MainActivity.java */
/* loaded from: classes3.dex */
class DragonSwap {
    private static final int BLOCK_SIZE = 16;
    private static final int[] S_BOX = {9, 11, 25, 20, 15, 30, 24, 23, 2, 26, 28, 13, 16, 19, 29, 31, 5, 4, 17, 12, 14, 8, 27, 21, 22, 3, 7, 0, 18, 6, 10, 1};

    private static byte[] encrypt1(byte[] message, String KEY) {
        A a = new A();
        B b = new B();
        long KEY2 = b.math(KEY);
        int[] B_BOX = a.rand(KEY2).stream().mapToInt(new ToIntFunction() { // from class: com.example.dragon.DragonSwap$$ExternalSyntheticLambda0
            @Override // java.util.function.ToIntFunction
            public final int applyAsInt(Object obj) {
                Integer valueOf;
                valueOf = Integer.valueOf(((Integer) obj).intValue());
                return valueOf.intValue();
            }
        }).toArray();
        for (int i = 0; i < message.length; i += 16) {
            byte[] block = Arrays.copyOfRange(message, i, i + 16);
            for (int j = 0; j < 16; j++) {
                int aa = (B_BOX[j] * j) % 16;
                byte tmp = block[j];
                block[j] = block[aa];
                block[aa] = tmp;
            }
            System.arraycopy(block, 0, message, i, 16);
        }
        return message;
    }

    private static byte[] SSBBOOXX(byte[] message) {
        byte[] encryptedMessage = new byte[message.length];
        for (int i = 0; i < message.length; i++) {
            encryptedMessage[i] = message[S_BOX[i]];
        }
        return encryptedMessage;
    }

    private static String encrypt2(byte[] message) {
        for (int i = 0; i < 16; i++) {
            message = SSBBOOXX(message);
        }
        StringBuilder sb = new StringBuilder();
        for (byte b : message) {
            sb.append(String.format("%02X", Byte.valueOf(b)));
        }
        return sb.toString();
    }

    public String finalenc(String ID, String KEY) {
        byte[] flag = ID.getBytes();
        byte[] paddedFlag = new byte[(((flag.length + 16) - 1) / 16) * 16];
        System.arraycopy(flag, 0, paddedFlag, 0, flag.length);
        byte[] encrypted1 = encrypt1(paddedFlag, KEY);
        return encrypt2(encrypted1);
    }
}
可以发现算法只是涉及到了密文的位置置换,不涉及任何的加密等。
具体逻辑就是通过填充00然后置换之后与密文进行比较,正确则输出”YOU GET IT“不正确则输出交换的结果。
解题
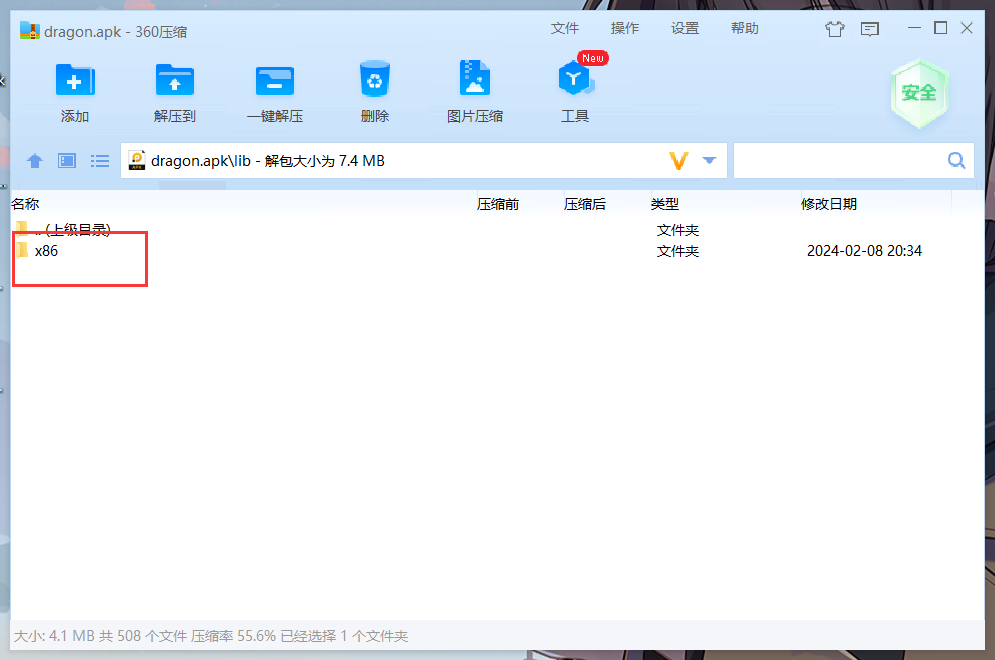
对于native层的程序,我们需要使用压缩包打开apk文件在lib文件夹中则可以看到so文件,其中文件名代表的是不同的架构
找到主要逻辑

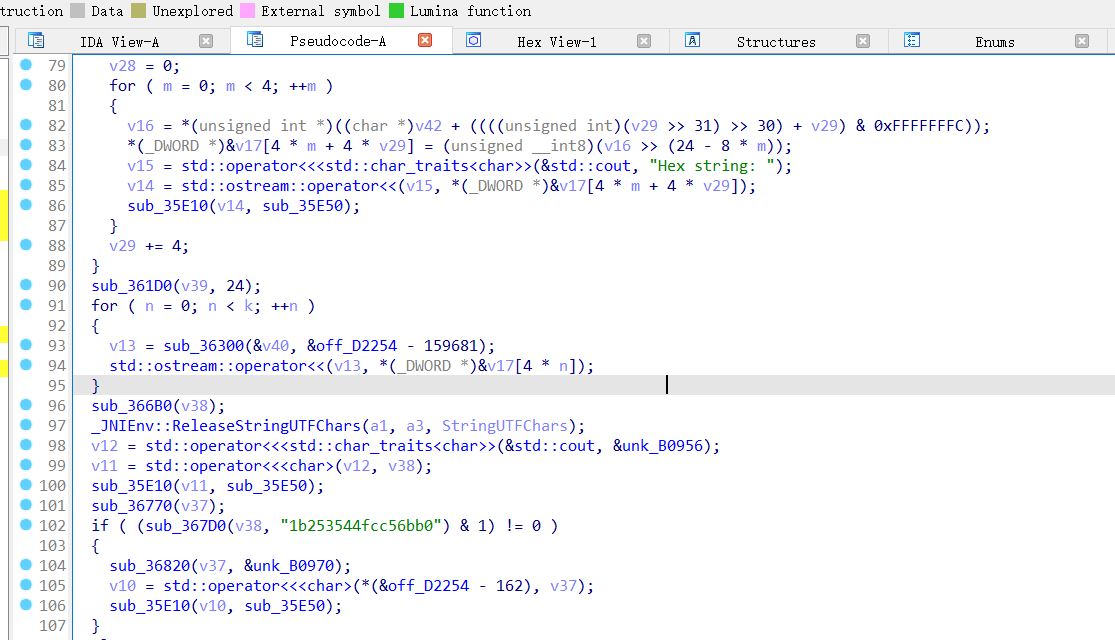
逻辑就是tea加密,转化为16进制字符串然后比对。
我们输入密钥再输入二十七个字母,程序会输出我们这27个字母被打乱的顺序

首先我们解TEA,然后根据程序自己输出的调换位置将字符还原即可
#include<iostream>
#include<algorithm>
#include<cstdio>
#include<cmath>
#include<map>
#include<vector>
#include<queue>
#include<stack>
#include<set>
#include<string>
#include<cstring>
#include<list>
#include<stdlib.h>
using namespace std;
typedef int status;
typedef int selemtype;
/*
                   _ooOoo_
                  o8888888o
                  88" . "88
                  (| -_- |)
                  O\  =  /O
               ____/`---'\____
            .'  \\|     |//  `.
            /  \\|||  :  |||//  \
           /  _||||| -:- |||||-  \
           |   | \\\  -  /// |   |
           | \_|  ''\---/''  |   |
           \  .-\__  `-`  ___/-. /
         ___`. .'  /--.--\  `. . __
      ."" '<  `.___\_<|>_/___.'  >'"".
     | | :  `- \`.;`\ _ /`;.`/ - ` : | |
     \  \ `-.   \_ __\ /__ _/   .-` /  /
======`-.____`-.___\_____/___.-`____.-'======
                   `=---='
^^^^^^^^^^^^^^^^^^^^^^^^^^^^^^^^^^^^^^^^^^^^^
    佛祖保佑       永不宕机     永无BUG
*/
unsigned int __cdecl xtea_encryption(unsigned int *a1, const unsigned int *a2) {
	unsigned int result; // eax
	int i; // [esp+0h] [ebp-18h]
	unsigned int v4; // [esp+8h] [ebp-10h]
	unsigned int v5; // [esp+Ch] [ebp-Ch]
	unsigned int v6; // [esp+10h] [ebp-8h]

	v6 = *a1;
	v5 = a1[1];
	v4 = 0x9E3779B9*32;
	for ( i = 0; i < 32; ++i ) {
		v5 -= (a2[(v4 >> 11) & 3] + v4) ^ (v6 + ((v6 >> 4) ^ (32 * v6)));
		v4 -= 0x9E3779B9;
		v6 -= (a2[v4 & 3] + v4) ^ (v5 + ((v5 >> 4) ^ (32 * v5)));

	}
	*a1 = v6;
	result = v5;
	a1[1] = v5;
	return result;
}
unsigned int qword_B0930[4] =
{ 19088743,(unsigned int) -1985229329,(unsigned int) -19088744,(unsigned int) 1985229328 };

unsigned enc[4] = {0x1b253544,0xfcc56bb0};

int main () {
	xtea_encryption(enc,qword_B0930);
	printf("%s\n",enc);
	//2024YYDS
	char table[] = "qwertyuiopasdfghjklzxcvbnmA";
	char mask[] = "cyqbfvzornmxstdpkjweailAugh";
	char res[] = "i{biecfuialflnlv_eegieo}Ntt";
	char opt[256] = {0};
	unsigned char dic[77] = {0};
	for(int i = 0 ; i <27 ; i ++ ){
		for(int j = 0 ; j < 27 ; j ++ ){
			if(table[j] == mask[i]){
				dic[i] = j;
			}
		}
	}
	for(int i = 0 ; i < 27 ; i ++ ){
		opt[dic[i]] = res[i];
	}
	printf("%s",opt);
}