docker引擎
目录
一、Docker引擎发展历程
二、docker引擎架构
三、docker引擎分类
四、docker引擎安装
4.1安装条件
4.2 使用rpm存储库安装
4.2.1设置存储库
4.2.2安装docker引擎
4.2.3启动docker,并设置docker开机自启动
五、卸载docker引擎
5.1.卸载 Docker 引擎、CLI、containerd 和 Docker Compose 包:
5..2主机上的映像、容器、卷或自定义配置文件 不会自动删除。要删除所有映像、容器和卷,需要执行以下操作:
一、Docker引擎发展历程
首发架构由两大核心组件构成:LXC(Linux Container)与Docker Daemon。
首发架构的两大问题:
1.严重依赖于LXC,出现了“卡脖子”问题,及无法实现Docker跨平台。所以在0.9版本使用了 Docker自研的Libcontainer替换了LXC。
2.Docker Daemon 中的“大而全”使得版本更新难、性能出现瓶颈、不符合软件哲学(由 Unix 团队提出),关键是,其还存在着“中心化”问题。所以在1.1版本中其实现了 OCI规范,将容器运行时Runc从Docker Daemon 中剥离了出来。
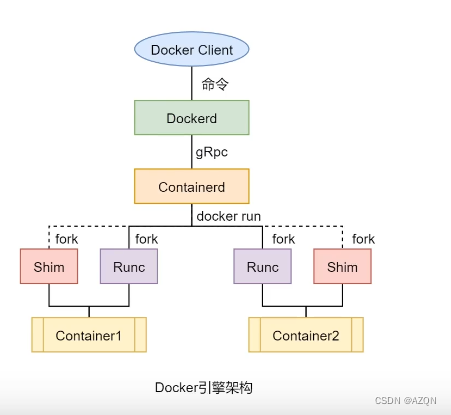
二、docker引擎架构
docker引擎是用来运行和管理容器的核心软件,其架构由五个部分组件组成:
docker client 、dockerd、Containerd、Runc、Shim

Docker Client:用户提交 Docker 命令。
Dockerd: 负责 REST API、处理镜像相关命令、网络、容器编排等。
Containerd:负责容器生命周期管理(负责处理容器相关的命令),但不负责创建容器。当docker run 命令到来时会fork出Runc与Shim两个进程。
Runc:负责创建容器进程,容器创建并启动完毕后,Runc将容器进程交付给Shim进程管理,然后自己退出。
Shim: 负责将容器与Docker Daemon进行解耦。
三、docker引擎分类
docker分为三大版本(Moby、CE、EE),俩个小版本(Edge、Statble)
四、docker引擎安装
4.1安装条件
要安装docker引擎,需要以下版本之一的维护版本Centos版本:
- CentOS 7
- CentOS 8 (stream)
- CentOS 9 (stream)
4.2 使用rpm存储库安装
在新主机上首次安装 Docker 引擎之前,需要设置 Docker 存储库。之后,安装和更新存储库中的 Docker。
4.2.1设置存储库
安装软件包(提供实用程序)并设置存储库。yum-utils yum-config-manager
使用阿里国内源安装docker
[root@localhost /]# yum-config-manager --add-repo http://mirrors.aliyun.com/docker-ce/linux/centos/docker-ce.repo
Loaded plugins: fastestmirror
adding repo from: http://mirrors.aliyun.com/docker-ce/linux/centos/docker-ce.repo
grabbing file http://mirrors.aliyun.com/docker-ce/linux/centos/docker-ce.repo to /etc/yum.repos.d/docker-ce.repo
repo saved to /etc/yum.repos.d/docker-ce.repo
4.2.2安装docker引擎
[root@localhost /]# yum install docker-ce docker-ce-cli containerd.io docker-buildx-plugin docker-compose-plugin
4.2.3启动docker,并设置docker开机自启动
[root@localhost /]# systemctl start docker
[root@localhost /]# systemctl enable docker
通过运行镜像来验证docker引擎是否安装成功。hello-world
[root@localhost /]# docker run hello-world
Unable to find image 'hello-world:latest' locally
latest: Pulling from library/hello-world
c1ec31eb5944: Pull complete
Digest: sha256:6352af1ab4ba4b138648f8ee88e63331aae519946d3b67dae50c313c6fc8200f
Status: Downloaded newer image for hello-world:latest

Hello from Docker!
This message shows that your installation appears to be working correctly.

To generate this message, Docker took the following steps:
 1. The Docker client contacted the Docker daemon.
 2. The Docker daemon pulled the "hello-world" image from the Docker Hub.
    (amd64)
 3. The Docker daemon created a new container from that image which runs the
    executable that produces the output you are currently reading.
 4. The Docker daemon streamed that output to the Docker client, which sent it
    to your terminal.

To try something more ambitious, you can run an Ubuntu container with:
 $ docker run -it ubuntu bash

Share images, automate workflows, and more with a free Docker ID:
 https://hub.docker.com/

For more examples and ideas, visit:
 https://docs.docker.com/get-started/
成功安装并且启动了docker引擎。
五、卸载docker引擎
5.1.卸载 Docker 引擎、CLI、containerd 和 Docker Compose 包:
[root@localhost /]# yum remove docker-ce docker-ce-cli containerd.io docker-buildx-plugin 5..2主机上的映像、容器、卷或自定义配置文件 不会自动删除。要删除所有映像、容器和卷,需要执行以下操作:
[root@localhost /]# rm -rf /var/lib/docker
[root@localhost /]# rm -fr /var/lib/containerd
必须手动删除任何已编辑的配置文件。
