【React】Vite创建React+TS项目
前提条件
有node环境,且node版本>=18.0.0
创建项目
npm create vite@latest
1.起项目名

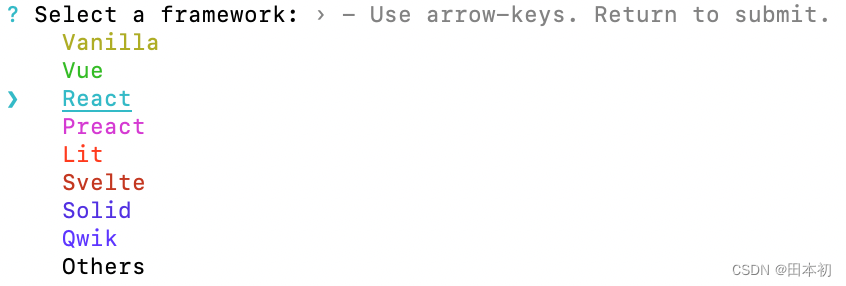
2.选择框架
3.选择语言
TypeScript + SWC 是指 Vite 使用 SWC(Speedy Web Compiler)作为 TypeScript 的编译器。
SWC 是一个针对 JavaScript 和 TypeScript 的超快速编译器,相比于传统的 TypeScript 编译器(tsc),SWC 具有更快的编译速度。
SWC 通过利用 Rust 编写的编译器,使用了更先进的优化技术,使得它在处理 TypeScript 代码时能够更快地进行转换和编译。特别是在大型项目中,SWC 相对于传统的 TypeScript 编译器有着更快的性能,特别是在启动项目和进行热模块更新时。
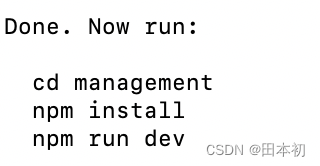
4.依次执行命令,启动项目

至此项目已初始化完毕
关闭严格模式
建议关闭严格模式,因为不能自动检测副作用,有意双重调用。将严格模式注释即可。
main.ts中
import React from "react"
import ReactDOM from "react-dom/client"
import App from "./App.tsx"
import "./index.scss"

ReactDOM.createRoot(document.getElementById("root")!).render(
  // <React.StrictMode>
  <App />
  // </React.StrictMode>
)
配置sass
下载
npm install sass
将项目初始化时的index.css文件,修改为.sass后缀后即可书写sass代码。
注意: main.ts中引入样式时,后缀也要修改
import "./index.scss"
vite.config.ts中注册全局样式
// 配置Scss
css: {
  preprocessorOptions: {
    scss: {
      additionalData: `@import "./src/styles/sassConfig";`,
    },
  },
},
配置路径别名
安装path
npm i @types/node --save-dev
在 vite.config.ts 中引入path,并声明快捷字符及其对应文件夹,这里以@表示src目录为例,代码如下:
import { defineConfig } from "vite"
import react from "@vitejs/plugin-react-swc"
import { resolve } from "path"

export default defineConfig({
  plugins: [react()],
  // 配置路径别名
  resolve: {
    alias: {
      "@": resolve(__dirname, "src"),
    },
  },
})
此时@已经可以正确读取src目录,但是输入@后,并未出现提示,需要在tsconfig.json文件中声明路径。

tsconfig.json,注意:这里的字符与目录一定要与vite.config.ts中的配置保持一致。
{
  "compilerOptions": {
    "target": "ES2020",
    "useDefineForClassFields": true,
    "lib": ["ES2020", "DOM", "DOM.Iterable"],
    "module": "ESNext",
    "skipLibCheck": true,

    "moduleResolution": "bundler",
    "allowImportingTsExtensions": true,
    "resolveJsonModule": true,
    "isolatedModules": true,
    "noEmit": true,
    "jsx": "react-jsx",

    "strict": true,
    "noUnusedLocals": true,
    "noUnusedParameters": true,
    "noFallthroughCasesInSwitch": true,

     // 路径别名
     "baseUrl": ".",
     "paths": {
       "@/*":["./src/*"]
     }
  },
  "include": ["src"],
  "references": [{ "path": "./tsconfig.node.json" }]
}
添加后,再次输入@后,编译器会读取src目录下的资源。

配置路由
配置请求
1. 下载axios及类型声明文件
npm install axios @types/axios
2. 根据需求封装axios
这里以最基本请求举例
// 在项目中创建一个 axios.js 文件

import axios from 'axios';

const instance = axios.create({
  baseURL: 'http://api.example.com', // 你的 API 地址
  timeout: 5000, // 请求超时时间(毫秒)
  headers: {
    'Content-Type': 'application/json', // 设置请求头,根据实际情况修改
  }
});

// 请求拦截器
instance.interceptors.request.use(
  config => {
    // 在发送请求之前做些什么,比如添加 token 等
    return config;
  },
  error => {
    // 对请求错误做些什么
    return Promise.reject(error);
  }
);

// 响应拦截器
instance.interceptors.response.use(
  response => {
    // 对响应数据做点什么
    return response.data;
  },
  error => {
    // 对响应错误做点什么
    return Promise.reject(error);
  }
);

export default instance;
3. 解决跨域
首先在项目根目录下创建三个文件,分别对应全局环境、开发环境、生产环境。

.env
NODE_ENV = env

VITE_NAME = '全局环境'
VITE_API_URL=''
.env.development
NODE_ENV = development

VITE_NAME = '开发环境'
VITE_API_URL='/api'
VITE_TARGET ='http://.....'
.env.production
NODE_ENV = production

VITE_NAME = '生产环境'
VITE_API_URL = ''
VITE_TARGET ='https://xxx.com/'
vite.config.ts中配置跨域
import react from "@vitejs/plugin-react-swc"
import { defineConfig, loadEnv } from "vite"

export default defineConfig(({ mode }) => {
  const config = loadEnv(mode, "./")

  return {
    plugins: [react()],
    // 配置跨域
    server: {
      port: 8888,
      host: "192.168.31.207",
      proxy: {
        "/api": {
          target: config.VITE_TARGET,  // 会自动判断当前环境,对应上述三个文件中的target
          changeOrigin: true,
          rewrite: (path) => path.replace(/^\/api/, ""),
        },
      },
    },
  }
})
配置Antd
1. 安装
官方地址
// npm
npm install antd --save
// yarn
yarn add antd
// pnpm
pnpm install antd --save
2. 下载icon
官方地址
// npm
npm install @ant-design/icons --save
// yarn
yarn add @ant-design/icons
// pnpm
pnpm install @ant-design/icons --save
3. 国际化
下载完毕后,默认语言为英文,需要在main.ts中注入并配置antd
import ReactDOM from "react-dom/client"
import App from "./App.tsx"
import "./index.scss"
// antd部分
import { ConfigProvider } from "antd"
import "dayjs/locale/zh-cn"
import zhCN from "antd/locale/zh_CN"

ReactDOM.createRoot(document.getElementById("root")!).render(
   <ConfigProvider locale={zhCN}>
     <App />
   </ConfigProvider>
)
4.定制主题
可以更改组件默认样式,创建配置文件如下,具体请查阅官方文档
export default {
  components: {
    Button: {
      colorPrimary: "#205fd4",  // 改变Button的type为primary时的颜色
    },
  },
}
在main.ts中注册自定义theme文件
import theme from "@/config/antdTheme" // 自定义theme文件

ReactDOM.createRoot(document.getElementById("root")!).render(
   <ConfigProvider theme={theme}>
     <App />
   </ConfigProvider>
)
