「OC」CAlayer——巧用动画实现一个丝滑的折叠cell
「OC」CAlayer——巧用动画实现一个丝滑的折叠cell
前言
在这个暑假集训后的时间,都在家里做着学习笔记的整理,深入学习了CALayer的相关知识,掌握了第三方库Masonry自动布局的用法,以及学习了MVC的相关内容,正好组内新学期的第一个任务就是写一个折叠cell的小demo,所以就打算将暑假学习过的内容,尽量整合在一块,进行巩固复习。
分装Model
由于我们只是简单的写一个折叠cell,所以单个的cell并不需要太过复杂的内容,所以我们将section进行分装即可,一个section就有着一个布尔值,判断是否展开,一个存储section数据的数组,还有对应section的headerView的标题
@interface Model : NSObject

@property (nonatomic, strong) NSString *name;
@property (nonatomic, strong) NSArray<NSString *> *items;
@property (nonatomic, assign) BOOL collapsed;

- (instancetype)initWithName:(NSString *)name items:(NSArray<NSString *> *)items collapsed:(BOOL)collapsed;

@end

NS_ASSUME_NONNULL_END
#import "Model.h"

@implementation Model

- (instancetype)initWithName:(NSString *)name items:(NSArray<NSString *> *)items collapsed:(BOOL)collapsed {
    self = [super init];
    if (self) {
        _name = name;
        _items = items;
        _collapsed = collapsed;
    }
    return self;
}

@end
重写headerView
为了更好的分装,提现MVC的实现,我写了一个headerView的子类,使用Masonry进行布局
//Header.h
#import <UIKit/UIKit.h>

NS_ASSUME_NONNULL_BEGIN

@interface Header : UITableViewHeaderFooterView

@property (nonatomic, strong) UILabel *titleLabel;
@property (nonatomic, strong) UIButton *rowButton;


@end

NS_ASSUME_NONNULL_END


//Header.m
#import "Header.h"
#import "Masonry.h"
@implementation Header

- (instancetype)initWithReuseIdentifier:(NSString *)reuseIdentifier {
    self = [super initWithReuseIdentifier:reuseIdentifier];
    if (self) {
        [self setupViews];
    }
    return self;
}

- (void)setupViews {
    self.contentView.backgroundColor = [UIColor purpleColor];

    self.titleLabel = [[UILabel alloc] init];
    self.titleLabel.font = [UIFont boldSystemFontOfSize:16];
    self.titleLabel.textColor = [UIColor whiteColor];
    [self.contentView addSubview:self.titleLabel];

    self.rowButton = [UIButton buttonWithType:UIButtonTypeSystem];
    [self.rowButton setImage:[UIImage systemImageNamed:@"chevron.right"] forState:UIControlStateNormal];
    self.rowButton.tintColor = [UIColor darkTextColor];
    [self.contentView addSubview:self.rowButton];

    [self.titleLabel mas_makeConstraints:^(MASConstraintMaker *make) {
        make.left.equalTo(self.contentView).offset(15);
        make.centerY.equalTo(self.contentView);
        make.right.equalTo(self.contentView);
    }];

    [self.rowButton mas_makeConstraints:^(MASConstraintMaker *make) {
        make.width.equalTo(@30);
        make.height.equalTo(@30);
        make.right.equalTo(self.contentView).offset(-15);
        make.centerY.equalTo(self.contentView);
    }];

}

@end
我们还需要在控制器之中对headerView进行注册
- (void)viewDidLoad {
    [super viewDidLoad];

    [self setupSections];
    self.tableView = [[UITableView alloc] initWithFrame:self.view.bounds style:UITableViewStyleGrouped];
    self.tableView.delegate = self;
    self.tableView.dataSource = self;
    [self.view addSubview:self.tableView];
    [self.tableView registerClass:[Header class] forHeaderFooterViewReuseIdentifier:@"header"];
    [self.tableView registerClass:[UITableViewCell class] forCellReuseIdentifier:@"cell"];
}

- (UIView *)tableView:(UITableView *)tableView viewForHeaderInSection:(NSInteger)section {
    Header *header = [tableView dequeueReusableHeaderFooterViewWithIdentifier:@"header"];

    if (!header) {
        header = [[Header alloc] initWithReuseIdentifier:@"header"];
    }

    Model *sectionData = self.models[section];
    header.titleLabel.text = sectionData.name;
    header.rowButton.tag = section;
    [header.rowButton addTarget:self action:@selector(toggleCollapse:) forControlEvents:UIControlEventTouchUpInside];

    [self rotateButton:header.rowButton collapsed:sectionData.collapsed];

    return header;
}
折叠的相关逻辑
其实早在暑假的3Gshare之中就已经学习折叠cell,只不过那时候写的比较大粗糙,还是为了应付是直接设置了一个button,点击就将tableView展开,当button不再选中状态的时候tableView就收回,这次编写的是使用tableView的headerView来进行操作,不过大致展开的逻辑还是相同的
我们先前在Model之中定义了一个判定是否展开的布尔值
- (NSInteger)tableView:(UITableView *)tableView numberOfRowsInSection:(NSInteger)section {
    Model *sectionData = self.models[section];
    return sectionData.collapsed ? 0 : sectionData.items.count;
}

- (void)toggleCollapse:(UIButton *)sender {//设置相关的方法使得headerView的按钮能触发该事件
    NSInteger section = sender.tag;
    Model *sectionData = self.models[section];
    sectionData.collapsed = !sectionData.collapsed;

    [self.tableView reloadSections:[NSIndexSet indexSetWithIndex:section] withRowAnimation:UITableViewRowAnimationNone];//使用动画进行自动变化

}
设置动画
由于按钮图片之中的箭头,需要在点击的时候顺带进行,90度的翻转,所以,我们我用上了CALayer之中的旋转动画,内容如下
- (void)rotateButton:(UIButton *)button collapsed:(BOOL)collapsed {
    CGFloat angle = collapsed ? 0.0 : M_PI_2;
    button.transform = CGAffineTransformMakeRotation(angle);
}
完整代码
控制器的完整代码如下
#import "ViewController.h"
#import "Model.h"
#import "Header.h"

@interface ViewController ()<UITableViewDelegate,UITableViewDataSource>

@property (nonatomic, strong) NSMutableArray<Model *> * models;
@property (nonatomic, strong) UITableView *tableView;
@end

@implementation ViewController


- (void)viewDidLoad {
    [super viewDidLoad];

    [self setupSections];
    self.tableView = [[UITableView alloc] initWithFrame:self.view.bounds style:UITableViewStyleGrouped];
    self.tableView.delegate = self;
    self.tableView.dataSource = self;
    [self.view addSubview:self.tableView];
    [self.tableView registerClass:[Header class] forHeaderFooterViewReuseIdentifier:@"header"];
    [self.tableView registerClass:[UITableViewCell class] forCellReuseIdentifier:@"cell"];
}

- (void)setupSections {
    self.models = [NSMutableArray array];
    [self.models addObject:[[Model alloc] initWithName:@"Mac" items:@[@"MacBook", @"MacBook Air", @"MacBook Pro", @"iMac", @"Mac Pro", @"Mac mini", @"Accessories", @"OS X El Capitan"] collapsed:YES]];
    [self.models addObject:[[Model alloc] initWithName:@"iPad" items:@[@"iPad Pro", @"iPad Air 2", @"iPad mini 4", @"Accessories"] collapsed:NO]];
    [self.models addObject:[[Model alloc] initWithName:@"iPhone" items:@[@"iPhone 6s", @"iPhone 6", @"iPhone SE", @"Accessories"] collapsed:NO]];
}


- (NSInteger)numberOfSectionsInTableView:(UITableView *)tableView {
    return self.models.count;
}

-(CGFloat)tableView:(UITableView *)tableView heightForFooterInSection:(NSInteger)section {
    return 0;
}

- (UIView *)tableView:(UITableView *)tableView viewForFooterInSection:(NSInteger)section {
    UIView *view = [[UIView alloc] initWithFrame:CGRectMake(0, 0, 0, 0)];
    return view;
}
- (NSInteger)tableView:(UITableView *)tableView numberOfRowsInSection:(NSInteger)section {
    Model *sectionData = self.models[section];
    return sectionData.collapsed ? 0 : sectionData.items.count;
}

- (UIView *)tableView:(UITableView *)tableView viewForHeaderInSection:(NSInteger)section {
    Header *header = [tableView dequeueReusableHeaderFooterViewWithIdentifier:@"header"];

    if (!header) {
        header = [[Header alloc] initWithReuseIdentifier:@"header"];
    }

    Model *sectionData = self.models[section];
    header.titleLabel.text = sectionData.name;
    header.rowButton.tag = section;
    [header.rowButton addTarget:self action:@selector(toggleCollapse:) forControlEvents:UIControlEventTouchUpInside];

    [self rotateButton:header.rowButton collapsed:sectionData.collapsed];

    return header;
}

- (CGFloat)tableView:(UITableView *)tableView heightForHeaderInSection:(NSInteger)section {
    return 50;
}

- (UITableViewCell *)tableView:(UITableView *)tableView cellForRowAtIndexPath:(NSIndexPath *)indexPath {
    UITableViewCell *cell = [tableView dequeueReusableCellWithIdentifier:@"cell" forIndexPath:indexPath];

    Model *sectionData = self.models[indexPath.section];
    cell.textLabel.text = sectionData.items[indexPath.row];

    return cell;
}


- (void)toggleCollapse:(UIButton *)sender {
    NSInteger section = sender.tag;
    Model *sectionData = self.models[section];
    sectionData.collapsed = !sectionData.collapsed;

    [self.tableView reloadSections:[NSIndexSet indexSetWithIndex:section] withRowAnimation:UITableViewRowAnimationNone];
}

- (void)rotateButton:(UIButton *)button collapsed:(BOOL)collapsed {
    CGFloat angle = collapsed ? 0.0 : M_PI_2;
    button.transform = CGAffineTransformMakeRotation(angle);
}
@end
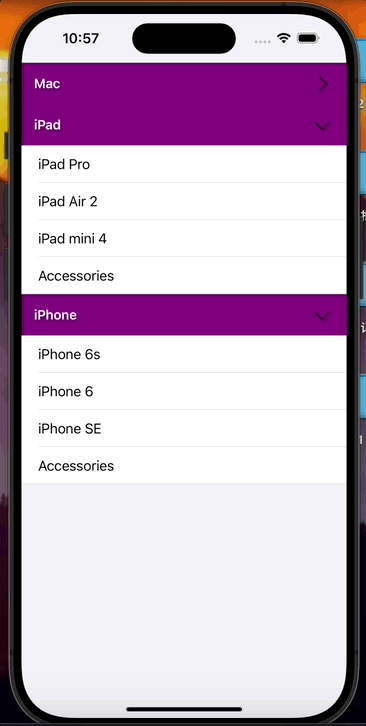
展示
实现的完整内容如下
参考资料
如何在 IOS 中实现可折叠 / 展开的 Table Section?!
ios-swift-collapsible-table-section