信号与槽,QMainWindow中常用类的使用
QMainWindow菜单栏和工具栏
菜单栏,工具栏,状态栏,中心部件,铆接部件(浮动窗口)
菜单栏
    //创建菜单栏
    QMenuBar *bar = menuBar();
    //指定父组件
    this->setMenuBar(bar);
    this->resize(600,400);
    this->setFixedSize(600,400); //固定窗口大小

    //往菜单栏里添加菜单
    //往 菜单里添加菜单项
    QMenu *file1 = bar->addMenu("文件");
    QMenu *file2 = bar->addMenu("编辑");
    bar->addMenu("构建");
    bar->addMenu("调试");

    file1->addAction("新建");
    file1->addSeparator();
    file1->addAction("打开");

    file2->addAction("复制");
    file2->addSeparator();
    file2->addAction("粘贴");
工具栏
    //创建工具栏
    QToolBar *tbar = new QToolBar(this);
    //将工具栏放入窗口 默认靠左停靠
    this->addToolBar(Qt::LeftToolBarArea,tbar);
    //后期设置,只允许左右停靠
    tbar->setAllowedAreas(Qt::LeftToolBarArea | Qt::RightToolBarArea);
    //设置不允许浮动
    tbar->setFloatable(false);
    //往工具栏里增加工具项
    tbar->addAction("欢迎");
    //实例化一个按钮
    QPushButton *btn = new QPushButton("编辑",this);
    //将按钮放入工具栏
    tbar->addWidget(btn);
状态栏
    //创建状态栏 最多只有一个
    QStatusBar *sbar = statusBar();
    //将状态栏放入窗口
    this->setStatusBar(sbar);
    //实力化一个标签
    QLabel *lab = new QLabel("编译输出",this);
    //将标签放入状态栏
    //sabr->addWidget(lab)  默认从左边显示
    sbar->addPermanentWidget(lab);//默认从右边显示
铆接部件(浮动窗口)
    //创建浮动窗口  可以有多个
    QDockWidget *dock = new QDockWidget("报错",this);
    //将浮动窗口放入窗口中
    this->addDockWidget(Qt::BottomDockWidgetArea,dock);
    //只允许左右停靠
    dock->setAllowedAreas(Qt::LeftDockWidgetArea | Qt::RightDockWidgetArea);

    //创建一个中心部件 只能有一个
    QTextEdit *edit = new QTextEdit(this);
    //将文本编辑器放入窗口中
    this->setCentralWidget(edit);
中心部件
    //创建一个中心部件 只能有一个
    QTextEdit *edit = new QTextEdit(this);
    //将文本编辑器放入窗口中
    this->setCentralWidget(edit);
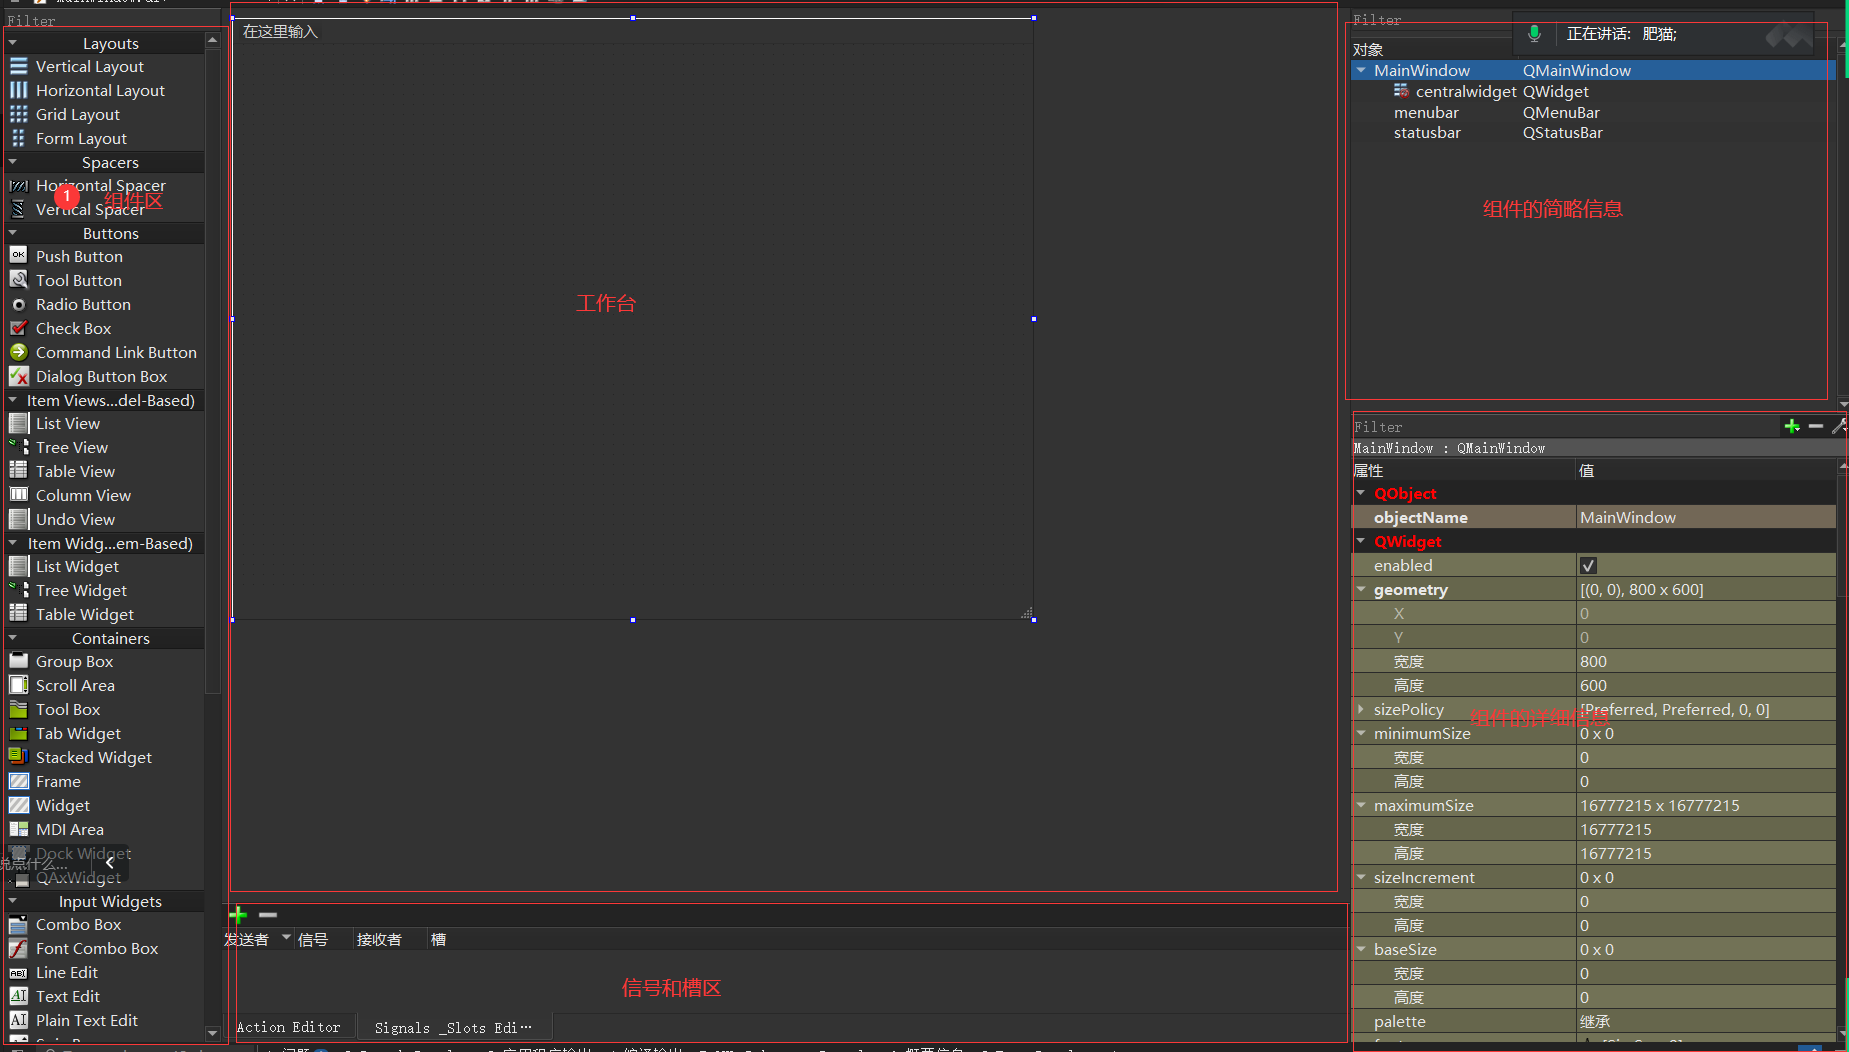
UI界面文件
UI界面文件在Forms文件夹下
UI界面可以通过UI指针访问到UI界面上的所有组件
资源文件的添加
确保项目兼容性,能够使得自己的代码在其他电脑能够正常运行,或者发布软件时也能正常运行。
步骤
将需要的资源放入项目中。
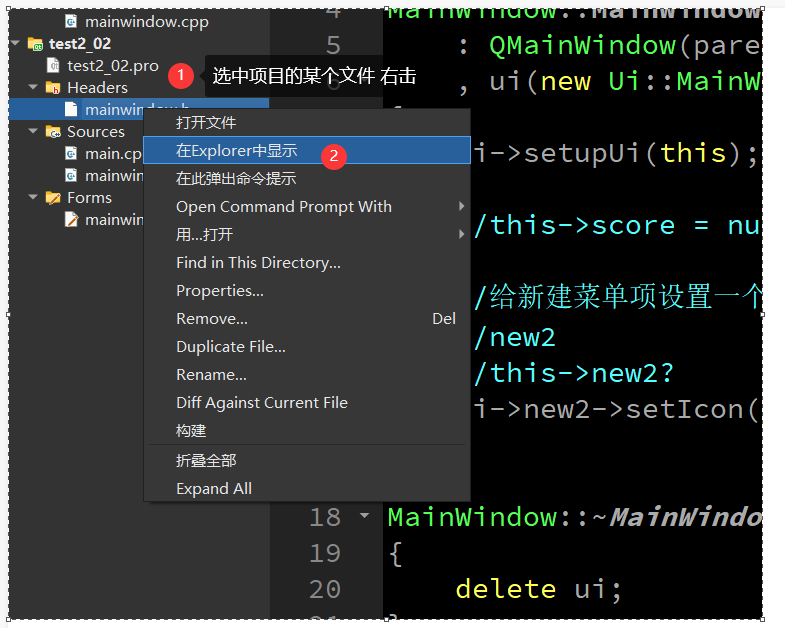
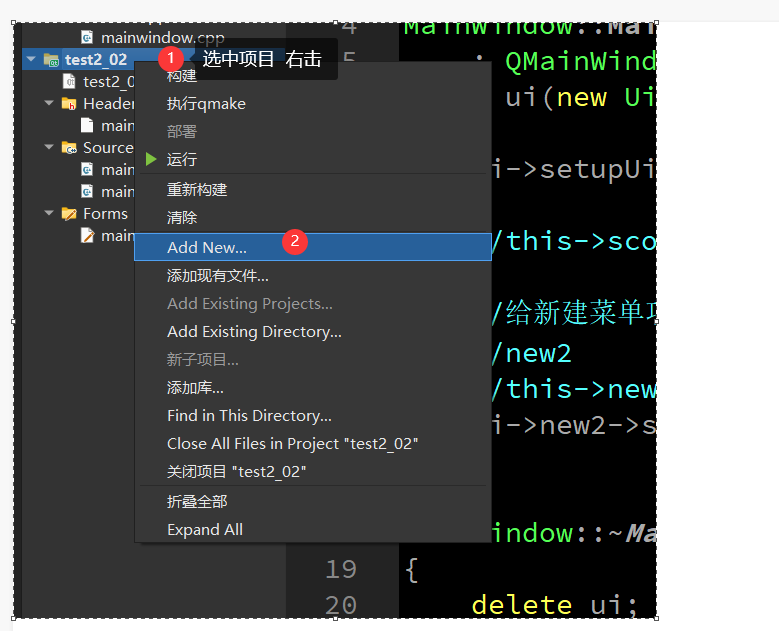
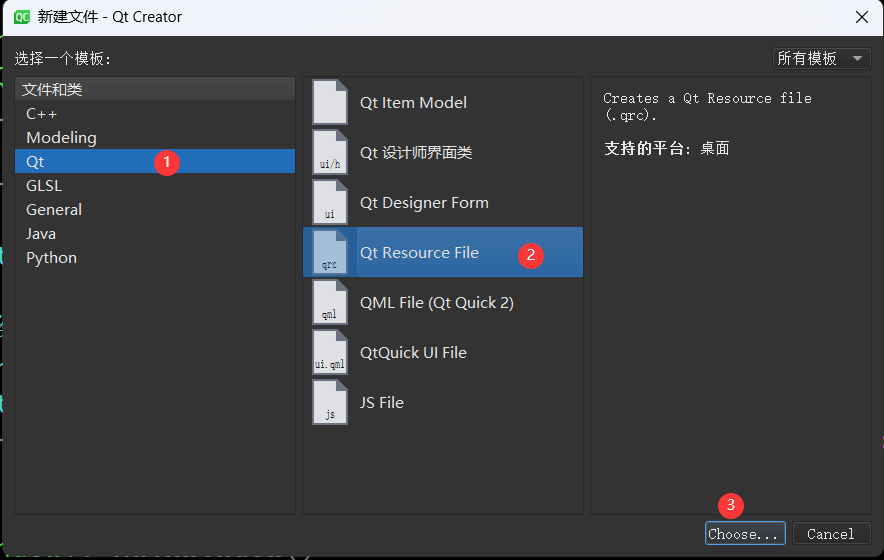
给项目增加一个资源文件,存放资源
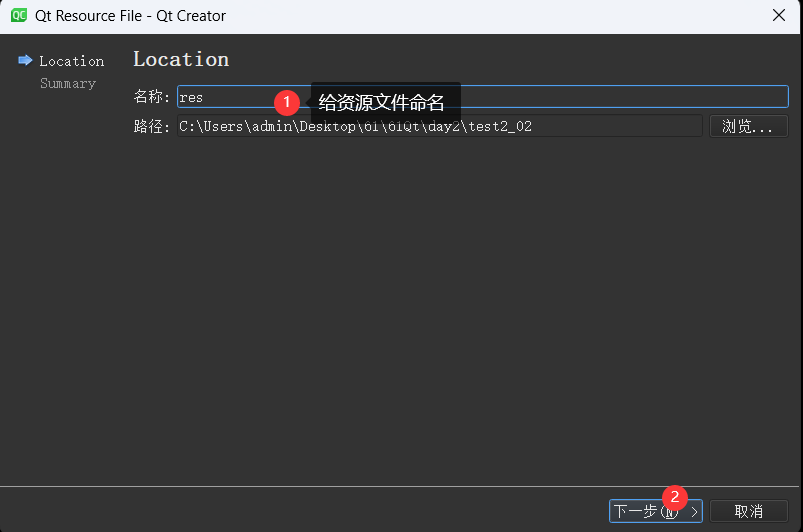
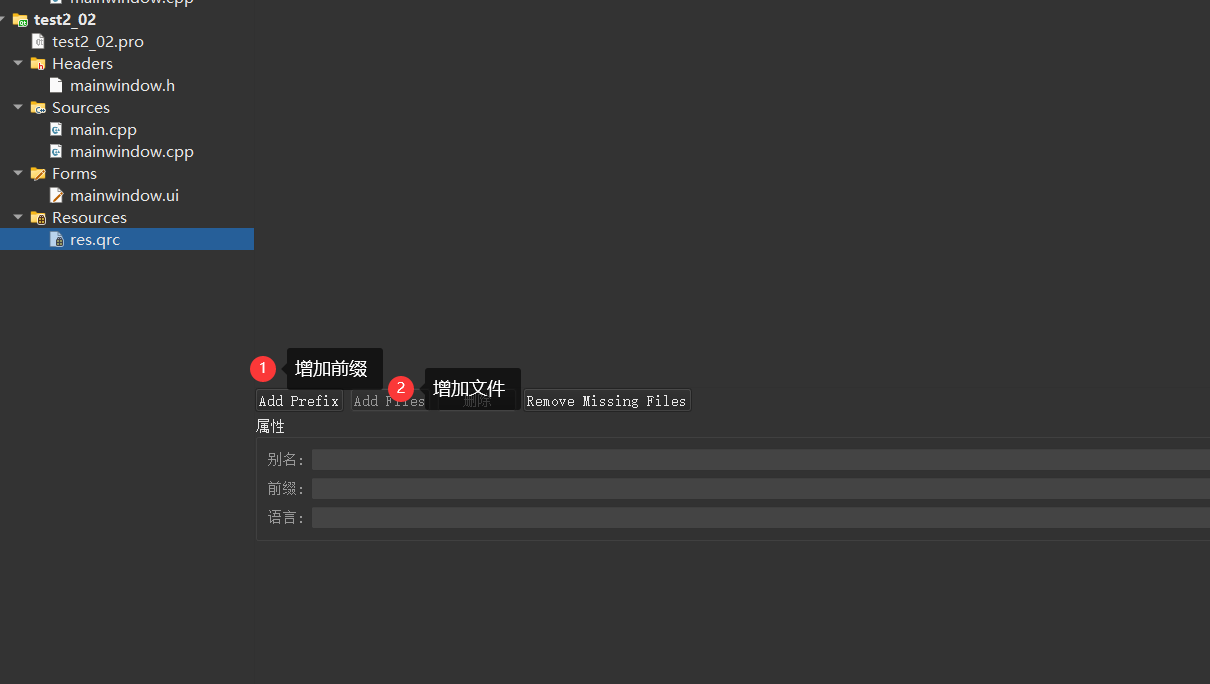
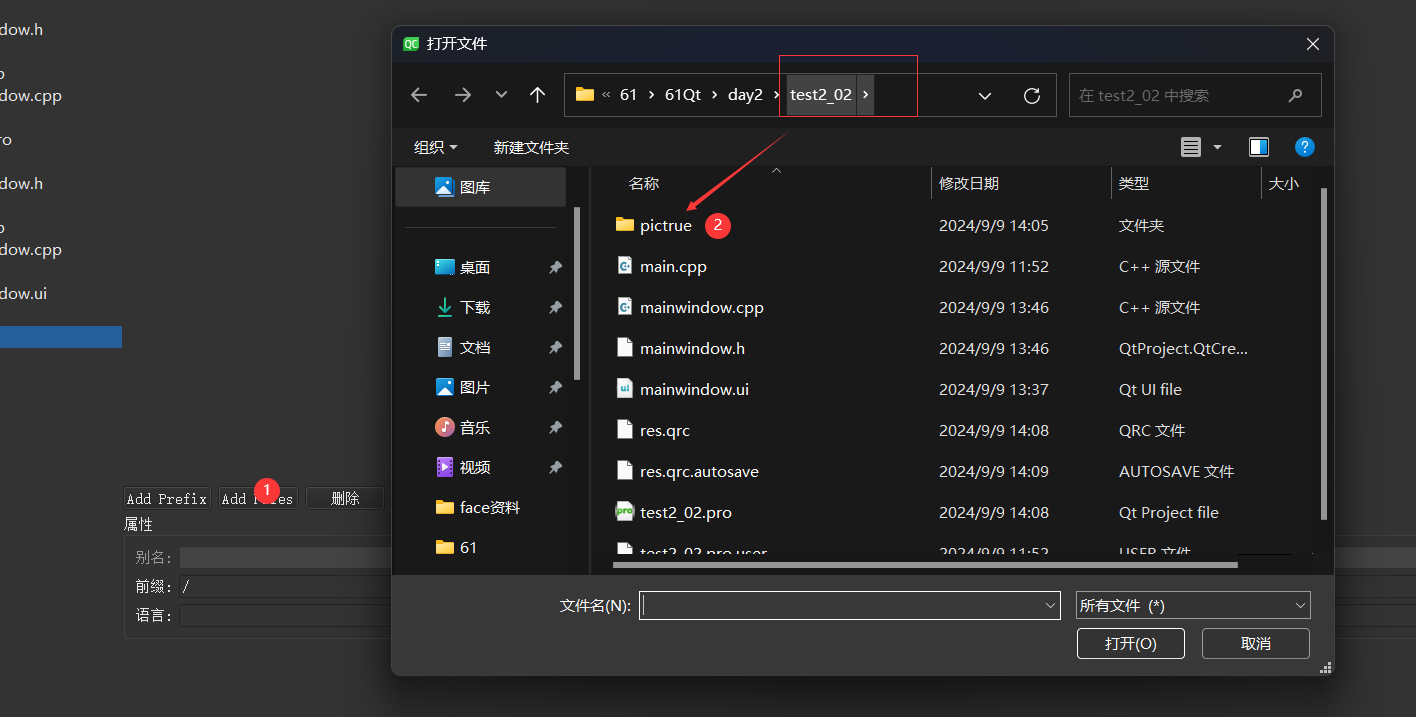
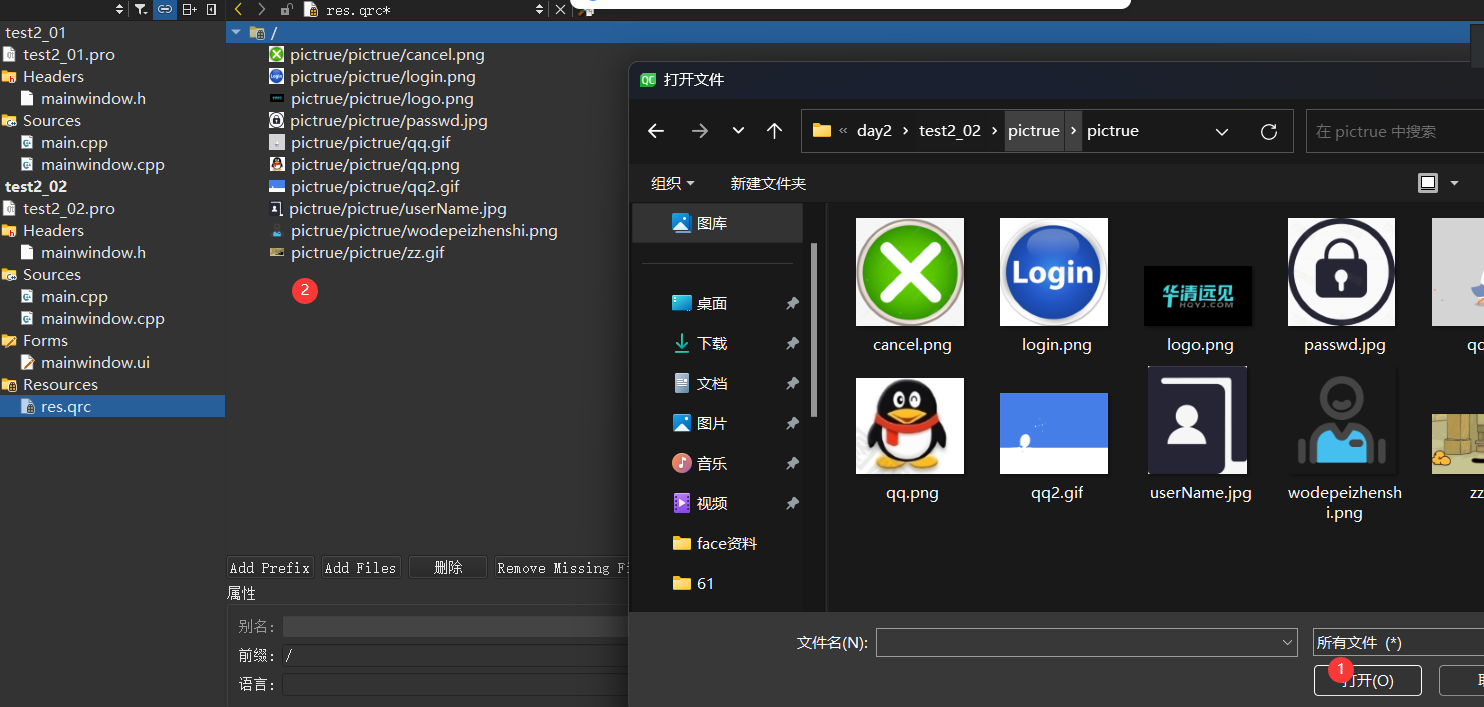
编译
登陆界面升级
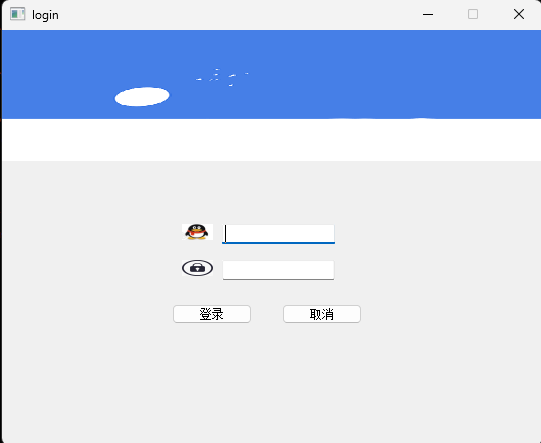
#include "login.h"
#include "ui_login.h"

login::login(QWidget *parent)
    : QWidget(parent)
    , ui(new Ui::login)
{
    ui->setupUi(this);

    QMovie *mv = new QMovie(":/pictrue/qq2.gif");
    ui->login_label->setMovie(mv);
    mv->start();
    ui->login_label->setScaledContents(true);  //使图片自适应标签

    ui->user_label->setPixmap(QPixmap(":/pictrue/qq.png"));
    ui->user_label->setScaledContents(true);  //使图片自适应标签

    ui->password_label->setPixmap(QPixmap(":/pictrue/passwd.jpg"));
    ui->password_label->setScaledContents(true);  //使图片自适应标签
    ui->password_Edit->setEchoMode(QLineEdit::Password);

}

login::~login()
{
    delete ui;
}
信号与槽
qt核心机制:对象树,信号与槽,事件机制
信号与槽是qt的核心机制之一,可以实现多个组件之间的连续(通信)
信号:信号函数,定义在类体的sginals权限下的函数,信号是一个不完整的函数,只要声明,不要实现。
槽:槽函数,定义在类体的slots权限下的函数,槽函数是一个完整的函数,既要声明又要实现。(槽函数可以当作普通函数使用)
任意一个组件都有系统提供的信号和槽
带有信号与槽的类体定义
#ifndef WIDGET_H
#define WIDGET_H

#include <QWidget>

QT_BEGIN_NAMESPACE
namespace Ui { class Widget; }
QT_END_NAMESPACE

class Widget : public QWidget
{
    Q_OBJECT

public:
    Widget(QWidget *parent = nullptr);
    ~Widget();

private:
    Ui::Widget *ui;

signals://表示在该权限下,都是信号函数(只能定义函数)
    void my_signal();

public slots://表示该权限下,都是槽函数(只能定义函数)
    void my_slot();

};
#endif // WIDGET_H
信号与槽的连接方式
方式一:基于UI界面上的连接,将UI界面上系统提供的信号与槽进行连接。(该链接方式不需要写信号函数,槽函数,连接函数)

方式二:基于UI界面上的连接,在组件上右击,转到槽,选中要发射的信号,在系统提供的槽函数框架中,书写逻辑代码(该链接方式不需要写信号函数,连接函数)
void Widget::on_close_clicked()
{
    qDebug() << "hello" << endl;
    static int num = 0;
    if(num%3 == 1)
    {
        ui->btn->setStyleSheet("background-color:red");
    }
    else if(num%3 == 2)
    {
        ui->btn->setStyleSheet("background-color:green");
    }
    else if(num%3 == 0)
    {
        ui->btn->setStyleSheet("background-color:blue");
    }
    num++;
}
方式三:手动连接信号和槽,基于qt4版本的连接,该链接是不友好的链接(该链接方式需要写连接函数,connect函数在QOject类中)
[static] QMetaObject::Connection //函数的返回值  静态成员函数
    QObject::connect( //函数名
        const QObject *sender, //组件的指针 信号的发送者
        const char *signal, //信号,由于信号是个函数,需要用函数指针,而不能用char *进行接受
        const QObject *receiver,
        const char *method,
        Qt::ConnectionType type = Qt::AutoConnection
        )
练习
将day1做的登录界面升级优化【资源文件的添加】
在登录界面的登录取消按钮进行以下设置:
使用手动连接,将登录框中的取消按钮使用第2种方式的连接到自定义的槽函数中,在自定义的槽函数中调用关闭函数
将登录按钮使用qt4版本的连接到自定义的槽函数中,在槽函数中判断ui界面上输入的账号是否为"admin",密码是否为"123456",如果账号密码匹配成功,则输出“登录成功”,并关闭该界面,如果匹配失败,则输出登录失败,并将密码框中的内容清空
头文件
#ifndef LOGIN_H
#define LOGIN_H

#include <QWidget>
#include <QMovie>
#include <QPushButton>
#include <QDebug>
#include <QString>

QT_BEGIN_NAMESPACE
namespace Ui { class login; }
QT_END_NAMESPACE

class login : public QWidget
{
    Q_OBJECT

public:
    login(QWidget *parent = nullptr);
    ~login();

public slots:
    void my_slot();
    void my_slot1();


private:
    Ui::login *ui;
    QPushButton *cancel_Button;
    QPushButton *login_Button;
};
#endif // LOGIN_H
源文件
#include "login.h"
#include "ui_login.h"

login::login(QWidget *parent)
    : QWidget(parent)
    , ui(new Ui::login)
    , cancel_Button(new QPushButton("取消",this))  //实例化cancel_Button空间
    , login_Button(new QPushButton("登录",this))  //实例化login_Button空间
{
    ui->setupUi(this);

    QMovie *mv = new QMovie(":/pictrue/qq2.gif");
    ui->login_label->setMovie(mv);
    mv->start();
    ui->login_label->setScaledContents(true);  //使图片自适应标签

    ui->user_label->setPixmap(QPixmap(":/pictrue/qq.png"));
    ui->user_label->setScaledContents(true);  //使图片自适应标签

    ui->password_label->setPixmap(QPixmap(":/pictrue/passwd.jpg"));
    ui->password_label->setScaledContents(true);  //使图片自适应标签
    ui->password_Edit->setEchoMode(QLineEdit::Password);


    login_Button->move(ui->password_label->x(),ui->password_label->y()+ui->password_label->height()+30);
    login_Button->resize(60,30);

    cancel_Button->move(login_Button->x()+login_Button->width()+30,login_Button->y());
    cancel_Button->resize(login_Button->size());

    connect(cancel_Button,SIGNAL(clicked()),this,SLOT(my_slot()));
    connect(login_Button,SIGNAL(clicked()),this,SLOT(my_slot1()));

}

login::~login()
{
    delete ui;
}

void login::my_slot()
{
    this->close();
}

void login::my_slot1()
{
    QString user,password;
    user = ui->user_Edit->text();
    password = ui->password_Edit->text();
    if(user == "admin" & password == "12345678")
    {
        qDebug() << "登陆成功" <<endl;
        this->close();
    }
    else
    {
        qDebug() << "登陆失败" <<endl;
        ui->user_Edit->clear();
        ui->password_Edit->clear();
    }
}