Shell 脚本学习
Shell学习
-
Shell 脚本
Shell 是一个用 C 语言编写的程序,它是用户使用 Linux 的桥梁。Shell 既是一种命令语言,又是一种程序设计语言。
Shell 是指一种应用程序,这个应用程序提供了一个界面,用户通过这个界面访问操作系统内核的服务。
Ken Thompson 的 sh 是第一种 Unix Shell,Windows Explorer 是一个典型的图形界面 Shell。
-
Shell环境
Shell 编程跟 JavaScript、php 编程一样,只要有一个能编写代码的文本编辑器和一个能解释执行的脚本解释器就可以了。
Linux 的 Shell 种类众多,常见的有:
- Bourne Shell(/usr/bin/sh或/bin/sh)
- Bourne Again Shell(/bin/bash)
- C Shell(/usr/bin/csh)
- K Shell(/usr/bin/ksh)
- Shell for Root(/sbin/sh)
这里我们学习的是 Bash,也就是 Bourne Again Shell,由于易用和免费 Bash 在日常工作中被广泛使用。同时,Bash 也是大多数 Linux 系统默认的 Shell。
-
编写第一个 Shell 脚本
但是我们如何在 linux 下操作文件编写脚本呢?
-
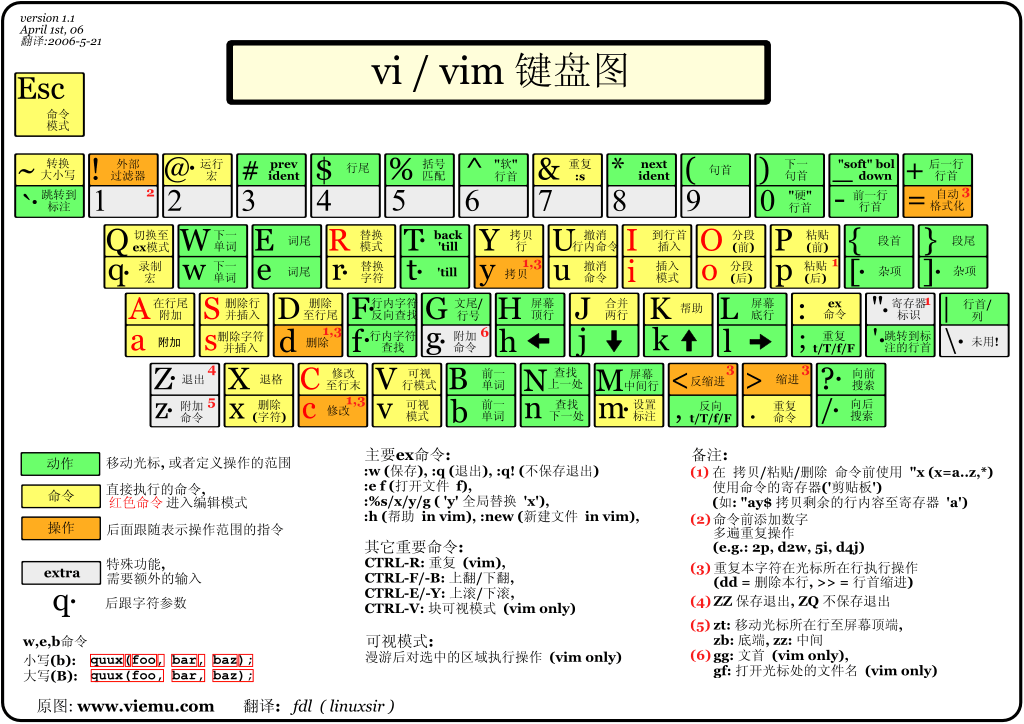
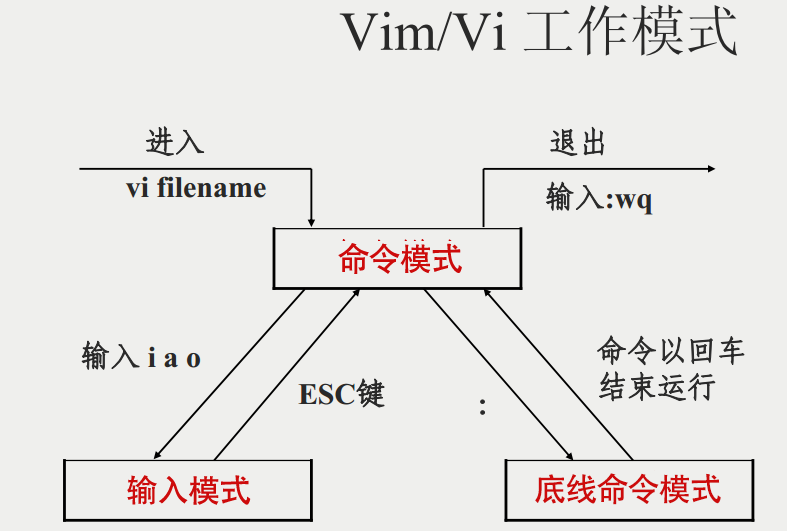
打开文本编辑器(vi/vim命令可以创建文件)
- 这里就放张图简单介绍一下,东西太多了,这里就不细说了


-
首先我们打开或创建一个目录,并使用 vim filename 的方法打开或创建一个文件进行编辑
oot@hcss-ecs-c2b8:/# cd /var
root@hcss-ecs-c2b8:/var#
# 查看当前目录下的文件和文件夹
root@hcss-ecs-c2b8:/var# ll
total 56
drwxr-xr-x 14 root root   4096 Sep 21 08:28 ./
drwxr-xr-x 24 root root   4096 Sep 20 00:12 ../
drwxr-xr-x  2 root root   4096 Sep 20 00:00 backups/
drwxr-xr-x 16 root root   4096 Jul 22  2023 cache/
drwxrwxrwt  2 root root   4096 Sep 20 06:25 crash/
drwxr-xr-x 49 root root   4096 Sep 19 23:54 lib/
drwxrwsr-x  2 root staff  4096 Apr 18  2022 local/
lrwxrwxrwx  1 root root      9 Aug  9  2022 lock -> /run/lock/
drwxrwxr-x 13 root syslog 4096 Sep 20 00:12 log/
drwxrwsr-x  2 root mail   4096 Aug  9  2022 mail/
drwxr-xr-x  2 root root   4096 Aug  9  2022 opt/
lrwxrwxrwx  1 root root      4 Aug  9  2022 run -> /run/
drwxr-xr-x  7 root root   4096 Jul 22  2023 snap/
drwxr-xr-x  4 root root   4096 Aug  9  2022 spool/
drwxr-xr-x  2 root root   4096 Sep 21 08:32 test/
drwxrwxrwt  8 root root   4096 Sep 21 08:38 tmp/
# 创建文件夹
root@hcss-ecs-c2b8:/var# mkdir test
mkdir: cannot create directory ‘test’: File exists
root@hcss-ecs-c2b8:/var# cd /test
-bash: cd: /test: No such file or directory
# 进入文件夹并用vim命令创建文件并编辑
root@hcss-ecs-c2b8:/var# cd test
root@hcss-ecs-c2b8:/var/test# vim helloworld.sh

# 编辑好使用:wq保存并退出
#!/bin/bash
echo "Hello world!"
:wq

root@hcss-ecs-c2b8:/var/test# ll
total 16
drwxr-xr-x  2 root root 4096 Sep 21 08:42 ./
drwxr-xr-x 14 root root 4096 Sep 21 08:28 ../
-rw-r--r--  1 root root   31 Sep 21 08:32 hello.sh
-rw-r--r--  1 root root   32 Sep 21 08:42 helloworld.sh
# 运行 shell 脚本
root@hcss-ecs-c2b8:/var/test# ./helloworld.sh
# 但是发现我们没有权限,为什么呢?
-bash: ./helloworld.sh: Permission denied
root@hcss-ecs-c2b8:/var/test#
不难看出我们创建的helloworld.sh文件他的权限信息为:-rw-r–r–,对于我们现在登录的root账号也就是对应的第二个到第四个"rw-"也就是仅仅只有读写的权限没有执行的权限,我们如何解决这个问题,
这里放张图简单介绍一下权限信息

-
chmod 修改文件的权限
chmod 777 filename
# 可以把九个二进制位置上有权限的值为1,那么三个一组可以用一个十进制整表示最大值为7即二进制的111

# 修改文件权限
# 修改前
-rw-r--r--  1 root root   32 Sep 21 08:42 helloworld.sh
root@hcss-ecs-c2b8:/var/test# chmod 777 helloworld.sh
# 修改后
root@hcss-ecs-c2b8:/var/test# ls -al helloworld.sh
-rwxrwxrwx 1 root root 32 Sep 21 08:52 helloworld.sh
# 现在运行我们编写的文件就没问题了,当然不用 chmod 777 只需要有执行权限也可以
root@hcss-ecs-c2b8:/var/test# ./helloworld.sh
Hello world!
root@hcss-ecs-c2b8:/var/test#
# 100 对应---x------ 即 -001 000 000
root@hcss-ecs-c2b8:/var/test# chmod 100 helloworld.sh
root@hcss-ecs-c2b8:/var/test# ls -al helloworld.sh
---x------ 1 root root 32 Sep 21 08:52 helloworld.sh
同样能执行成功
root@hcss-ecs-c2b8:/var/test# ./helloworld.sh
Hello world!
root@hcss-ecs-c2b8:/var/test#
到此我们的第一个 shell 脚本也就编写完毕了
-
-
Shell 变量
- 变量的定义
在 Shell 编程中,变量是用于存储数据值的名称。
定义变量时,变量名不加美元符号($,PHP语言中变量需要),如:
your_name="runoob"
但是,有一点,变量名和等号之间不能有空格,这和我们之前的编程习惯有点区别
# 如果中间有空格,bash会把他等号以及之前的部分认为是一个命令,但这个命令也不存在就会报错
root@hcss-ecs-c2b8:/var/test# my_name= "zhengnan"
zhengnan: command not found
且需要遵守以下原则:
- 只包含字母、数字和下划线: 变量名可以包含字母(大小写敏感)、数字和下划线 _,不能包含其他特殊字符。
- 不能以数字开头: 变量名不能以数字开头,但可以包含数字。
- 避免使用 Shell 关键字: 不要使用Shell的关键字(例如 if、then、else、fi、for、while 等)作为变量名,以免引起混淆。
- 使用大写字母表示常量: 习惯上,常量的变量名通常使用大写字母,例如 PI=3.14。
- 避免使用特殊符号: 尽量避免在变量名中使用特殊符号,因为它们可能与 Shell 的语法产生冲突。
- 避免使用空格: 变量名中不应该包含空格,因为空格通常用于分隔命令和参数。
有效的 Shell 变量名示例如下:
RUNOOB="www.runoob.com"
LD_LIBRARY_PATH="/bin/"
_var="123"
var2="abc"
无效的变量命名:
# 避免使用if作为变量名
if="some_value"
# 避免使用 $ 等特殊符号
variable_with_$=42
?var=123
user*name=runoob
# 避免空格
variable with space="value"
等号两侧避免使用空格:
# 正确的赋值
variable_name=value

# 有可能会导致错误
variable_name = value
-
如何使用变量
普通变量
使用一个定义过的变量,只要在变量名前面加美元符号即可,如:
root@hcss-ecs-c2b8:/var/test# my_name=zhengNan
root@hcss-ecs-c2b8:/var/test# echo $my_name
zhengNan
root@hcss-ecs-c2b8:/var/test# my_name=zhengNan01
root@hcss-ecs-c2b8:/var/test# echo $my_name
zhengNan01
当我们给变量第N次赋值的时候都不用加美元符号’$’
变量名外面的花括号是可选的,加不加都行,加花括号是为了帮助解释器识别变量的边界,比如下面这种情况:
实例
for skill in Ada Coffe Action Java; do
echo "I am good at ${skill}Script"
done
如果不给skill变量加花括号,写成echo "I am good at $skillScript",解释器就会把$skillScript当成一个变量(其值为空),代码执行结果就不是我们期望的样子了。
推荐给所有变量加上花括号,这是个好的编程习惯。
只读变量
使用 readonly 命令可以将变量定义为只读变量,只读变量的值不能被改变。
下面的例子尝试更改只读变量,结果报错:
root@hcss-ecs-c2b8:/var/test# only_read_variable="My birthday"
root@hcss-ecs-c2b8:/var/test# my_birthday="20010101"
root@hcss-ecs-c2b8:/var/test# readonly my_birthday
# 这里就算你赋值和原来一样也不行,只能读取,不能赋值
root@hcss-ecs-c2b8:/var/test# my_birthday="20010101"
-bash: my_birthday: readonly variable
root@hcss-ecs-c2b8:/var/test# my_birthday="200101011"
-bash: my_birthday: readonly variable
删除变量
使用 unset 命令可以删除变量。语法:
root@hcss-ecs-c2b8:/var/test# my_name=zhengnan
root@hcss-ecs-c2b8:/var/test# echo $my_name
zhengnan
root@hcss-ecs-c2b8:/var/test# unset my_name
root@hcss-ecs-c2b8:/var/test# echo $my_name

root@hcss-ecs-c2b8:/var/test# unset my_birthday
-bash: unset: my_birthday: cannot unset: readonly variable
需要注意的是,只读的变量无法删除会提示-bash: unset: my_birthday: cannot unset: readonly variable
变量类型
-
字符串变量
在 Shell中,变量通常被视为字符串。
你可以使用单引号 ’ 或双引号 " 来定义字符串,例如
root@hcss-ecs-c2b8:/var/test# my_name="zhengnan"
root@hcss-ecs-c2b8:/var/test# my_name='zhengnan'
root@hcss-ecs-c2b8:/var/test# echo $my_name
zhengnan
# 简单使用一下提取子字符串两参数开始提取的前一个位置和提取字符个数
root@hcss-ecs-c2b8:/# my_name=zhengnan
# 提取第1个位置开始后面五个字符
root@hcss-ecs-c2b8:/# echo ${my_name:1:5}
hengn
root@hcss-ecs-c2b8:/# echo ${my_name:0:5}
zheng
# 查找子字符串
root@hcss-ecs-c2b8:/# echo `expr index "$my_name" n`
4
root@hcss-ecs-c2b8:/# echo ${my_name:4:1}
g
root@hcss-ecs-c2b8:/# echo ${my_name:3:1}
n
# 这里用法是 expr index "变量" 目标字符串
# 返回目标字符串里面第一个第一个出现在变量里的索引
root@hcss-ecs-c2b8:/# echo `expr index "$my_name" z`
1
双引号的优点:
- 双引号里可以有变量
- 双引号里可以出现转义字符
-
整数变量
在一些Shell中,你可以使用 declare 或 typeset 命令来声明整数变量。
这样的变量只包含整数值,例如:
root@hcss-ecs-c2b8:/var/test# declare -i my_age=23
root@hcss-ecs-c2b8:/var/test# echo $my_age
23
root@hcss-ecs-c2b8:/var/test# my_age="22"
root@hcss-ecs-c2b8:/var/test# echo $my_age
22
root@hcss-ecs-c2b8:/var/test# my_age="qwe"
root@hcss-ecs-c2b8:/var/test# echo $my_age
0
# 我们给my_age赋值一个不能转换的成整数的值,那么他就会变成默认值0
root@hcss-ecs-c2b8:/var/test# my_age="zheng"
root@hcss-ecs-c2b8:/var/test# echo $my_age
0
# 我们重新赋值一个可以成功转化的值那么就能正常赋值
root@hcss-ecs-c2b8:/var/test# my_age="123123"
root@hcss-ecs-c2b8:/var/test# echo $my_age
123123
这样的声明告诉 Shell 将 my_integer 视为整数,如果尝试将非整数值赋给它,Shell会尝试将其转换为整数,如果无法转换成整数那么他的值就会变成0
-
Shell 数组
bash支持一维数组(不支持多维数组),并且没有限定数组的大小。
类似于 C 语言,数组元素的下标由 0 开始编号。获取数组中的元素要利用下标,下标可以是整数或算术表达式,其值应大于或等于 0。
# 在 Shell 中,用括号来表示数组,数组元素用"空格"符号分割开,我们之前学习的大部分数组都是逗号隔开。定义数组的一般形式为: # 数组名=(值1 值2 ... 值n) # 例如 # array_name=(value0 value1 value2 value3) root@hcss-ecs-c2b8:/# language_array=(Java C C++ Erlang Ruby Rust) # # 取得数组元素的个数 root@hcss-ecs-c2b8:/# length=${#language_array[@]} root@hcss-ecs-c2b8:/# echo $length 6 root@hcss-ecs-c2b8:/# length=${#language_array[*]} root@hcss-ecs-c2b8:/# echo $length 6 # root@hcss-ecs-c2b8:/# length=${#language_array[n]} 获取索引为n的元素的长度 root@hcss-ecs-c2b8:/# length=${#language_array[1]} root@hcss-ecs-c2b8:/# echo $length 1 root@hcss-ecs-c2b8:/# length=${#language_array[2]} root@hcss-ecs-c2b8:/# echo $length 3 root@hcss-ecs-c2b8:/# length=${#language_array[0]} root@hcss-ecs-c2b8:/# echo $length 4 root@hcss-ecs-c2b8:/# -
Shell 注释
以 # 开头的行就是注释,会被解释器忽略。
通过每一行加一个 # 号设置多行注释,像这样:
#--------------------------------------------
# 这是一个注释
# author:郑楠
# site:www.jessamine.com
# slogan:学的不仅是技术,更是梦想!
#--------------------------------------------
##### 用户配置区 开始 #####
#
#
# 这里可以添加脚本描述信息
#
#
##### 用户配置区 结束  #####
多行注释
使用 Here 文档多行注释还可以使用以下格式:
:<<EOF
注释内容...
注释内容...
注释内容...
EOF
以上例子中,: 是一个空命令,用于执行后面的 Here 文档,<<‘EOF’ 表示开启 Here 文档,COMMENT 是 Here 文档的标识符,在这两个标识符之间的内容都会被视为注释,不会被执行。
EOF 也可以使用其他符号:实例
: <<'COMMENT'
这是注释的部分。
可以有多行内容。
COMMENT

:<<'
注释内容...
注释内容...
注释内容...
'

:<<!
注释内容...
注释内容...
注释内容...
!
# 在控制台中的效果就是这样
root@hcss-ecs-c2b8:/# :<<'COMMENT'
> 23123
>
> 321
> 23
> 123123
>
> COMMENT
root@hcss-ecs-c2b8:/# :<<1
> 123123
> 123
> 1
root@hcss-ecs-c2b8:/# 23
123: command not found
root@hcss-ecs-c2b8:/# :<<comment_tage
> comment-context
> comment-context-line2
> comment_tag
>
> comment_tage
直接使用 : 号
我们也可以使用了冒号 : 命令,并用单引号 ’ 将多行内容括起来。由于冒号是一个空命令,这些内容不会被执行。
格式为:: + 空格 + 单引号。
实例
: '
这是注释的部分。
可以有多行内容。
'
