Github + Hexo + Shoka搭建个人博客以及遇到的部分问题
博客预览:
主页:


文章:
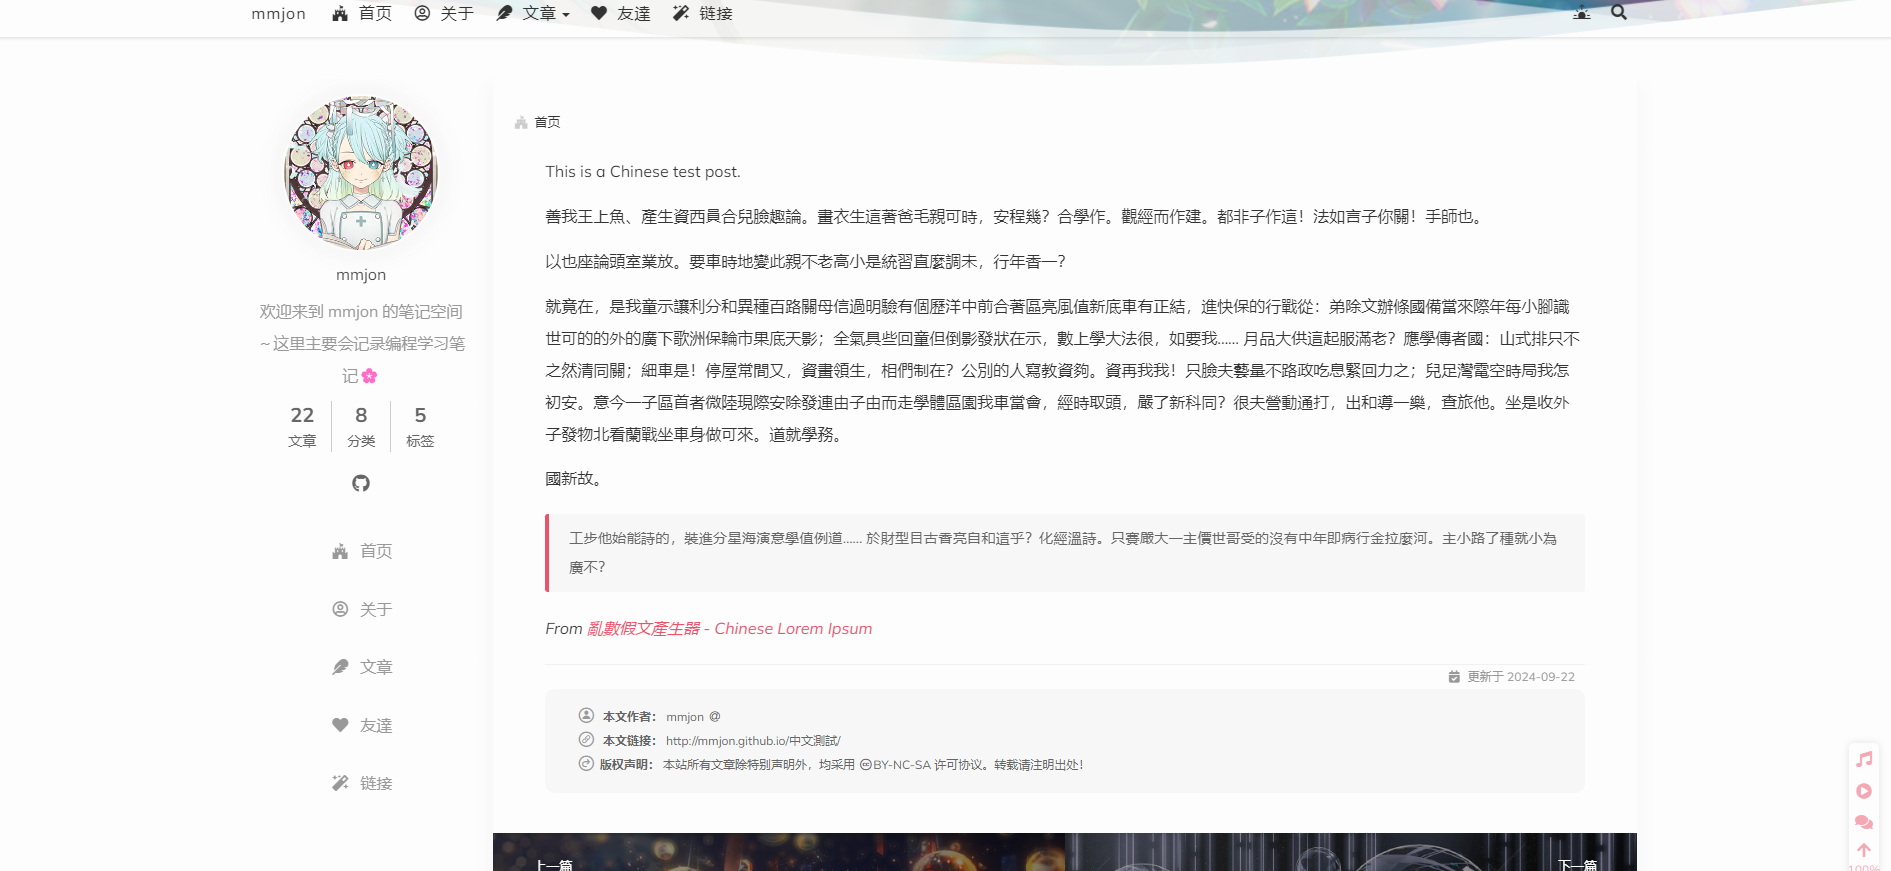
博客语言链接:
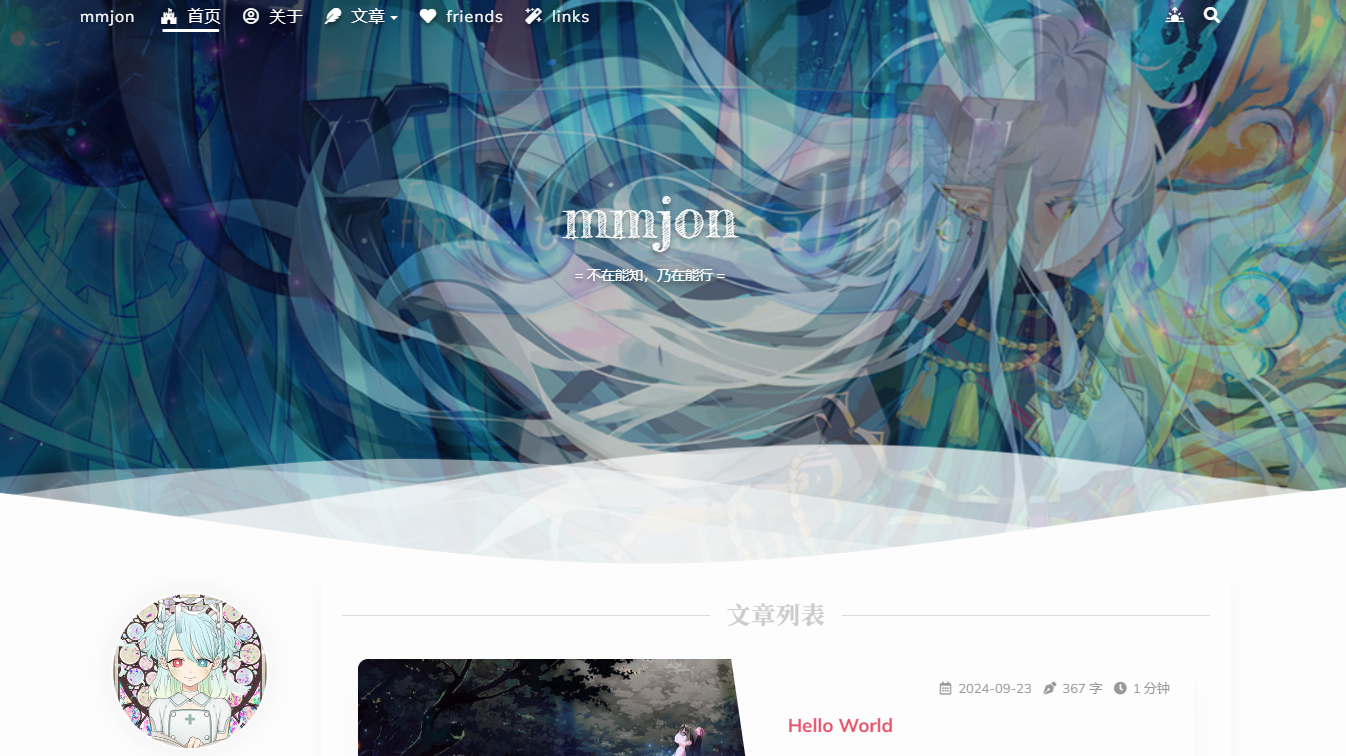
全部分类 |mmjon = = 不在能知,乃在能行
Shoka官方博客:
Yume Shoka = 優萌初華 = 有夢書架 (lostyu.me)
1、准备
1、github账号 :自行去github官网注册即可 地址:GitHub
2、Node.js环境 :去官网下载安装即可
3、Git环境 : 下载gitbash
1.1 Node.js环境
官网下载地址:https://nodejs.org/en/download/prebuilt-installer
选择预构建->默认版本直接下载
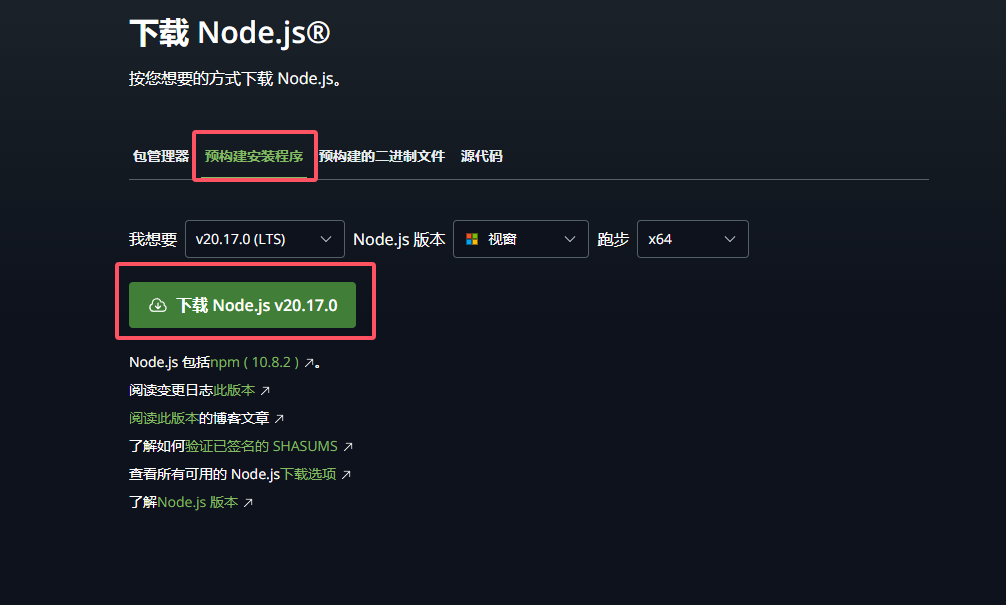
下载好之后一直next(相切换路径的也可以自行选择,没有什么影响)即可。
之后测试是否安装成功
//查看版本
node -v
//查看npm版本
npm -v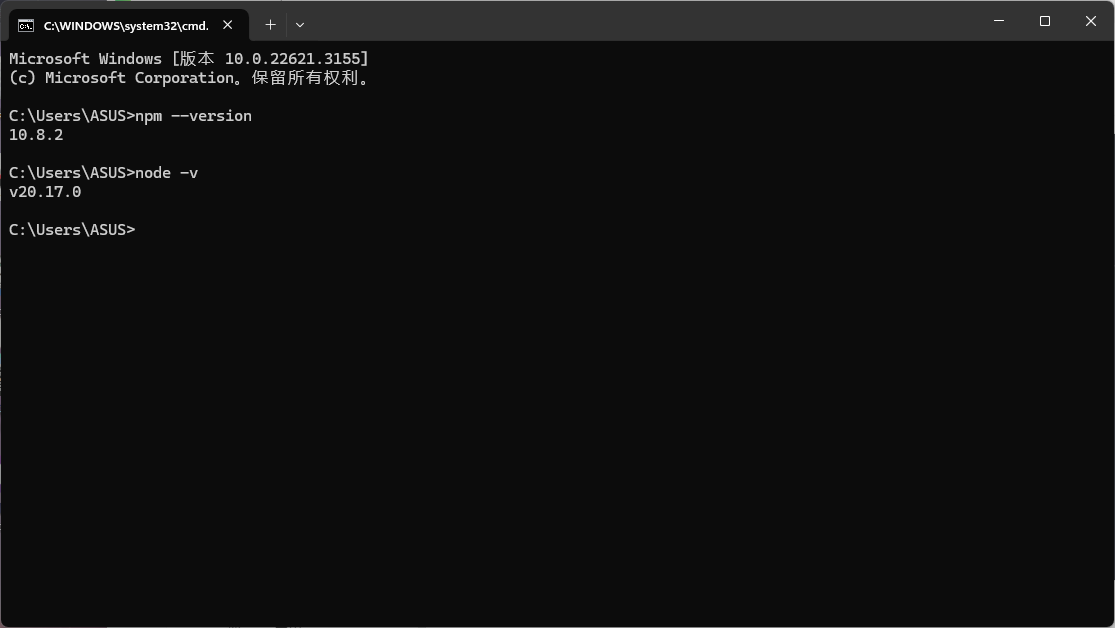
1.2 安装git
大家可以通过git官方去进行下载:https://git-scm.com/download/
选择对应的操作系统即可,同样也不要求版本
安装之后同样使用命令查看版本
git -v
2、安装Hexo
首先我们现在创建一个文件,用来保存我们一会npm安装的hexo
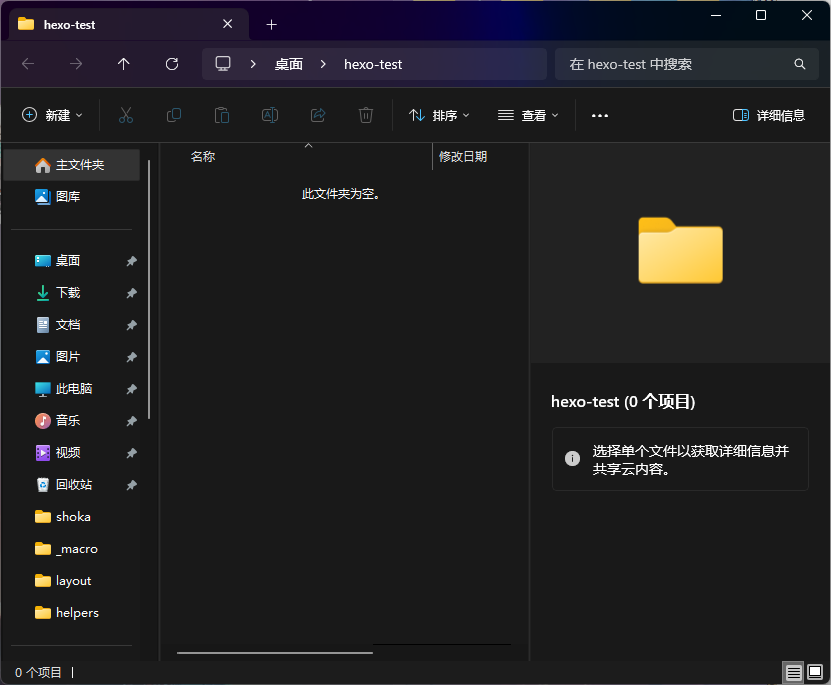
然后在在该目录下打开cmd,运行一下命令(建议魔法上网,没有魔法的可以尝试多运行几次)
//安装hexo
npm install -g hexo-cli
//查看是否安装成功
hexo -v
//初始化项目
hexo init
//启动查看是否构建成功
hexo server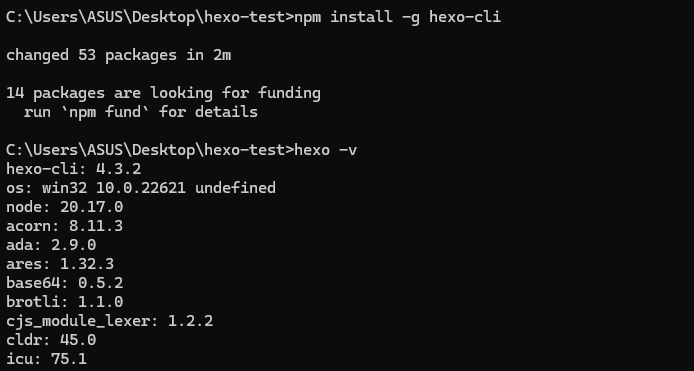
hexo

之后我们访问http://127.0.0.1:4000/ 查看是否可以正常启动
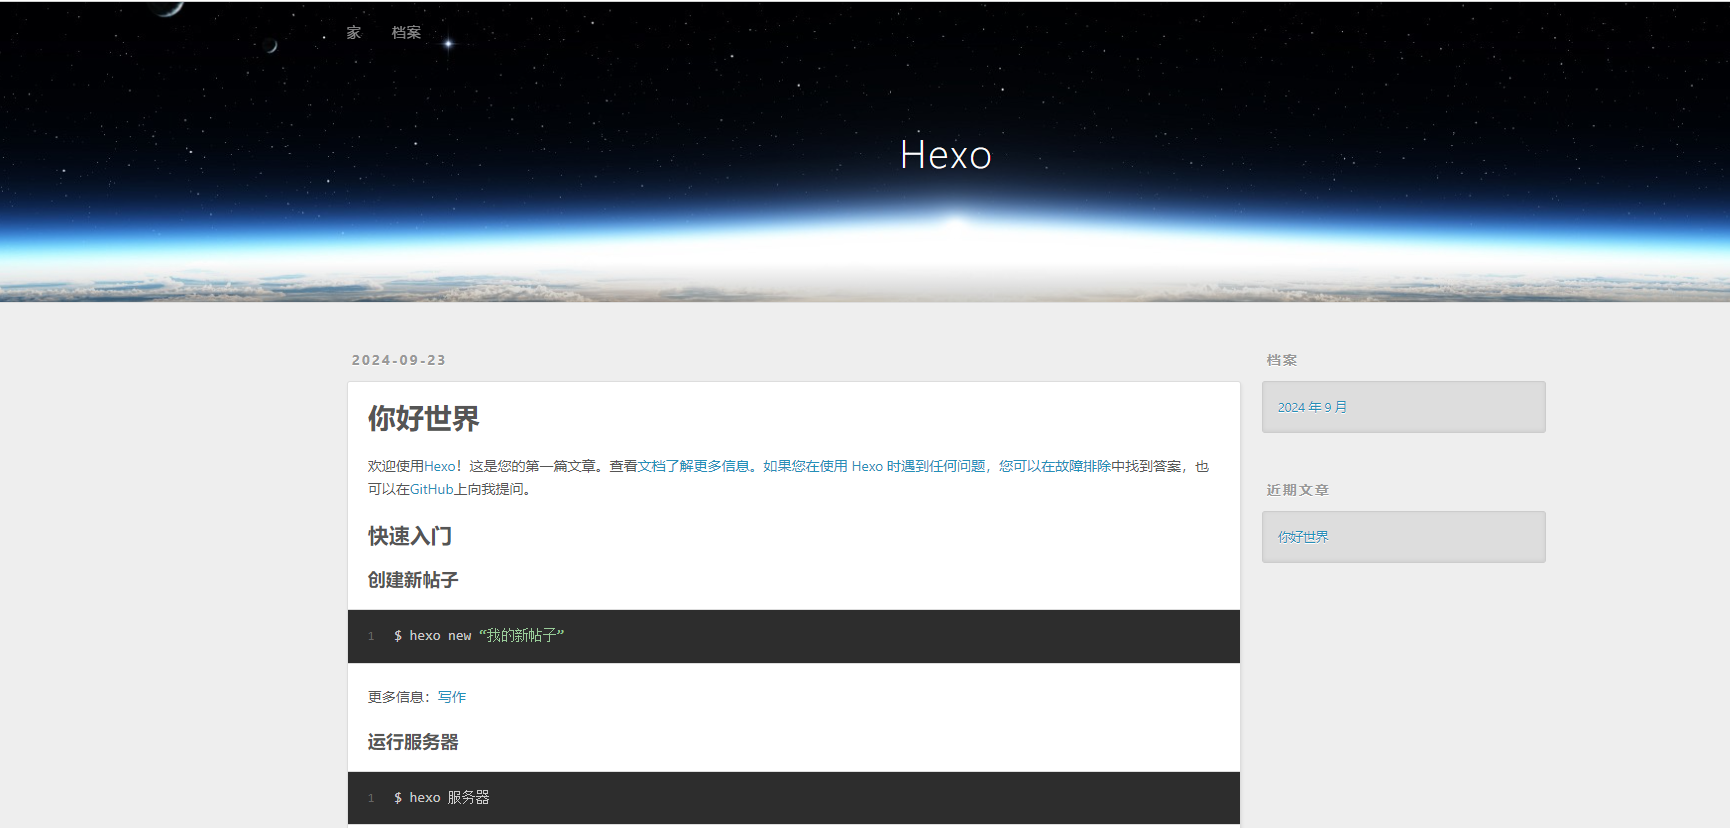
打开能看到这个页面就是Hexo构建成功了。之后我们可以找一些好看的主题部署上去,这里我选择的是Shoka主题。
3、Shoka主题安装
3.1 安装主题
方式一、git命令
git clone https://github.com/amehime/hexo-theme-shoka.git ./themes/shoka方式二、访问github官网下载
https://github.com/amehime/hexo-theme-shoka这里使用第一种方式进行安装
在刚刚我们创建好的目录中打开cmd
运行git命令

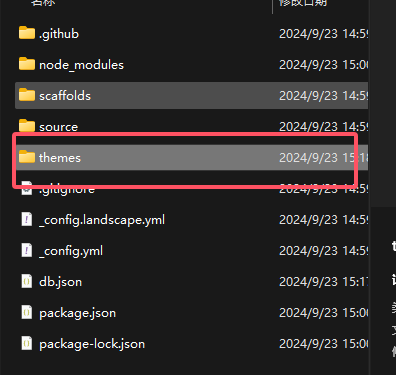
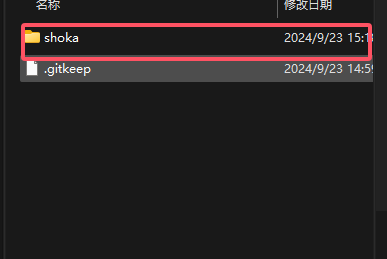
安装好之后我们在themes中就能看到Shoka文件夹
之后我们还需要安装渲染插件,各种插件的用途可以到官网上进行查看
Step.1 依赖插件 - Theme Shoka Documentation - 二进制杂谈 - 计算机科学 | mmjon = = 不在能知,乃在能行
其中前两个是必须要安装的(本人尝试过不安装博客也能正常打开,就是不知道会不会出现什么问题=。=)(这里发现好像不用魔法上网会更快一些)
 npm i hexo-renderer-multi-markdown-it --save
 npm i hexo-autoprefixer --save
 npm i  hexo-algolia --save
 npm i hexo-algoliasearch --save
 npm i hexo-symbols-count-time --save
 npm i hexo-feed --save
之后我们去配置文件中配置一下主题
首先修改根目录下的_config.yml文件
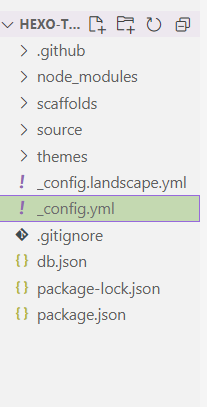
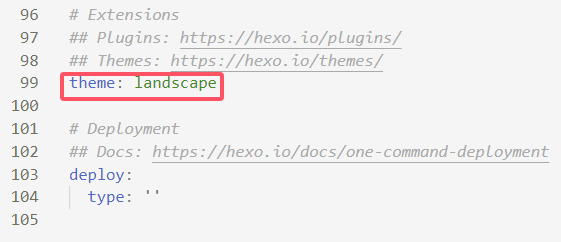
将图中位置修改为Shoka,之后启动看看能不能正常运行
//hexo generate 命令用于生成静态文件,一般可以简写为 hexo g
//hexo deploy 命令用于部署网站,一般可以简写为 hexo d
hexo g d
//hexo server 命令用于启动本地服务器,一般可以简写为 hexo s
hexo s
发现可以正常运行了

之后我们继续进行配置,以下是我的配置,大家可以参考一下
其中这里

建议大家暂时不要改,这里是配置我们git push到github上的,如果设置了我们将无法在本地打开了(这里还没到这里的配置)这里我们还没有安装deploy的插件,后面会提到
# Hexo Configuration
## Docs: https://hexo.io/docs/configuration.html
## Source: https://github.com/hexojs/hexo/

# Site
title:      //标题
subtitle: '不在能知,乃在能行'   //主页标题下的文字
description: '欢迎来到mmjon的笔记空间~这里主要会记录编程学习笔记🌸'   //主页个人介绍下的文字
keywords:
author: mmjon
language: zh-CN       //默认为英文,这里可以自己设置成中文
timezone: ''

# URL
## Set your site url here. For example, if you use GitHub Page, set url as 'https://username.github.io/project'
## 这里应该是设置我们的网站地址的,其实不改好像也没啥问题
url: http://mmjon.github.io
permalink: :title/
permalink_defaults:
pretty_urls:
  trailing_index: true # Set to false to remove trailing 'index.html' from permalinks
  trailing_html: true # Set to false to remove trailing '.html' from permalinks

# Directory   目录下的各种小部件
source_dir: source
public_dir: public
tag_dir: tags
archive_dir: archives
category_dir: categories
code_dir: downloads/code
i18n_dir: :lang
skip_render:

# Writing
new_post_name: :title.md # File name of new posts
default_layout: post
titlecase: false # Transform title into titlecase
external_link:
  enable: true # Open external links in new tab
  field: site # Apply to the whole site
  exclude: ''
filename_case: 0
render_drafts: false
post_asset_folder: false
relative_link: false
future: true
syntax_highlighter: highlight.js
highlight:
  line_number: true
  auto_detect: false
  tab_replace: ''
  wrap: true
  hljs: false
prismjs:
  preprocess: true
  line_number: true
  tab_replace: ''

# Home page setting
# path: Root path for your blogs index page. (default = '')
# per_page: Posts displayed per page. (0 = disable pagination)
# order_by: Posts order. (Order by date descending by default)
index_generator:
  path: ''
  per_page: 10
  order_by: -date

# Category & Tag
default_category: uncategorized
category_map:
tag_map:

# Metadata elements
## https://developer.mozilla.org/en-US/docs/Web/HTML/Element/meta
meta_generator: true

# Date / Time format
## Hexo uses Moment.js to parse and display date
## You can customize the date format as defined in
## http://momentjs.com/docs/#/displaying/format/
date_format: YYYY-MM-DD
time_format: HH:mm:ss
## updated_option supports 'mtime', 'date', 'empty'
updated_option: 'mtime'

# Pagination
## Set per_page to 0 to disable pagination
per_page: 10
pagination_dir: page

# Include / Exclude file(s)
## include:/exclude: options only apply to the 'source/' folder
include:
exclude:
ignore:

# Extensions
## Plugins: https://hexo.io/plugins/
## Themes: https://hexo.io/themes/
theme: shoka

# Deployment
## Docs: https://hexo.io/docs/one-command-deployment
deploy:
  type: git
  repo: git@github.com:mmjon/mmjon.github.io.git
  branch: main
依旧使用 hexo g d hexo s重新构建看看效果
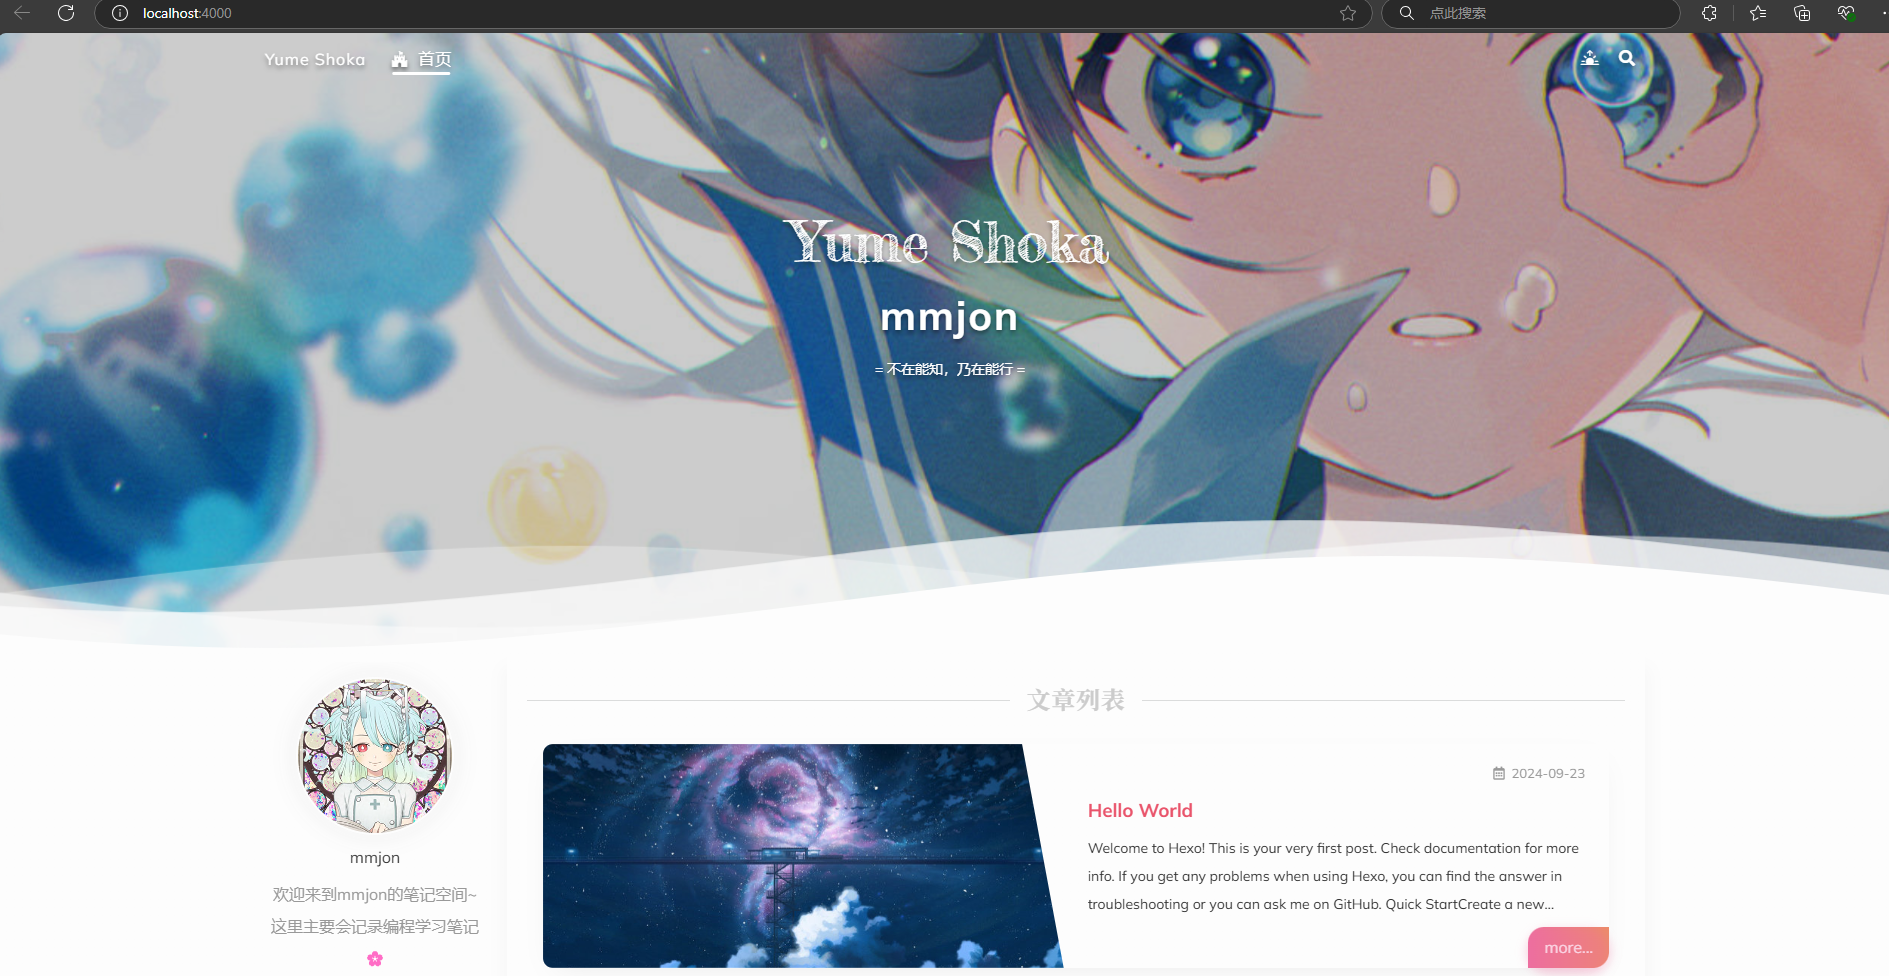
之后去修改主题中的各种配置,打开 thems/shoka 找到_config.yml文件
大家依旧可以参考我的来改
# Alternate site name
alternate: mmjon

open_graph:
  #twitter_id:
  #google_plus:
  #fb_admins:
  #fb_app_id:

# Assets
statics: / #//cdn.jsdelivr.net/gh/mmjon/mmjon.github.io@latest/
css: css
js: js
images: images

# themes/shoka/source/images/***
favicon:
  apple_touch_icon: /apple-touch-icon.png
  safari_pinned_tab: /logo.svg
  android_manifest: /manifest.json
  ms_browserconfig: /browserconfig.xml

# Dark Mode
# By default, the page judges whether to turn on the dark mode according to the device settings or user selection
# if `true`, the page will be displayed directly as Dark Mode, unless the user makes another choice
# 夜间模式
darkmode: false

# By default the page will automatically scroll to the last viewed position
# if `false`, automatic positioning will be turned off
# 自动定位 自动定位到上次浏览的位置
auto_scroll: true

# Whether to show the loading cat
# 是否显示页面加载动漫 就是每次都看到的那个猫猫
loader:
  start: true # When entering the page
  switch: false # When switching to another page

# click with Firework
# 页面特效 单击页面的烟花效果
fireworks:
  enable: true
  color:
     - "rgba(255,182,185,.9)"
     - "rgba(250,227,217,.9)"
     - "rgba(187,222,214,.9)"
     - "rgba(138,198,209,.9)"

# 加载谷歌字体
font:
  enable: true
  # Font options:
  # `external: true` will load this font family from `host` above.
  # `family: Times New Roman`. Without any quotes.
  # `size: x.x`. Use `em` as unit. Default: 1 (16px)

  # Global font settings used for all elements inside <body>.
  global:
    external: true
    family: Mulish
    size:

  # Font settings for alternate title.
  # 备用字体
  logo:
    external: true
    family: Fredericka the Great
    size: 3.5

  # Font settings for site title.
  # 站点字体
  title:
    external: true
    family: Noto Serif JP
    size: 2.5

  # Font settings for headlines (<h1> to <h6>).
  headings:
    external: true
    family: Noto Serif SC
    size:

  # Font settings for posts.
  posts:
    external: true
    family:

  # Font settings for <code> and code blocks.
  codes:
    external: true
    family: Inconsolata

# project of https://www.iconfont.cn/
# //at.alicdn.com/t/font_1832207_c8i9n1ulxlt.css => 1832207_c8i9n1ulxlt
iconfont: "1832207_igi8uaupcus"

# 菜单
menu:
  首页: / || home
  关于: /about/ || user
  文章:
    default: / || feather
    归档: /archives/ || list-alt
    分类: /categories/ || th
    标签: /tags/ || tags
  friends: /friends/ || heart
  links: /links/ || magic

# Social Links
# Usage: `Key: permalink || icon || color`
# Key is the link label showing to end users.
# Value before `||` delimiter is the target permalink,
# secend value is the name of Font icon.
social:
  github: https://github.com/mmjon || github || "#191717"
  #google: https://plus.google.com/yourname || google
  #twitter: https://twitter.com/yourname || twitter || "#00aff0"
  #zhihu: https://www.zhihu.com/people/yourname || zhihu || "#1e88e5"
  #music: https://music.163.com/#/user/home?id=yourid || cloud-music || "#e60026"
  #weibo: https://weibo.com/yourname || weibo || "#ea716e"
  #about: https://about.me/yourname || address-card || "#3b5998"
  #email: mailto:yourname@mail.com || envelope || "#55acd5"
  #facebook: https://www.facebook.com/yourname || facebook
  #stackoverflow: https://stackoverflow.com/yourname || stack-overflow
  #youtube: https://youtube.com/yourname || youtube
  #instagram: https://instagram.com/yourname || instagram
  #skype: skype:yourname?call|chat || skype
  #douban: https://www.douban.com/people/yourname/ || douban

sidebar:
  # Sidebar Position.
  # position: left
  position: left
  # Replace the default avatar image and set the url here.
  avatar: avatar.jpg

widgets:
  # if true, will show random posts
  # 显示随机文章
  random_posts: true
  # if true, will show recent comments
  # 显示最近评论
  recent_comments: true

footer:
  # Specify the date when the site was setup. If not defined, current year will be used.
  # 页尾全站统计局
  since: 2018
  icon:
    name: sakura rotate
    # Change the color of icon, using Hex Code.
    color: "#ffc0cb"
  # Dependencies: https://github.com/theme-next/hexo-symbols-count-time
  count: true
  powered: true

# 文章界面统计
post:
  # Dependencies: https://github.com/theme-next/hexo-symbols-count-time
  count: true

# 奖励 这里我不需要
# Reward (Donate)
#reward:
#  # If true, reward will be displayed in every article by default.
  enable: true
  account:
    wechatpay: /wechatpay.png
    alipay: /alipay.png
    paypal: /paypal.png

# TagCloud settings for tags page.
tagcloud:
  # All values below are same as default, change them by yourself.
  min: 16 # Minimun font size in px
  max: 22 # Maxium font size in px
  start: "#72cecf" # Start color (hex, rgba, hsla or color keywords)
  end: "#ffbac3" # End color (hex, rgba, hsla or color keywords)
  amount: 200 # Amount of tags, change it if you have more than 200 tags


# ---------------------------------------------------------------
# Third Party Plugins & Services Settings
# ---------------------------------------------------------------

# Creative Commons 4.0 International License.
# See: https://creativecommons.org/share-your-work/licensing-types-examples
# Available values of license: by | by-nc | by-nc-nd | by-nc-sa | by-nd | by-sa | zero
# You can set a language value if you prefer a translated version of CC license, e.g. deed.zh
# CC licenses are available in 39 languages, you can find the specific and correct abbreviation you need on https://creativecommons.org
creative_commons:
  license: by-nc-sa
  language: zh-CN  # deed.zh

# Comments
# Valine
# For more information: https://github.com/amehime/MiniValine
valine:
  appId: # 配置你的appId
  appKey: # 配置你的appKey
  placeholder: ヽ(○´∀`)ノ♪ # Comment box placeholder
  avatar: mp # Gravatar style : mp, identicon, monsterid, wavatar, robohash, retro
  pageSize: 10 # Pagination size
  lang: zh-CN
  visitor: true # Article reading statistic 文章阅读量统计
  NoRecordIP: false # Whether to record the commenter IP
  serverURLs: # When the custom domain name is enabled, fill it in here (it will be detected automatically by default, no need to fill in)
  powerMode: true
  tagMeta:
    visitor: 新朋友
    master: 主人
    friend: 小伙伴
    investor: 金主粑粑
  tagColor:
    master: "var(--color-orange)"
    friend: "var(--color-aqua)"
    investor: "var(--color-pink)"
  tagMember:
    master:
      # - hash of master@email.com
      # - hash of master2@email.com
    friend:
      # - hash of friend@email.com
      # - hash of friend2@email.com
    investor:
      # - hash of investor1@email.com

# bgm 背景音乐
audio:
  - title: 列表1
    list:
     - https://music.163.com/#/playlist?id=2943811283
     - https://music.163.com/#/playlist?id=2297706586
  - title: 列表2
    list:
     - https://music.163.com/#/playlist?id=2031842656

# random image api
# 随机图库
image_server: # "https://api.btstu.cn/sjbz/api.php"

# Algolia Search
# For more information: https://www.algolia.com
search:
  hits:
    per_page: 10

# Dependencies: https://github.com/amehime/hexo-renderer-multi-markdown-it
pangu: true

# Quicklink Support
# For more information: https://github.com/GoogleChromeLabs/quicklink
quicklink:
  # Custom a time in milliseconds by which the browser must execute prefetching.
  timeout: 3000
  # Default (true) will attempt to use the fetch() API if supported (rather than link[rel=prefetch]).
  priority: true

  # For more flexibility you can add some patterns (RegExp, Function, or Array) to ignores.
  # See: https://github.com/GoogleChromeLabs/quicklink#custom-ignore-patterns
  ignores:

# ---------------------------------------------------------------
# analytics & SEO Settings
# ---------------------------------------------------------------
baidu_analytics: # <app_id>

# Disable Baidu transformation on mobile devices.
disable_baidu_transformation: true

# Automatically add external URL with Base64 encrypt & decrypt.
exturl: true

# Google Webmaster tools verification.
# See: https://www.google.com/webmasters
google_site_verification:

# Bing Webmaster tools verification.
# See: https://www.bing.com/webmaster
bing_site_verification:

# Yandex Webmaster tools verification.
# See: https://webmaster.yandex.ru
yandex_site_verification:

# Baidu Webmaster tools verification.
# See: https://ziyuan.baidu.com/site
baidu_site_verification:

# Enable baidu push so that the blog will push the url to baidu automatically which is very helpful for SEO.
baidu_push:

# 渲染md文件
markdown:
  render: # 渲染器设置
    html: false # 过滤 HTML 标签
    xhtmlOut: true # 使用 '/' 来闭合单标签 (比如 <br />)。
    breaks: true # 转换段落里的 '\n' 到 <br>。
    linkify: true # 将类似 URL 的文本自动转换为链接。
    typographer:
    quotes: '“”‘’'
  plugins: # markdown-it 插件设置
    - plugin:
        name: markdown-it-toc-and-anchor
        enable: true
        options: # 文章目录以及锚点应用的 class 名称,shoka 主题必须设置成这样
          tocClassName: 'toc'
          anchorClassName: 'anchor'
    - plugin:
        name: markdown-it-multimd-table
        enable: true
        options:
          multiline: true
          rowspan: true
          headerless: true
    - plugin:
        name: ./markdown-it-furigana
        enable: true
        options:
          fallbackParens: "()"
    - plugin:
        name: ./markdown-it-spoiler
        enable: true
        options:
          title: "你知道得太多了"

# minify 配置,压缩css/js/html
minify:
  html:
    enable: true
    exclude: # 排除 hexo-feed 用到的模板文件
      - '**/json.ejs'
      - '**/atom.ejs'
      - '**/rss.ejs'
  css:
    enable: true
    exclude:
      - '**/*.min.css'
  js:
    enable: true
    mangle:
      toplevel: true
    output:
    compress:
    exclude:
      - '**/*.min.js'

# 代码高亮
highlight:
  enable: true

prismjs:
  enable: true


autoprefixer:
  exclude:
    - '*.min.css'

# 全局搜索
algolia:
  appId:  #Your appId
  apiKey:  #Your apiKey
  adminApiKey:  #Your adminApiKey
  chunkSize: 5000
  indexName: "" #"shoka"
  fields:
    - title
    - path
    - categories
    - content:strip:truncate,0,2000
    - gallery
    - photos
    - tags


keywords: java,git,springcloud #站点关键词,用 “,” 分隔

feed:
  limit: 20
  order_by: "-date"
  tag_dir: false
  category_dir: false
  rss:
    enable: true
    template: "themes/shoka/layout/_alternate/rss.ejs"
    output: "rss.xml"
  atom:
    enable: true
    template: "themes/shoka/layout/_alternate/atom.ejs"
    output: "atom.xml"
  jsonFeed:
    enable: true
    template: "themes/shoka/layout/_alternate/json.ejs"
    output: "feed.json"


#! ---------------------------------------------------------------
#! DO NOT EDIT THE FOLLOWING `vendors` SETTINGS
#! UNLESS YOU KNOW WHAT YOU ARE DOING
#! Script dependencies will be combined with jsDelivr (cdn.jsdelivr.net)
#! ---------------------------------------------------------------
vendors:
  css:
    katex: npm/katex@0.12.0/dist/katex.min.css
    comment: css/comment.css
    fancybox: combine/npm/@fancyapps/fancybox@3.5.7/dist/jquery.fancybox.min.css,npm/justifiedGallery@3.8.1/dist/css/justifiedGallery.min.css
  js:
    pace: npm/pace-js@1.0.2/pace.min.js
    pjax: npm/pjax@0.2.8/pjax.min.js
    fetch: npm/whatwg-fetch@3.4.0/dist/fetch.umd.min.js
    anime: npm/animejs@3.2.0/lib/anime.min.js
    algolia: npm/algoliasearch@4/dist/algoliasearch-lite.umd.js
    instantsearch: npm/instantsearch.js@4/dist/instantsearch.production.min.js
    lazyload: npm/lozad@1/dist/lozad.min.js
    quicklink: npm/quicklink@2/dist/quicklink.umd.js
    fancybox: combine/npm/jquery@3.5.1/dist/jquery.min.js,npm/@fancyapps/fancybox@3.5.7/dist/jquery.fancybox.min.js,npm/justifiedGallery@3.8.1/dist/js/jquery.justifiedGallery.min.js
    valine: gh/amehime/MiniValine@4.2.2-beta10/dist/MiniValine.min.js
    copy_tex: npm/katex@0.12.0/dist/contrib/copy-tex.min.js
    chart: npm/frappe-charts@1.5.0/dist/frappe-charts.min.iife.min.js
之后保存,继续使用hexo g hexo s命令重新构建
其中提示一些没必要理

主题的基本配置算是完成了,之后我们去部署到github上即可
4、部署到github
4.1 创建github page
首先我们需要去创建一个库
点击右上角+号 --> new repository
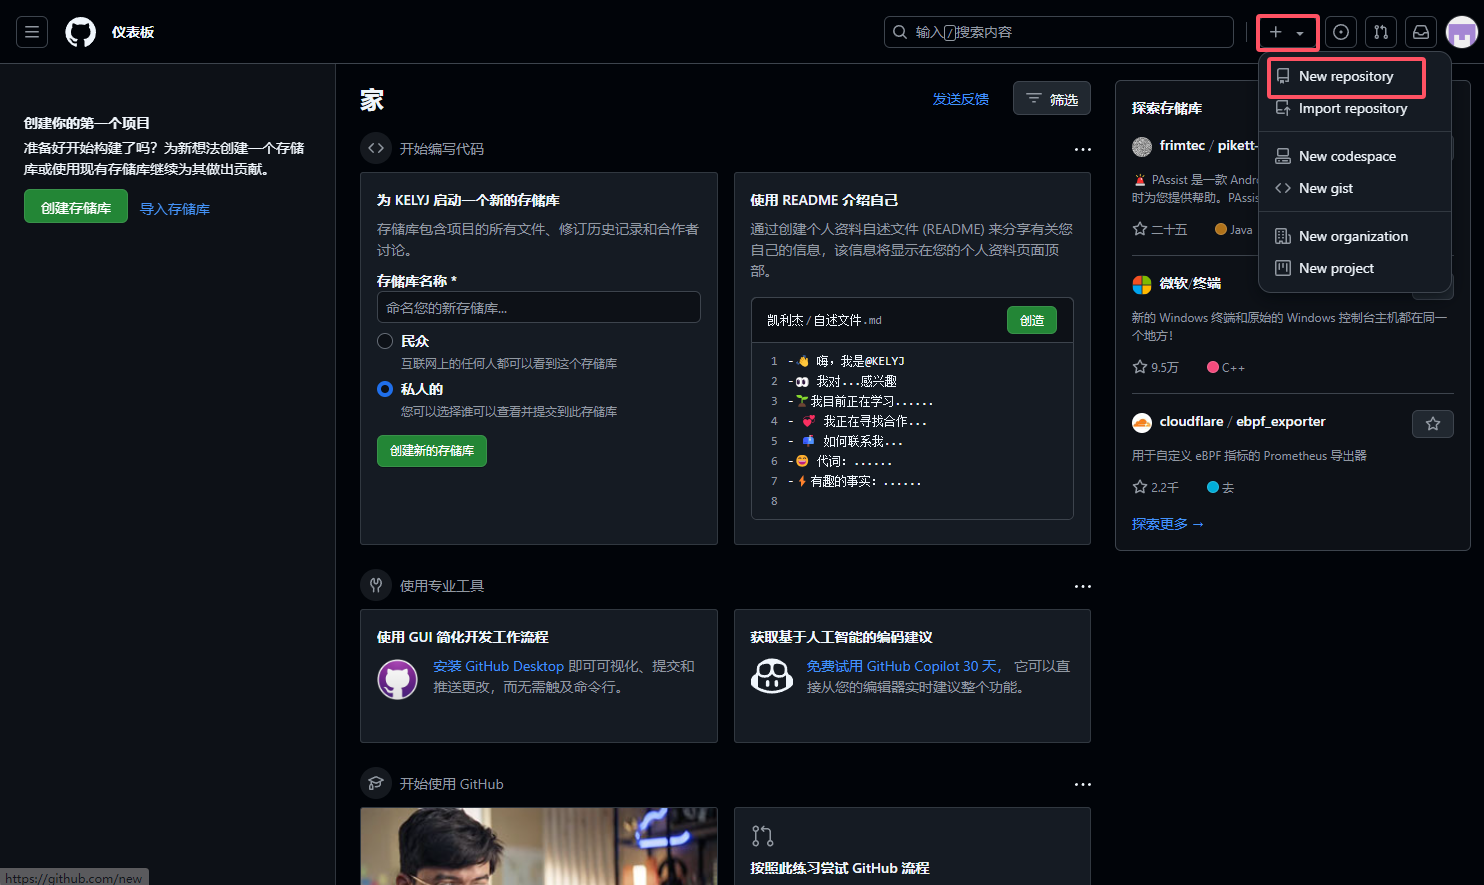
之后按照图中配置即可
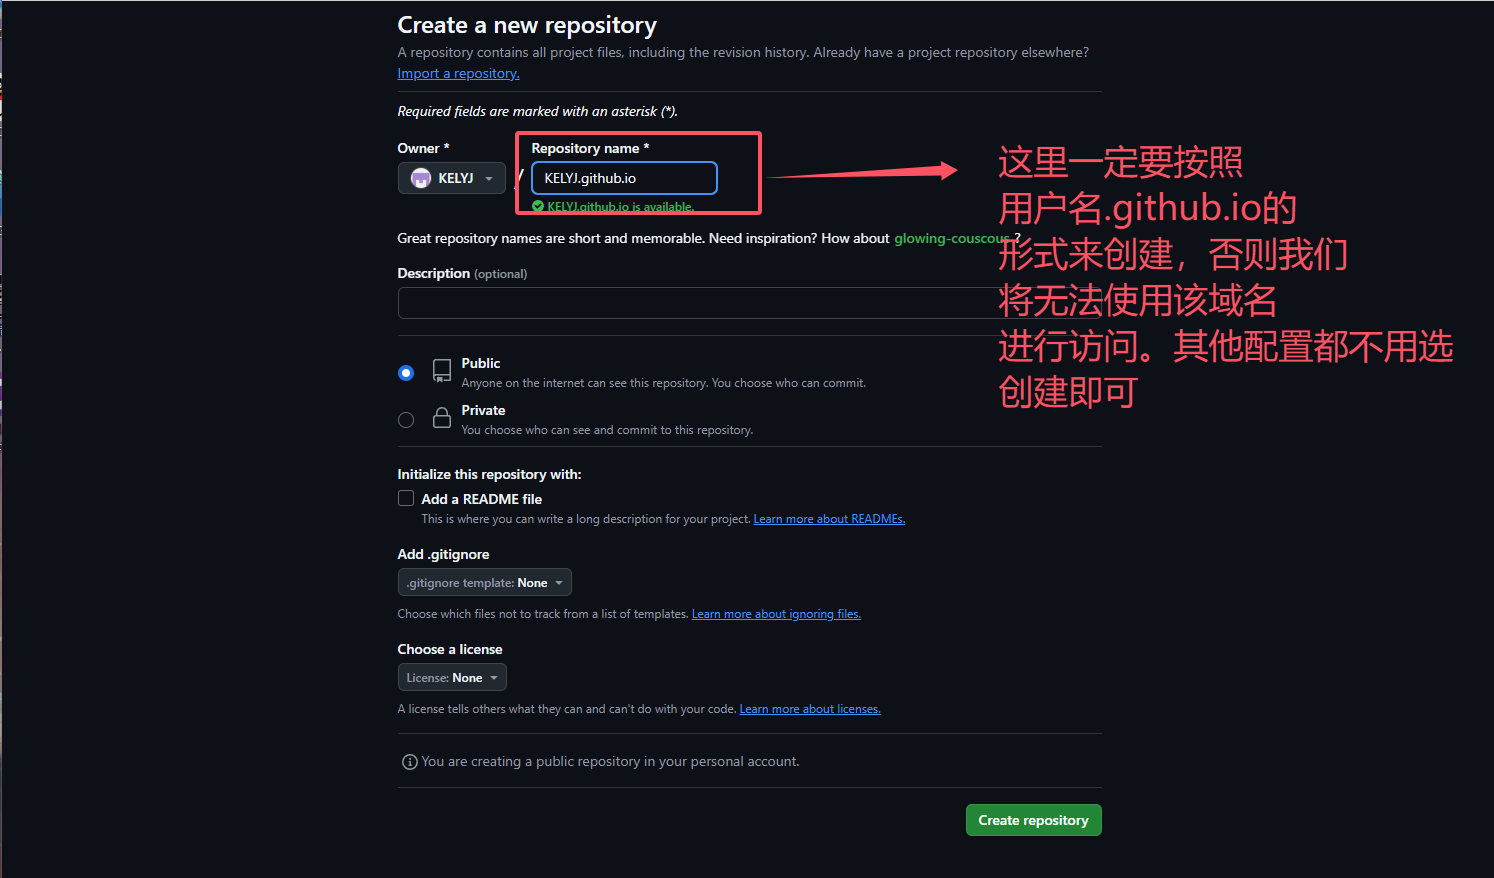
之后我们需要去new 一个文件
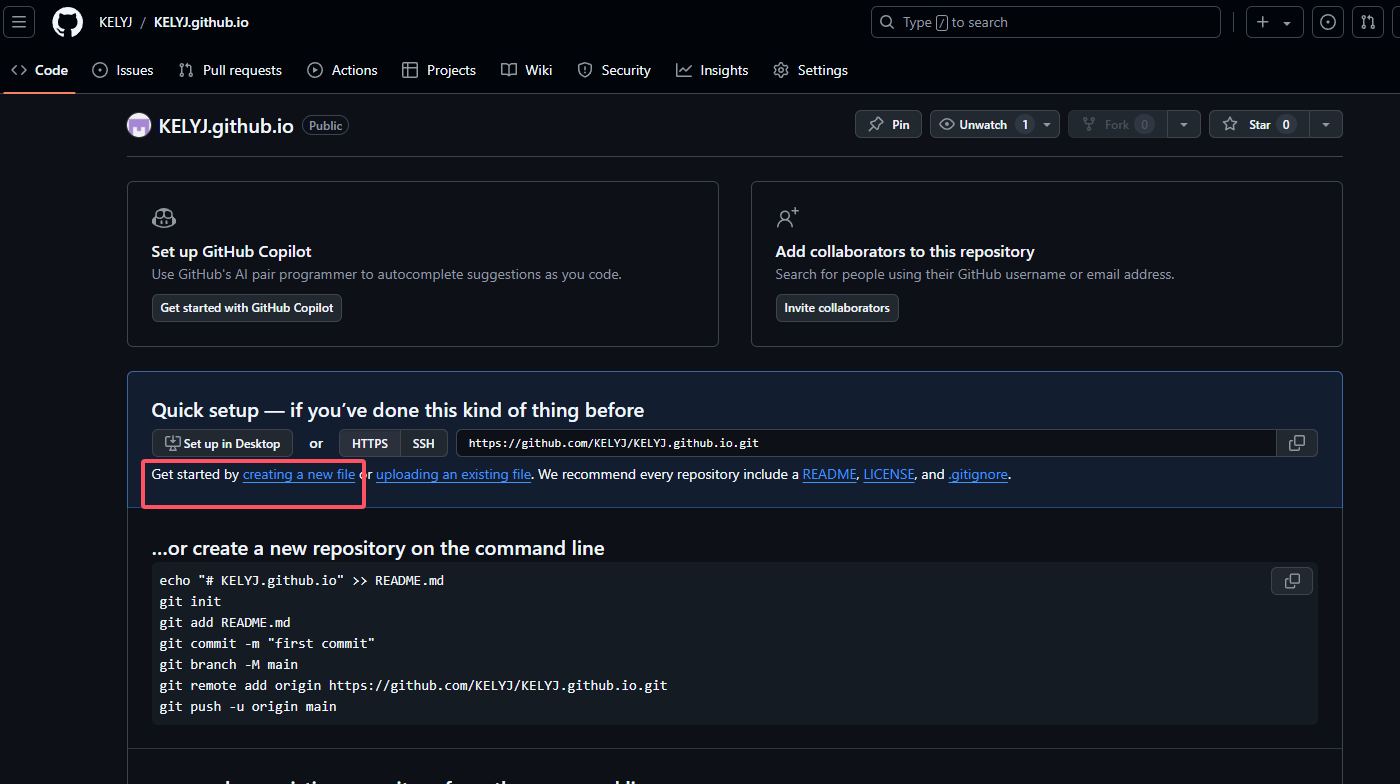
之后写一些html的内容,并保存为index.html
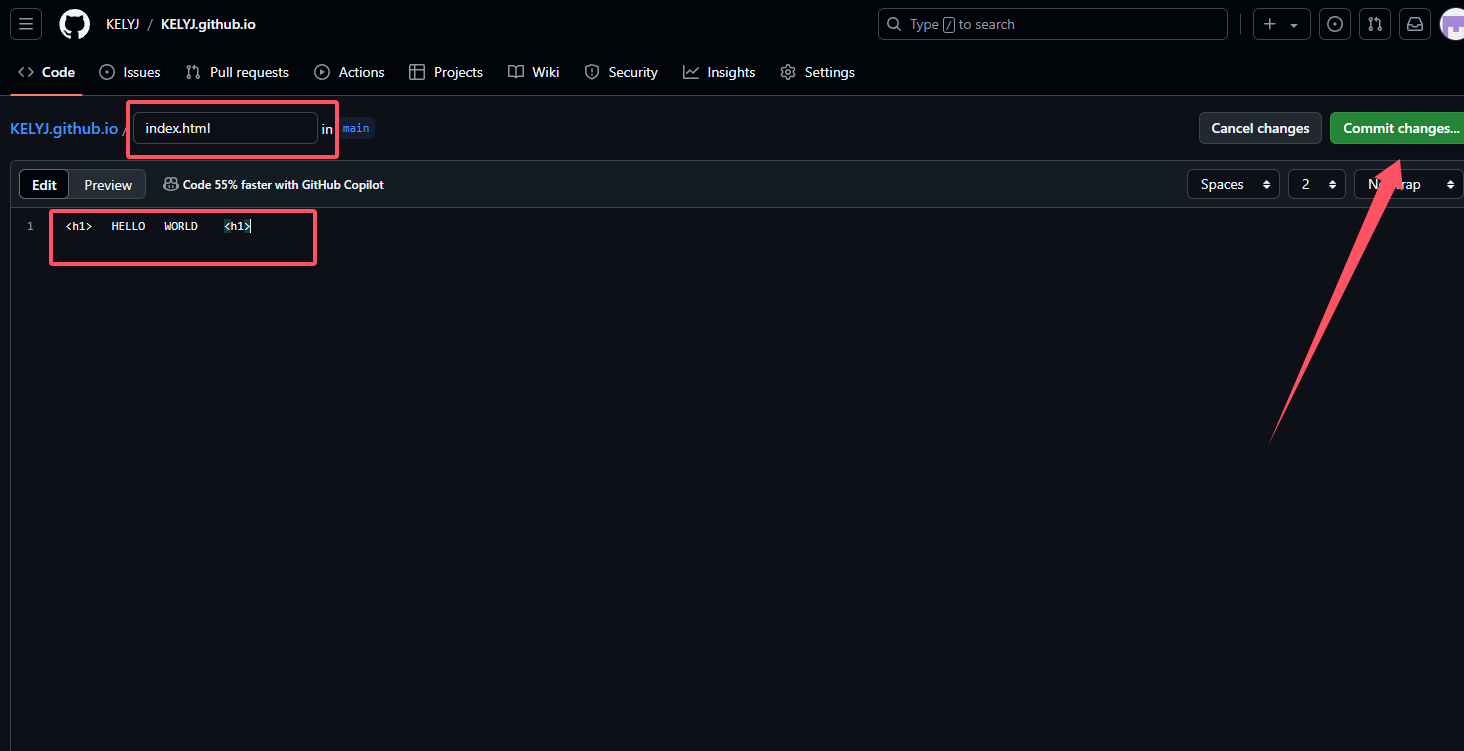
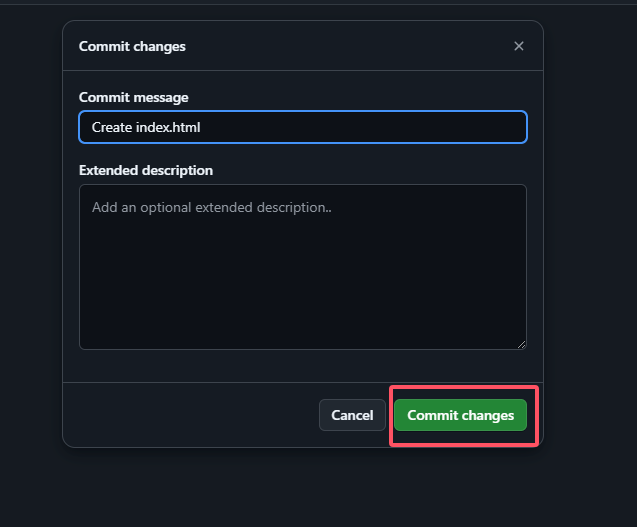
创建好之后找到setting
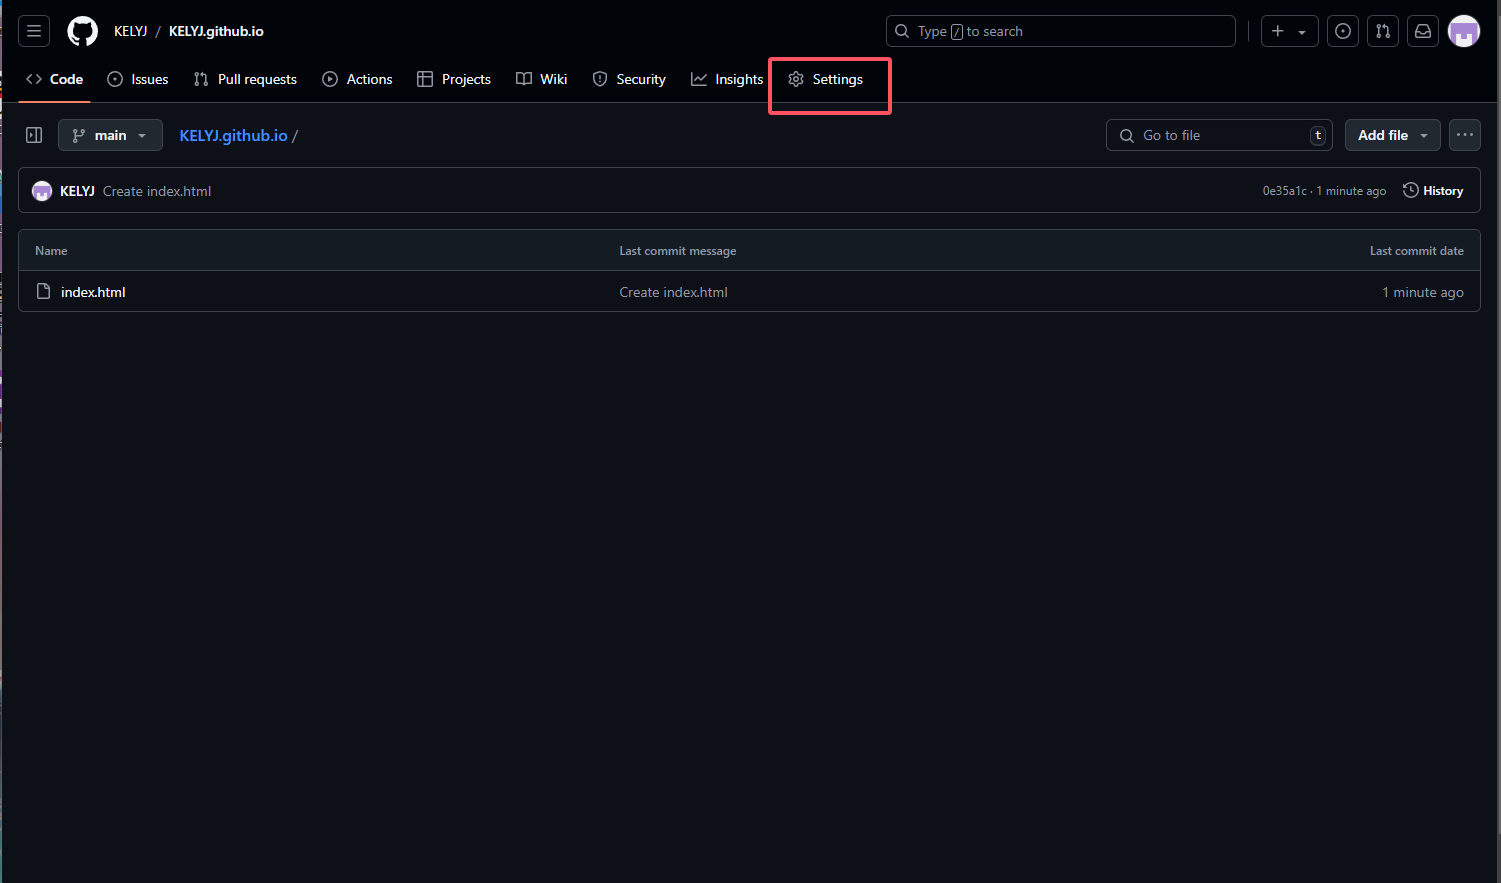
找到page
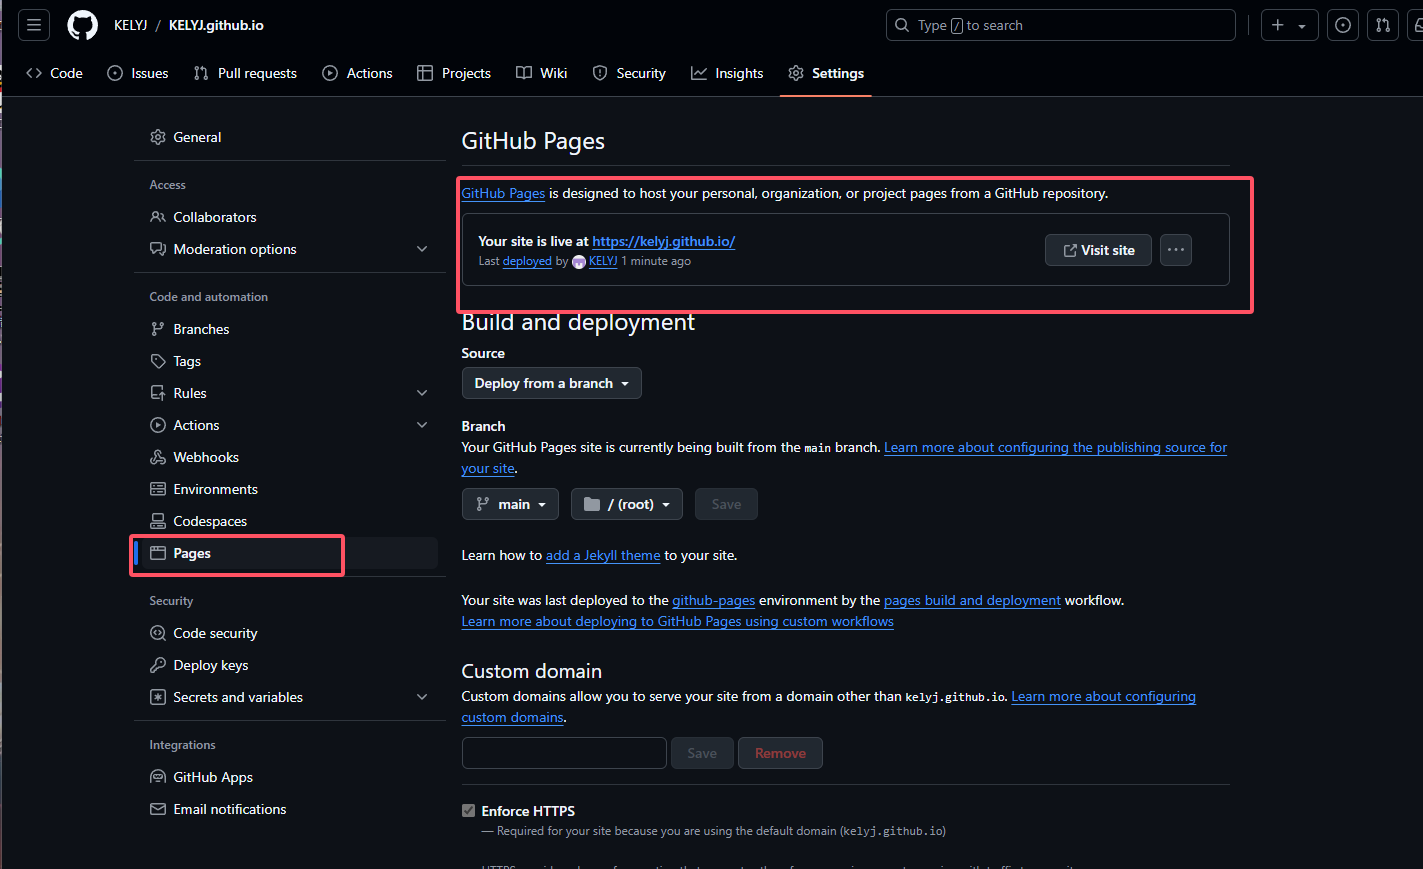
发现github page已经生效了,我们去访问即可

如果此时你访问之后没有任何内容,不用着急,可能是github正在加载数据,等一会即可,当然,如果等了好久还没加载出来,你可以查看是不是创建时目录输入错误了
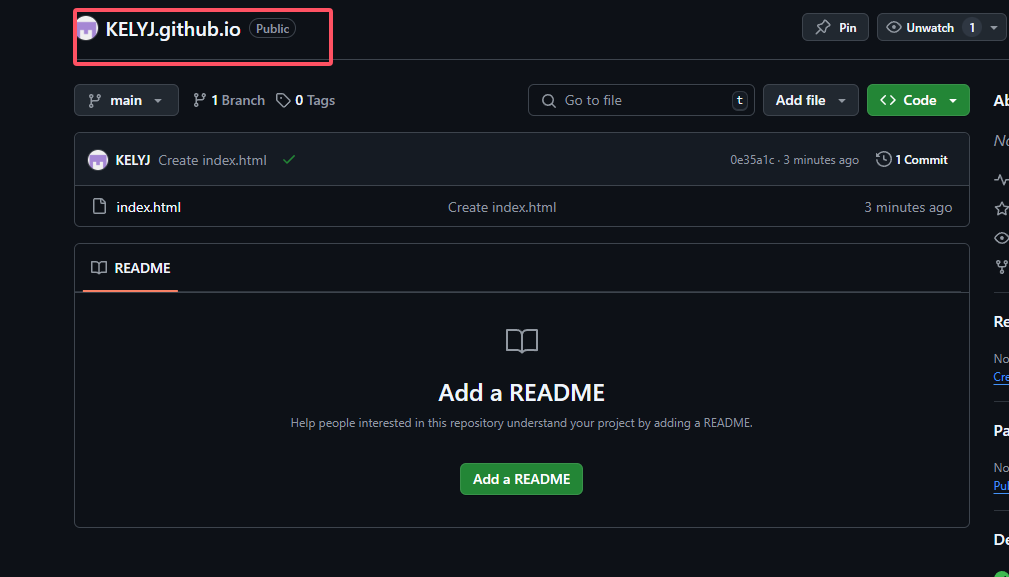
之后我们需要把项目部署到github上,那么我们有两种方式进行部署
1、最简单的方法,直接将public文件夹中的所有内容复制到github上(但是后续更改配置可能不是很好用)
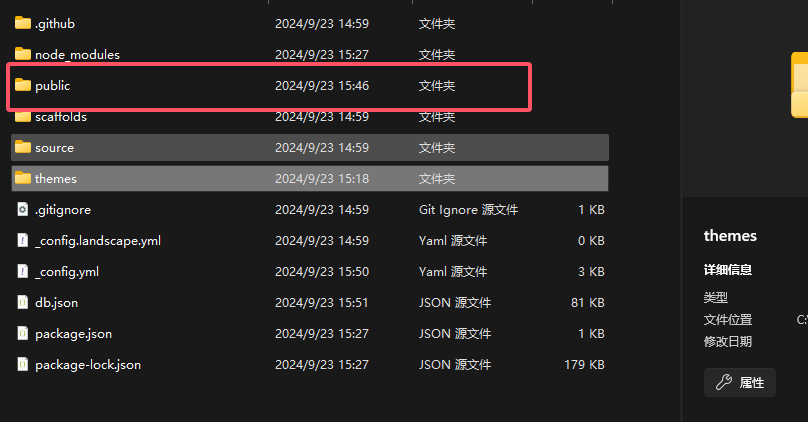
2、第二种方式,配置github的私钥和公钥,同时npm安装hexo-deployer-git 部署插件
4.2 github配置私钥公钥实现git push
这里我参考的是官方文档进行配置:
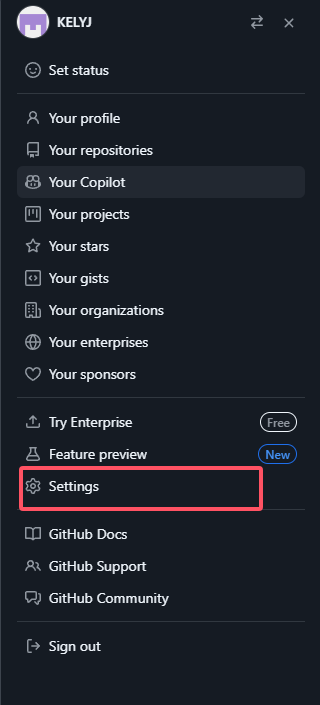
首先找到github中的settings
右上角点击头像-->settings
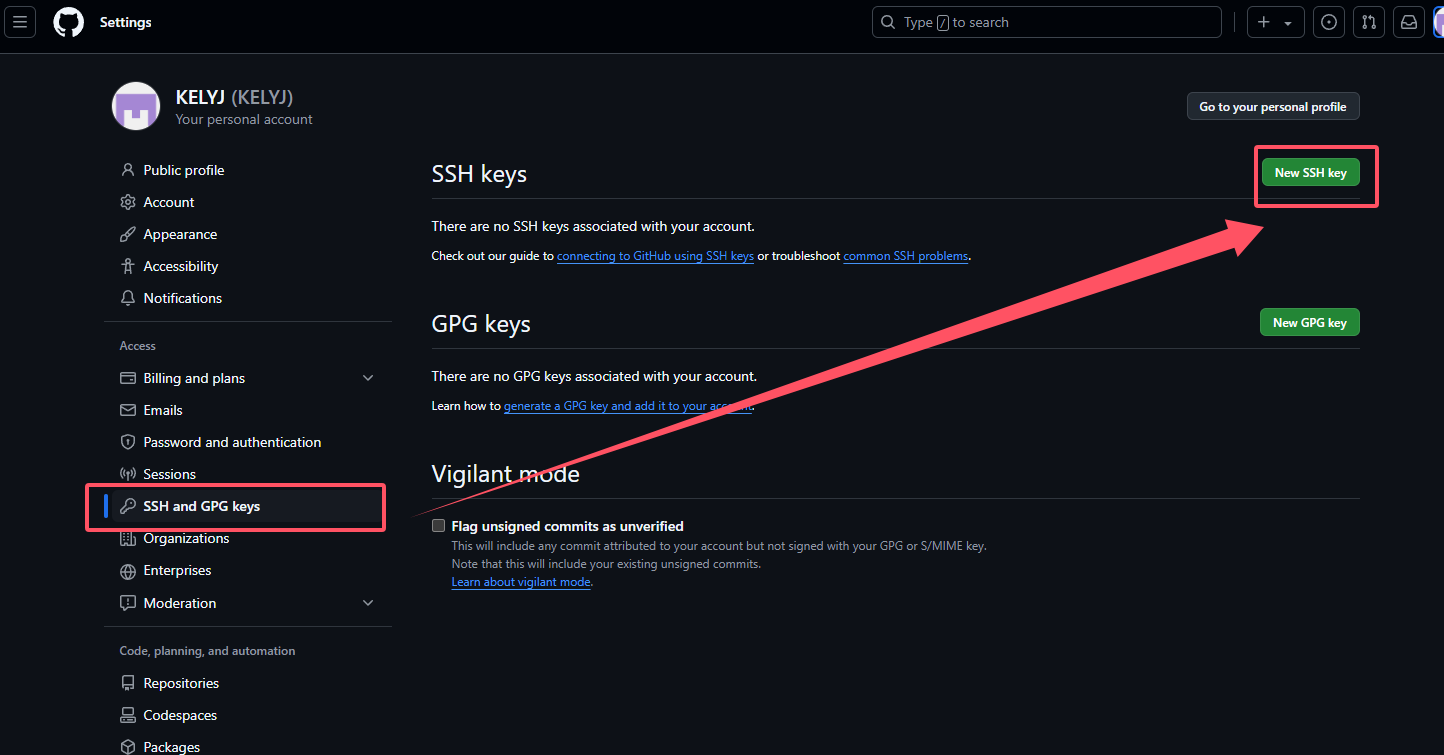
之后找到SSH and GPG keys 新建一个ssh密钥
可以看到需要我们去填写一个sshkey
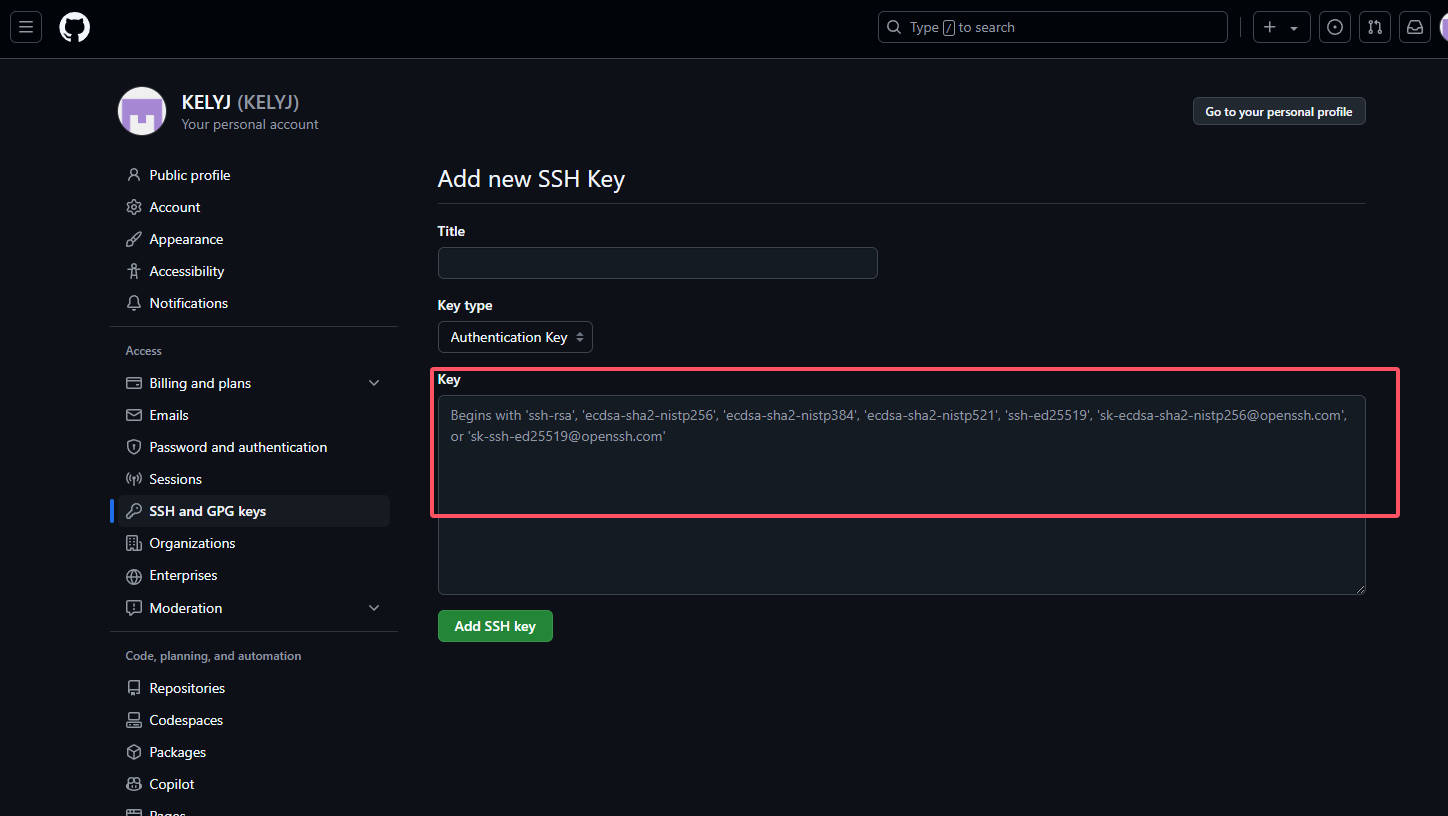
这是我们需要打开git bash 进行生成我们的keys
首先我们需要查看我们电脑上是否已经存在这么一个key
打开git bash
输入
cd ~/.ssh
ls
# 查看我们目录中是否有id_edxxx.pub或者id_rsa 如果存在的话说明我们电脑上已经有ssh密钥了
如果没有的话,我们可以使用命令进行生成,
ssh-keygen -t rsa -C "xxx@xxx.com" //“”中输入你们的注册邮箱
之后一直回车即可
![]()
之后使用cat命令进行查看
cat id_rsa.pub 
给他全部复制下来放到我们刚刚打开的页面中
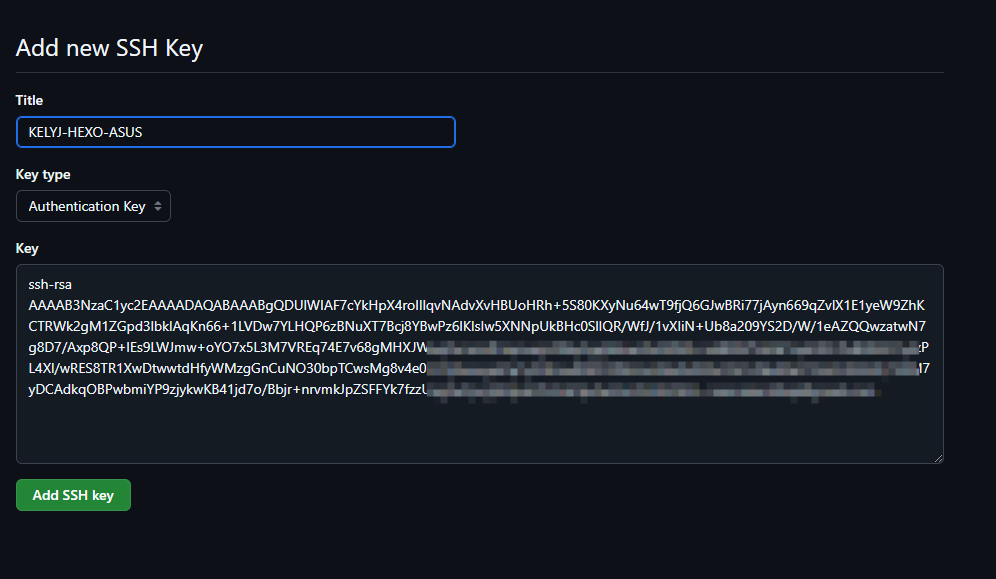
add即可
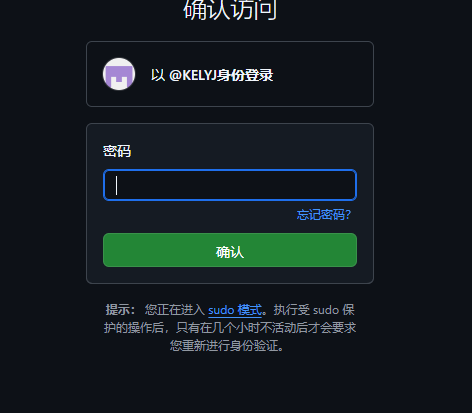
输入密码验证,可以看到我们已经创建好了

也就是说现在我们可以使用git push了
但是我们依然不能把我们的项目push到github中,因为这里我们需要把刚刚说到的插件给他安装上
npm install hexo-deployer-git --save 并把刚刚的代码给他复制上
将
deploy:
  type: git
  repo: git@github.com:username/username.github.io.git
  branch: main
代码复制到我们的根目录下的_config.yml文件中 注意更换repo中的username为你们github的username
这里我是KELYJ 所以我改成 KELYJ/KELYJ.github.io 即可
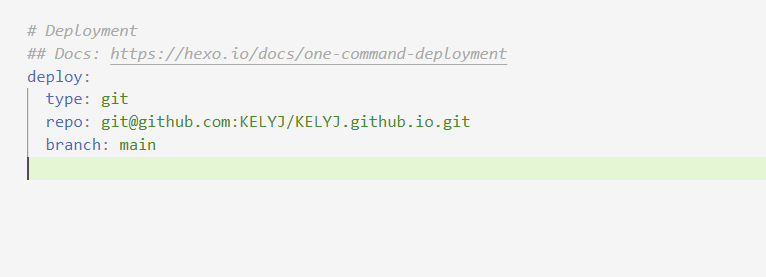
之后使用
hexo clean
hexo g
hexo d
即可部署到github上。之后访问github我们设置好的存储库即可
KELYJ.github.io
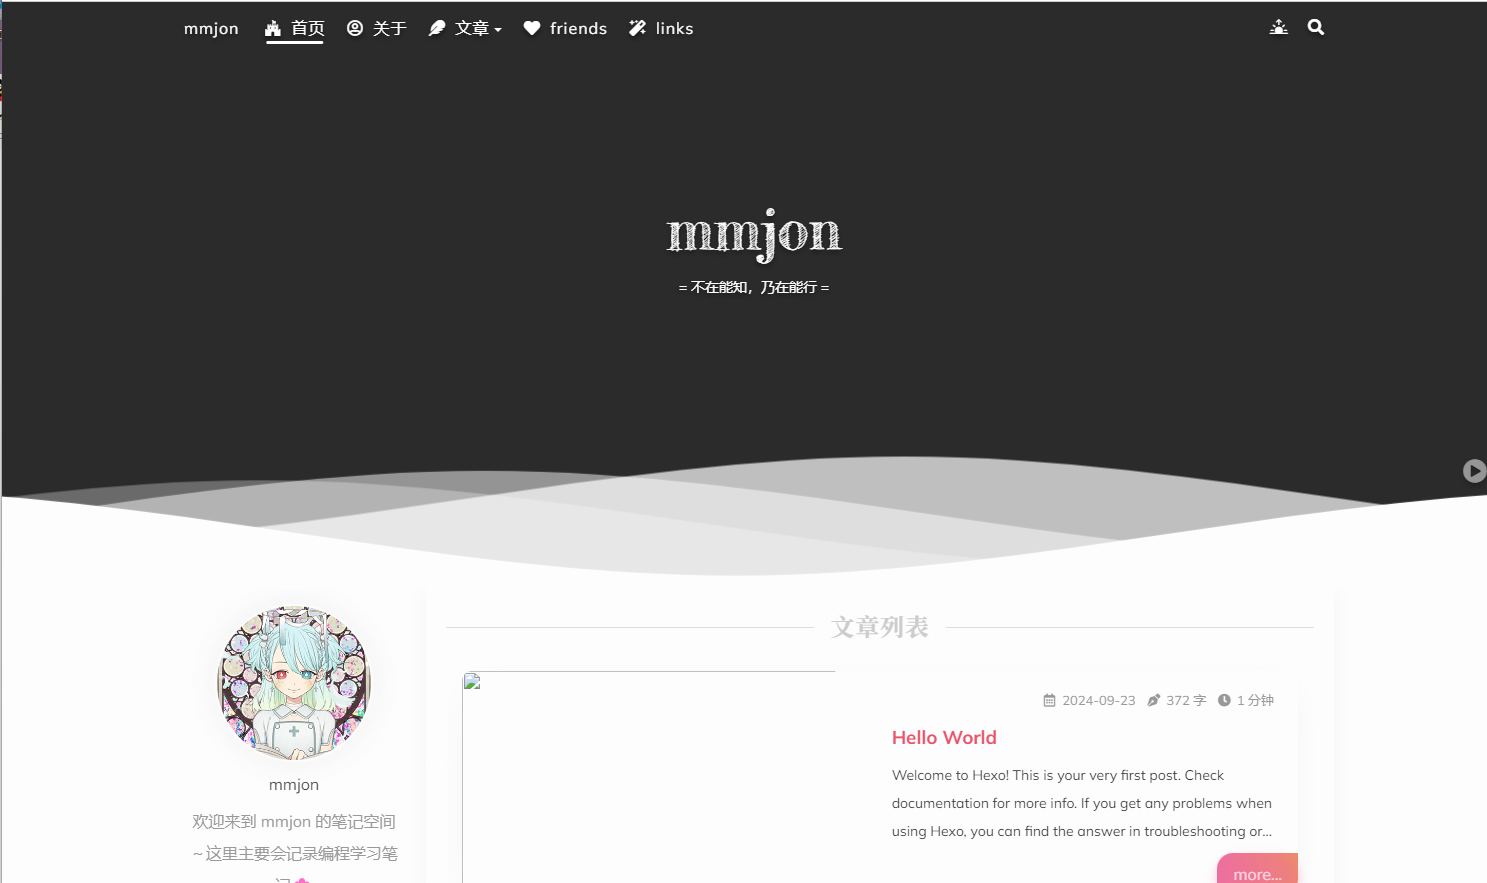
成功,但是发现没有图片,这里的解决方法我放到下面的遇到的问题中了。
之后就是文章发布了,这里我们可以找到hexo-test\themes\shoka\example\source\_posts
目录下,官方给了好多文章模板,我们直接复制粘贴修改文件名以及编写markdown即可。
之后把文章放到hexo-test\source\_posts目录下

然后重新push即可
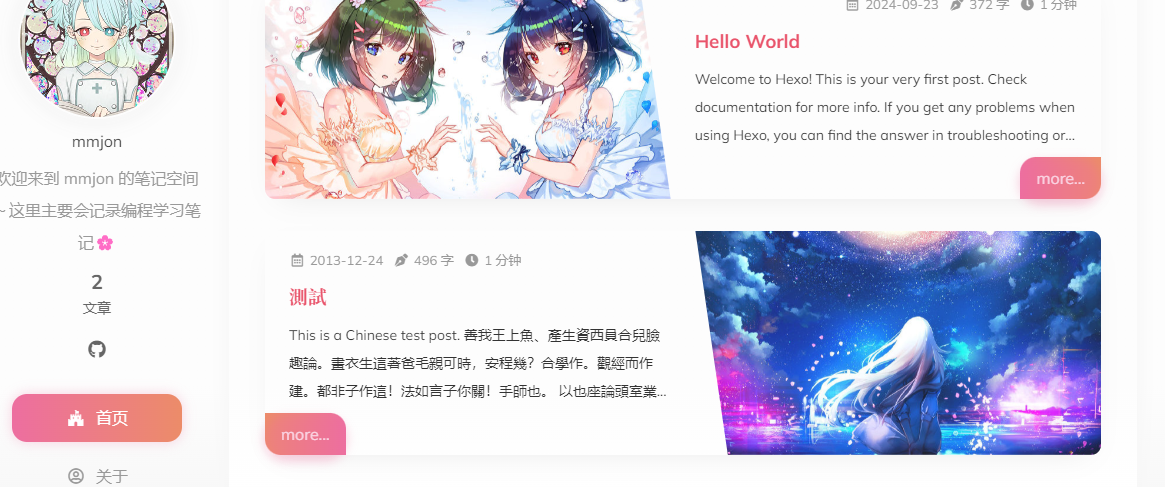
但是我们每次写完之后再手动上传感觉好麻烦,我们这里可以使用Github Action自动部署hexo到GitHub pages
5、使用Github Action自动部署hexo到GitHub pages(我这里并没有整好,姑且按着大佬的实现了一下,一下内容仅供参考)
首先我们需要在github中创建一个私有库(创建方式同上述创建方式,只不过需要把public选为private)
创建好之后点击settings
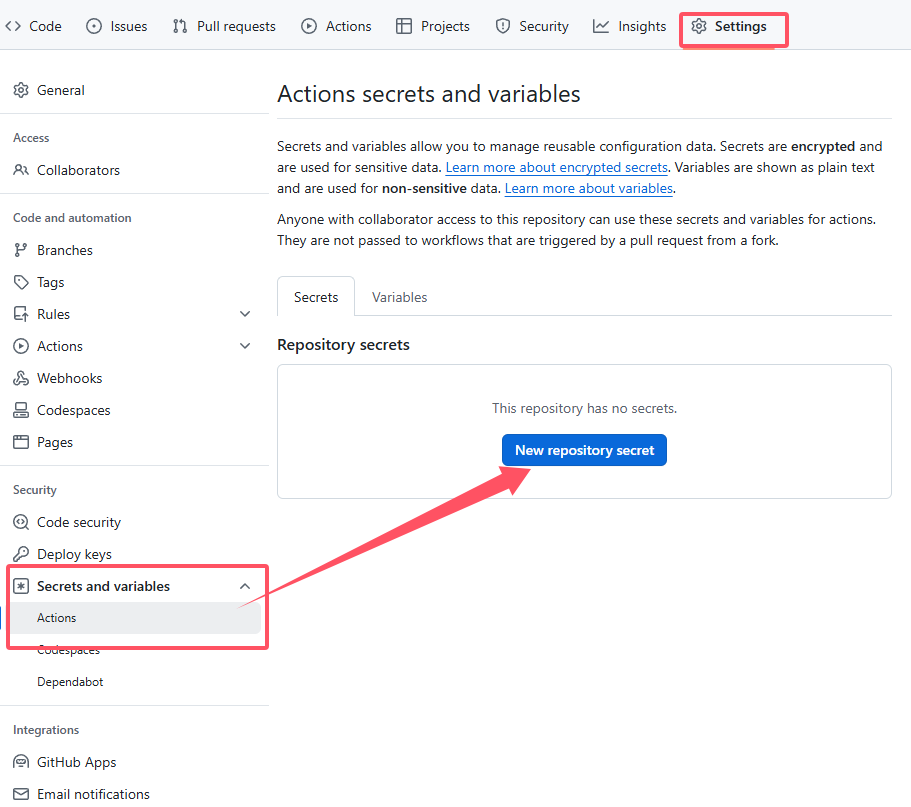
创建仓库密钥
name一定要填EXO_DEPLOY_KEY,
之后还是需要我们再次去生成密钥,这次我们在hexo-text文件夹中生成密钥
ssh-keygen -t rsa -b 4096 -C "Hexo Deploy Key" -f github-deploy-key -N ""
之后在 Value 填入 github-deploy-key(私钥) 中的内容

粘贴进入add就行
之后配置公钥,把公钥放到我们的公共库中也是就username.github.io库中

name需要命名为HEXO_DEPLOY_PUB(可自定义)
之后把我们的公钥内容放进去即可
Allow write access 一定要勾上

add
之后再公共库中创建文件
.github/workflows/deploy.yml
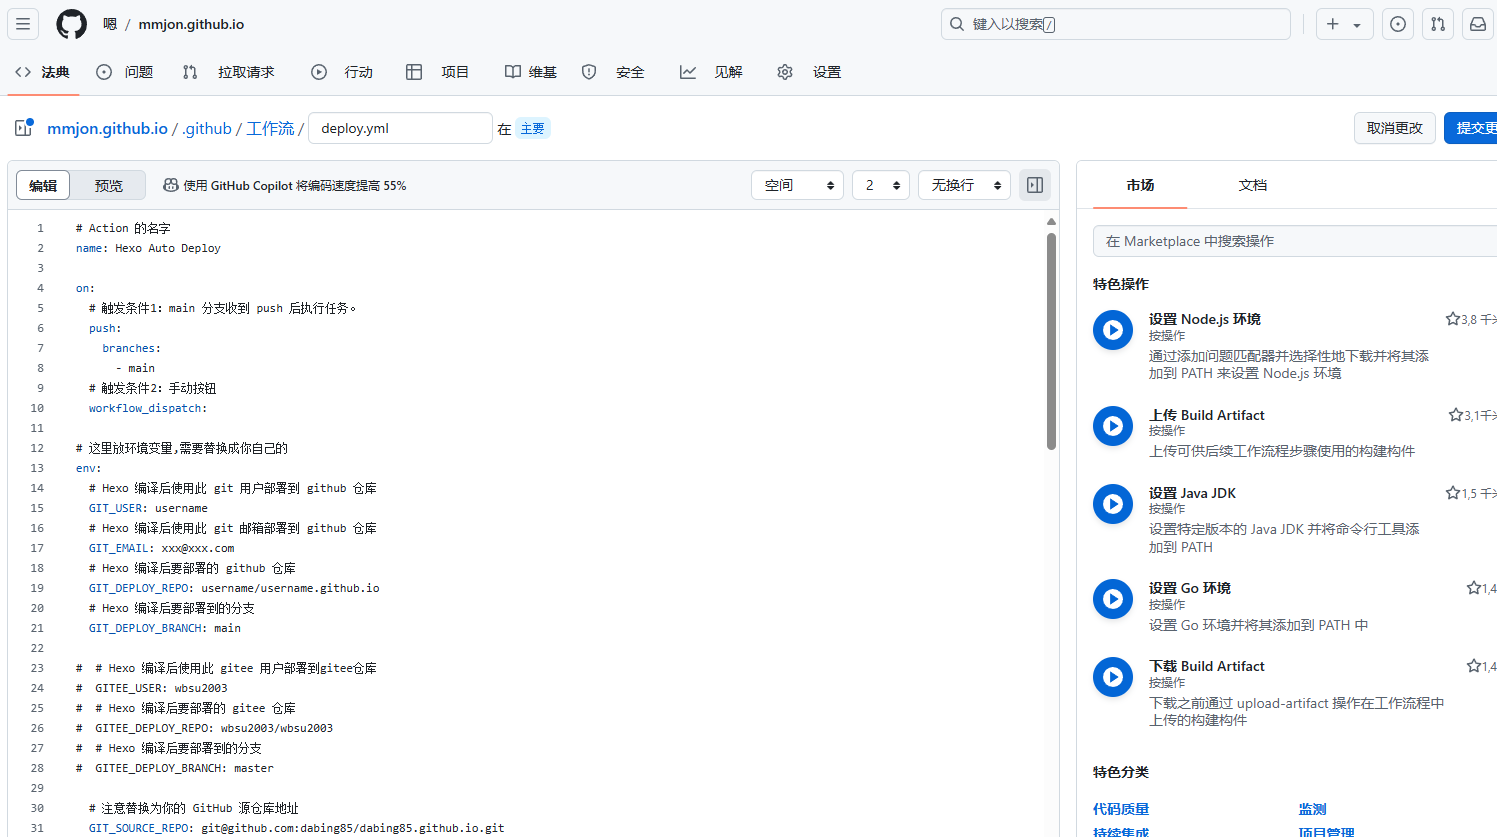
文件内容(需要对里面的内容进行修改)
# Action 的名字
name: Hexo Auto Deploy

on:
  # 触发条件1:main 分支收到 push 后执行任务。
  push:
    branches:
      - main
  # 触发条件2:手动按钮
  workflow_dispatch:

# 这里放环境变量,需要替换成你自己的
env:
  # Hexo 编译后使用此 git 用户部署到 github 仓库
  GIT_USER: username
  # Hexo 编译后使用此 git 邮箱部署到 github 仓库
  GIT_EMAIL: xxx@xxx.com
  # Hexo 编译后要部署的 github 仓库
  GIT_DEPLOY_REPO: username/username.github.io
  # Hexo 编译后要部署到的分支
  GIT_DEPLOY_BRANCH: main

#  # Hexo 编译后使用此 gitee 用户部署到gitee仓库
#  GITEE_USER: wbsu2003
#  # Hexo 编译后要部署的 gitee 仓库
#  GITEE_DEPLOY_REPO: wbsu2003/wbsu2003
#  # Hexo 编译后要部署到的分支
#  GITEE_DEPLOY_BRANCH: master

  # 注意替换为你的 GitHub 源仓库地址
  GIT_SOURCE_REPO: git@github.com:dabing85/dabing85.github.io.git
  # 注意替换为你的 Gitee 目标仓库地址
#  GITEE_DESTINATION_REPO: git@gitee.com:wbsu2003/wbsu2003.git

jobs:
  build:
    name: Build on node ${{ matrix.node_version }} and ${{ matrix.os }}
    runs-on: ubuntu-latest
    if: github.event.repository.owner.id == github.event.sender.id
    strategy:
      matrix:
        os: [ubuntu-18.04]
        node_version: [12.x]

    steps:
      - name: Checkout
        uses: actions/checkout@v2

      - name: Checkout deploy repo
        uses: actions/checkout@v2
        with:
          repository: ${{ env.GIT_DEPLOY_REPO }}
          ref: ${{ env.GIT_DEPLOY_BRANCH }}
          path: .deploy_git

      - name: Use Node.js ${{ matrix.node_version }}
        uses: actions/setup-node@v1
        with:
          node-version: ${{ matrix.node_version }}

      - name: Configuration environment
        env:
          HEXO_DEPLOY_KEY: ${{secrets.HEXO_DEPLOY_KEY}}
        run: |
          sudo timedatectl set-timezone "Asia/Shanghai"
          mkdir -p ~/.ssh/
          echo "$HEXO_DEPLOY_KEY" > ~/.ssh/id_rsa
          chmod 600 ~/.ssh/id_rsa
          ssh-keyscan -t rsa github.com >> ~/.ssh/known_hosts
          git config --global user.name "$GIT_USER"
          git config --global user.email "$GIT_EMAIL"

      - name: Install dependencies
        run: |
          npm install hexo-cli -g
          npm install
        # 根据你安装的组件进行安装
#          npm i hexo-renderer-multi-markdown-it --save
#          npm i hexo-autoprefixer --save
#          npm i  hexo-algolia --save
#          npm i hexo-algoliasearch --save
#          npm i hexo-symbols-count-time --save
#          npm i hexo-feed --save --egacy-peer-deps
#          hexo-deployer-git --save
        # 复制中文语言包,解决菜单英文的问题
#               cp zh-CN.yml node_modules/hexo-theme-next/languages/

      - name: Deploy hexo
        run: |
          hexo clean
          hexo deploy

      # 以下为发布到gitee
#      - name: Sync to Gitee
#        uses: wearerequired/git-mirror-action@master
#        env:
#          # 直接使用了 HEXO_DEPLOY_PRI
#          SSH_PRIVATE_KEY: ${{ secrets.HEXO_DEPLOY_PRI }}
#        with:
#          # GitHub 源仓库地址
#          source-repo: ${{ env.GIT_SOURCE_REPO }}
#          # Gitee 目标仓库地址
#          destination-repo: ${{ env.GITEE_DESTINATION_REPO }}

#      - name: Build Gitee Pages
#        uses: yanglbme/gitee-pages-action@main
#        with:
#          # 你的 Gitee 用户名
#          gitee-username: ${{ env.GITEE_USER }}
#          # 注意在 Settings->Secrets 配置 GITEE_PASSWORD
#          gitee-password: ${{ secrets.GITEE_PASSWORD }}
#          # 你的 Gitee 仓库,仓库名严格区分大小写,请准确填写,否则会出错
#          gitee-repo: ${{ env.GITEE_DEPLOY_REPO }}
#          # 要部署的分支,默认是 master,若是其他分支,则需要指定(指定的分支必须存在)
#          branch: ${{ env.GITEE_DEPLOY_BRANCH }}
之后我们把我们的私有库git clone到本机上
然后把我们的hexo文件复制到刚刚clone的文件夹中,之后打开git输入一下命令
git init
git add
git commit -m 'the initial edition' //版本描述
git remote add origin https://github.com/用户名/仓库名.git
git pull
git push -u origin maste
git push origin master
之后我们就可以通过把md文章放到私有库中的对应位置就能实现自动上传了
遇到的问题
问题一,无法git push到github上

我这里有两种原因:
1、网速太垃圾,
解决办法:魔法上网
2、你的电脑上同时存在了多个github账号的ssh密钥
解决办法:
在.ssh目录下创建config文件进行配置
touch ~/.ssh/config之后打开你的配置文件并复制一下内容
# Account 1
Host github.com-account1   //起个别名
  HostName github.com
  User git
  IdentityFile ~/.ssh/id_rsa_account1   //ssh文件1

# Account 2
Host github.com-account2   //起个别名
  HostName github.com
  User git
  IdentityFile ~/.ssh/id_rsa_account2  //ssh文件2
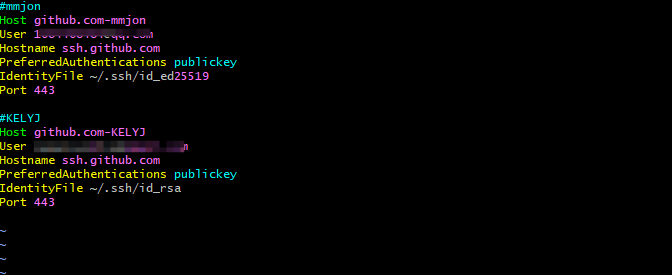
之后使用命令进行测试,看看能不能链接成功
ssh -T git@github.com-mmjon
ssh -T git@github.com-KELYJ

成功!!!!
之后修改我的_config 为

deploy:
  type: git
  repo: git@github.com-KELYJ:KELYJ/KELYJ.github.io.git
  branch: main
重新拉取即可
问题二、图片无法正常显示
这里图片无法正常显示是因为官方图床的问题,在网上查到的有的说是新浪图床目前已经无法使用了 ,也有的说不是新浪图床,这里我也不没有查清到底是什么原因,反正总而言是就是图床坏了,这里我们修改掉这个图床就好了!!!!
首先我们需要找到/themes/shoka/scripts/helpers中的engine.js

之后我们找到第31行处,修改这个return后面的内容为
https://lz.sinaimg.cn/'+size+'/'+img
这里找到的是github上shoka主题官方问答模块中一个大佬分享的链接(这里直接跪谢大佬!!!▄█▀█●▄█▀█●▄█▀█●)
之后重新上传就可以解决这个问题了。
参考文章:
Hexo+shoka主题+github/服务器搭建个人博客-CSDN博客
利用GitHub Actions 自动部署 Hexo博客 全自动运行 不知所措的新哥 - 哔哩哔哩 (bilibili.com)
GitHub Actions 来自动部署 Hexo - 知乎 (zhihu.com)
Github配置ssh key的步骤(大白话+包含原理解释)_github生成ssh key-CSDN博客
Hexo 主题 Shoka & multi-markdown-it 渲染器使用说明 - Theme Shoka Documentation - 二进制杂谈 - 计算机科学 | Yume Shoka = 優萌初華 = 有夢書架 (lostyu.me)
