three.js----快速上手,如何用vue在web页面中导入 gltf/glb , fbx , obj 模型
首先去three.js官网下载three.js包,或者在直接在vue项目中 npm install three@0.158.0 --save
(学three.js需要有一点前端基础,基础掌握不牢的还是从基础开始)
这个0.158.0是版本号,不用纠结选新的还是选旧的,新手先不考虑这些,three.js基本上个把月就会更新一次,选一个不太新也不太旧的即可,初学直接上手操作,出了问题后才好纠正(因为如果代码cv过来了一个问题都没遇到,可能到最后学会的也只有cv了 !!!)
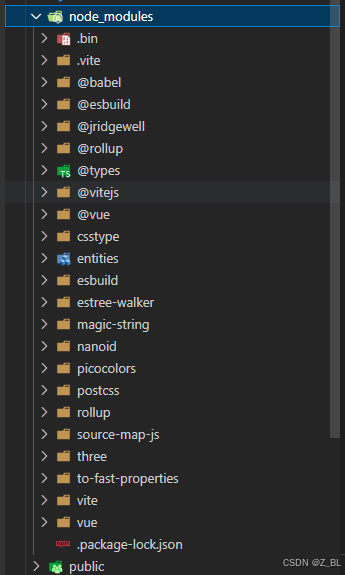
npm install 成功后,可在node_modules文件夹中可以看到 three 文件夹
目录就不介绍了,打开就这些

基本要用到的东西都在在 three/examples/jsm 目录下
jsm目录是threejs各种功能扩展库找到loaders文件夹,所有的模型导入功能库都在这里
![]()

![]()
这三个分别是 .fbx .gltf/.glb .obj的导入工具
jsm中的libs文件夹中:
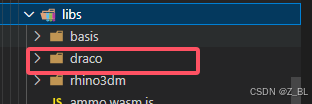
draco文件是模型解压文件,.gltf格式的要用到
ok,该讲的基础讲完了,开始演示,如何导入.fbx模型
.fbx
<template>
    <div class="bodys">
        <div class="content" ref="modelBox"></div>
    </div>
</template>

<script setup>
import * as THREE from "three";
import { ref, onMounted } from 'vue'
import { OrbitControls } from "three/examples/jsm/controls/OrbitControls.js"
import { FBXLoader } from "three/examples/jsm/loaders/FBXLoader";
const modelBox = ref()
let controls


// 创建场景
const scene = new THREE.Scene;
// 创建相机
const camera = new THREE.PerspectiveCamera(50, window.innerWidth / window.innerHeight, 0.1, 1000);
camera.position.set(10, 10, 10)// -----相机位置
// 创建渲染器
const renderer = new THREE.WebGLRenderer({
    antialias: true//添加抗锯齿
});
renderer.setSize(window.innerWidth, window.innerHeight)//渲染器大小
// 渲染函数
const render = () => {
    renderer.render(scene, camera); //渲染器添加场景和相机
    requestAnimationFrame(render); //requestAnimationFrame是逐帧渲染(逐帧触发rander)
}
// 挂载后渲染dom
onMounted(() => {
    modelBox.value.appendChild(renderer.domElement)
    renderer.setClearColor("#000")//初始化背景颜色
    scene.background = new THREE.Color("#ccc")//设置背景为#000
    scene.environment = new THREE.Color("#ccc")

    // const gridHelp = new THREE.GridHelper(10,10)//设置网格地面,大小10*10(可选加)
    // scene.add(gridHelp)

    render()//执行渲染
})

// 添加控制器
controls = new OrbitControls(camera, renderer.domElement)
// 导入模型
const loader = new FBXLoader()
loader.load('../../public/model/monitor/camera.fbx', (fbx) => {
    console.log('fbx', fbx); //可以把模型输出出来
    fbx.position.set(0, 0, 0); //模型位置,我设置为原点(0,0,0)
    scene.add(fbx) //添加模型
})


// 添加灯光(看需求添加光源,我这里直接把光拉满)
const light1 = new THREE.DirectionalLight(0xffffff, 1);
light1.position.set(0, 0, 10);
scene.add(light1);
const light2 = new THREE.DirectionalLight(0xffffff, 1);
light2.position.set(0, 0, -10);
scene.add(light2);
const light3 = new THREE.DirectionalLight(0xffffff, 1);
light3.position.set(10, 0, 0);
scene.add(light3);
const light4 = new THREE.DirectionalLight(0xffffff, 1);
light4.position.set(-10, 0, 0);
scene.add(light4);
const light5 = new THREE.DirectionalLight(0xffffff, 1);
light5.position.set(0, 10, 0);
scene.add(light5);
const light6 = new THREE.DirectionalLight(0xffffff, 0.3);
light6.position.set(5, 10, 0);
scene.add(light6);
const light7 = new THREE.DirectionalLight(0xffffff, 0.3);
light7.position.set(0, 10, 5);
scene.add(light7);
const light8 = new THREE.DirectionalLight(0xffffff, 0.3);
light8.position.set(0, 10, -5);
scene.add(light8);
const light9 = new THREE.DirectionalLight(0xffffff, 0.3);
light9.position.set(-5, 10, 0);
scene.add(light9);
</script>
.gltf/.glb
<template>
  <div class="bodys">
    <div class="content" ref="modelBox"></div>
  </div>
</template>
<script setup>
import * as THREE from "three";
import { ref, onMounted } from 'vue'
import { OrbitControls } from "three/examples/jsm/controls/OrbitControls.js"
import { GLTFLoader } from "three/examples/jsm/loaders/GLTFLoader";
import { DRACOLoader } from "three/examples/jsm/loaders/DRACOLoader"

// 创建场景
const scene = new THREE.Scene;
// 创建相机
const camera = new THREE.PerspectiveCamera(50, window.innerWidth / window.innerHeight, 0.1, 1000);
camera.position.set(10,10,10)// -----相机位置
// 创建渲染器
const renderer = new THREE.WebGLRenderer({
  antialias: true//添加抗锯齿
});
renderer.setSize(window.innerWidth, window.innerHeight)//渲染器大小

// 挂载后渲染dom
onMounted(() => {
  modelBox.value.appendChild(renderer.domElement)
  renderer.setClearColor("#000")//初始化背景颜色
  scene.background = new THREE.Color("#ccc")//设置背景为#000
  scene.environment = new THREE.Color("#ccc")
  render()//执行渲染
})
// 渲染
const render = () => {
  // renderer.render(scene, camera);
  composer.render()
  requestAnimationFrame(render);
}
// 添加控制器
controls = new OrbitControls(camera, renderer.domElement)
// 导入模型
const loader = new GLTFLoader()
const dracoLoader = new DRACOLoader()
dracoLoader.setDecoderPath('../../node_modules/three/examples/jsm/libs/draco/') //模型解压文件
loader.setDRACOLoader(dracoLoader)
loader.load('../../public/model/smartbuilding/SmartBuilding_Map.gltf', (gltf) => {
  console.log(gltf);
  const obj = gltf.scene;
  group = gltf.scene;
  obj.position.set(0, 0, 0);
  scene.add(obj)
})

  // 添加灯光
  const light1 = new THREE.DirectionalLight(0xffffff, 1);
  light1.position.set(0, 0, 10);
  scene.add(light1);
  const light2 = new THREE.DirectionalLight(0xffffff, 1);
  light2.position.set(0, 0, -10);
  scene.add(light2);
  const light3 = new THREE.DirectionalLight(0xffffff, 1);
  light3.position.set(10, 0, 0);
  scene.add(light3);
  const light4 = new THREE.DirectionalLight(0xffffff, 1);
  light4.position.set(-10, 0, 0);
  scene.add(light4);
  const light5 = new THREE.DirectionalLight(0xffffff, 1);
  light5.position.set(0, 10, 0);
  scene.add(light5);
  const light6 = new THREE.DirectionalLight(0xffffff, 0.3);
  light6.position.set(5, 10, 0);
  scene.add(light6);
  const light7 = new THREE.DirectionalLight(0xffffff, 0.3);
  light7.position.set(0, 10, 5);
  scene.add(light7);
  const light8 = new THREE.DirectionalLight(0xffffff, 0.3);
  light8.position.set(0, 10, -5);
  scene.add(light8);
  const light9 = new THREE.DirectionalLight(0xffffff, 0.3);
  light9.position.set(-5, 10, 0);
  scene.add(light9);
</script>
.obj
.obj格式文件的模型和.fbx类似,只需要将:
import { FBXLoader } from "three/examples/jsm/loaders/FBXLoader";换成
import { OBJLoader} from "three/examples/jsm/loaders/OBJLoader";即可
( ง⁼̴̀ω⁼̴́)ง⁼³₌₃