香橙派5(RK3588)使用npu加速yolov5推理的部署过程
香橙派5使用npu加速yolov5推理的部署过程
硬件环境
部署过程
模型训练(x86主机)
在带nvidia显卡(最好)的主机上进行yolo的配置与训练, 获取最终的best.pt模型文件, 详见另一篇文档
模型转换(x86主机)
下载airockchip提供的yolov5(从pt到onnx)
一定要下这个版本的yolov5, 用于将pt模型转换成onnx模型, 这里的模型转换做了优化, 砍掉了最后一层, 只有这个onnx转换成rknn后, 可以正常推理
https://github.com/airockchip/yolov5.git
# 以下操作需要在虚拟环境中进行, 如果不是在虚拟环境 请先激活
cd yolov5
python3 export.py --rknpu --weight yolov5s.pt #请把这里的pt文件换成自己的文件
# 执行结束后, 应该会在当前目录下, 看到一个同名的 .onnx文件, 例如yolov5s.onnx
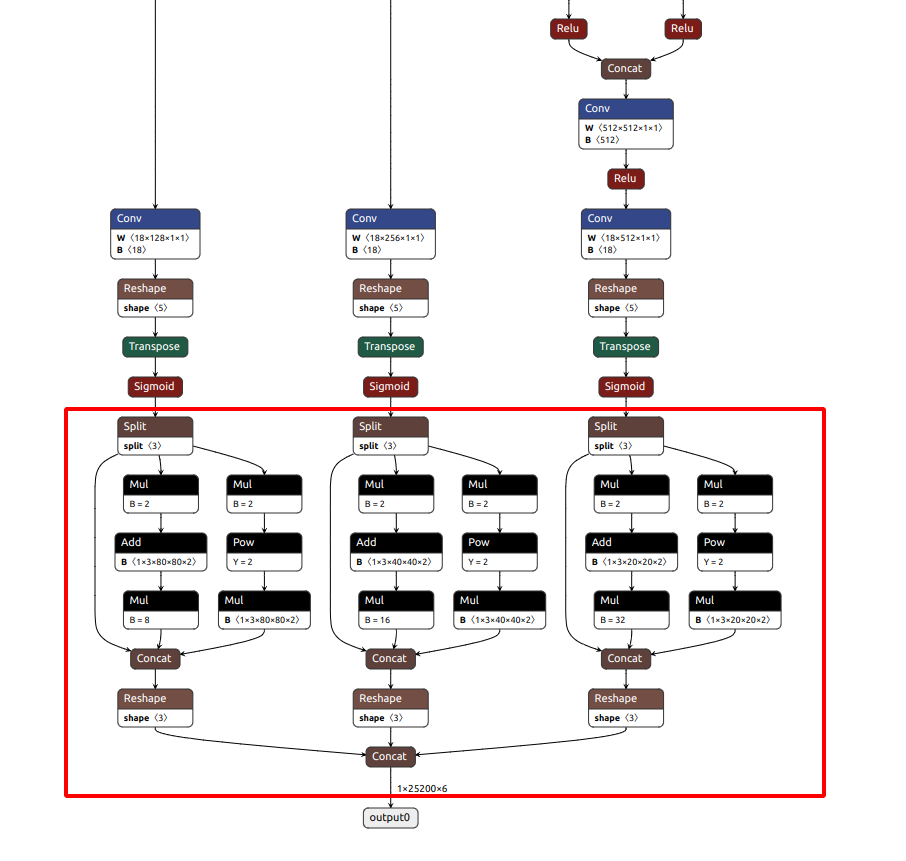
将该模型放到在线模型可视化网站, 检查模型的末端是否为下图类似的结构, 在sigmoid函数后直接就是输出, 而不是另一个检测层
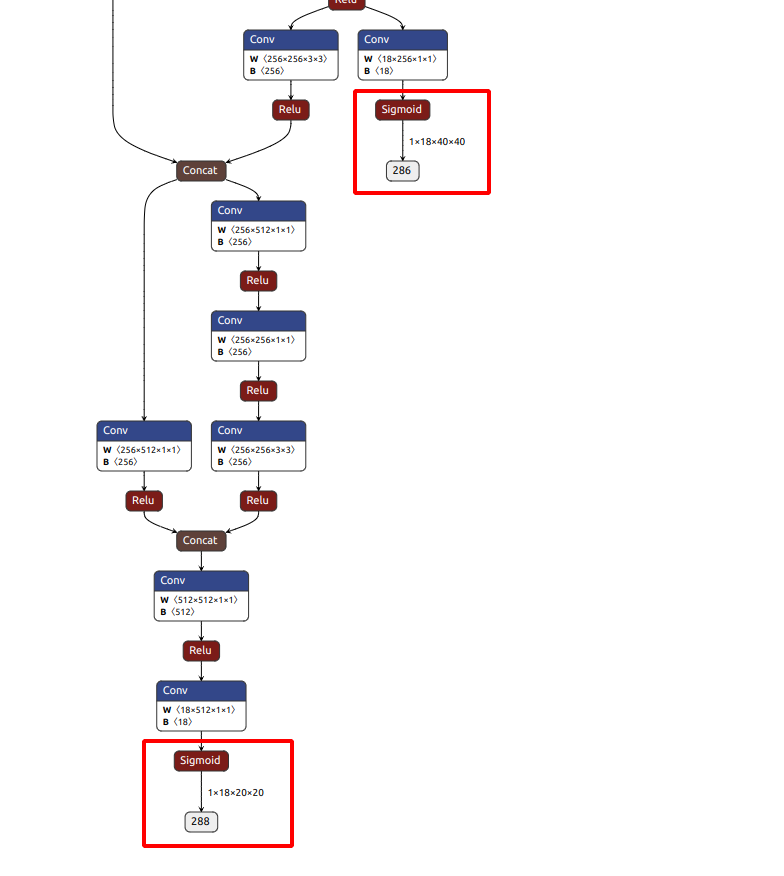
如果是下面这种, 说明转换的onnx模型有问题, 用的export.py应该不是瑞芯微的, yolo官方支持的转换模型, 在最后多了一层检测, 正常是没有下面红框里的内容的
下载rknn-toolkit2(从onnx到rknn)
git clone https://github.com/airockchip/rknn-toolkit2.git
cd rknn-toolkit2/rknn-toolkit2/packages
# 需要确定是在虚拟环境下执行下面的指令, 如果不是在虚拟环境下, 请先使用下面的命令激活虚拟环境
# conda activate yolo
pip install -r requirements_cp38-2.2.0.txt #这里要对应python版本, 以及可能需要走清华镜像源, 否则很卡, 如果需要走镜像源, 请执行下面这段进行替代
# pip install -r requirements_cp38-2.2.0.txt -i https://pypi.tuna.tsinghua.edu.cn/simple
pip install rknn_toolkit2-2.2.0-cp38-cp38-manylinux_2_17_x86_64.manylinux2014_x86_64.whl
如果有其他依赖不满足, 需要手动下载, 最后应该是这样的结果, 说明安装成功了

下载rknn_model_zoo
git clone https://github.com/airockchip/rknn_model_zoo.git
cd rknn_model_zoo/examples/yolov5/python
# 需要确定是在虚拟环境下执行下面的指令, 如果不是在虚拟环境下, 请先使用下面的命令激活虚拟环境
# conda activate yolo
python convert.py ../model/yolov5s_relu.onnx rk3588 i8 ../model/yolov5s_relu.rknn # 注意将前面的onnx模型路径修改成上面best.pt转换成的best.onnx路径, 后面那个是输出的路径, 可以随便改
香橙派部署(arm64)
下载虚拟环境管理工具 miniforge3
安装过程与在amd64上安装anaconda类似, 可以一路敲回车, 输yes
wget https://github.com/conda-forge/miniforge/releases/latest/download/Miniforge3-Linux-aarch64.sh
# 如果上一步卡很久, 可以考虑在自己电脑上挂梯子下好传过去, 或者走中转, 使用
# wget https://mirror.ghproxy.com/https://github.com/conda-forge/miniforge/releases/latest/download/Miniforge3-Linux-aarch64.sh 进行偷渡
chmod +x Miniforge3-Linux-aarch64.sh
./Miniforge3-Linux-aarch64.sh
# 一路回车就好, 默认安装路径为 ~/miniforge3
使用miniforge3创建虚拟环境
source ~/miniforge3/bin/activate #有可能在安装过程中, 就已经把这一步写进了环境变量, 看是否有(base)前缀, 有的话就不需要执行这一步

# 创建虚拟环境
conda create -n yolo python=3.8 #这里python版本可以指定不同的, 以3.8为例, -n 后面跟的是环境名
# 激活环境, 如果环境名不是yolo, 就把yolo这个名字换掉
conda activate yolo
安装rknn-toolkit-lite
git clone https://github.com/airockchip/rknn-toolkit2.git
# 以下命令需要在虚拟环境中进行
cd rknn-toolkit2/rknn-toolkit-lite2/packages
pip install rknn_toolkit_lite2-2.2.0-cp38-cp38-linux_aarch64.whl # 这一步可能会缺少相关依赖? 也许需要
# cd ../../rknn-toolkit2/packages
# pip install -r requirements_cp38-2.2.0.txt
测试推理(香橙派)
# 下载rknn_model_zoo
git clone https://github.com/airockchip/rknn_model_zoo.git
cd rknn_model_zoo/examples/yolov5/python
# 需要确定是在虚拟环境下执行下面的指令, 如果不是在虚拟环境下, 请先使用下面的命令激活虚拟环境
# conda activate yolo
修改香橙派自带的yolo代码
rknn-toolkit只支持amd64, 在香橙派上部署运行时需要arm架构的库, 即rknn-toolkit-lite, 因此相应的要修改该包的代码, 使用rknnlite进行推理
import os
import cv2
import sys
import argparse
import numpy as np
import platform
from rknnlite.api import RKNNLite

# 添加路径
realpath = os.path.abspath(__file__)
_sep = os.path.sep
realpath = realpath.split(_sep)
sys.path.append(os.path.join(realpath[0]+_sep, *realpath[1:realpath.index('rknn_model_zoo')+1]))

from py_utils.coco_utils import COCO_test_helper

OBJ_THRESH = 0.25
NMS_THRESH = 0.45
IMG_SIZE = (640, 640)  # (width, height), 例如 (1280, 736), 需要和训练时的size匹配

CLASSES = ("pallet",)  # 这里的类型需要匹配模型中检测的类型个数, 名称以及顺序, 否则会出现检测的是对的, 但是标签打错了的情况

DEVICE_COMPATIBLE_NODE = '/proc/device-tree/compatible'

def get_host():
    # 获取平台和设备类型
    system = platform.system()
    machine = platform.machine()
    os_machine = system + '-' + machine
    if os_machine == 'Linux-aarch64':
        try:
            with open(DEVICE_COMPATIBLE_NODE) as f:
                device_compatible_str = f.read()
                if 'rk3588' in device_compatible_str:
                    host = 'RK3588'
                else:
                    host = 'RK356x'
        except IOError:
            print('Read device node {} failed.'.format(DEVICE_COMPATIBLE_NODE))
            exit(-1)
    else:
        host = os_machine
    return host


def filter_boxes(boxes, box_confidences, box_class_probs):
    box_confidences = box_confidences.reshape(-1)
    class_max_score = np.max(box_class_probs, axis=-1)
    classes = np.argmax(box_class_probs, axis=-1)

    _class_pos = np.where(class_max_score * box_confidences >= OBJ_THRESH)
    scores = (class_max_score * box_confidences)[_class_pos]
    boxes = boxes[_class_pos]
    classes = classes[_class_pos]

    return boxes, classes, scores


def nms_boxes(boxes, scores):
    x = boxes[:, 0]
    y = boxes[:, 1]
    w = boxes[:, 2] - boxes[:, 0]
    h = boxes[:, 3] - boxes[:, 1]

    areas = w * h
    order = scores.argsort()[::-1]

    keep = []
    while order.size > 0:
        i = order[0]
        keep.append(i)

        xx1 = np.maximum(x[i], x[order[1:]])
        yy1 = np.maximum(y[i], y[order[1:]])
        xx2 = np.minimum(x[i] + w[i], x[order[1:]] + w[order[1:]])
        yy2 = np.minimum(y[i] + h[i], y[order[1:]] + h[order[1:]])

        w1 = np.maximum(0.0, xx2 - xx1 + 0.00001)
        h1 = np.maximum(0.0, yy2 - yy1 + 0.00001)
        inter = w1 * h1

        ovr = inter / (areas[i] + areas[order[1:]] - inter)
        inds = np.where(ovr <= NMS_THRESH)[0]
        order = order[inds + 1]
    keep = np.array(keep)
    return keep


def post_process(input_data, anchors):
    boxes, scores, classes_conf = [], [], []

    # 调试输出 - 查看 input_data 和 anchors 的形状
    for i in range(len(input_data)):
        print(f"Debug: input_data[{i}].shape = {input_data[i].shape}")
        print(f"Debug: anchors[{i}] = {anchors[i]}")

    # 调整 reshape 逻辑以匹配实际输入尺寸
    for i in range(len(input_data)):
        # 根据输出形状和锚点数调整 reshape 逻辑
        num_anchors = len(anchors[i])
        grid_h, grid_w = input_data[i].shape[-2], input_data[i].shape[-1]
        expected_channels = num_anchors * (5 + len(CLASSES))

        if input_data[i].shape[1] != expected_channels:
            print(f"Error: input_data[{i}] channels {input_data[i].shape[1]} does not match expected channels {expected_channels}")
            continue

        # Reshape to (num_anchors, 5 + num_classes, grid_h, grid_w)
        input_data[i] = input_data[i].reshape((num_anchors, 5 + len(CLASSES), grid_h, grid_w))

        boxes.append(box_process(input_data[i][:, :4, :, :], anchors[i]))
        scores.append(input_data[i][:, 4:5, :, :])
        classes_conf.append(input_data[i][:, 5:, :, :])

    def sp_flatten(_in):
        ch = _in.shape[1]
        _in = _in.transpose(0, 2, 3, 1)
        return _in.reshape(-1, ch)

    boxes = [sp_flatten(_v) for _v in boxes]
    classes_conf = [sp_flatten(_v) for _v in classes_conf]
    scores = [sp_flatten(_v) for _v in scores]

    boxes = np.concatenate(boxes) if boxes else np.array([])
    classes_conf = np.concatenate(classes_conf) if classes_conf else np.array([])
    scores = np.concatenate(scores) if scores else np.array([])

    if len(boxes) == 0 or len(classes_conf) == 0 or len(scores) == 0:
        return None, None, None

    boxes, classes, scores = filter_boxes(boxes, scores, classes_conf)

    nboxes, nclasses, nscores = [], [], []
    for c in set(classes):
        inds = np.where(classes == c)
        b = boxes[inds]
        c = classes[inds]
        s = scores[inds]
        keep = nms_boxes(b, s)

        if len(keep) != 0:
            nboxes.append(b[keep])
            nclasses.append(c[keep])
            nscores.append(s[keep])

    if not nclasses and not nscores:
        return None, None, None

    boxes = np.concatenate(nboxes)
    classes = np.concatenate(nclasses)
    scores = np.concatenate(nscores)

    return boxes, classes, scores


def box_process(position, anchors):
    grid_h, grid_w = position.shape[2:4]
    anchors = np.array(anchors)
    num_anchors = len(anchors)
    anchors = anchors.reshape(num_anchors, 2, 1, 1)

    # 生成网格
    col, row = np.meshgrid(np.arange(0, grid_w), np.arange(0, grid_h))
    grid = np.stack((col, row), axis=0).astype(np.float32)
    grid = grid[np.newaxis, :, :, :]  # shape: (1, 2, grid_h, grid_w)

    # 位置解码
    box_xy = (position[:, :2, :, :] * 2.0 - 0.5 + grid) * (IMG_SIZE[0] / grid_w)
    box_wh = (position[:, 2:4, :, :] * 2.0) ** 2 * anchors

    # 将 [c_x, c_y, w, h] 转换为 [x1, y1, x2, y2]
    box = np.concatenate((box_xy - box_wh / 2.0, box_xy + box_wh / 2.0), axis=1)
    return box


def draw(image, boxes, scores, classes):
    for box, score, cl in zip(boxes, scores, classes):
        left, top, right, bottom = [int(_b) for _b in box]
        print("%s @ (%d %d %d %d) %.3f" % (CLASSES[cl], left, top, right, bottom, score))
        cv2.rectangle(image, (left, top), (right, bottom), (255, 0, 0), 2)
        cv2.putText(image, '{0} {1:.2f}'.format(CLASSES[cl], score),
                    (left, top - 6), cv2.FONT_HERSHEY_SIMPLEX, 0.6, (0, 0, 255), 2)


def setup_model(args):
    # 根据设备类型选择模型
    if args.model_path:
        rknn_model = args.model_path
    else:
        rknn_model = 'pallet_detection.rknn'  # Replace with your model path

    rknn_lite = RKNNLite()
    ret = rknn_lite.load_rknn(rknn_model)
    if ret != 0:
        print('Load RKNN model failed')
        exit(ret)
    print('done')
    return rknn_lite


if __name__ == '__main__':
    parser = argparse.ArgumentParser(description='RKNNLite inference example')
    parser.add_argument('--model_path', type=str, required=False, help='model path, could be .rknn file')
    parser.add_argument('--target', type=str, required=False, default='rk3566', help='target RKNPU platform')
    parser.add_argument('--img_folder', type=str, default='../model', help='img folder path')
    parser.add_argument('--img_show', action='store_true', default=False, help='draw the result and show')
    parser.add_argument('--img_save', action='store_true', default=False, help='save the result')
    parser.add_argument('--coco_map_test', action='store_true', help='enable coco map test')
    args = parser.parse_args()

    # 初始化模型
    rknn_lite = setup_model(args)
    print('--> Init runtime environment')
    ret = rknn_lite.init_runtime()
    if ret != 0:
        print('Init runtime environment failed')
        exit(ret)
    print('done')

    # 加载图片
    file_list = sorted(os.listdir(args.img_folder))
    img_list = [f for f in file_list if f.lower().endswith(('.jpg', '.jpeg', '.png', '.bmp'))]
    co_helper = COCO_test_helper(enable_letter_box=True)

    # 定义锚点(这里用的是yolo默认的锚点, 可以使用自定义训练后生成的)
    anchors = [
        [[10, 13], [16, 30], [33, 23]],     # 第一个尺度的锚点
        [[30, 61], [62, 45], [59, 119]],    # 第二个尺度的锚点
        [[116, 90], [156, 198], [373, 326]] # 第三个尺度的锚点
    ]

    # 运行推理
    for i, img_name in enumerate(img_list):
        print('infer {}/{}'.format(i + 1, len(img_list)), end='\r')

        img_path = os.path.join(args.img_folder, img_name)
        img_src = cv2.imread(img_path)
        if img_src is None:
            continue

        img = co_helper.letter_box(im=img_src.copy(), new_shape=(IMG_SIZE[1], IMG_SIZE[0]), pad_color=(0, 0, 0))
        img = cv2.cvtColor(img, cv2.COLOR_BGR2RGB)
        img = img[np.newaxis, ...]  # 增加批次维度以匹配4D输入要求

        # 推理
        outputs = rknn_lite.inference(inputs=[img])

        # 输出调试信息
        for idx, output in enumerate(outputs):
            print(f"Output[{idx}] shape: {output.shape}")

        boxes, classes, scores = post_process(outputs, anchors=anchors)

        if args.img_show or args.img_save:
            print('\n\nIMG: {}'.format(img_name))
            img_p = img_src.copy()
            if boxes is not None:
                draw(img_p, co_helper.get_real_box(boxes), scores, classes)

            if args.img_save:
                result_path = os.path.expanduser(f'~/result_{i+1}.jpg')
                cv2.imwrite(result_path, img_p)
                print('Detection result save to {}'.format(result_path))
            if args.img_show:
                cv2.imshow("full post process result", img_p)
                cv2.waitKeyEx(0)

    rknn_lite.release()
运行推理
# 以下命令需要在虚拟环境中进行, 当前应该在以下目录 rknn_model_zoo/examples/yolov5/python
python3 pallet_detect.py --model_path ~/new.rknn --img_folder images/ --img_save
# 修改model_path为新模型的实际目录
# 修改img_folder为实际要测试的图像集
# 如果需要保存图像, 则加上--img_save, 会将图片保存到当前路径下, 以result_*jpg为名