后台管理系统的通用权限解决方案(二)SpringBoot整合Swagger Springfox实现接口日志文档
文章目录
- 1 Swagger介绍
- 2 Swagger常用注解
- 3 Swagger使用案例
1 Swagger介绍
使用Swagger,我们只需要按照它的规范去定义接口及接口相关的信息,再通过Swagger衍生出来的一系列项目和工具,就可以做到生成各种格式的接口文档,生成多种语言的客户端和服务端的代码,以及在线调试接口等等。
这样,在开发项目的新版本或者迭代版本时,只需要更新Swagger描述文件,就可以自动生成接口文档和客户端服务端代码,做到调用端代码、服务端代码以及接口文档的一致性。
为了简化Swagger的使用,Spring框架对Swagger进行了整合,建立了Spring-swagger项目,后面改成了现在的Springfox。
通过在项目中引入Springfox,就可以扫描相关的代码,生成描述文件,进而生成与代码一致的接口文档和客户端代码。
2 Swagger常用注解
| 注解 | 说明 |
|---|---|
| @Api | 用在请求的类上,例如Controller类,表示对类的说明 |
| @ApiModel | 用在响应的类上,通常是实体类,表示一个返回响应数据的信息 |
| @ApiModelProperty | 用在属性上,描述响应类的属性 |
| @ApiOperation | 用在请求的方法上,说明方法的用途、作用 |
| @ApiImplicitParams | 用在请求的方法上,表示一组参数说明 |
| @ApiImplicitParam | 用在@ApiImplicitParams注解中,指定一个请求参数的各个方面 |
3 Swagger使用案例
- 1)创建maven工程
swagger-demo,并配置其pom.xml文件如下
<?xml version="1.0" encoding="UTF-8"?>
<project xmlns="http://maven.apache.org/POM/4.0.0"
         xmlns:xsi="http://www.w3.org/2001/XMLSchema-instance"
         xsi:schemaLocation="http://maven.apache.org/POM/4.0.0 http://maven.apache.org/xsd/maven-4.0.0.xsd">
    <modelVersion>4.0.0</modelVersion>
    <parent>
        <groupId>org.springframework.boot</groupId>
        <artifactId>spring-boot-starter-parent</artifactId>
        <version>2.2.2.RELEASE</version>
        <relativePath/>
    </parent>
    <groupId>com.hsgx</groupId>
    <artifactId>swagger-demo</artifactId>
    <version>1.0-SNAPSHOT</version>
    <properties>
        <maven.compiler.source>8</maven.compiler.source>
        <maven.compiler.target>8</maven.compiler.target>
        <project.build.sourceEncoding>UTF-8</project.build.sourceEncoding>
    </properties>
    <dependencies>
        <dependency>
            <groupId>org.springframework.boot</groupId>
            <artifactId>spring-boot-starter-web</artifactId>
        </dependency>
        <dependency>
            <groupId>org.projectlombok</groupId>
            <artifactId>lombok</artifactId>
        </dependency>
        <!--springfox-->
        <dependency>
            <groupId>io.springfox</groupId>
            <artifactId>springfox-swagger-ui</artifactId>
            <version>2.9.2</version>
        </dependency>
        <dependency>
            <groupId>io.springfox</groupId>
            <artifactId>springfox-swagger2</artifactId>
            <version>2.9.2</version>
        </dependency>
    </dependencies>
</project>
- 2)创建实体类
User,并添加@ApiModel注解和@ApiModelProperty注解
package com.hsgx.pojo;

import io.swagger.annotations.ApiModel;
import io.swagger.annotations.ApiModelProperty;
import lombok.Data;

@Data
@ApiModel(description = "用户实体")
public class User {
    @ApiModelProperty(value = "主键")
    private Integer id;
    @ApiModelProperty(value = "姓名")
    private String name;
    @ApiModelProperty(value = "年龄")
    private Integer age;
    @ApiModelProperty(value = "地址")
    private String address;
}
- 3)创建
UserController类,实现分页查询方法,并添加@Api、@ApiOperation、@ApiImplicitParams、@ApiImplicitParam注解
package com.hsgx.controller;

import io.swagger.annotations.Api;
import io.swagger.annotations.ApiImplicitParam;
import io.swagger.annotations.ApiImplicitParams;
import io.swagger.annotations.ApiOperation;
import org.springframework.web.bind.annotation.GetMapping;
import org.springframework.web.bind.annotation.PathVariable;
import org.springframework.web.bind.annotation.RequestMapping;
import org.springframework.web.bind.annotation.RestController;

@RestController
@RequestMapping("/user")
@Api(tags = "用户控制器")
public class UserController {

    @ApiImplicitParams({
            @ApiImplicitParam(name = "pageNum", value = "页码",
                    required = true, type = "Integer"),
            @ApiImplicitParam(name = "pageSize", value = "每页条数",
                    required = true, type = "Integer"),
    })
    @ApiOperation(value = "分页查询用户信息")
    @GetMapping(value = "page/{pageNum}/{pageSize}")
    public String findByPage(@PathVariable Integer pageNum,
                             @PathVariable Integer pageSize) {
        return "OK";
    }

}
- 4)创建配置类
SwaggerAutoConfiguration,并添加@EnableSwagger2注解
package com.hsgx.config;

import org.springframework.context.annotation.Bean;
import org.springframework.context.annotation.Configuration;
import springfox.documentation.builders.ApiInfoBuilder;
import springfox.documentation.builders.RequestHandlerSelectors;
import springfox.documentation.service.ApiInfo;
import springfox.documentation.service.Contact;
import springfox.documentation.spi.DocumentationType;
import springfox.documentation.spring.web.plugins.Docket;
import springfox.documentation.swagger2.annotations.EnableSwagger2;

@Configuration
@EnableSwagger2
public class SwaggerAutoConfiguration {

    @Bean
    public Docket createRestApi1() {
        Docket docket = new Docket(DocumentationType.SWAGGER_2)
                .apiInfo(apiInfo()).groupName("用户接口组")
                .select()
                //为当前包路径
                .apis(RequestHandlerSelectors.basePackage("com.hsgx.controller"))
                .build();
        return docket;
    }

    // 构建api文档的详细信息
    private ApiInfo apiInfo() {
        return new ApiInfoBuilder()
                //页面标题
                .title("API接口文档")
                //创建人
                .contact(new Contact("灰色孤星", "http://www.hsgx.com", ""))
                //版本号
                .version("1.0")
                //描述
                .description("API 描述")
                .build();
    }
}
- 5)创建启动类
SwaggerDemoApp
package com.hsgx;

import org.springframework.boot.SpringApplication;
import org.springframework.boot.autoconfigure.SpringBootApplication;

@SpringBootApplication
public class SwaggerDemoApp {

    public static void main(String[] args) {
        SpringApplication.run(SwaggerDemoApp.class, args);
    }
}
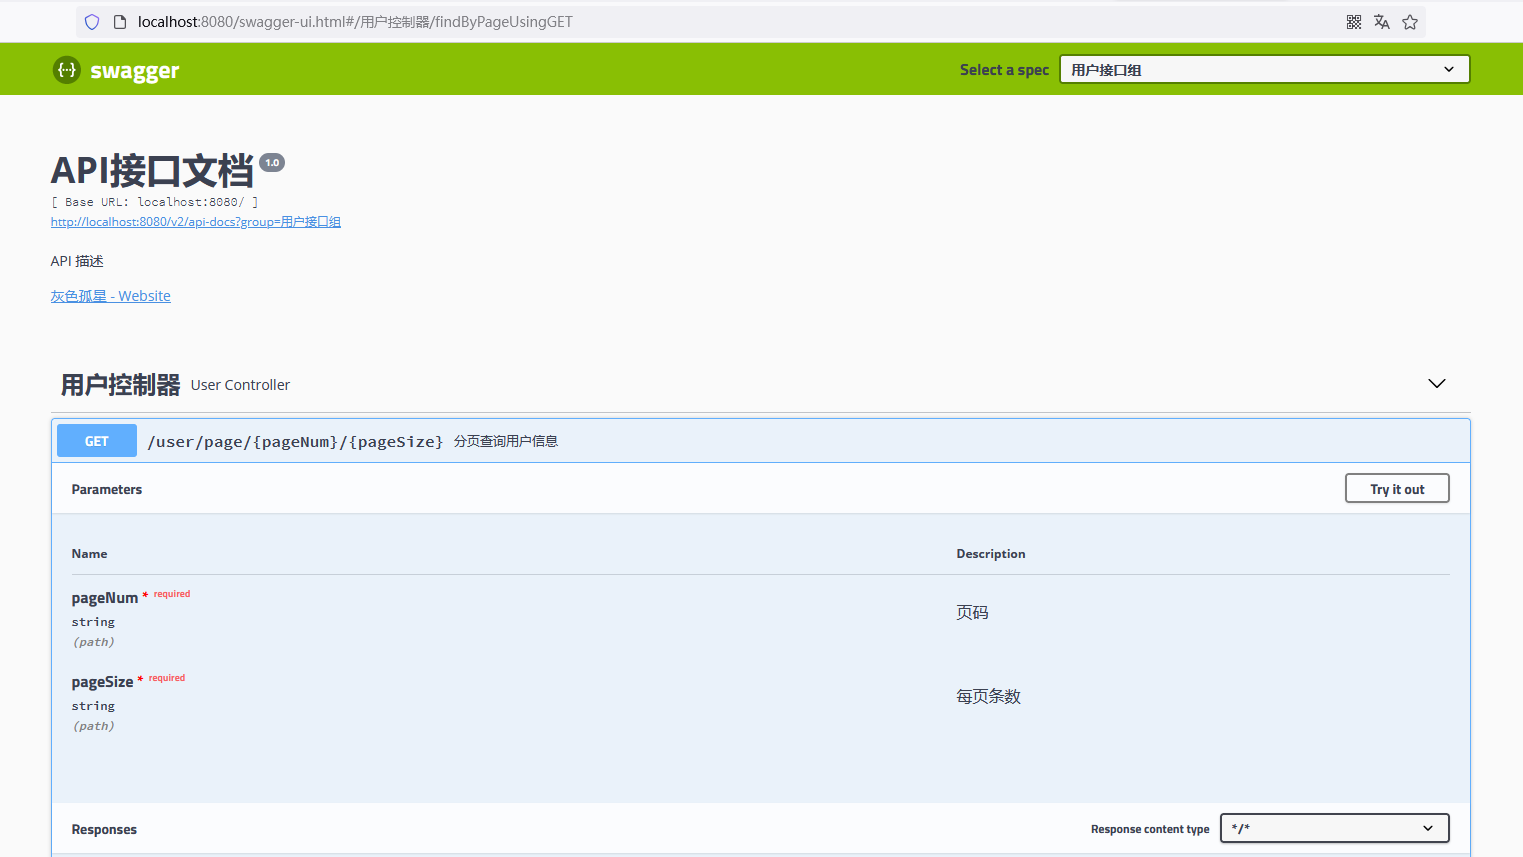
- 6)启动服务,访问地址:
http://localhost:8080/swagger-ui.html

由结果可知,Swagger根据我们配置的注解自动生成了接口文档,后续前端开发者和后端开发者都可以根据这个文件进行开发。
…
本节完,更多内容查阅:后台管理系统的通用权限解决方案
延伸阅读:后台管理系统的通用权限解决方案(一)如何自定义一个starter?
