使用AMD GPU和ONNX Runtime高效生成图像与Stable Diffusion模型
Efficient image generation with Stable Diffusion models and ONNX Runtime using AMD GPUs

2024年2月23日撰写,作者[道格拉斯·贾(Douglas Jia)](Douglas Jia — ROCm Blogs)
在这篇博客中,我们将向您展示如何使用预训练的Stable Diffusion模型,通过ONNX Runtime在AMD GPU上生成图像。功能包括从文本生成图像(文本到图像)、转换已有视觉内容(图像到图像)以及修复损坏的图片(修复)。
稳健扩散(Stable Diffusion)
稳健扩散在图像生成领域中崭露头角,成为一项突破性的革新技术,使用户能够将文本描述无缝转换为引人注目的视觉图像。
稳健扩散使用扩散建模(diffusion modeling)在前向传递过程中逐步向图像中引入噪声,直到图像变得不可辨认。接着,在文本提示的引导下,模型仔细逆转这一过程,逐渐将噪声图像细化回与文本输入相一致的连贯且有意义的图像表示。这一创新技术使得稳健扩散能够以卓越的保真度和对文本描述高度忠实的方式生成图像。通过仔细控制扩散过程并结合文本引导,模型有效地捕捉了文本的本质,并将抽象概念转换为生动的视觉呈现。
稳健扩散的多功能性不仅限于文本到图像生成,还包括一系列图像操作任务,如图像到图像翻译(image-to-image translation)和图像修复(inpainting)。
图像到图像翻译*及在保留图像基本特征的同时,将一个图像转换为另一个图像,例如风格、配色和结构。
图像修复则是在图像缺失或损坏的区域填充合理且一致的细节,以修复损坏或不完整的图像。
ONNX Runtime#
ONNX Runtime 是一个开源的推理和训练加速器,用于优化各种硬件平台上的机器学习模型,包括 AMD GPU。通过利用 ONNX Runtime,Stable Diffusion 模型可以在 AMD GPU 上流畅运行,大大加快图像生成过程,同时保持卓越的图像质量。
设置运行环境
只要正确安装了ROCm及其兼容的软件包,Stable Diffusion模型就可以在AMD GPU上运行。本文中的代码片段已经在ROCm 5.6、Ubuntu 20.04、Python 3.8和PyTorch 2.0.1上进行了测试。为了方便起见,你可以在Linux系统中直接拉取和运行以下Docker镜像:
docker run -it --ipc=host --network=host --device=/dev/kfd --device=/dev/dri \
           --group-add video --cap-add=SYS_PTRACE --security-opt seccomp=unconfined \
           --name=sdxl rocm/pytorch:rocm5.6_ubuntu20.04_py3.8_pytorch_2.0.1 /bin/bash
要运行本文提供的代码片段,你首先需要安装Optimum和ONNX Runtime Python包。
Hugging Face的Optimum包通过提供专门的性能优化工具来增强Transformers,以实现目标硬件上的高效模型训练。Optimum的核心是利用配置对象来定义各种加速器的优化参数,从而创建专用的优化器、量化器和剪枝器。特别地,Optimum与ONNX Runtime无缝集成,增强其在优化和部署模型时的适应性,以提升性能。
注意
要成功运行模型,必须安装与ROCm兼容的ONNX Runtime包。请参考不同ROCm版本的 ONNX Runtime wheels 列表。推荐使用稳定版本的包。
pip install https://download.onnxruntime.ai/onnxruntime_training-1.16.3%2Brocm56-cp38-cp38-manylinux_2_17_x86_64.manylinux2014_x86_64.whl
pip install optimum diffusers accelerate deepspeed numpy==1.20.3
图像处理
在接下来的部分中,我们使用来自 optimum.onnxruntime 类的稳定扩散推理管道。鉴于稳定扩散模型检查点的大小,我们首先将diffuser模型导出为ONNX模型格式,然后将其保存到本地。在这之后,我们加载并使用本地模型进行推理。通过指定`provider="ROCMExecutionProvider"`,我们要求ONNX运行时尽可能使用我们的AMD GPU进行推理。
提示
要了解AMD GPU可以节省多少时间,您可以使用`provider="CPUExecutionProvider"`。
为了避免在运行本教程的每个部分时出现内存错误,您可能需要清除以前的Python shell,然后重新加载包和模型。
文本到图像
# 仅需运行以下代码块一次以将模型保存到本地。之后,只需加载本地模型。
from optimum.onnxruntime import ORTStableDiffusionXLPipeline

model_id = "stabilityai/stable-diffusion-xl-base-1.0"
pipeline_rocm = ORTStableDiffusionXLPipeline.from_pretrained(
    model_id,
    export=True,
    provider="ROCMExecutionProvider",
)
pipeline_rocm.save_pretrained("sdxl_onnx_base")
from optimum.onnxruntime import ORTStableDiffusionXLPipeline

pipeline_rocm = ORTStableDiffusionXLPipeline.from_pretrained(
    "./sdxl_onnx_base", export=False, provider="ROCMExecutionProvider"
)
您可以在注释和未注释的提示之间切换,以探索模型生成的多种图像。此外,我们鼓励您创建自己的提示,以测试模型输出的创造力和多样性。
# prompt = "the house in the forest, dark night, leaves in the air, fluorescent mushrooms, clear focus, very coherent, very detailed, contrast, vibrant, digital painting"
# prompt = "A photorealistic portrait of a young woman with flowing red hair and piercing green eyes, smiling warmly against a backdrop of lush greenery."
# prompt = "A classic oil painting depicting a grand banquet scene, with nobles and ladies adorned in exquisite attire feasting under a chandelier's soft glow."
# prompt = "A pixel art rendition of a bustling cyberpunk cityscape, neon lights illuminating skyscrapers and holographic advertisements casting a vibrant glow."
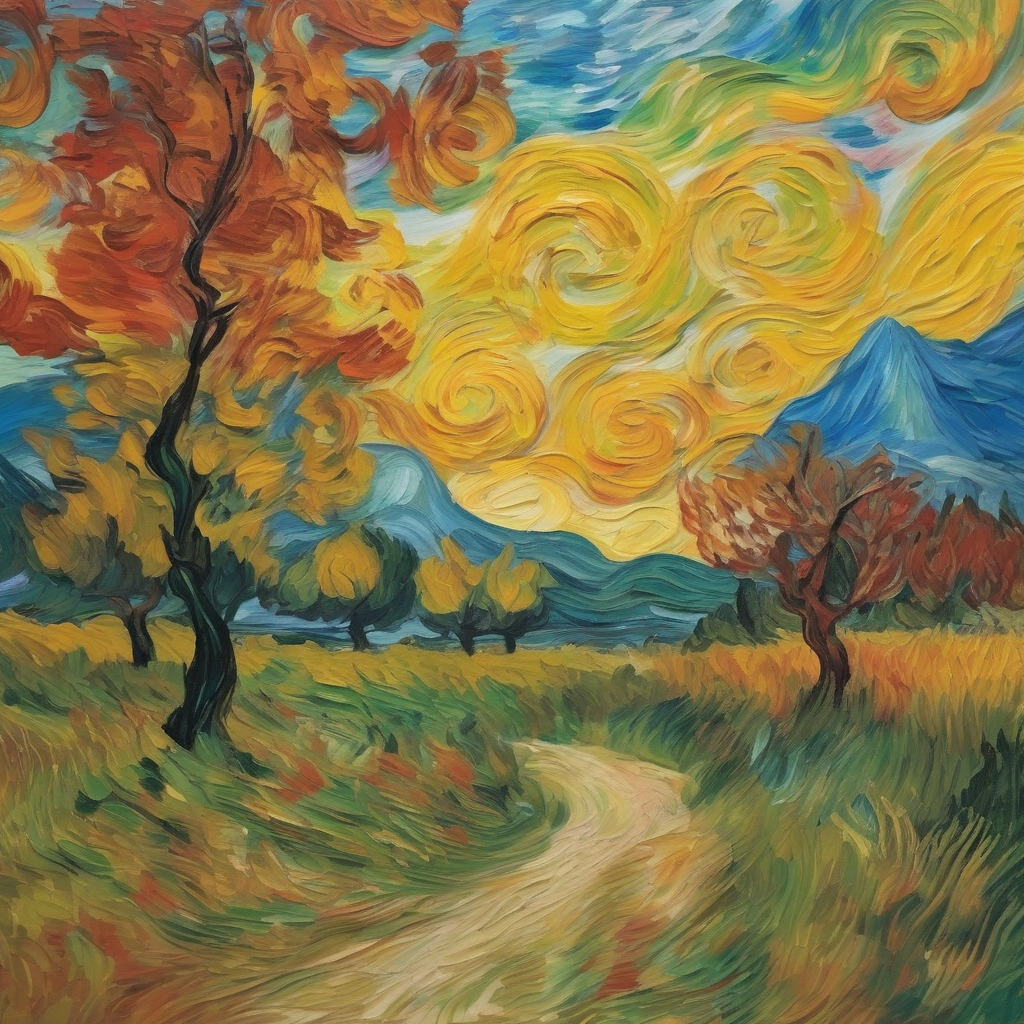
prompt = "A Van Gogh-inspired landscape painting, capturing the swirling brushstrokes and vibrant colors characteristic of the artist's style."
images = pipeline_rocm(prompt=prompt).images[0]
# You can also use images.save('file_name.png') if you are using a remote machine and cannot show images inline.
images.show()
100%|██████████| 50/50 [01:30<00:00, 1.80s/it]

图像到图像
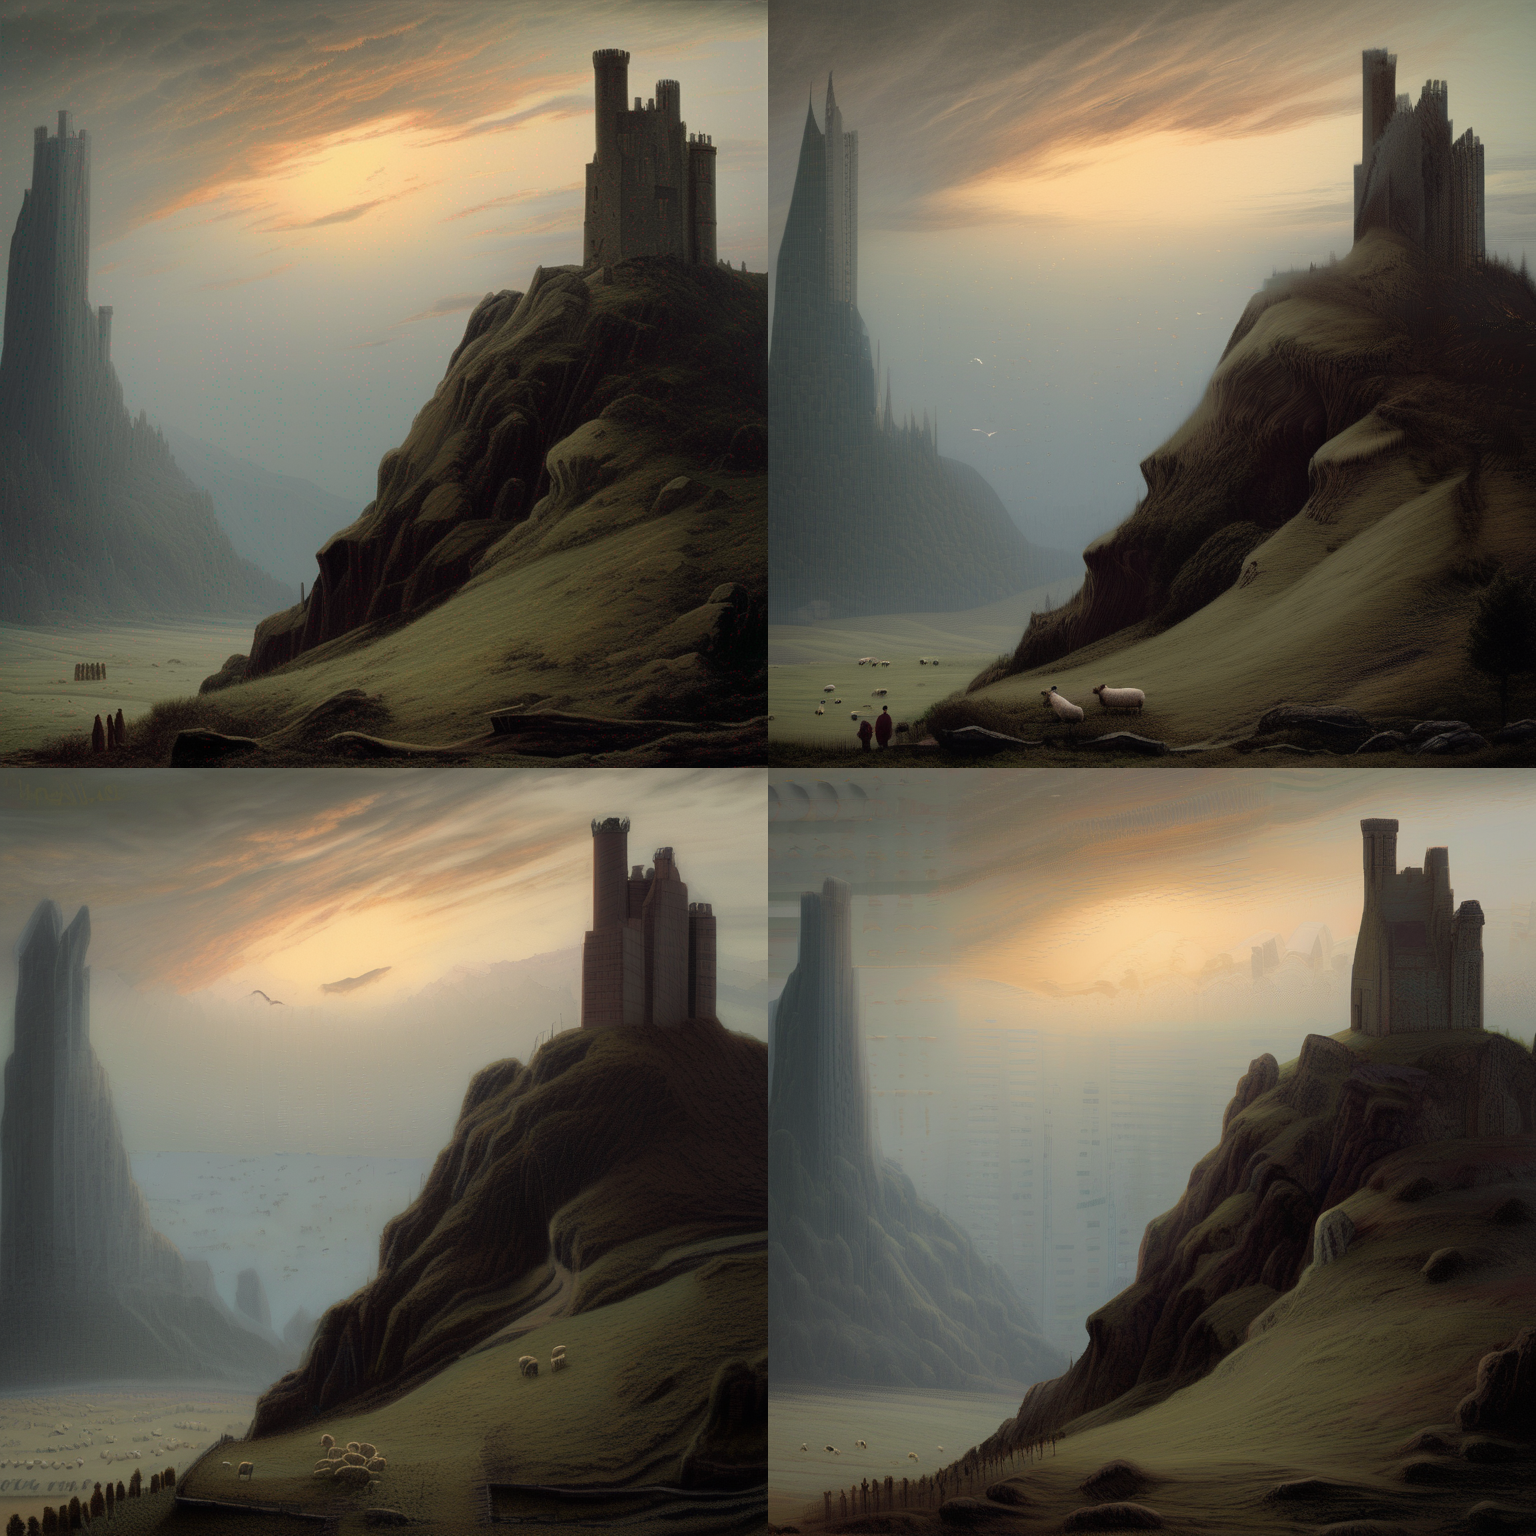
在这个任务中,我们提供一个文本提示和一张图像,指导Stable Diffusion根据文本来修改图像。
from diffusers.utils import load_image, make_image_grid
from optimum.onnxruntime import ORTStableDiffusionXLImg2ImgPipeline

pipeline = ORTStableDiffusionXLImg2ImgPipeline.from_pretrained(
    "./sdxl_onnx_base", export=False, provider="ROCMExecutionProvider"
)
url = "https://huggingface.co/datasets/optimum/documentation-images/resolve/main/intel/openvino/sd_xl/castle_friedrich.png"
image_in = load_image(url).convert("RGB")
prompt = "A multitude of sheep blankets the hillside"
images = pipeline(prompt, image=image_in, num_images_per_prompt=3).images

make_image_grid([image_in, *images], rows=2, cols=2)
100%|██████████| 15/15 [00:15<00:00, 1.04s/it]
修改后的图像保留了原图的风格、纹理和关键元素,同时根据文本提示加入了指定的变化。

修复(Inpainting)
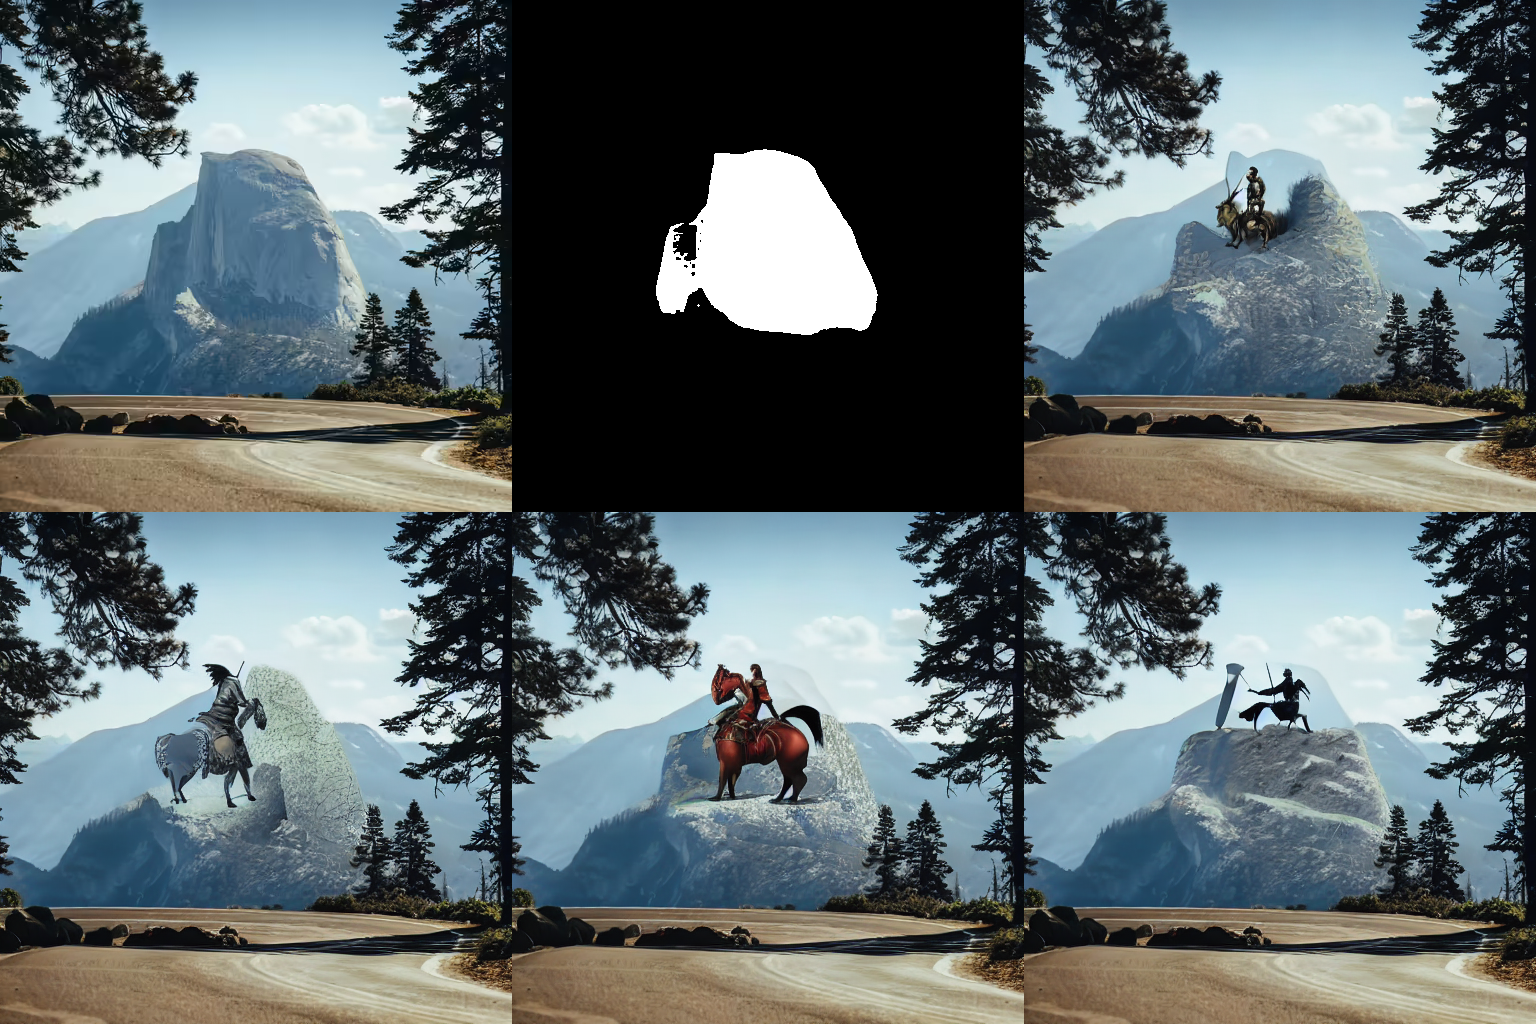
修复(Inpainting)涉及使用细致的技术重建图像中丢失或损坏的部分。利用稳定扩散模型,这个过程中智能生成内容以填补识别出的空白,确保与现有的上下文无缝融合,同时保持整体的连贯性和风格。这种方法对于需要恢复、增强或完成图像中被遮蔽或损坏部分的任务尤为有效。要启动修复管道,基本输入包括基础图像、模拟缺失或损坏部分的掩码,以及指导管道如何创建缺失部分的文本提示。
以下示例生成的图像展示了管道不仅基于提示生成部分内容的能力,还能与原始图像的周围环境和谐共存。
# 这段代码只需运行一次,以将模型保存到本地。之后,可以加载本地模型。
from optimum.onnxruntime import ORTStableDiffusionInpaintPipeline

pipeline_in = ORTStableDiffusionInpaintPipeline.from_pretrained(
    "runwayml/stable-diffusion-inpainting",
    export=True,
    provider="ROCMExecutionProvider",
)
pipeline_in.save_pretrained("sd_inpaint")
from diffusers.utils import load_image, make_image_grid
from optimum.onnxruntime import ORTStableDiffusionInpaintPipeline

pipeline_in = ORTStableDiffusionInpaintPipeline.from_pretrained(
    "sd_inpaint", export=False, provider="ROCMExecutionProvider"
)
# 加载基础图像和掩码图像
init_image = load_image(
    "https://huggingface.co/datasets/huggingface/documentation-images/resolve/main/diffusers/inpaint.png"
)
mask_image = load_image(
    "https://huggingface.co/datasets/huggingface/documentation-images/resolve/main/diffusers/inpaint_mask.png"
)

prompt = "concept art of a Medieval Knight holding a sword riding on a horse on a huge stone, highly detailed, 8k"
image = pipeline_in(
    prompt=prompt, image=init_image, mask_image=mask_image, num_images_per_prompt=4
).images
make_image_grid([init_image, mask_image, *image], rows=2, cols=3)
100%|██████████| 50/50 [00:24<00:00, 2.07it/s]

