【HarmonyOS Next】状态管理V2版本使用详解
概述
现阶段状态管理V2版本还在试用阶段,但是切实解决了很多在项目中使用V1导致的痛点问题,比如:
- 同一数据被多视图代理时,无法同步数据修改。
- 无法做到深度观测和深度监听。
- 更新对象中某个数据时,会导致整个对象属性都刷新,导致程序运行缓慢。
状态管理V2版 装饰器总览
- @ObservedV2:装饰class,使得装饰的class具有深度监听的能力。
- @Trace:只能在@ObservedV2装饰的class中使用,被装饰的属性具有深度观测的能力。
- @ComponentV2:装饰页面或者自定义组件。确定struct中可以使用V2版的装饰器。
- @Local:装饰的变量为当前组件的内部状态,无法从外部初始化。
- @Param:装饰的变量为组件的输入,可以接受从外部传入初始化并同步。
- @Once:装饰的变量仅初始化时同步一次,需要与@Param一起使用。
- @Event:装饰方法类型,作为组件输出,可以通过该方法影响父组件中变量。
- @Monitor:装饰器用于@ComponentV2装饰的自定义组件或@ObservedV2装饰的类中,能够对状态变量进行深度监听。
- @Provider和@Consumer:用于跨组件层级双向同步。
- @Computed:计算属性,在被计算的值变化的时候,只会计算一次。主要应用于解决UI多次重用该属性从而重复计算导致的性能问题
- !!语法:双向绑定语法糖。
class的深入监测
使用@ObservedV2和@Trace两种装饰器,实现对属性修改的观测能力。具有以下特点:
- 被@Trace装饰器装饰的属性变化时,仅会通知属性关联的组件进行刷新。
- @ObservedV2的类实例目前不支持使用JSON.stringify进行序列化。
@Trace可装饰的变量
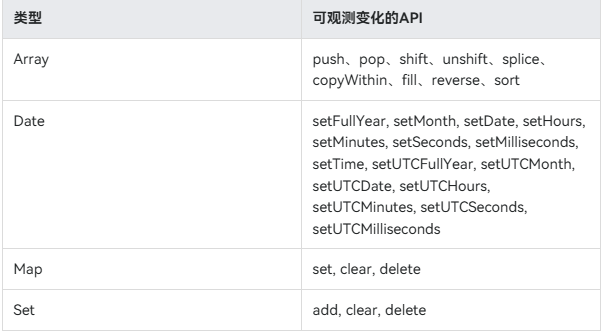
class中成员属性。属性的类型可以为number、string、boolean、class、Array、Date、Map、Set等类型。
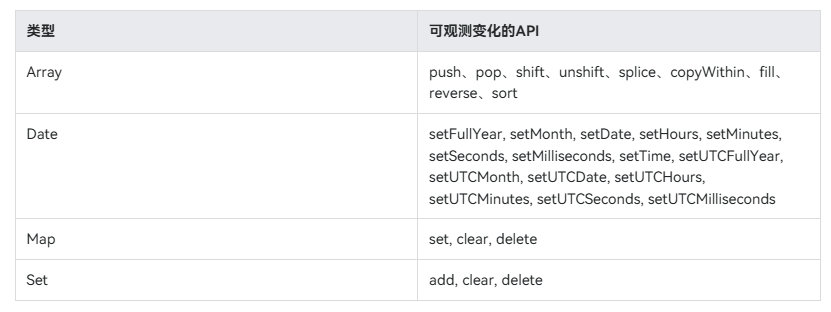
@Trace可观测API变化
使用
新建三个class,Father,Son,Son2。
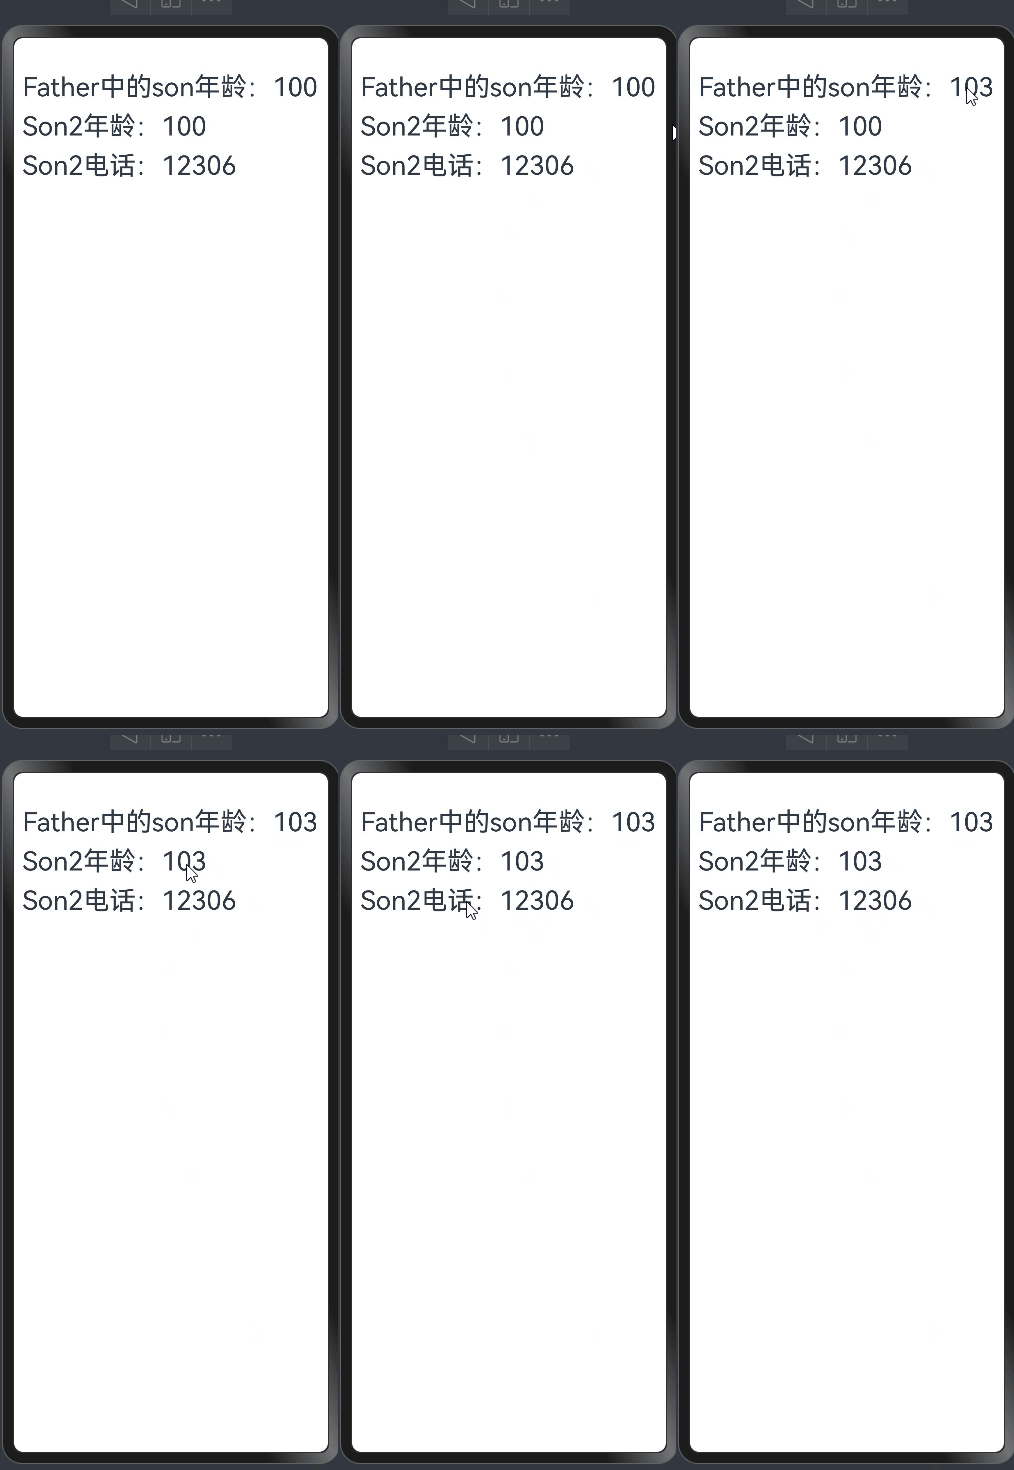
- Son类被@ObservedV2装饰器装饰,age属性被@Trace装饰器装饰。因此,age属性的修改会引起UI更新。
- Father类没有被@ObservedV2装饰器修饰。
- Son2类继承Son类,有一个没有被@Trace装饰器装饰的Telephone属性。
@Entry
@ComponentV2
struct ObservedPage {
  father: Father = new Father();
  son2: Son2 = new Son2();

  build() {
    Column({ space: 10 }) {
      Text(`Father中的son年龄:${this.father.son.age}`)
        .fontSize(30)
        .onClick(() => {
          this.father.son.age++;
        })

      Text(`Son2年龄:${this.son2.age}`)
        .fontSize(30)
        .onClick(() => {
          this.son2.age++;
        })

      Text(`Son2电话:${this.son2.Telephone}`)
        .fontSize(30)
        .onClick(() => {
          this.son2.Telephone = "12348";
        })
    }
    .height('100%')
    .width('100%')
    .alignItems(HorizontalAlign.Start)
    .margin({ left: 10 })
  }
}

@ObservedV2
class Son {
  @Trace age: number = 100;
}

class Father {
  son: Son = new Son();
}

class Son2 extends Son {
  Telephone: string = "12306";
}
实现效果如下:
自定义组件
使用@ComponentV2装饰器结合@Local、@Param、@Once、@Event、@Provider、@Consumer等装饰器,实现自定义组件的状态观测。
使用时需要注意的点是:复杂类型常量重复赋值给状态变量时,会重复触发刷新,可能导致冗余刷新,因此,为了避免这种不必要的赋值和刷新,可以使用UIUtils.getTarget()获取原始对象提前进行新旧值的判断,当两者相同时不执行赋值。
@Local
使用@Local装饰对象,可以达到观测对象本身变化的效果。
具有以下特点:
- 被@Local装饰的变量无法从外部初始化,因此必须在组件内部进行初始化。
- @Local支持观测number、boolean、string、Object、class等基本类型以及Array、Set、Map、Date等内嵌类型。
- @Local支持null、undefined以及联合类型。
- 当装饰的变量类型是内置类型时,可以观察到变量整体赋值以及通过API调用带来的变化。
代码实现
新建一个class对象Info,其中name属性被@Trace装饰器装饰,age属性没有被装饰
@Entry
@ComponentV2
struct ComponentPage {
  info1: Info = new Info("Tom", 25);
  @Local info2: Info = new Info("Tom", 25);

  build() {
    Column({ space: 10 }) {
      Text(`info1: ${this.info1.name}-${this.info1.age}`).fontSize(30) // Text1
      Text(`info2: ${this.info2.name}-${this.info2.age}`).fontSize(30) // Text2
      Button("change info1&info2")
        .onClick(() => {
          this.info1 = new Info("Lucy", 18); // Text1不会刷新
          this.info2 = new Info("Lucy", 18); // Text2会刷新
        })
      Button("修改info2的名字")
        .onClick(() => {
          this.info2.name = "zzx" // Text2会刷新
        })
      Button("修改info2的年龄")
        .onClick(() => {
          this.info2.age++; // Text2不会刷新
        })
    }
    .width("100%")
    .height("100%")
  }
}

@ObservedV2
class Info {
  @Trace name: string;
  age: number;

  constructor(name: string, age: number) {
    this.name = name;
    this.age = age;
  }
}
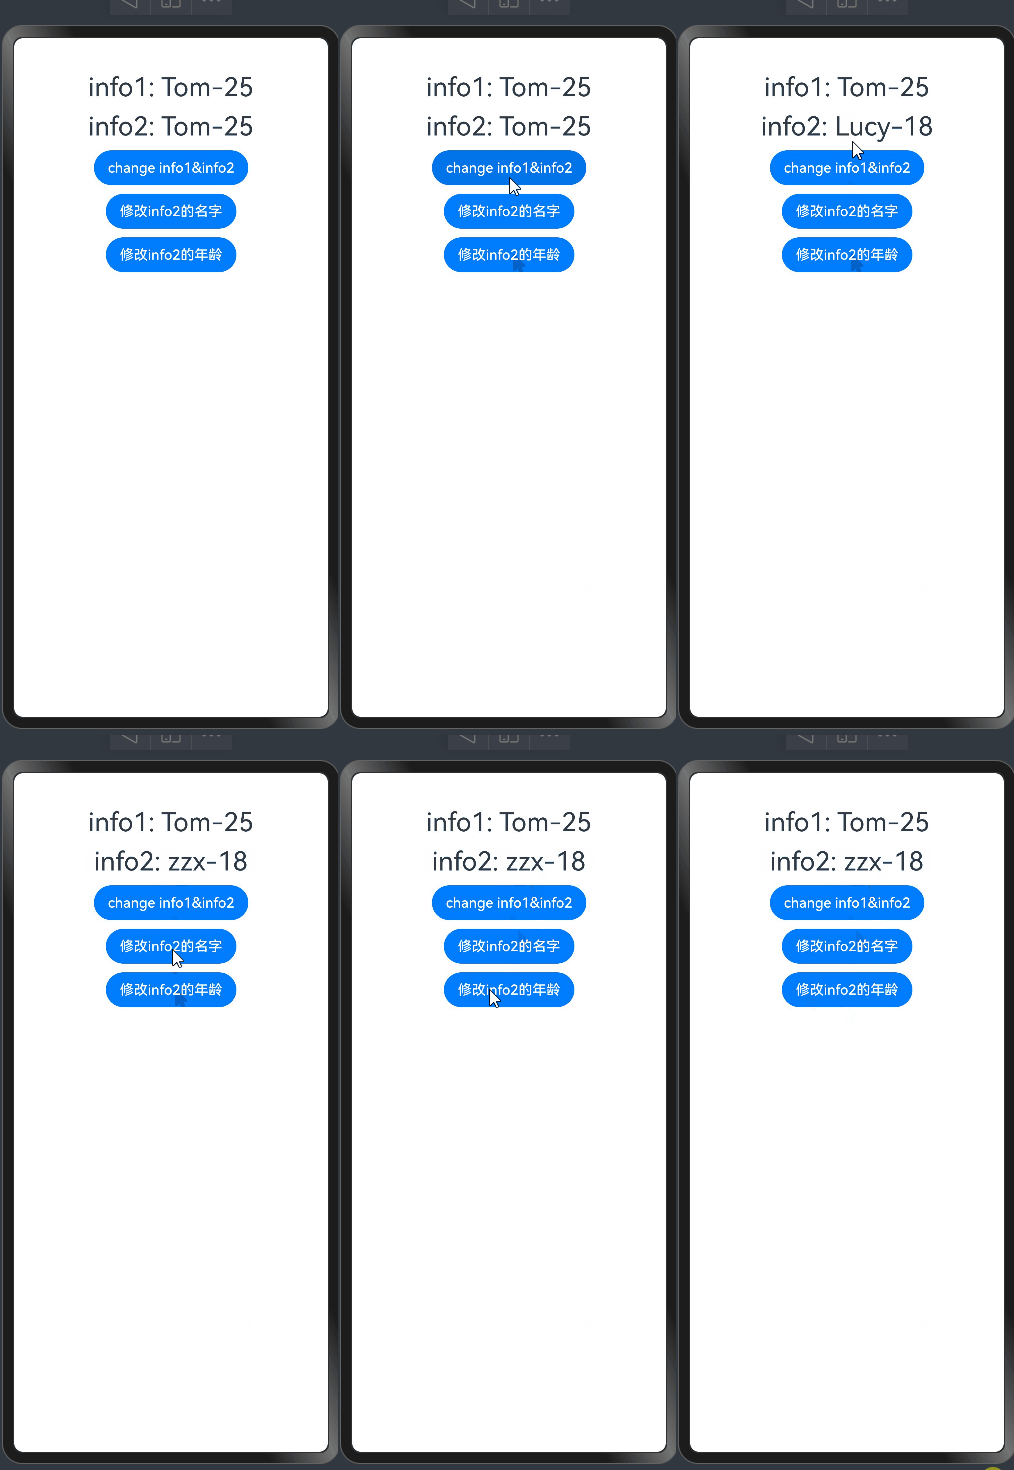
实现效果如下:
- 点击“change info1&info2”按钮,Text1不会刷新,Text2会刷新。
- 点击“修改info2的名字” 按钮,Text2会刷新。
- 点击“修改info2的年龄” 按钮,Text2不会刷新。
@Param
具有以下特点:
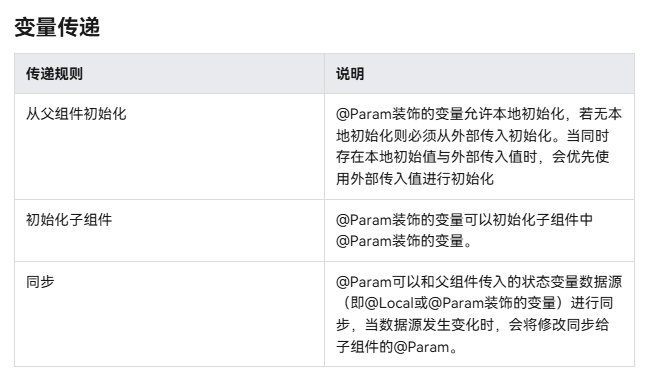
- @Param装饰的变量支持本地初始化,但是不允许在组件内部直接修改变量本身。
- 被@Param装饰的变量能够在初始化自定义组件时从外部传入,当数据源也是状态变量时,数据源的修改会同步给@Param。
- @Param可以接受任意类型的数据源,包括普通变量、状态变量、常量、函数返回值等。
- @Param装饰的变量变化时,会刷新该变量关联的组件。
- @Param支持观测number、boolean、string、Object、class等基本类型以及Array、Set、Map、Date等内嵌类型。
- 当装饰简单类型时,对变量的整体改变能够观测到;当装饰对象类型时,仅能观测对象整体的改变;当装饰数组类型时,能观测到数组整体以及数组元素项的改变;当装饰Array、Set、Map、Date等内嵌类型时,可以观测到通过API调用带来的变化。
- @Param支持null、undefined以及联合类型。
代码实现
@Entry
@ComponentV2
struct ParamPage {
  @Local infoList: ParamInfo[] =
    [new ParamInfo("Alice", 8, 0, 0), new ParamInfo("Barry", 10, 1, 20), new ParamInfo("Cindy", 18, 24, 40)];

  build() {
    Column({ space: 10 }) {
      ForEach(this.infoList, (info: ParamInfo) => {
        MiddleComponent({ info: info })
      })
      Button("修改")
        .onClick(() => {
          this.infoList[0] = new ParamInfo("Atom", 40, 27, 90);
          this.infoList[1].name = "Bob";
          this.infoList[2].region = new Region(7, 9);
        })
    }
    .margin({ left: 10 })
    .width("100%")
    .height("100%")
    .alignItems(HorizontalAlign.Start)
  }
}

@ComponentV2
struct MiddleComponent {
  @Param info: ParamInfo = new ParamInfo("0", 0, 0, 0);

  build() {
    Column({ space: 10 }) {
      Text(`name: ${this.info.name}`).fontSize(30)
      Text(`age: ${this.info.age}`).fontSize(30)
      SubComponent({ region: this.info.region })
    }
    .alignItems(HorizontalAlign.Start)
  }
}

@ComponentV2
struct SubComponent {
  @Param region: Region = new Region(0, 0);

  build() {
    Column() {
      Text(`region: ${this.region.x}-${this.region.y}`).fontSize(30)
    }
  }
}

@ObservedV2
class Region {
  @Trace x: number;
  @Trace y: number;

  constructor(x: number, y: number) {
    this.x = x;
    this.y = y;
  }
}

@ObservedV2
class ParamInfo {
  @Trace name: string;
  @Trace age: number;
  @Trace region: Region;

  constructor(name: string, age: number, x: number, y: number) {
    this.name = name;
    this.age = age;
    this.region = new Region(x, y);
  }
}
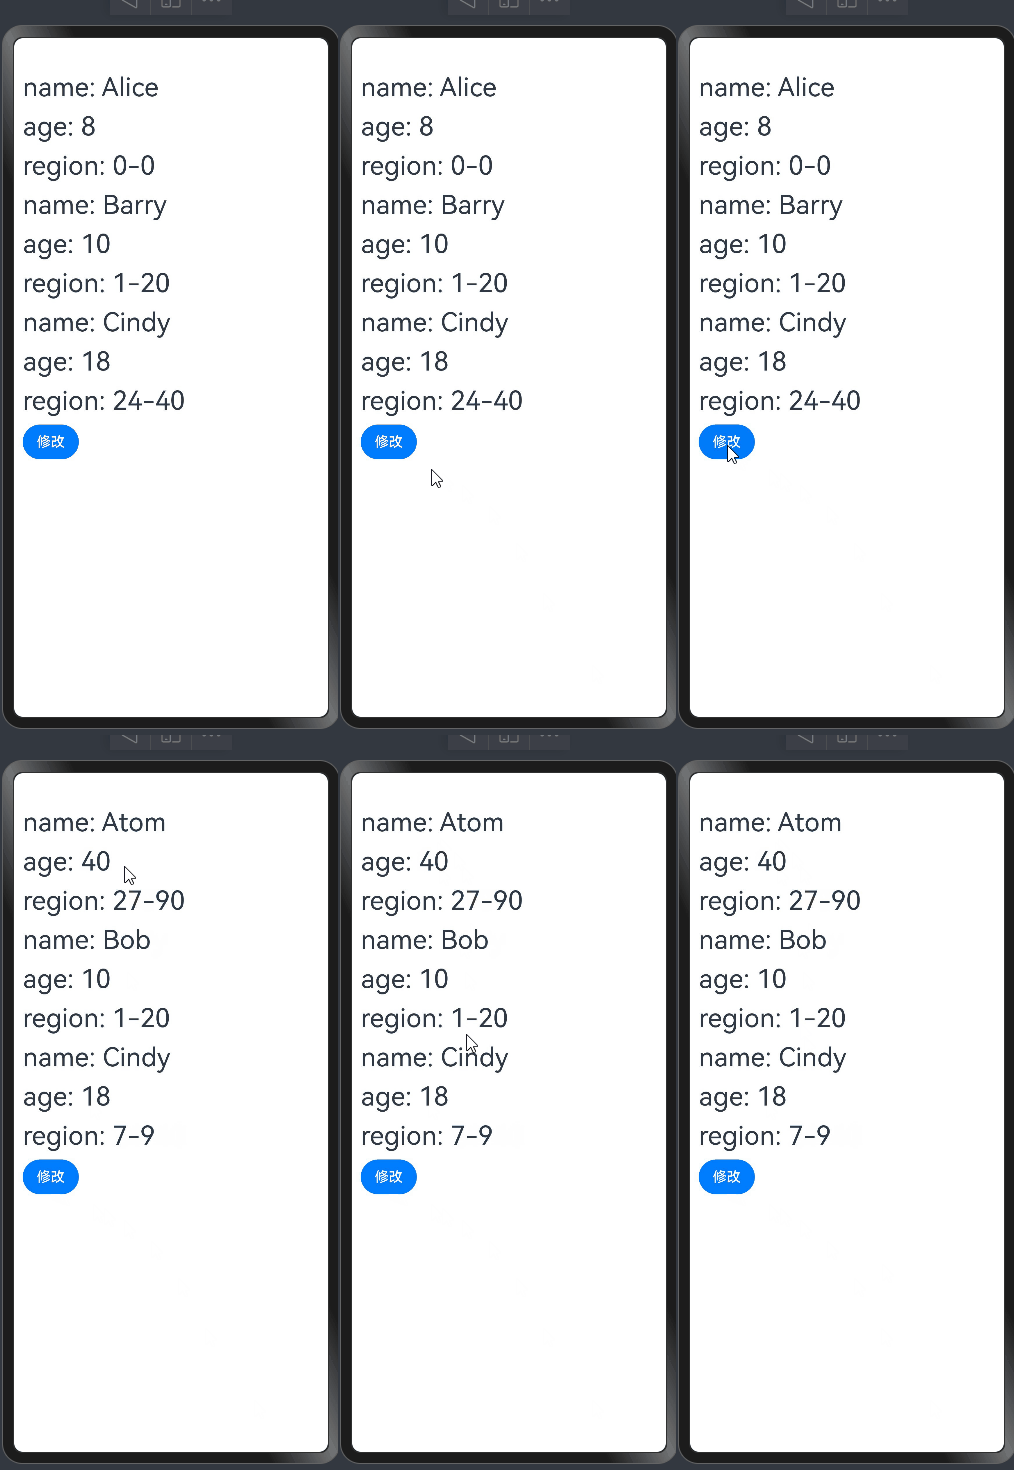
实现效果:
@Once
可以对@Param装饰器的能力进行修改,具有以下的特点:
- @Once必须搭配@Param使用,单独使用或搭配其他装饰器使用都是不允许的。
- @Once不影响@Param的观测能力,仅针对数据源的变化做拦截。
- @Once与@Param搭配使用时,可以在本地修改@Param变量的值。
@Event
使用@Event装饰器装饰回调方法,可以实现子组件对父组件传递的@Param装饰的变量进行修改。类似子组件定义了一个委托函数,然后在父组件初始化的时候,对子组件的委托函数进行定义,子组件可以使用委托函数来实现想要的效果。
使用场景
更改父组件中的变量
@Entry
@ComponentV2
struct EventPage {
  @Local title: string = "Titile One";
  @Local fontColor: Color = Color.Red;

  build() {
    Column() {
      Child({
        title: this.title,
        fontColor: this.fontColor,
        changeFactory: (type: number) => {
          if (type == 1) {
            this.title = "Title One";
            this.fontColor = Color.Red;
          } else if (type == 2) {
            this.title = "Title Two";
            this.fontColor = Color.Green;
          }
        }
      })
    }
    .width("100%")
    .height("100%")
  }
}

@ComponentV2
struct Child {
  @Param title: string = '';
  @Param fontColor: Color = Color.Black;
  @Event changeFactory: (x: number) => void = (x: number) => {
  };

  build() {
    Column({ space: 10 }) {
      Text(`${this.title}`)
      Button("change to Title Two")
        .onClick(() => {
          this.changeFactory(2);
        })
      Button("change to Title One")
        .onClick(() => {
          this.changeFactory(1);
        })
    }
  }
}
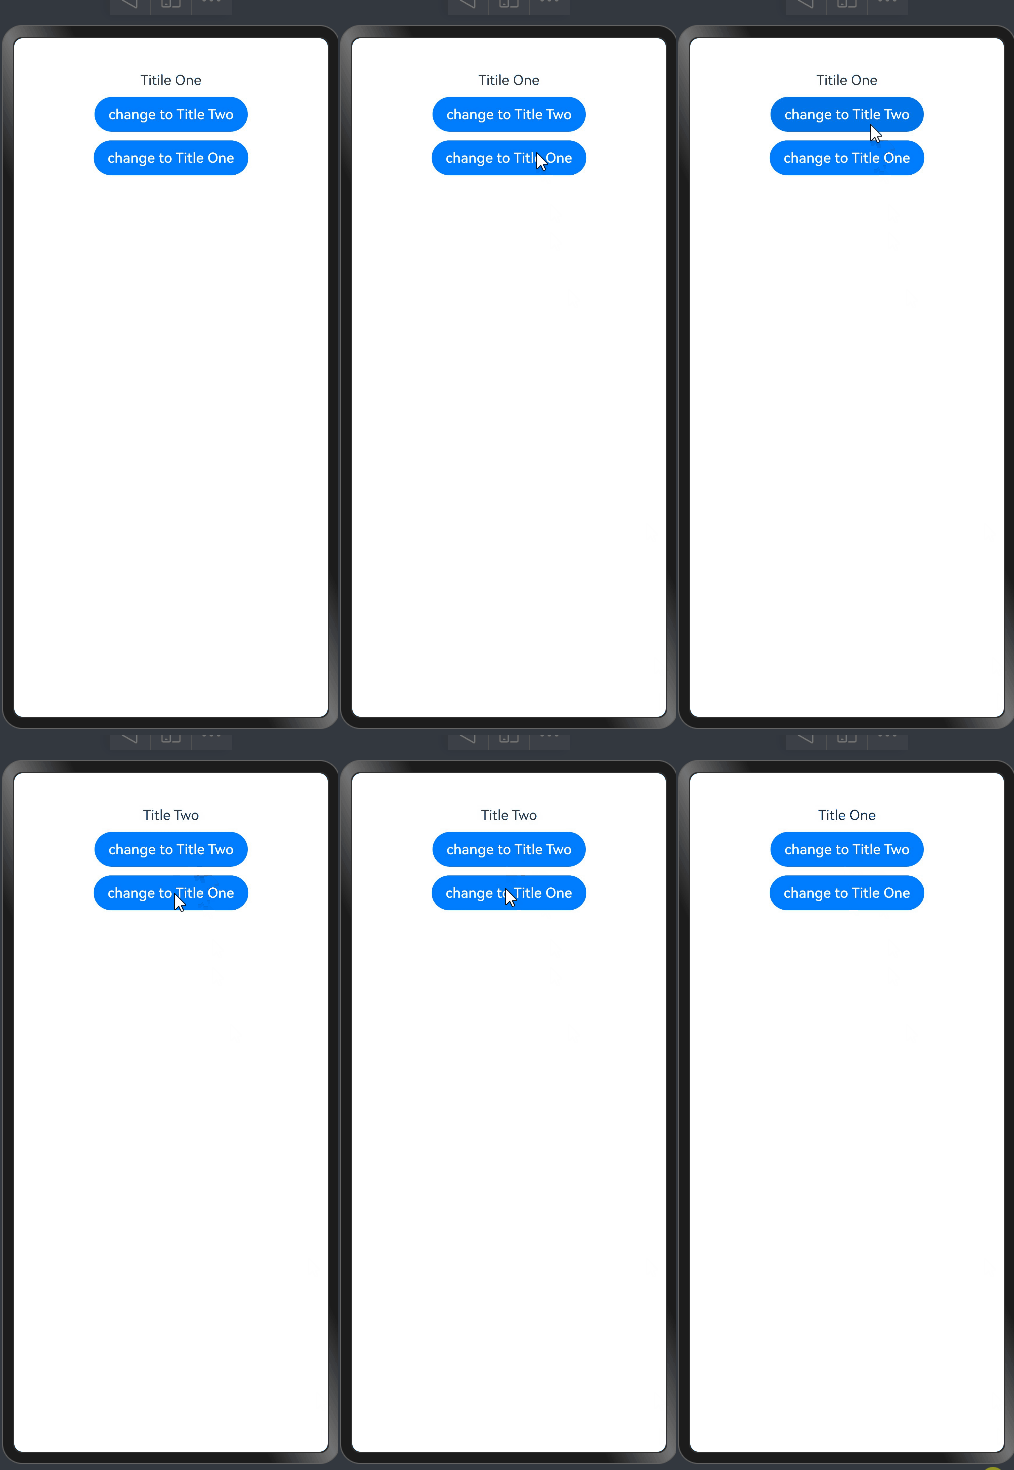
实现效果:
@Provider和@Consumer
仅能修饰自定义组件内的属性,不能修饰class的属性。
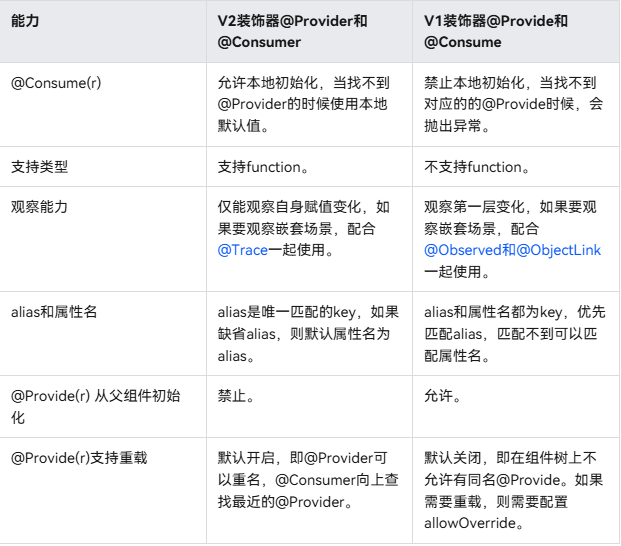
和V1版本中的@Provide和@Consume有异曲同工之妙,主要用于跨组件层级数据双向同步,但也存在不一样的能力:
@Provider语法:
@Provider(alias?: string) varName : varType = initValue
- aliasName?: string,别名,缺省时默认为属性名,向上查找最近的@Provider。
@Consumer语法:
@Consumer(alias?: string) varName : varType = initValue
- aliasName?: string,别名,缺省时默认为属性名。
使用场景
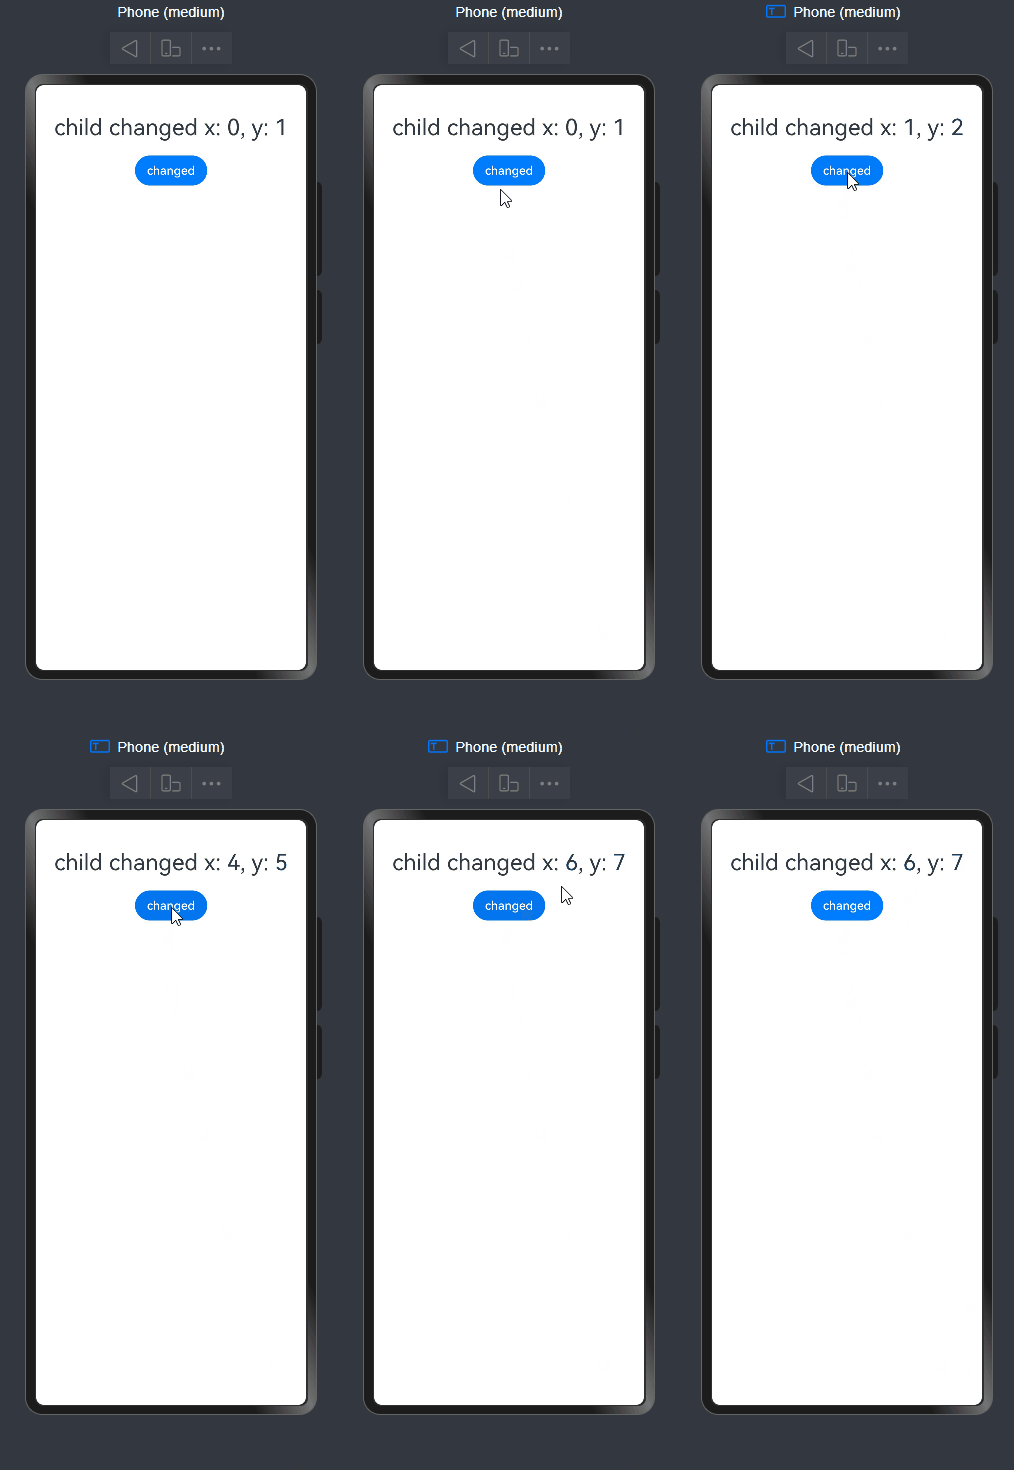
子组件需要修改父组件的内容,可以使用 @Provider和@Consumer来实现。
@Entry
@ComponentV2
struct ProviderPage {
  @Local childX: number = 0;
  @Local childY: number = 1;
  @Provider() onClick1: (x: number, y: number) => void = (x: number, y: number) => {
    this.childX += x;
    this.childY += y;
  }

  build() {
    Column({ space: 20 }) {
      Text(`child changed x: ${this.childX}, y: ${this.childY}`).fontSize(30)
      ProviderPageChild()
    }
    .width("100%")
    .height("100%")
  }
}

@ComponentV2
struct ProviderPageChild {
  @Consumer() onClick1: (x: number, y: number) => void = (x: number, y: number) => {
  };

  build() {
    Button("changed")
      .draggable(true)
      .onClick(() => {
        this.onClick1(1, 1);
      })
  }
}
@Monitor
- 用来监听状态变量变化,支持在类中与@ObservedV2、@Trace配合使用。
- 单个@Monitor装饰器能够同时监听多个属性的变化,当这些属性在一次事件中共同变化时,只会触发一次@Monitor的回调方法。
- @Monitor装饰器具有深度监听的能力,能够监听嵌套类、多维数组、对象数组中指定项的变化。对于嵌套类、对象数组中成员属性变化的监听要求该类被@ObservedV2装饰且该属性被@Trace装饰
- 在继承类场景中,可以在父子组件中对同一个属性分别定义@Monitor进行监听,当属性变化时,父子组件中定义的@Monitor回调均会被调用。
装饰器参数
字符串类型的对象属性名。可同时监听多个对象属性,每个属性以逗号隔开,例如@Monitor(“prop1”, “prop2”)。可监听深层的属性变化,如多维数组中的某一个元素,嵌套对象或对象数组中的某一个属性。
  @Monitor("childX")
  OnChange(monitor: IMonitor) {
    //do something
  }
IMonitor类型的变量用作@Monitor装饰方法的参数。
IMonitor类型参数
- dirty:Array :保存发生变化的属性名。
- value:function:传入参数为path?: string,返回IMonitorValue类型参数。
IMonitorValue类型参数
- before:T:监听属性变化之前的值。
- now:T:监听属性变化之后的当前值。
- path:string:监听的属性名。
使用场景
新建MonitorInfo类和被@ObservedV2装饰器装饰并继承MonitorInfo类的MonitorInfo2。
@Entry
@ComponentV2
struct MonitorPage {
  @Local info: MonitorInfo = new MonitorInfo("Tom", 25);
  @Local info2: MonitorInfo2 = new MonitorInfo2("zzx", 27, "zhongzx");

  @Monitor("info")
  infoChange(monitor: IMonitor) {
    console.log(`MonitorInfo change`);
  }

  @Monitor("info.name")
  infoPropertyChange(monitor: IMonitor) {
    console.log(`MonitorInfo name change`);
  }

  @Monitor("info2")
  info2Change(monitor: IMonitor) {
    console.log(`MonitorInfo2 change`);
  }

  @Monitor("info2.fullname")
  info2PropertyChange(monitor: IMonitor) {
    console.log(`MonitorInfo2 fullname change`);
  }

  build() {
    Column({ space: 10 }) {
      Text(`name: ${this.info.name}, age: ${this.info.age}`)
      Text(`name: ${this.info2.name}, age: ${this.info2.age},fullName:${this.info2.fullname}`)
      Button("change info")
        .onClick(() => {
          this.info = new MonitorInfo("Lucy", 18); // 能够监听到
        })
      Button("change info.name")
        .onClick(() => {
          this.info.name = "Jack"; // 监听不到
        })
      Button("change info2")
        .onClick(() => {
          this.info2 = new MonitorInfo2("Lucy", 20, "hl"); // 能够监听到
        })
      Button("change info2.fullName")
        .onClick(() => {
          this.info2.fullname = "hhl"; // 能够监听到
        })
      Button("change info2.name")
        .onClick(() => {
          this.info2.name = "Jack"; // 监听不到
        })
    }
    .width("100%")
    .height("100%")
  }
}

class MonitorInfo {
  name: string;
  age: number;

  constructor(name: string, age: number) {
    this.name = name;
    this.age = age;
  }
}

@ObservedV2
class MonitorInfo2 extends MonitorInfo {
  @Trace fullname: string = "";

  constructor(name: string, age: number, fullName: string) {
    super(name, age);
    this.fullname = fullName;
  }
}
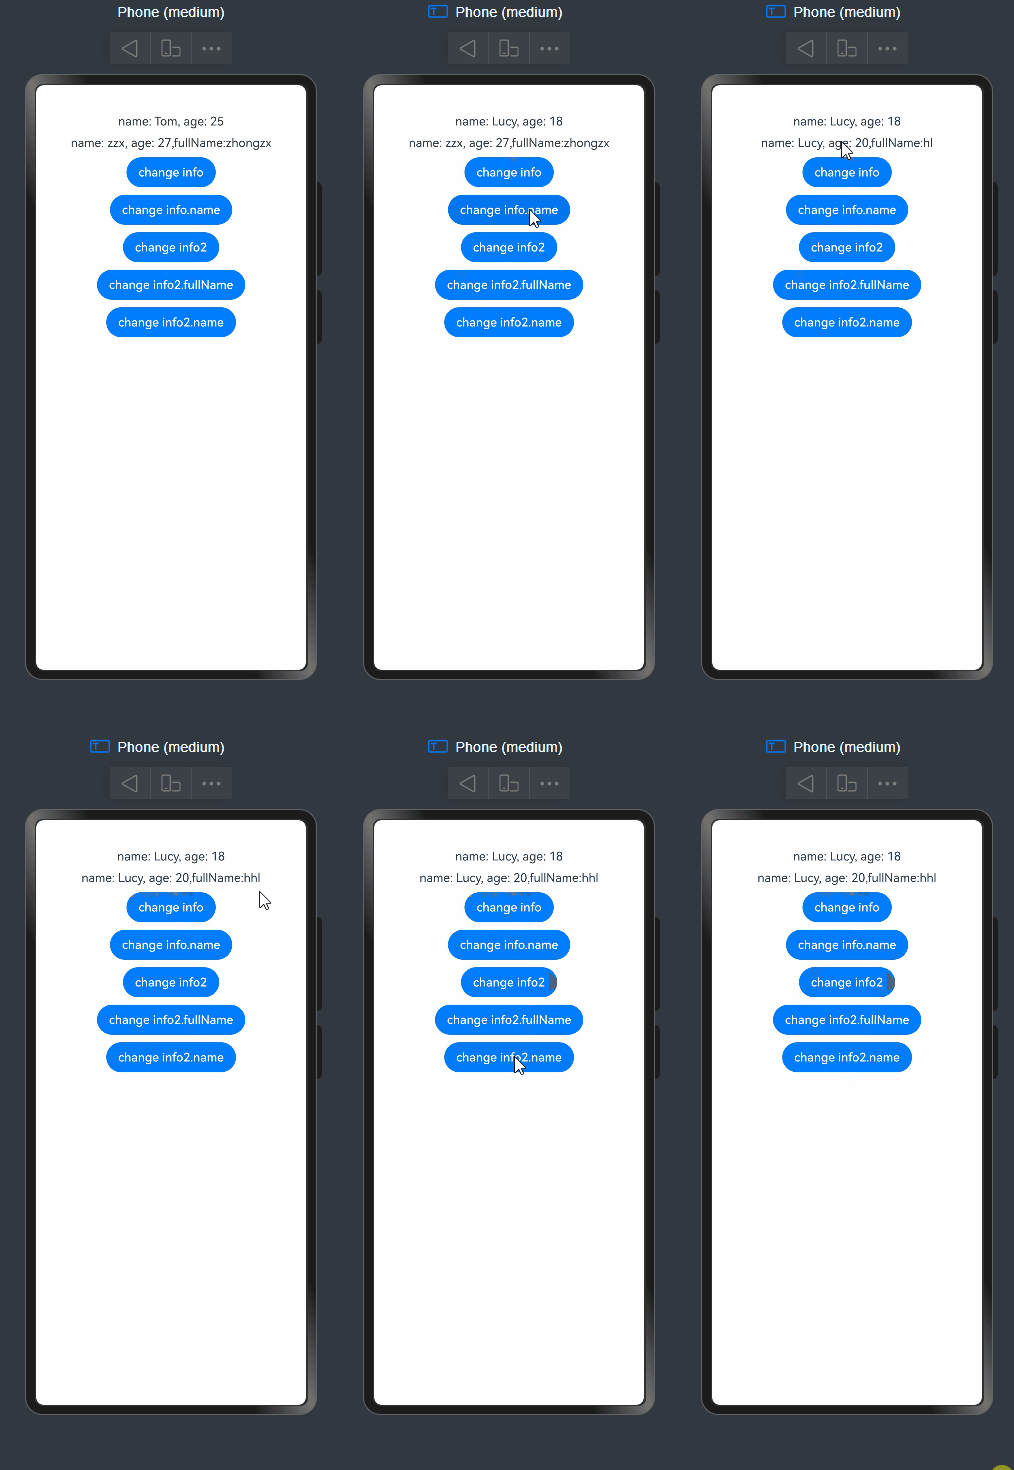
实现效果如下:
- 整体替换的时候,都可以监测到。
- 没有使用@ObservedV2和@Trace装饰器的class属性修改时无法被监测到。

总结
简单讲解了主要的V2装饰器,其中还有一些装饰在试用的时候出错了,就没有把使用方法总结出来。希望可以帮助到大家
