arkUI:布局的属性(margin、padding、border、borderRadius)
arkUI:布局的属性(margin、padding、border、borderRadius)
- 1 前言
- 2 表格
- 3 相关内容说明
- 3.1 内边距(padding)
- 3.2 外边距(margin)
- 3.3 边框(border)
- 3.4 圆角(borderRadius)
- 4 例子
- 4.1 外边距(margin)
- 4.1.1 源码1 (外边距)
- 4.1.2 源码1运行效果
- 4.2 内边距(padding)
- 4.2.1 源码2(内边距)
- 4.2.2 源码2运行效果
- 4.3 边框(border)
- 4.3.1 源码3(边框)
- 4.3.2 源码3运行效果
- 4.4 圆角(borderRadius)
- 4.4.1 源码4(圆角)
- 2.4.1 源码6运行效果
- 5.结语
- 6.定位日期
1 前言
我们可以在ArkUI 中使用内外边距(padding 和 margin)、边框(border)以及圆角(borderRadius)来调整组件的布局和外观。这些样式是前端开发中常用的布局技巧,能够大幅提升界面的美观性和可用性。
2 表格
| 属性 | 描述 |
|---|---|
| margin | 外边距 |
| padding | 内边距 |
| border | 边框 |
| borderRadius | 圆角 |
3 相关内容说明
3.1 内边距(padding)
内边距(padding)用于设置组件内部内容与边框之间的距离。
		padding(20):为四个方向(上、下、左、右)设置相同的内边距。
		padding({ left: 25 }):单独设置左边的内边距。
3.2 外边距(margin)
外边距(margin)用于设置组件之间的间距。
		margin({ bottom: 40 }):设置底部外边距为 40。
		margin({ top: 20 }):设置顶部外边距为 20。
		margin(20):为四个方向(上、下、左、右)设置相同的外边距。
3.3 边框(border)
边框(border)用于给组件添加边框,并设置边框的宽度、颜色和样式。
- 如下,设置边框宽度为 3,颜色为蓝色,样式为实线。
border({ width: 3, color: "blue", style: BorderStyle.Solid })
- 如下,底部边框宽度为 8,颜色为绿色,样式为实线。
border({ width: { bottom: 8 }, color: "green", style: BorderStyle.Solid })
- 如下,底部边框宽度为 8,颜色为绿色,样式为实线。
border({
  width: {
    top: 1,
    bottom: 5,
    left: 10,
    right: 3
  },
  color: '#f00',
  style: { top: BorderStyle.Solid, bottom: BorderStyle.Dotted, right: BorderStyle.Dashed }
})
3.4 圆角(borderRadius)
圆角(borderRadius)用于设置组件的圆角效果,可以根据需要调整不同的圆角半径来控制组件的外观。
		borderRadius(10):设置所有四个角的圆角半径为 10。
		borderRadius(30):对于正方形,圆角大于宽度的一半时会变成圆形。
		borderRadius(0):设置圆角为 0,表示没有圆角,保持矩形的形状。
4 例子
4.1 外边距(margin)
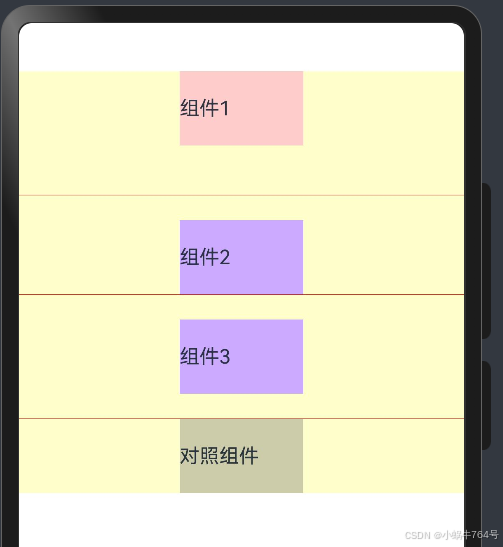
margin 可以传递一个对象,指定上下左右的外边距,例如 { top: 20, bottom: 30 },也可以直接传递一个数字来设置四个方向的外边距一致。如果要修改不同方向的外边距,应该使用对象而不是单一数字。
4.1.1 源码1 (外边距)
@Entry
@Component
struct PageLayoutAttrivute {
  build() {
      Column() {  // 内部容器,垂直排列组件
        // 外边距,margin
        Text("组件1")
          .width(100)
          .height(60)
          .backgroundColor("#fcc")
          .margin({ bottom: 40 })  // 设置底部外边距

        Divider()
          .color("red")  // 设置分隔线颜色为红色

        Text("组件2")
          .width(100)
          .height(60)
          .backgroundColor("#caf")
          .margin({ top: 20 })  // 设置顶部外边距

        Divider()
          .color("red")  // 设置分隔线颜色为红色

        Text("组件3")
          .width(100)
          .height(60)
          .backgroundColor("#caf")
          .margin(20)  // 直接设置所有方向的外边距为20

        Divider()
          .color("red")  // 设置分隔线颜色为红色

        Text("对照组件")
          .width(100)
          .height(60)
          .backgroundColor("#cca")  // 设置背景颜色

      }
      .backgroundColor("#ffc")  // 内部容器背景颜色
    }
  }
4.1.2 源码1运行效果

4.2 内边距(padding)
源码2展示了一个简单的布局,其中包含了三个 Text 组件,并且每个组件都有不同的边框和内边距设置。
4.2.1 源码2(内边距)
@Entry
@Component
struct PageLayoutAttrivute {

  build() {
    Column() {
      Text("对照组1")
        .border({ width: 1, color: "black" })  // 边框,颜色为黑色
        .fontWeight('bold')  // 设置字体加粗

      Text("实验组1")
        .border({ width: 1, color: "blue" })  // 边框,颜色为蓝色
        .padding(20)  // 设置内边距

      Text("实验组2")
        .border({ width: 1, color: "green" })  // 边框,颜色为绿色
        .padding({ left: 25 })  // 设置左边内边距
    }
    .width("100%")  // 设置容器宽度为 100%
  }
}
4.2.2 源码2运行效果
- 实验组1全部内边距为20vp。实验组2只设置左边内边距为25vp。

4.3 边框(border)
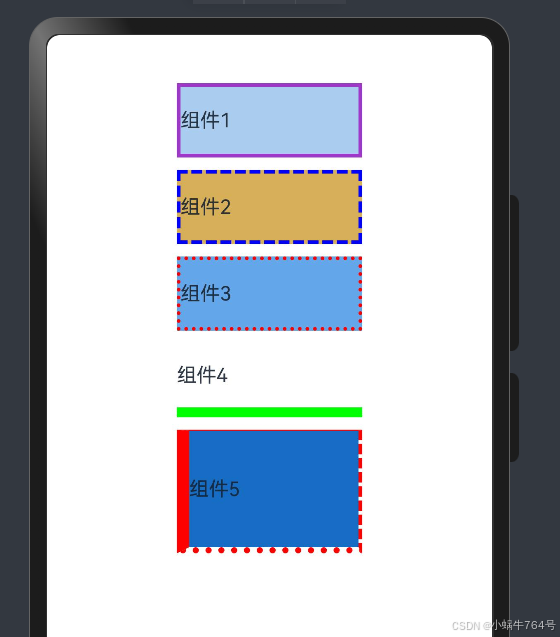
使用 { bottom: 8 } 来只设置底部边框宽度为 8,其他的边宽度保持默认。border 属性支持对不同边(如 top、bottom、left、right)进行单独设置。为每个组件的 border 设置添加了注释,以便更清楚地说明每个设置的作用。
4.3.1 源码3(边框)
@Entry
@Component
struct PageLayoutAttrivute {
  build() {
    Column({ space: 10 }) {  // 设置组件之间的垂直间距为 10
      // 组件1,设置边框样式
      Text('组件1')
        .width(150)
        .height(60)
        .backgroundColor('#ace')
        .border({ width: 3, color: "#ff9d38c8", style: BorderStyle.Solid })  // 设置实线边框

      // 组件2,设置虚线边框
      Text('组件2')
        .width(150)
        .height(60)
        .backgroundColor('#ffd7af59')
        .border({ width: 3, color: "blue", style: BorderStyle.Dashed })  // 设置虚线边框

      // 组件3,设置点状边框
      Text('组件3')
        .width(150)
        .height(60)
        .backgroundColor('#ff64a6ea')
        .border({ width: 3, color: "red", style: BorderStyle.Dotted })  // 设置点状边框

      // 组件4,底部设置特定边框宽度
      Text('组件4')
        .width(150)
        .height(60)
        // .backgroundColor('#ff75bfc6')
        .border({ width: { bottom: 8 }, color: "green", style: BorderStyle.Solid })  // 仅设置底部边框宽度

      // 组件5,多边框设置
      Text('组件5')
        .width(150)
        .height(100)
        .backgroundColor('#ff176cc3')
        .border({
          width: { top: 1, bottom: 5, left: 10, right: 3 },  // 各个边的不同宽度
          color: '#f00',  // 边框颜色为红色
          style: {  // 不同边使用不同的边框样式
            top: BorderStyle.Solid,
            bottom: BorderStyle.Dotted,
            right: BorderStyle.Dashed
          }
        })
    }
    .width("100%")  // 设置容器宽度为 100%
  }
}
4.3.2 源码3运行效果

4.4 圆角(borderRadius)
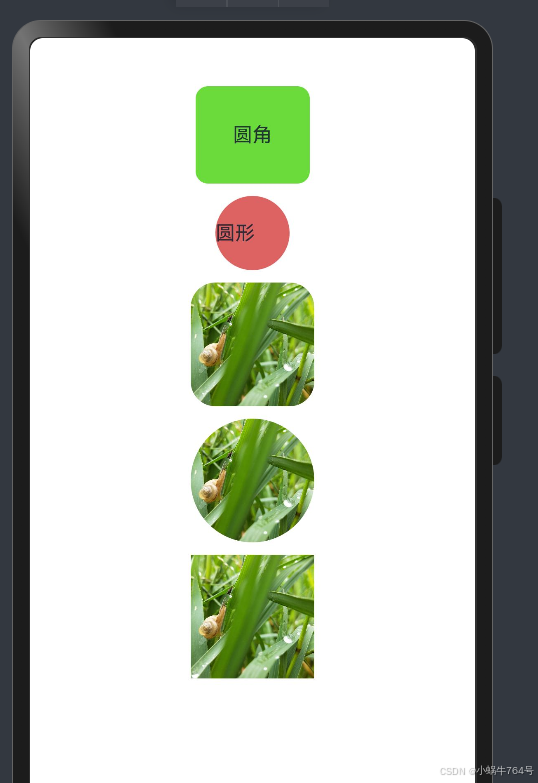
以下源码4演示了如何在 ArkUI 中使用 borderRadius 来设置组件的圆角效果,包含了文本、图片等不同元素的圆角设置。我们使用用 $r(“app.media.xiaowoniu764”) 来引用图片,确保这个路径正确,并且图片文件存在。一般来说,资源路径会根据项目的目录结构而有所不同。对于图片元素,设置 borderRadius 的效果会应用到图片的每个角,如果值足够大且图片本身是正方形,则会变成圆形。
4.4.1 源码4(圆角)
@Entry
@Component
struct PageLayoutAttrivute {
  build() {
    Column({ space: 10 }) {  // 设置子组件之间的垂直间距为 10

      // 第一个文本,具有圆角效果
      Text('圆角')  // 文本内容设置为 "圆角"
        .padding(30)  // 给文本添加 30 的内边距
        .backgroundColor("#ff6adb3b")  // 设置背景颜色
        .borderRadius(10)  // 设置圆角半径为 10

      // 正方形,圆角的值大于宽度的一半时,变成圆形
      Text('圆形')  // 给文本组件添加内容,展示正方形的圆角
        .width(60)  // 宽度设置为 60
        .height(60)  // 高度设置为 60
        .backgroundColor("#ffdd6363")  // 设置背景颜色
        .borderRadius(30)  // 设置圆角半径为 30,大于宽度的一半,变为圆形

      // 图片,也可以设置圆角
      Image($r("app.media.xiaowoniu764"))  // 加载图片
        .width(100)  // 设置宽度为 100
        .height(100)  // 设置高度为 100
        .borderRadius(20)  // 设置圆角半径为 20

      // 更大的圆角,图片将变为圆形
      Image($r("app.media.xiaowoniu764"))  // 加载图片
        .width(100)  // 设置宽度为 100
        .height(100)  // 设置高度为 100
        .borderRadius(50)  // 设置圆角半径为 50,变为圆形

      // 对照组,设置边框为 0 的圆角效果
      Image($r("app.media.xiaowoniu764"))  // 加载图片
        .width(100)  // 设置宽度为 100
        .height(100)  // 设置高度为 100
        .borderRadius(0)  // 设置圆角为 0,表示没有圆角,保持矩形
    }
    .width("100%")  // 设置容器宽度为 100%
  }
}
2.4.1 源码6运行效果

5.结语
每个组件的常见用法都有必要记录一下,后续有不懂的可以回顾查看。毕竟官方文档,有些繁杂的。自己积累自己的文本库。碰到啥记录啥,这些都是经验的积累。没想到不难的内容,编写也要耗费这么多时间。
由于笔者的能力有限,创作的内容有所不足在所难免,也敬请读者包涵和指出,万分感谢!
6.定位日期
2024-11-5;
23:50;
