基于 Vue 实现简易 Vue-Router
一、简介
在日常开发中,无论使用 Vue 还是 React ,都会不可避免的使用到与其最相配的路由管理器 Vue-Router 或 React-Router. 作为前端开发的诸君相信对于路由原理也有所了解,也不妨实现一个自己的路由,加深理解.
二、准备工作
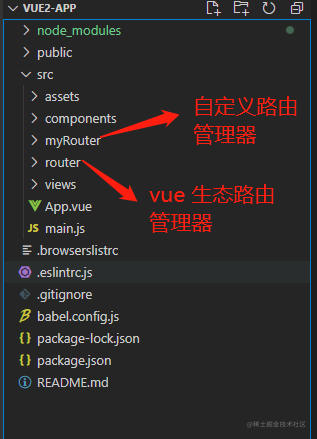
1. 这里为了方便,使用 vue-cli 创建了一个项目,目录结构如下:

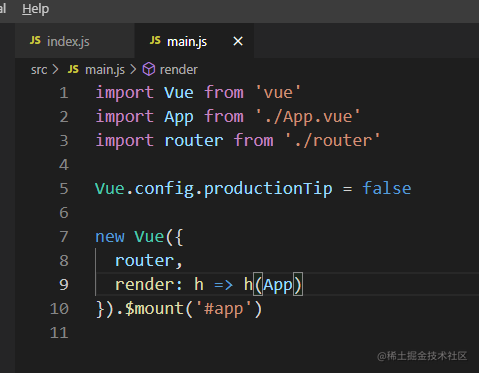
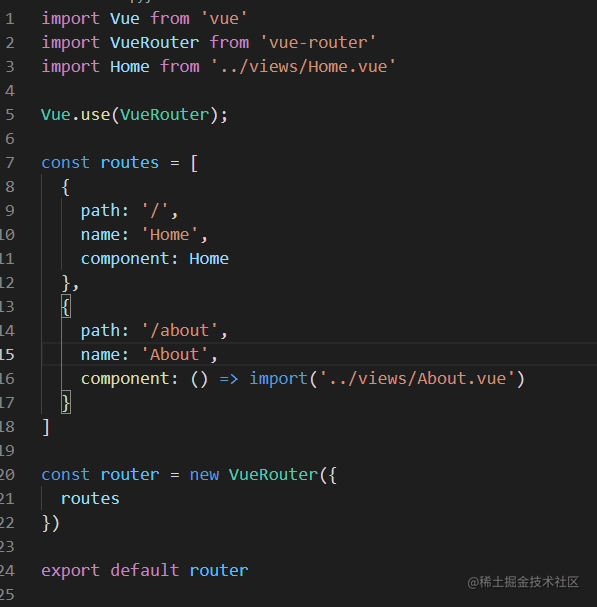
2. 首先观察 vue-router 是如何使用的,主要涉及到 main.js 和 router文件夹下的 index.js
main.js 中就是简单的引入,将 router 加入到 new Vue 的 options 中

router/index.js 这里都是常规的内容,不在做过多解释

三、路由原理
1. 前端路由分为 hash 路由 和 history 路由
hash 模式是根据 url 上 #/ 部分的变化来对应页面的展示,同时不会刷新页面,也就是不会自动重新向服务器发送请求,除了代码中的请求,一般是通过 js 来对页面进行渲染history 则是根据页面 url 的变更对应页面上的内容,准确的说是会自动向服务器请求对应页面的文件资源,然后在浏览器上进行加载渲染
2. 实现前端路由的关键点
- 如何改变 URL 时却不引起页面刷新?
- 如何监听 URL 的变化?
Hash 模式
- hash 是 URL 中 hash (#) 及后面的那部分,常用作锚点在页面内进行导航,改变 URL 中的 hash 部分不会引起页面刷新
- 通过 window.onhashchange 事件监听 URL 的变化. URL 发生变化的场景有:
- 通过浏览器前进后退
- 通过
<a>标签 - 通过 window.location
- 以上情况改变 URL 都会触发 hashchange 事件
History 模式
- HTML5 中为 history 提供了 pushState 和 replaceState 新接口,这两个方法改变 URL 的 path 部分不会引起页面刷新
- history 提供类似 hashchange 事件的 popstate 事件,但 popstate 事件有些不同:
- 通过浏览器前进后退改变 URL 时会触发 popstate 事件,通过pushState/replaceState或
<a>标签改变 URL 不会触发 popstate 事件 - 但可以通过拦截 pushState/replaceState 的调用和
<a>标签的点击事件来检测 URL 变化,也可实现监听 URL 的变化
- 通过浏览器前进后退改变 URL 时会触发 popstate 事件,通过pushState/replaceState或
四、实现 MyRouter
这里 MyRouter 主要实现 hash 模式,知道了路由原理, history 模式也是同样的,同样的即便需要基于 Vue3 实现也是一样的原理,只是实现上会有些差异, 这里就不过多描述.
1. 定义 MyRouter 类,主要内容有
保存外界路由数据监听路由变化将当前路由地址存储在响应式数据中,响应式数据通过 Vue.util.defineReactive 实现
2. MyRouter.install 方法,主要是通过在 Vue.use 的时候进行调用
通过 mixin 为所有组件混入只读的路由信息,同时指定所有组件的根组件 _root 指向同一个实例全局注册 router-link全局注册 router-view,同时根据 Vue.protype.$router 上的信息渲染对应的路由视图内容
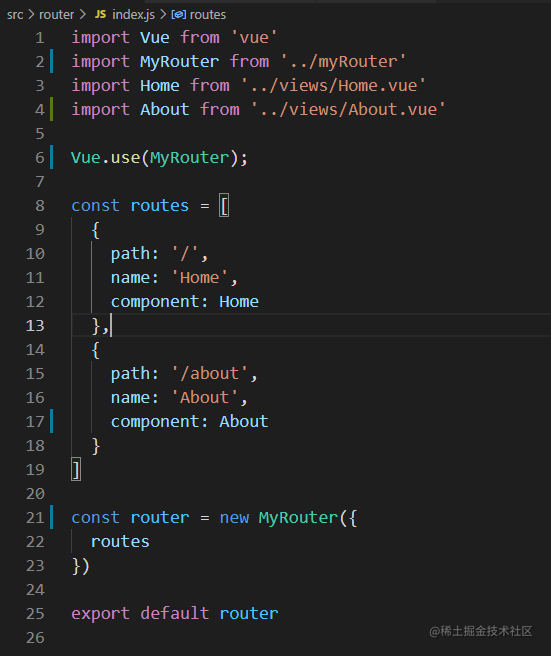
3. 使用方式几乎没有变化,和 vue-router 保持了一致性

4. 完整代码如下
import Vue from 'vue';

export default class MyRouter {
constructor(config) {
  // 保存路由数据
  this.routers = config.routes;
  // 保存转换后的路由信息
  this.routersMap = this.getRoutersMap(config.routes);

  // 转换为响应式数据,保存当前路由路径
  Vue.util.defineReactive(this, 'currentPath', '');

  // 初始化
  this.initRouter();
}

initRouter() {
  // 1.初始化获取当前页面地址
  this.getCurrentPath();

  // 2.监听路由地址变化
  window.onhashchange = () => {
    this.getCurrentPath();
  };
}

// 获取 { [path]: [component] } 形式的路由数据
getRoutersMap(routes) {
  return routes.reduce((memo, curr) => {
    memo[curr.path] = curr.component;
    return memo;
  }, {});
}

// 获取当前页面地址
getCurrentPath() {
  this.currentPath = window.location.hash.slice(1) || '/';
}
}

// Vue.use 时执行
MyRouter.install = function (Vue) {

// 在 Vue 原型挂载 $router,使用 mixin 延迟到组件构建之后执行, 否则获取不到 this.$options
Vue.mixin({
  created() {
    // 只有在 this.$options.router 存在时赋值给 $router,此时 this 代表的是根组件,因为根组件才含有 router 选项
    if (this.$options.router) {
      this._root = this;
      Vue.prototype.$router = this.$options.router;
      // 保证 $router 不能被修改
      Object.defineProperty(Vue.prototype, '$router', {
        writable: false
      });
    } else {
      // 让所有的子组件都指向共同的根组件实例
      this._root = this.$parent._root;
    }
  }
});

// 注册 router-link
Vue.component("router-link", {
  props: {
    "to": String
  },
  // template: `<a :href="to" class="my-router-link"><slot></slot></a>`,
  render(h) {
    return h('a', {
      attrs: {
        href: `#${this.to}`,
      },
      class: "my-router-link",
    }, this.$slots.default)
  },
});

// 注册 router-view
Vue.component("router-view", {
  render(h) {
    if (this.$router) {
      return h(this.$router.routersMap[this.$router.currentPath]);
    } else {
      return null;
    }
  }
});
};
