遥测数据采集工具Grafana Alloy
介绍
Alloy是Grafana产品公司旗下的一款新主推遥测数据采集工具,Grafana Alloy也是一个开源OpenTelemetry收集器,具有内置 Prometheus管道并支持指标、日志、跟踪和配置文件。Alloy支持为OTEL、Prometheus、Pyroscope、Loki等服务提供许多指标、日志、跟踪等原生数据管道以及数据采集功能。Alloy在Grafana产品生态中,用于替代Promital、Agent两个采集程序,Alloy提供了强大和灵活的模块组件配置功能,支持远比原Agent工具更多的数据格式处理功能和更多样的采集来源端、多平台数据转换能力;并且支持自定义配置组件、数据过滤、数据管道转发、本地配置、云端配置等,官方声明Alloy对更多平台协议数据兼容性更好、安全性和数据配置调试能力更强;
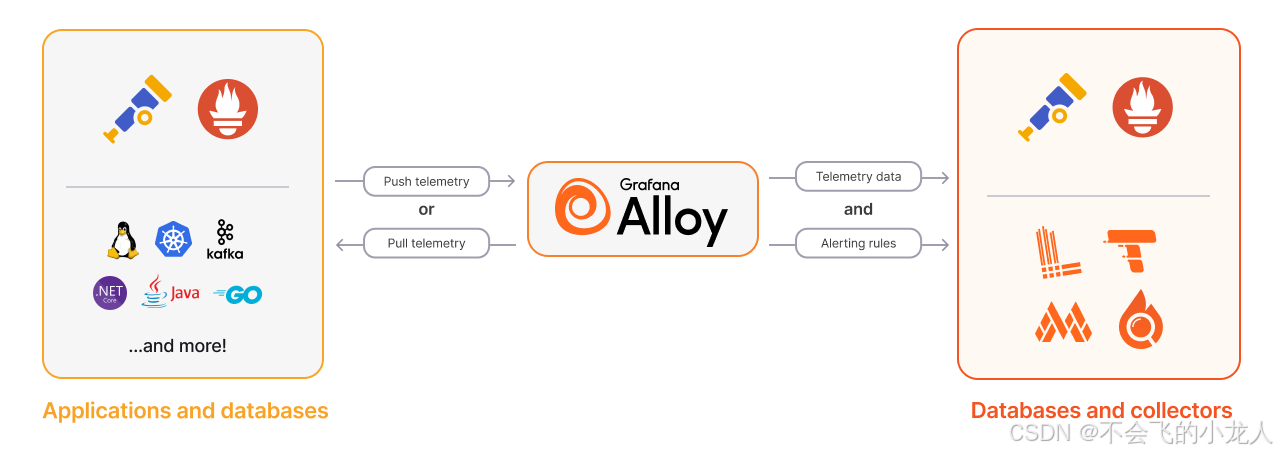
注:推出Alloy的同时官方也声明,不在维护Grafana Agent现有程序,后续Grafana Agent已被弃用,并将会持续到2025年10月31日为止,在2025年11月1日终止使用(EOL);官方建议迁移到Grafana Alloy,因此还在用Grafana Agent的同学,也因该尽快迁移到Grafana Alloy采集工具上;
官网
官网:Grafana Alloy | OpenTelemetry Collector distribution
文档:Grafana Alloy | Grafana Alloy documentation
下载
从Github获取已打包的二进制文件,支持linux、mac、windows等操作系统,按操作系统环境下载即可。
Github发包路径:https://github.com/grafana/alloy/releases/tag/v1.4.3

环境说明
为了方便演示,本地以windows环境为主,因此下载使用alloy-windows-amd64.exe.zip解压包,实际windows与linux环境使用配置文件一样,可以直接将本地调试好的yml配置文件复制到linux环境下使用;
安装Alloy
Alloy需要安装在应用服务所在主机上才能进行抓取,下载alloy-windows-amd64.exe.zip解压包后,解压到任意目录(非中文),在alloy-windows-amd64.exe程序同目录下创建config.alloy文件(此为启动加载配置文件)
Alloy命令启动配置
// 公开或私用组件指标模式(默认"--stability.level=generally-available")
alloy-windows-amd64.exe run config.alloy --stability.level=public-preview

// 实验性模式
alloy-windows-amd64.exe run config.alloy --stability.level=experimental

// linux后台启动
//nohup ./alloy-linux-amd64 run config.alloy > log.out 2>&1 &
需要注意的是,--stability.level表示当前启动稳定模式,experimental表示开放实验性功能(即一些未成熟的可用功能,生产不推荐)用于配置调试用,public-preview表示开放公共可预览特性等功能,generally-available表示已经成熟普遍可用的功能(默认,生产环境因用此配置);
更多详情配置参考官方:The run command | Grafana Alloy documentation
关于性能消耗
官方相关资源采集过程中性能消耗说明,参考:Estimate Grafana Alloy resource usage | Grafana Alloy documentation
Alloy基础配置
采集日志到Loki
// 收集日志
local.file_match "default" {
    path_targets = [{
        __path__    = "/data/log/info-*.log",
        service     = "systemName",
    }]
}

// 记录采集位置
loki.source.file "default" {
    targets               = local.file_match.default.targets
    forward_to            = [loki.write.default.receiver]
}

// 日志发送loki
loki.write "default" {
    endpoint {
        url = "http://127.0.0.1:3100/loki/api/v1/push"
    }
}
组件说明:
- local.file_match :本地文件加载路径与K/V类型自定义标签配置,path_targets为数组,支持多个路径配置,__path__支持通配符用法,如:__path__ = "/data/log/info-*.log",加载以info为前缀的适配log文件
- loki.source.file:从来源目标提取文件日志数据,并分发给目标组件
- loki.write:推送日志到Loki服务目标
采集指标到Prometheus
Alloy本身提供了多种平台与服务的指标抓取、处理、分发能力,并通过prometheus进行远端收集与分析;如:kafka、oracle、mysql、postgres、redis、windows、unix等,内置功能支持直接配置采集端点即可使用,简化了安装各种端点组件来使用,使部署与实施变得更容易;
// 收集alloy指标
prometheus.exporter.self "defalut" { }

// 收集windows host指标
prometheus.exporter.windows "defalut" {
    enabled_collectors  = ["cpu","cs","logical_disk","net","os","service","system"]
}

// 抓取目标组件指标
prometheus.scrape "defalut" {
    targets    = array.concat(prometheus.exporter.self.defalut.targets, prometheus.exporter.windows.defalut.targets)
    forward_to = [prometheus.remote_write.default.receiver]
    job_name   = "alloy_otel"
}

// 指标发送
prometheus.remote_write "default" {
    endpoint {
    	  url = "http://127.0.0.1:9090/api/v1/write"
    }
}
组件说明
- prometheus.exporter.self: 收集alloy自身指标
- prometheus.exporter.windows:收集windows 主机运行指标,已启用的采集指标,参见:enabled_collectors,非启用指标名则不采集;
- prometheus.scrape:抓取目标组件指标数据,并将数据分发给目标组件
- prometheus.remote_write:将指标数据推送给prometheus远程服务
Alloy支持的promethues指标组件如下:prometheus | Grafana Alloy documentation
集OTEL协议数据
OTEL(开放式遥测)是一种用于收集、处理和可视化软件性能和信任度数据的标准和框架,与供应商和工具无关,这意味着它可以与各种各样的可观察性后端一起使用。
Alloy支持多种平台和服务的OTEL数据收集、处理、分发,如:otelhttp、awss3、kafka、loki、prometheus、datadog、zipkin等;
// 接收otel协议转发数据
otelcol.receiver.otlp "default" {
    http {}
    grpc {
    	  endpoint = "0.0.0.0:4317"
    }
    output {
        metrics = [otelcol.processor.batch.default.input]
        logs    = [otelcol.processor.batch.default.input]
        traces  = [otelcol.processor.batch.default.input]
    }
}
// 批量收集发送,用于本地缓冲数据
otelcol.processor.batch "default" {
      output {
          metrics = [otelcol.exporter.otlp.default.input]
          logs    = [otelcol.exporter.otlp.default.input]
          traces  = [otelcol.exporter.otlp.default.input]
      }
}
// 通过gRPC发送otlp数据
otelcol.exporter.otlp "default" {
    client {
        endpoint = "192.168.1.100:4317"
        tls { insecure = true}
    }
}
组件说明
- otelcol.receiver.otlp:接收otel协议转发数据
- otelcol.processor.batch: 批量收集发送,用于本地缓冲数据,从而降低数据传输次数,提高数据压缩率,控制每批数据大小和处理时间,提升性能
- otelcol.exporter.otlp:通过gRPC发送otlp数据到目标OTEL接收服务端
OpenTelemetry代理
OpenTelemetry是API、SDK 和工具的集合。使用它来检测、生成、收集和导出遥测数据(指标、日志和跟踪),以帮助您分析软件的性能和行为。
因此本章演示项目中,同样依赖opentelemetry-sdk,在程序的JVM启动命令中加入opentelemetry-javaagent代理jar包,从而抓取otel协议数据(指标、日志、链路)推送到endpoint目标服务Collector收集端。
opentelemetry-javaagent.jar从github上下载:GitHub - open-telemetry/opentelemetry-java-instrumentation: OpenTelemetry auto-instrumentation and instrumentation libraries for Java
相关JVM参数配置详见官方文档:Configure the SDK | OpenTelemetry
注:上述示例,指向的是本地Alloy采集服务代理端口,Alloy支持otel协议数据接收与管道转发功能;
SpringBoot全链路追踪
搭建日志链接路平台
由于之前文章中已讲解搭建过《Grafana,Loki,Tempo,Prometheus,Agent搭建日志链路监控平台》本章不在重复搭建过程,可点击此访问:Grafana,Loki,Tempo,Prometheus,Agent搭建日志链路监控平台_grafana tempo-CSDN博客
略....
SpringBoot项目搭建
同样之前文章中讲解过《SpringBoot+Prometheus采集Metrics指标数据》,该章中的springboot项目做为本章应用程序演示示例,可点击此访问:SpringBoot+Prometheus采集Metrics指标数据_prometheus metrics-CSDN博客
注:安装Prometheus后,无需在配置文件中配置采集springboot的端点参数,本章将通过Alloy去分发推送springboot指标数据到Prometheus中
略...
IDEA中配置opentelemetry代理
在右上角 Select Run/Debug Configurations》Edit Configurations》找到对应用主程序入口类
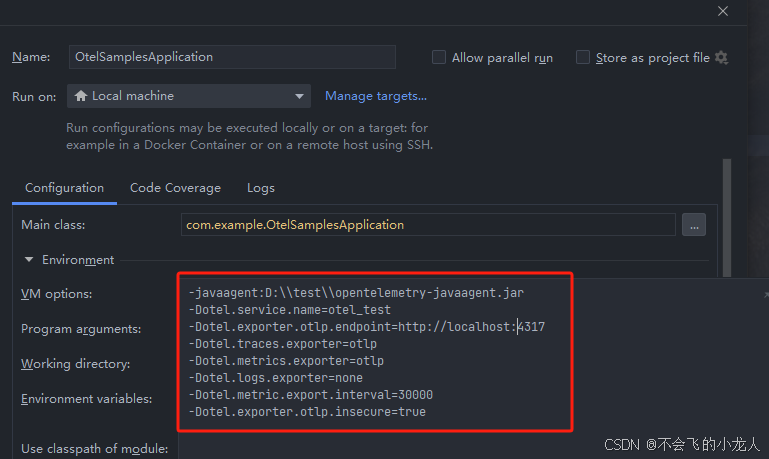
在VM options中填入如下参数
-javaagent:D:\\test\\opentelemetry-javaagent.jar
-Dotel.service.name=otel_test
-Dotel.exporter.otlp.endpoint=http://localhost:4317
-Dotel.traces.exporter=otlp
-Dotel.metrics.exporter=otlp
-Dotel.logs.exporter=none
-Dotel.metric.export.interval=30000
-Dotel.exporter.otlp.insecure=true
注:其它-Dotel.logs.exporter=none 表示log日志不走otel协议推送,因为日志一般会输出到日志文件中,从文件中加载日志能记录整个应用程序的启动过程,而otel需要在应用服务启动中并且agent代理生效后,才能正常抓取otel协议日志数据,因此会有部份缺失;通过Alloy直接抓取本地日志文件内容,能保证日志数据的全生命周期流程完整性;
配置SpringBoot项目日志格式输出traceID=%X{trace_id}到log文件中,通常在logack.xml或log4j2.xml中配置,如果没有独立设置日志配置文件,或修改springboot本身的application.yml中loggin.pattern.file配置,如下:
%d{yyyy-MM-dd HH:mm:ss.SSS} %level traceID=%X{trace_id} %thread %class{36}:%L - %m%n%wEx配置springboot监控指标
在pom.xml中添加prometheus指标监控,添加springboot端点指标与健康检查模块;
<dependency>
   <groupId>org.springframework.boot</groupId>
   <artifactId>spring-boot-starter-actuator</artifactId>
</dependency>
<!-- prometheus依赖 -->
<dependency>
   <groupId>io.micrometer</groupId>
   <artifactId>micrometer-registry-prometheus</artifactId>
   <version>1.11.0</version>
</dependency>
在application.yml添加以下健康服务检测功能以及开放端点
# 启用服务健康检测,注册中心将通过http://host:port/actuator/health 检测服务的存活,默认10s一次
management:
#  server:
#    address: 127.0.0.1
#    port: 8081
  endpoints:
    web:
      cors:
        # 跨域配置开放所有,CORS默认处于禁用状态
        allowed-origins: "*"
        allowed-methods: "*"
      discovery:
        # 启用一个接口可以返回所有端点信息
        enabled: true
      exposure:
        include:
          # 开放所有端点health,info,metrics,通过actuator/+端点名就可以获取相应的信息。开发用*,上生产请取消。默认打开health和info
          - "*"
        # 某些端点除外,不做开启
        exclude:
          - env
          - beans
          - info
          - configprops
          - health
          - heapdump
          - shutdown
          - threaddump
          - loggers
          - conditions
  endpoint:
    shutdown:
      enabled: true
    health:
      # 开启后打印详细信息
      show-details: always
启动Springboot服务
完成上述流程后,在IDEA中启动SpringBoot服务
略...
配置Alloy组件
在Alloy安装目录中,修改配置,完整的config.alloy配置如下:
// =====================Otel配置===================================
// 接收otel协议转发数据
otelcol.receiver.otlp "default" {
    http {}
    grpc {
    	  endpoint = "0.0.0.0:4317"
    }
    output {
    	    //logs 通过 loki.source.file 采集
          metrics = [otelcol.exporter.prometheus.default.input]
          traces  = [
              otelcol.exporter.otlp.tempo_default.input,
              otelcol.connector.spanlogs.default.input,
              otelcol.connector.servicegraph.default.input,
        ]
    }
}
// 从otel中输出日志loki
otelcol.exporter.loki "default" {
  forward_to = [loki.write.default.receiver]
}
// 通过gRPC发送otlp链路数据到tempo服务
otelcol.exporter.otlp "tempo_default" {
    client {
        endpoint = "192.168.1.100:4317"
        tls {
            insecure = true
            insecure_skip_verify = true
        }
    }
}
// 从otel中输出指标数据到prometheus
otelcol.exporter.prometheus "default" {
  forward_to = [prometheus.remote_write.default.receiver]
}

// =====================Loki配置===================================
// 读取指定路径日志文件和配置标签
local.file_match "default" {
    path_targets = [{
        __path__      = "D:/Workspaces/idea_2/TraceCloud/logs/producer-info.log",
        service_name  = "producer-log-197",
        system        = "producer",
    }]
}
// 记录采集位置
loki.source.file "default" {
    encoding     = "UTF-8"
    targets      = local.file_match.default.targets
    forward_to   = [loki.write.default.receiver]
}
// 日志发送loki
loki.write "default" {
    endpoint {
        url = "http://192.168.1.100:3100/loki/api/v1/push"
    }
}

// =====================Span日志记录配置===================================
otelcol.connector.spanlogs "default" {
  roots = true
  span_attributes = ["http.method", "http.target"]
  output {
    logs = [otelcol.exporter.loki.default.input]
  }
}

// =====================服务图配置===================================
otelcol.connector.servicegraph "default" {
  dimensions = ["http.method", "http.target"]
  output {
    metrics = [otelcol.exporter.prometheus.default.input]
  }
}

// =====================Prometheus配置===================================
// 收集alloy指标
prometheus.exporter.self "defalut" { }
// 收集windows host指标
prometheus.exporter.windows "defalut" {
    enabled_collectors  = ["cpu","cs","logical_disk","net","os","service","system"]
}
// 指标抓取
prometheus.scrape "defalut" {
    targets    = array.concat(prometheus.exporter.self.defalut.targets, prometheus.exporter.windows.defalut.targets)
    forward_to = [prometheus.remote_write.default.receiver]
    job_name   = "producer_node"
}
// 抓取远程服务指标
prometheus.scrape "remote_default" {
	targets = [{"__address__" = "localhost:8082"}]
	scheme = "http"
	metrics_path = "/actuator/prometheus"
	scrape_interval = "30s"
	scrape_timeout = "10s"
	job_name = "producer_samples"
  forward_to = [prometheus.remote_write.default.receiver]
}
// 指标发送
prometheus.remote_write "default" {
    endpoint {
    	  name = "producer"
        url  = "http://192.168.1.100:9090/api/v1/write"
    }
}
运行Alloy
在通过windows系统的CMD命令行窗口进入到安装目录(以本地实际安装目录为准):cd D:\test\alloy-windows-amd64>
D:\test\alloy-windows-amd64> ./alloy-windows-amd64.exe run ./config.alloy服务拓扑图
App在运行中产生各种日志、指标、otel数据等,通过Agent推送到Alloy或Alloy主动抓取数据,最后在本地Alloy处理后根据不同能力的收集服务,分发推送到服务端进行存储,统一在Grafana端进行应用展示;

服务接口测试
SpringBoot健康检查
http://localhost:8082/actuator
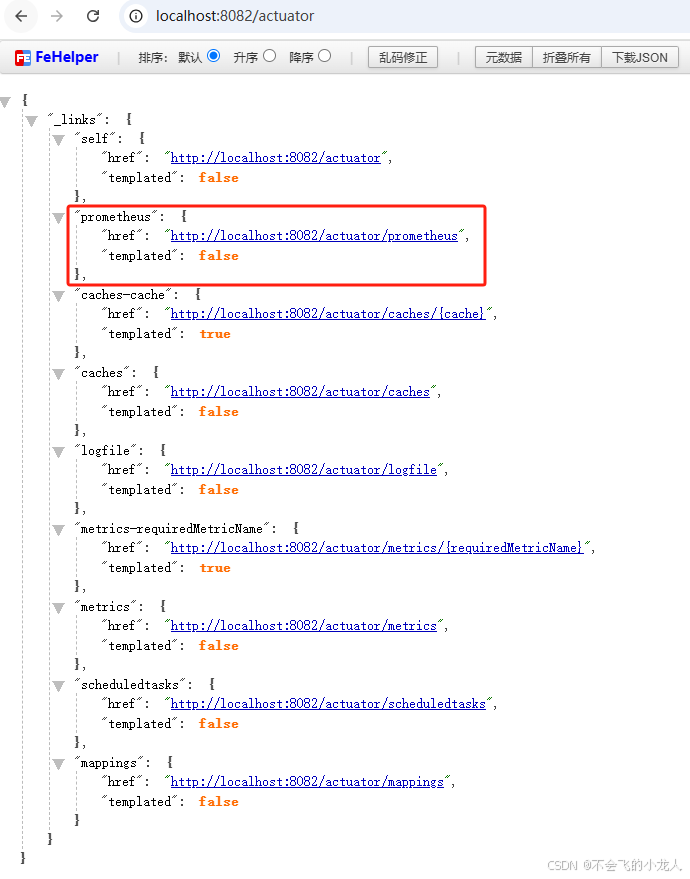
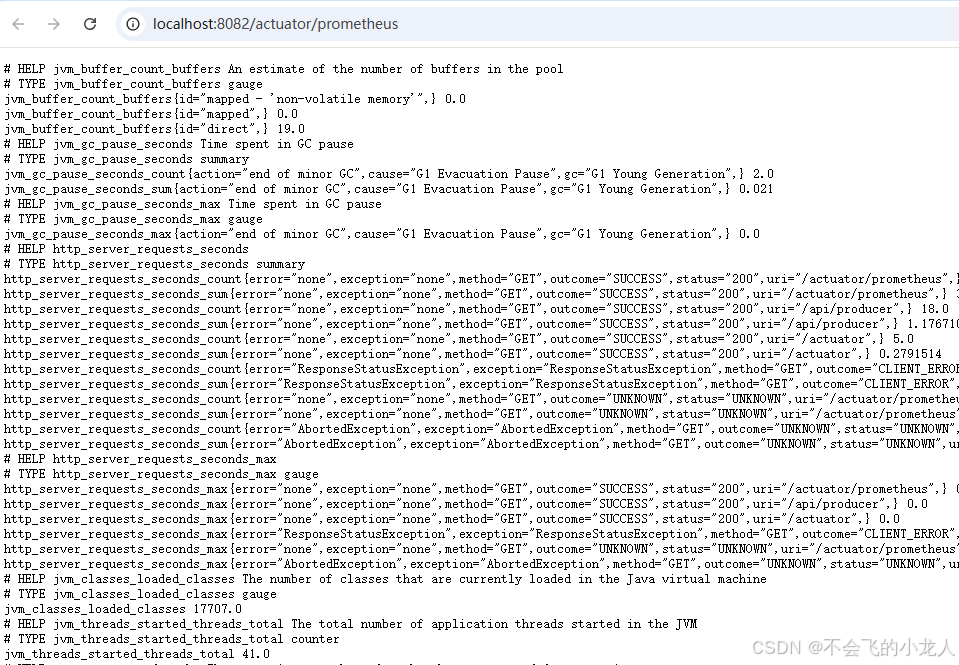
Prometheus端口数据
http://localhost:8082/actuator/prometheus
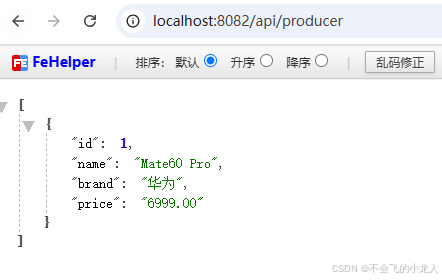
HTTP测试接口
http://localhost:8082/api/producer (注意:本地示例服务启用的8082端口)
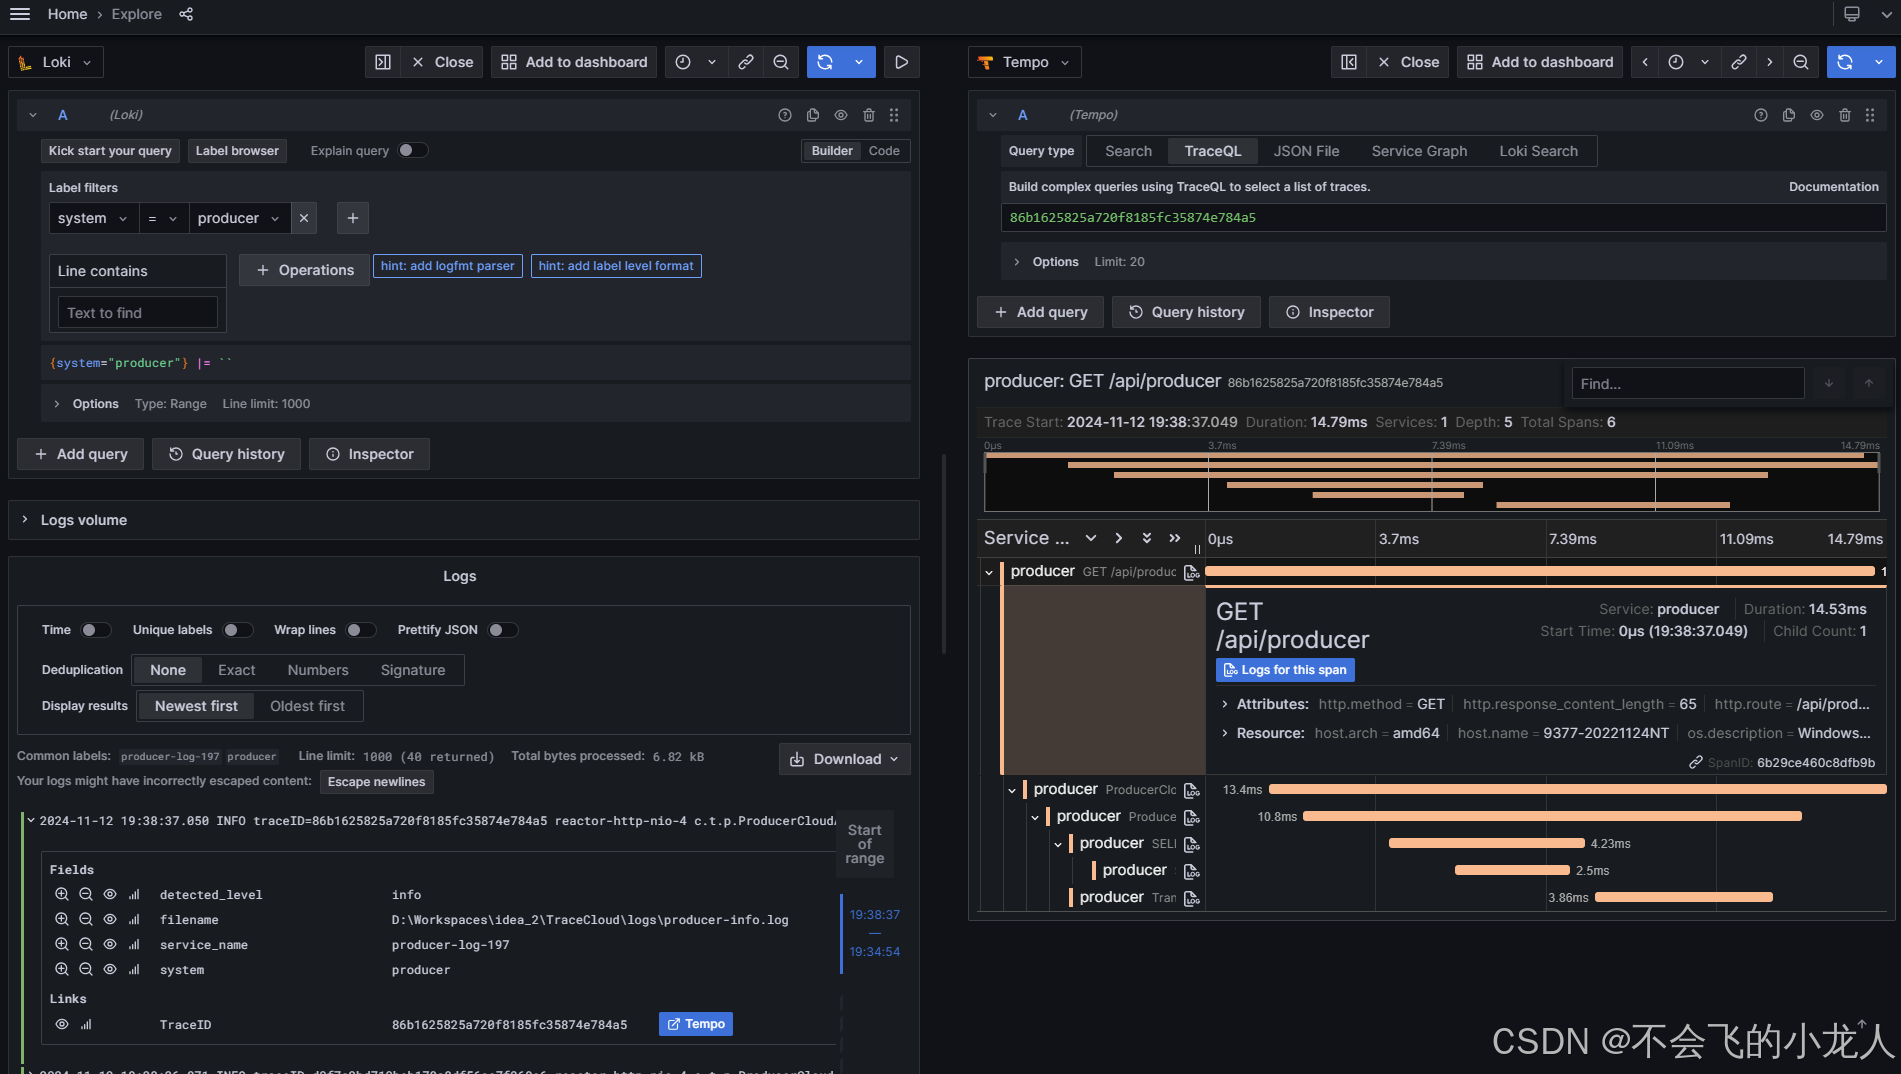
Loki日志与Tempo链路
向springboot服务发起http请求后,后端服务会打印日志并输出到日志文件中,opentelemetry-javaagent.jar代理通过探针技术,抓取springboot运行过程中的数据、跨度、指标等,通过otel协议推送到指定Alloy采集端,进行处理并分发到Loki和Tempo中,以下是通过Loki查询出打印日志数据,通过输出日志行中的所带的TraceID(跟踪埋点ID),点击关联上Tempo查询该TraceId全链接执行过程,展示分析出的每一步耗时与跨度信息等;
Dashboards图表展示
通过Alloy抓取各类指标、日志、链路等遥测数据后,推送到相关服务后,可以很方便的在Grafana已集成的环境中进行分析与展示,官方也提供了很多共享Dashboards图表资源,可直接导入到本地环境中进行使用;
共享Dashboards网址:Grafana dashboards | Grafana Labs
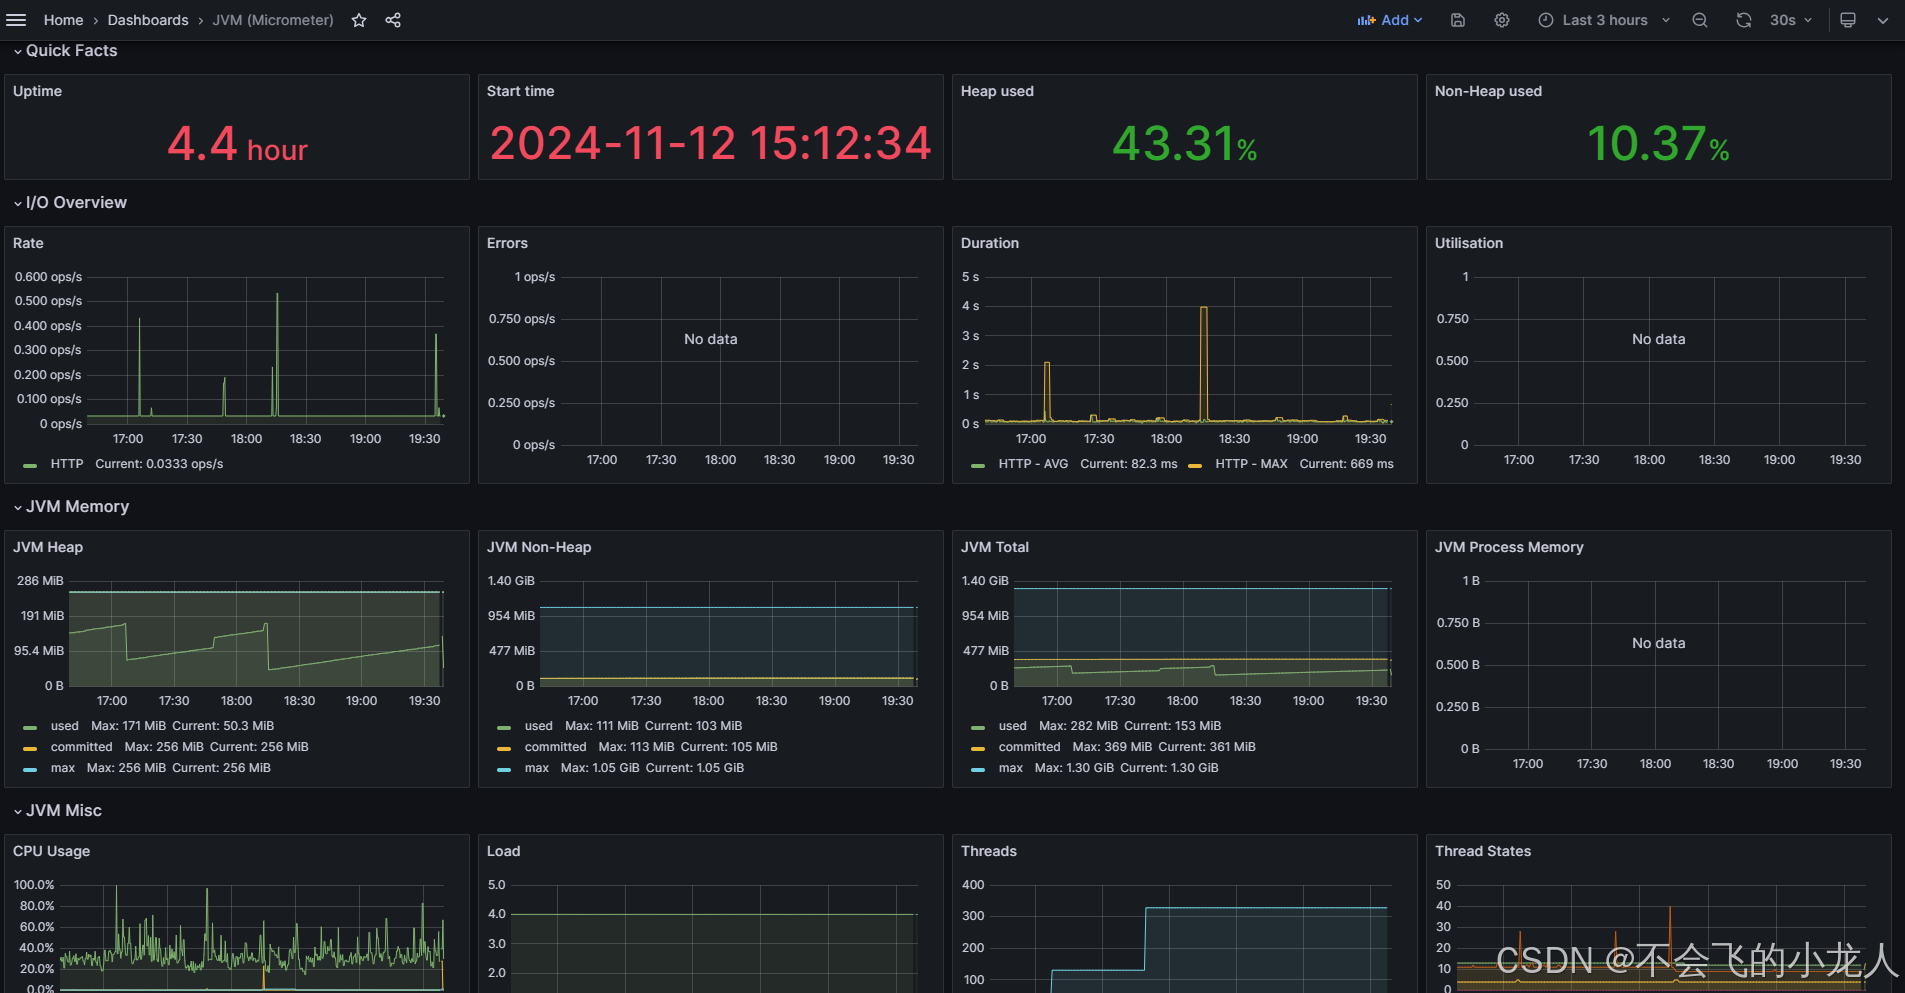
JVM指标监控
通过Otel协议获取JVM指标数据后,发送到Alloy进行接收,并推送到Prometheus中进行存储,通过图表进行展示;
图表来源于官方共享Dashboards,ID:4071 (JVM (Micrometer))
共享Dashboards网址:Grafana dashboards | Grafana Labs
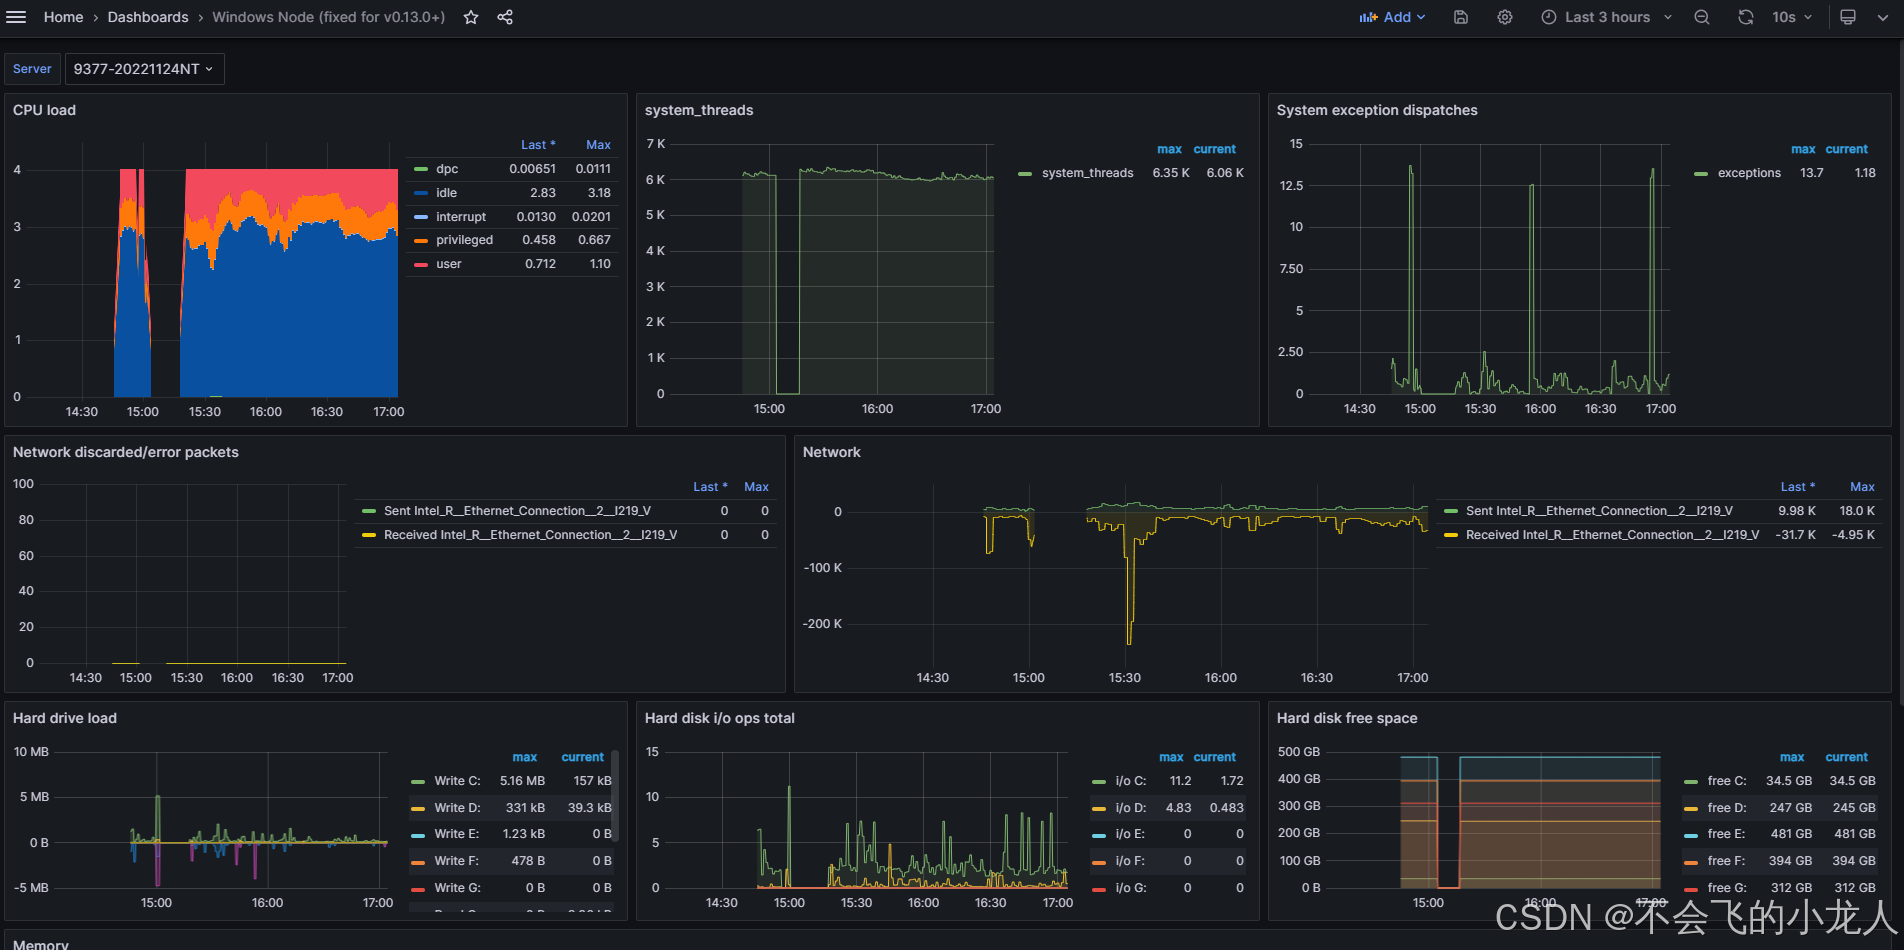
Windows主机资源监控图表
通过Alloy抓取windows主机上的指标数据,推送到Prometheus中进行存储,通过图表进行展示;
图表来源于官方共享Dashboards,ID:12422 (Windows Node (fixed for v0.13.0+))
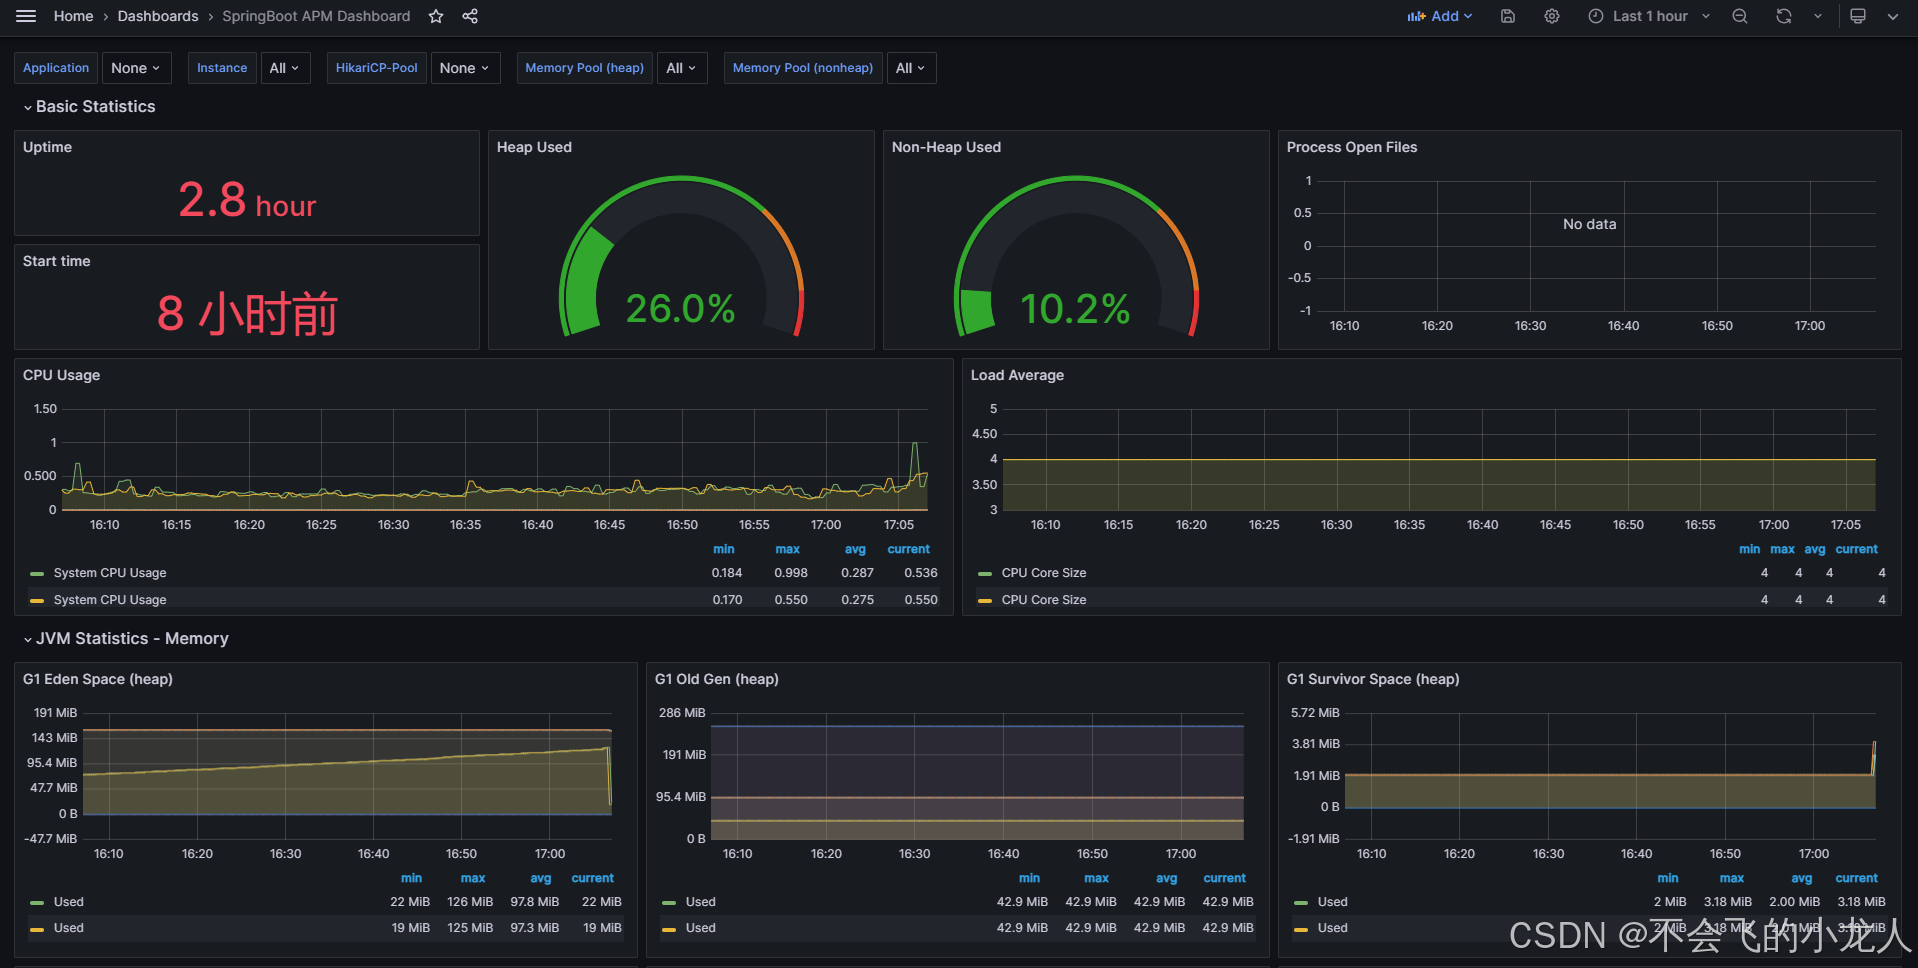
SpringBoot监控资源图表
通过Alloy抓取主动抓取SpringBoot上的/actuator/prometheus端点数据,推送到Prometheus中进行存储;
图表来源于官方共享Dashboards,ID:12900 (SpringBoot APM Dashboard)
总结
Alloy 非常灵活,你可以轻松配置它以满足您在本地、仅限云端或两者混合的需求。Alloy 使用 120 多个组件从应用程序、数据库和 OpenTelemetry 收集器收集遥测数据,并且 Alloy还支持创建和共享自定义组件。Alloy支持使用多个生态系统进行收集,包括 OpenTelemetry 和 Prometheus。遥测数据可以推送至Alloy,或者Alloy可以从您的数据源中提取数据。
虽然Alloy作为一款开源产品推向市场的时间比较新,但官方计划约每6周发布一个新或小版本,因此做为Grafana Agent替换工具,也是后续Grafana生态系例中主力采集终端工具,相信会投入更多的资源去完善Alloy使用问题与增加更多Alloy功能,对于开发者来说,多一个更强大开源全链路遥测数据采集工具,是一种新的体验和选择,学习撑握Alloy后也是增加自身技术广度的一种最佳体现。
参考文档:
Grafana Alloy | Grafana Alloy documentation
https://github.com/open-telemetry/opentelemetry-collector-contrib/blob/v0.105.0/pkg/ottl/contexts/ottlmetric/README.md
prometheus | Grafana Alloy documentation
