鸿蒙MVVM模式介绍与使用
文章目录
- 鸿蒙MVVM模式介绍与使用
- 背景
- MVVM模式介绍
- 相关装饰器介绍
- @State状态变量
- @Prop、@Link的作用
- MVVM架构模式的实现以及相关装饰器的使用
- 具体实现效果
- 总结
鸿蒙MVVM模式介绍与使用
背景
最近在学习鸿蒙开发,想到了以前写安卓移动端应用时经常会用到的MVVM架构模式,就想着能不能在鸿蒙开发的过程中也使用一下,在鸿蒙开发文档里找到了https://developer.huawei.com/consumer/cn/doc/harmonyos-guides-V5/arkts-mvvm-V5这篇文档,在这篇文档的基础上做了一些深化和总结
MVVM模式介绍
在应用开发中,UI的更新需要随着数据状态的变化进行实时同步,而这种同步往往决定了应用程序的性能和用户体验。为了解决数据与UI同步的复杂性,ArkUI采用了 Model-View-ViewModel(MVVM)架构模式。MVVM 将应用分为Model、View和ViewModel三个核心部分,实现数据、视图与逻辑的分离。通过这种模式,UI可以随着状态的变化自动更新,无需手动处理,从而更加高效地管理数据和视图的绑定与更新。
ArkUI采取MVVM = Model + View + ViewModel模式。
- Model层:存储数据和相关逻辑的模型。
- 负责整个应用的原始数据和数据库操作
- 可以将一些网络请求获取的数据局放在这里
- View层:在ArkUI中通常是@Component装饰组件渲染的UI。
- 页面组件,某些业务组件,通用组件等.
- ViewModel层:在ArkUI中,ViewModel是存储在自定义组件的状态变量、LocalStorage和AppStorage中的数据。
- ViewModel层负责处理Model层获取的一些数据,并且进行逻辑处理,以及对View的渲染(
向上刷新ui,向下更新数据) - 可以把它理解为后端开发经常会接触到的service层
- ViewModel层负责处理Model层获取的一些数据,并且进行逻辑处理,以及对View的渲染(
ArkUI的UI开发开发模式即是MVVM模式,而状态管理在MVVM模式中扮演者ViewModel的角色,向上刷新UI,向下更新数据.
最重要的就是理解向上刷新ui,向下更新数据.

同步数据时使用事件驱动,例如在页面加载之前执行的方法的aboutToAppear()方法可以进行数据的初始化,执行一些接口方法之类之类的数据获取方法.
这些方法主要实现位置就在ViewModel中
-
不可跨层访问
- View层不可以直接调用Model层的数据,只能通过ViewModel提供的方法进行调用。
- Model层数据,不可以直接操作UI,Model层只能通知ViewModel层数据有更新,由ViewModel层更新对应的数据。
-
非父子组件间不可直接访问**(这是针对View层设计的核心原则)**
- 禁止直接访问父组件(使用事件或是订阅能力)
- 禁止直接访问兄弟组件能力。这是因为组件应该仅能访问自己看的见的子节点(通过传参)和父节点(通过事件或通知),以此完成组件之间的解耦。
主要是为了减少代码耦合程度
相关装饰器介绍
@State状态变量
@State装饰器作为最常用的装饰器,用来定义状态变量,一般作为父组件的数据源,当开发者点击时,通过触发状态变量的更新从而刷新UI,去掉@State则不再支持刷新UI。
@state装饰器是用来控制当前组件的数据源,
使用有@state装饰器装饰的组件时会得实时刷新UI的能力.
@Prop、@Link的作用
随着需要渲染的组件越来越多,@Entry组件必然需要进行拆分,为此拆分出的子组件就需要使用@Prop和@Link装饰器:
- @Prop是父子间单向传递,子组件会深拷贝父组件数据,可从父组件更新,也可自己更新数据,但不会同步父组件数据。
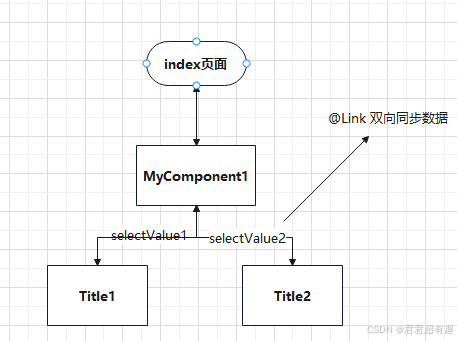
- @Link是父子间双向传递,父组件改变,会通知所有的@Link,同时@Link的更新也会通知父组件对应变量进行刷新。
说白了就是
@Prop是单向传递,子同步父的数据,父不同步子的数据
@Link一个是双向传递,父子数据同步
MVVM架构模式的实现以及相关装饰器的使用
先看看test项目结构

- 定义基础组件
/**
 * 标题Title
 */
@Preview
@Component
export struct Title {
  // @Prop装饰的变量,由于值是上层组件给的,所以不需要进行值的初始化
  @Prop titleStatic: TitleStatic;
  // 与上层组件建立双向链接,实时刷新数据和ui
  @Link selectValue: string;
  // 无参构造组件方法
  @BuilderParam titleBuilderParam: () => void = this.doNothingBuilder

  @Builder
  doNothingBuilder() {
  }

  build() {
    // 第一层
    Row() {
      // 第二层
      Row() {
        Text(this.titleStatic.title)
          .fontColor(this.titleStatic.fontColor)
          .opacity(1)
          .fontSize(16)
      }.width('30%')

      // 第二层
      Row() {
        if (this.titleStatic.isShowSelect) {
          Select([{ value: this.titleStatic.selectItems[0].toString() },
            { value: this.titleStatic.selectItems[1].toString() },
            { value: this.titleStatic.selectItems[2].toString() },
            { value: this.titleStatic.selectItems[3].toString() }])
            .selected(0)
            .value('2024')
            .font({ size: 16, weight: 500 })
            .fontColor(this.titleStatic.fontColor)
            .selectedOptionFont({ size: 16, weight: 400 })
            .optionFont({ size: 16, weight: 400 })
            .arrowPosition(ArrowPosition.END)
            .menuAlign(MenuAlignType.START, { dx: 0, dy: 0 })
            .backgroundColor(100000000)
            .optionWidth(200)
            .optionHeight(300)
            .divider(null)
            .opacity(1)
            .onSelect((index: number, value?: string | undefined) => {
              // 逻辑处理
              this.selectValue = value || '';
            })
        }
        if (this.titleStatic.isShowTo) {
          Image($r('app.media.white_right_arrow'))
            .width(16)
        }
      }.width('70%').justifyContent(FlexAlign.End)
    }.width('100%')
    .backgroundColor(100000000)
  }
}
//标题静态数据
export interface TitleStatic {
  title: ResourceStr; // 标题文字
  fontColor: ResourceColor; // 文字颜色
  isShowTo: boolean; // 是否显示箭头
  isShowSelect: boolean; // 是否显示选择框
  selectItems: Array<string>; // 可以选择的条目
}
- 定义组合组件
@Component
export struct MyComponent1 {
  // 静态数据.直接传给下层组件
  titleStatic1: TitleStatic = {
    title: '测试1',
    fontColor: '#191919',
    isShowTo: true,
    isShowSelect: true,
    selectItems: ['2024', '2023', '2022', '2021']
  };
  titleStatic2: TitleStatic = {
    title: '测试2',
    fontColor: '#191919',
    isShowTo: true,
    isShowSelect: true,
    selectItems: ['2024', '2023', '2022', '2021']
  };
  // 组件动态选择
  @Link selectValue1: string;
  @Link selectValue2: string;
  // 无参组件构造函数
  @BuilderParam titleBuilderParam: () => void = this.doNothingBuilder

  @Builder
  doNothingBuilder() {
  }

  build() {
    // 第一层
    Column({ space: 10 }) {
      Title({
        titleStatic: this.titleStatic1,
        selectValue: this.selectValue1
      })
      Title({
        titleStatic: this.titleStatic2,
        selectValue: this.selectValue2
      })
    }
    .width('100%')
    .backgroundColor('rgba(255, 255, 255, 0.72)')
    .padding(10)
    .borderRadius(15)
  }
}
- 定义Model
/**
 * @ProjectName : MyApplicationTest
 * @FileName : BaseModel
 * @Author : 君君超有趣
 * @Time : 2024/11/21 17:02
 * @Description : Model基类
 */
export class BaseModel {

}


/**
 * 数据来源 Model层
 */
@Observed
export class TestModel extends BaseModel {
  /**
   * @Author 君君超有趣
   * @Description 获取数据
   * @Date 10:40 2024/11/18
   * @Param
   * @return
   **/
  async getIssueData<T>(year:number) {
    return year;
  }
}
- 定义ViewModel
/**
 * @ProjectName : MyApplicationTest
 * @FileName : BaseViewModel
 * @Author : 君君超有趣
 * @Time : 2024/11/21 17:04
 * @Description : 基础ViewModel类,所有ViewModel都应继承此类
 */
export abstract class BaseViewModel<T extends BaseModel> {
  /**
   * 模型实例
   * @type T
   */
  public mModel: T | undefined;

  /**
   * 构造函数
   * @param {T} model 模型实例
   */
  constructor(model: T) {
    // 初始化模型实例
    this.mModel = model;
  }

  /**
   * 销毁方法,用于释放资源
   */
  public onDestroy() {
    // 将模型实例设置为undefined,释放资源
    this.mModel = undefined;
  }
}
/**
 * ViewModel层,连接Model层和ViewModel层
 */
@Observed
export class TestVM extends BaseViewModel<TestModel> {
  //提供给View的动态数据
  date1: string = '';
  date2: string = '';

  /**
   * @Author 君君超有趣
   * @Description //处理原始数据
   * @Date 15:25 2024/11/14
   * @Param
   * @return
   **/
  async getYearData(index: number, year: number): Promise<string> {
    return new Promise((resolve, reject) => {
      this.mModel?.getIssueData<requestResult<issue>>(year).then((res) => {
        // 进行数据处理
        if (index === 0) {
          this.date1 = res + '年';
        }
        if (index === 1) {
          this.date2 = res + '年';
        }
        // 返回结果值
        resolve('成功')
      }).catch((e: Error) => {
        reject('出现异常')
      })
    })
  }
}
- 定义具体页面Entity
@Entry
@Component
struct Index {
  // 拿到ViewModel对象
  projectManagerVM: TestVM = new TestVM(new TestModel());
  // 监听值的变化
  @State @Watch('onSelectValueChange1') selectValue1: string = '';
  @State @Watch('onSelectValueChange2') selectValue2: string = '';
  // 页面本地值,用来同步修改本层组件的值
  @State date1: string = '0';
  @State date2: string = '0';

  /**
   * @Author 君君超有趣
   * @Description 监听第一个年份选择变化
   * @Date 11:22 2024/11/21
   * @Param
   * @return
   **/
  onSelectValueChange1() {
    // TODO:业务逻辑
    console.info('selectValue1值发生变化:' + this.selectValue1)
    this.projectManagerVM.getYearData(0, Number(this.selectValue1)).then(res => {
      this.date1 = this.projectManagerVM.date1;
      console.info('date1值发生变化:' + this.date1)
    })
  }

  /**
   * @Author 君君超有趣
   * @Description 监听第二个年份选择变化
   * @Date 11:23 2024/11/21
   * @Param
   * @return
   **/
  onSelectValueChange2() {
    // TODO:业务逻辑
    console.info('selectValue2值发生变化:' + this.selectValue2)
    this.projectManagerVM.getYearData(1, Number(this.selectValue2)).then(res => {
      this.date2 = this.projectManagerVM.date2;
      console.info('date2值发生变化:' + this.date2)
    })

  }

  build() {
    Column() {
      MyComponent1({
        selectValue1: this.selectValue1,
        selectValue2: this.selectValue2
      })
      Text(this.date1)
      Text(this.date2)
    }
  }
}
具体实现效果


总结
记住一句话就好了:向上刷新ui,向下更新数据.
以上就是我接触鸿蒙后学习到的在鸿蒙开发下使用MVVM架构的具体方法,有什么疑问或者建议可以联系我.
