Python的tkinter如何把日志弄进文本框(Text)
当我们用python的Tkinter包给程序设计界面时,在有些时候,我们是希望程序的日志显示在界面上的,因为用户也需要知道程序目前运行到哪一步了,以及程序当前的运行状态是否良好。python的通过print函数打印出来的日志通常显示在后台,但用户一般不希望查看后台,甚至希望后台被隐藏,所以希望直接在界面上看见日志。
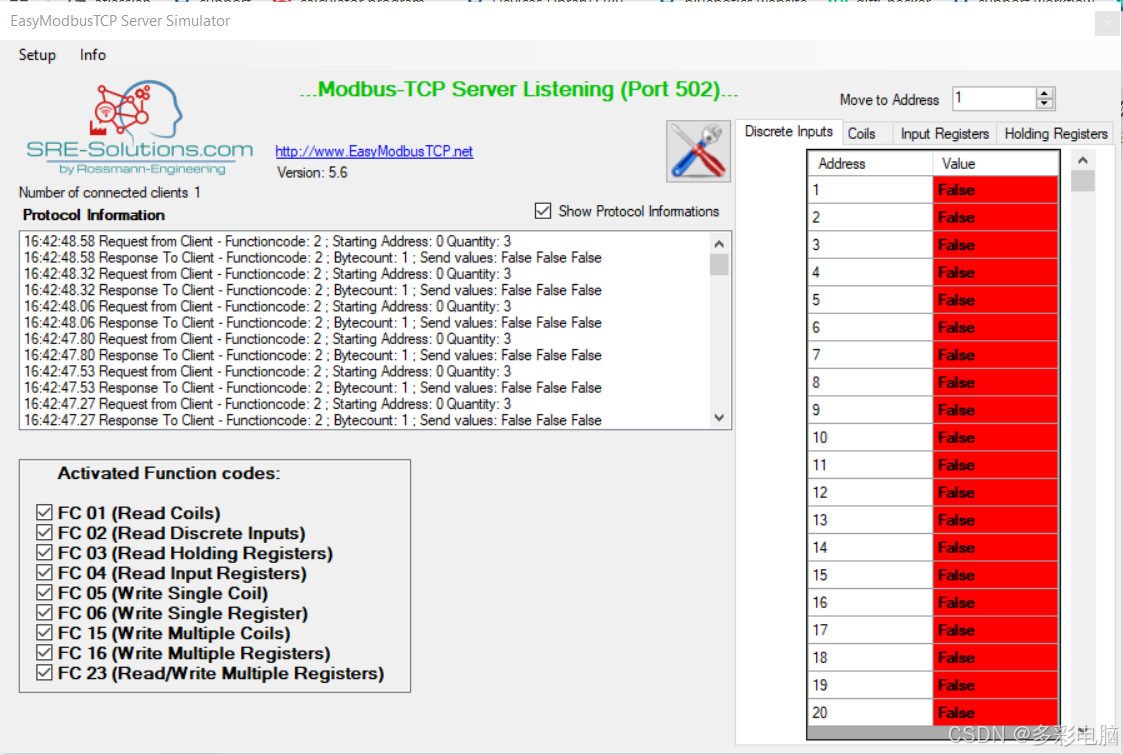
例如,在SourceForge上下载的EasyModbusTCP Server Simulator,是一款用于模拟Modbus服务器通讯的PLC的程序。该程序的运行界面如下(如需了解Modbus是什么,请阅读ModbusTCP协议 - ioufev - 博客园):

在图中可看出,左侧Protocol Information下方的文本框显示的是该程序收到的Modbus客户端发给它的通讯请求。这个文本框里的内容是不断更新的,因为不断地会有新的请求发给它。这个日志的显示,有助于用户确认该Modbus服务器模拟器是否以及收到了请求,从而有助于Modbus相关的程序调试。
在通过python的tkinter设计程序时,可以将python程序中产生的日志显示在文本框(Text)中,实现一样的效果。
一、程序基本思路
通常情况下,在python中,print函数就是把一些日志打印在控制台中。但是,通过一些代码,可以要求程序的print函数打印的日志不打印在控制台中,而是打印在其它的数据流中。
可以阅读该网站:Two Ways to Capture Print。该网站介绍了两种办法,我们这里主要关注第二种方法,即把print()函数的输出导向另一个变量。
output_buffer = io.StringIO()
sys.stdout = output_buffer在python中,运行这两句语句后,此时再运行print()函数,控制台上就不会再出现任何内容。这并不是说print()函数失效了,而是说它的输出流已不再是系统默认的sys.__stdout__了(之后会再提到并详细说明),而是改为通过io.StringIO()创建的output_buffer输出数据流。print()函数输出的内容之后都进入output_buffer了。
output = output_buffer.getvalue()通过这句代码,把output_buffer输出数据流的内容取出,赋值到变量output中。
下面,把print()函数的输出数据流还原为控制台
sys.stdout = sys.__stdout__注意:python中有一个叫sys的包,里面的__stdout__是python自带的控制台输出流。默认情况下,输出流都是python自带的控制台输出流。当然可以用上述代码临时更改。
现在,就可以通过print()函数在控制台上看见output的值,即当时从控制流output_buffer接收到的值。
二、Tkinter实现
所以,现在用tkinter做一个程序界面,实现将日志显示在文本框(Text)的功能。关于文本框如何使用,见Tkinter Text。
(一)例子说明
本文的例子,是用tkinter做一个AGV调度系统的客户端。文章中不涉及调度系统的具体交互方式,只展示界面本身的代码。在该界面中,植入车辆和创建任务的过程都是异步执行的线程,使用方式介绍见How to Use Thread in Tkinter Applications。
代码:
from tkinter import *
from tkinter import ttk
from threading import Thread
from os.path import dirname, join
from tkinter.scrolledtext import ScrolledText
import sys
sys.path.append(dirname(__file__))
sys.path.append(join(dirname(__file__), '..'))
#print(sys.path)
#from ANTServerRESTClient import ANTServerRestClient, MissionType, RetCode, FlexibleRouting, MissionPriority
#from ToolsAPI import MissionMaker, ServerManager, VehicleManager
import datetime
from time import sleep
from tkinter import messagebox
from InsertVehicles import insertProgram
from SimulateInstallation import simulation
import io
from icon import img
import base64
import os
#from os import execl


class insertThread(Thread):
    def __init__(self):
        super().__init__()
    def run(self):
        insertProgram()

class simulationThread(Thread):
    def __init__(self, num):
        super().__init__()
        self.num = num
    def run(self):
        simulation(self.num)


class App(Tk):
    def __init__(self):
        super().__init__()
        self.title("Demo of End of Chain Logistics")
        self.resizable(False, False)
        tmp = open("tmp.ico", "wb+")
        tmp.write(base64.b64decode(img))
        tmp.close()
        self.iconbitmap('tmp.ico')
        os.remove("tmp.ico")
        #self.iconbitmap(join(dirname(__file__), 'favicon.ico'))
        style = ttk.Style()
        style.configure('TButton', font=('Helvetica', 14))
        #style.configure('TSpinbox', font=('Helvetica', 14))
        #self.geometry('500x500')
        self.labelAll = ttk.Label(self, text="Control panel of Logistics Demo", font=('Helvetica', 24))
        self.labelAll.grid(row=0, columnspan=2)
        self.insertButton = ttk.Button(self, text="Insert vehicles", command=self.insertVehicles)
        self.insertButton.grid(row=1, column=0)
        self.missionButton = ttk.Button(self, text="Create missions", command=self.createMissions)
        self.missionButton.grid(row=2, column=0)
        self.missNum = IntVar(value=50)
        self.missionNum = ttk.Spinbox(self, from_=1, to=100, textvariable=self.missNum, wrap=False, state='readonly', font=('Helvetica', 14))
        self.missionNum.grid(row=2, column=1)
        self.logLabel = ttk.Label(self, text="Logs:", font=('Helvetica', 14))
        self.logLabel.grid(row=3, column=0)
        self.logClearButton = ttk.Button(self, text="Clear all logs", command=self.clearLogs)
        self.logClearButton.grid(row=3, column=1)
        self.logs = StringVar()
        self.logText = ScrolledText(self, width=60, height=10, state='disabled')
        self.logText.grid(row=4, columnspan=2)
        self.logs.trace_add('write', self.updatelog)
        self.out_buffer = io.StringIO()
        sys.stdout.flush()
        sys.stdout = self.out_buffer
        self.protocol("WM_DELETE_WINDOW", self.on_closing)
        self.logPos = 0


    def insertVehicles(self):
        insertThd = insertThread()
        insertThd.start()
        self.monitorThread(insertThd, self.insertButton)

    def clearLogs(self):
        self.logText.config(state=NORMAL)
        self.logText.delete(0.0, END)
        self.logText.config(state=DISABLED)

    def monitorThread(self, thd:Thread, btn:ttk.Button):
        if thd.is_alive():
            btn.state(['disabled'])
            self.after(100, lambda: self.monitorThread(thd, btn))
        else:
            btn.state(['!disabled'])
        self.logs.set(self.out_buffer.getvalue())

    def createMissions(self):
        missionThd = simulationThread(self.missNum.get())
        missionThd.start()
        self.monitorThread(missionThd, self.missionButton)

    def updatelog(self, a, b, c):
        self.logText.config(state=NORMAL)
        self.logText.delete(0.0, END)
        self.logText.insert(0.0, self.logs.get())
        self.logText.config(state=DISABLED)

    def on_closing(self):
    # 处理关闭窗口事件的代码
        sys.stdout=sys.__stdout__
        sys.stdout.flush()
        self.destroy()
        #execl(sys.executable, sys.executable, *sys.argv)


if __name__=="__main__":
    app = App()
app.mainloop()首先,阅读App()里的__init__()函数,里面把sys.stdout改为了self.out_buffer,所以print的打印内容都会进入self.out_buffer。另外,monitorThread函数里的最后一句。也就是说,每次按下按钮后,监控线程的过程中,都会把self.logs变量更新为self.out_buffer里的内容。最后,在updatelog()中,文本框self.logText里的内容会被清空,并赋值为self.logs变量。这样,所有的日志,在线程运行时,都会不断被用于更新文本框。
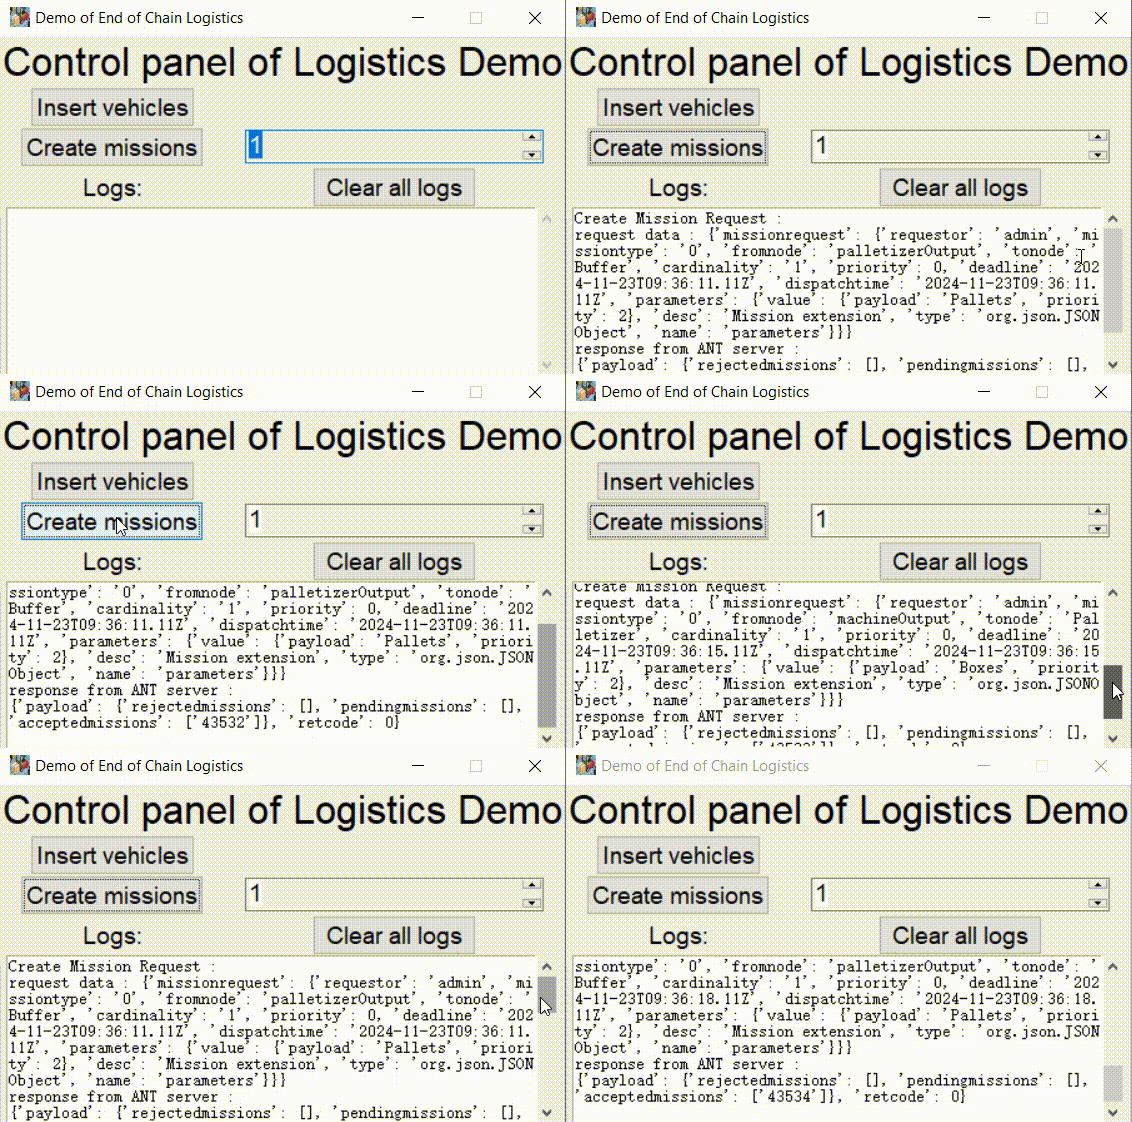
运行结果:

(二)问题及解决方式
从动画中可知,每次运行Create missions时,日志会更新,但每次都会让滚动条滑到顶部。这不科学也不美观。原因主要在于,更新文本框的方法,是把日志整个(无论是已有的日志还是新产生的日志)都赋值给文本框,而不是只把新产生的日志附在文本框的最后。因此,为了让实现的方式更合理,需要做一些修改。修改的结果应该是:每次点击按钮,运行程序后,文本框不要删除任何文字,只是把新的日志附在最后。因此,新的日志,要和原来已有的日志分开。
例如:第一次按键后,产生的日志是:
1234
5678
第二次按键后,新产生的日志是
9101112
13141516因此,在整个通过io.StringIO()创建的输出数据流output_buffer中,所有的日志都被保留。如果此时读取output_buffer.getValue(),结果是:
1234
5678
9101112
13141516
但我们要把前两行和后两行分开,要能做到在前两行已经在文本框里,再次读取该输出流时,只取出后两行,然后将它附在(即从末尾插入)文本框中。
关于如何使用输出流output_buffer,即这个io.StringIO类型的输出流,请阅读Python StringIO 模块完整指南及示例。在本文中,需要使用三个函数:
1. StringIO.seek():这个用于设置输出流目前的光标位置
2. StringIO.tell():这个用于得到输出流目前的光标位置
3. StringIO.read():这个用于从光标位置开始读取输出流的内容。和getValue()不同之处在于,getValue()是读取整个输出流的内容。
所以,读取输出流,从哪里开始读,是可以控制的。只要光标设置妥当,可以实现只读取最后即最新的几行的功能。
基本思路:每次读取后,记录输出流目前光标位置(即最后一个位置),用tell()函数。假设此时为时间点A,那么之后输出流有了更新(新日志)再读取时,首先把光标移到时间点A记录的光标位置(用seek()函数),然后再用read()函数读取,此时读取的内容只是新的几行日志,不包含之前已经读过的日志。这样,新日志只需附在文本框最后即可。
改进后,代码如下:
from tkinter import *
from tkinter import ttk
from threading import Thread
from os.path import dirname, join
from tkinter.scrolledtext import ScrolledText
import sys
sys.path.append(dirname(__file__))
sys.path.append(join(dirname(__file__), '..'))
#print(sys.path)
#from ANTServerRESTClient import ANTServerRestClient, MissionType, RetCode, FlexibleRouting, MissionPriority
#from ToolsAPI import MissionMaker, ServerManager, VehicleManager
import datetime
from time import sleep
from tkinter import messagebox
from InsertVehicles import insertProgram
from SimulateInstallation import simulation
import io
from icon import img
import base64
import os
#from os import execl


class insertThread(Thread):
    def __init__(self):
        super().__init__()
    def run(self):
        insertProgram()

class simulationThread(Thread):
    def __init__(self, num):
        super().__init__()
        self.num = num
    def run(self):
        simulation(self.num)


class App(Tk):
    def __init__(self):
        super().__init__()
        self.title("Demo of End of Chain Logistics")
        self.resizable(False, False)
        tmp = open("tmp.ico", "wb+")
        tmp.write(base64.b64decode(img))
        tmp.close()
        self.iconbitmap('tmp.ico')
        os.remove("tmp.ico")
        #self.iconbitmap(join(dirname(__file__), 'favicon.ico'))
        style = ttk.Style()
        style.configure('TButton', font=('Helvetica', 14))
        #style.configure('TSpinbox', font=('Helvetica', 14))
        #self.geometry('500x500')
        self.labelAll = ttk.Label(self, text="Control panel of Logistics Demo", font=('Helvetica', 24))
        self.labelAll.grid(row=0, columnspan=2)
        self.insertButton = ttk.Button(self, text="Insert vehicles", command=self.insertVehicles)
        self.insertButton.grid(row=1, column=0)
        self.missionButton = ttk.Button(self, text="Create missions", command=self.createMissions)
        self.missionButton.grid(row=2, column=0)
        self.missNum = IntVar(value=50)
        self.missionNum = ttk.Spinbox(self, from_=1, to=100, textvariable=self.missNum, wrap=False, state='readonly', font=('Helvetica', 14))
        self.missionNum.grid(row=2, column=1)
        self.logLabel = ttk.Label(self, text="Logs:", font=('Helvetica', 14))
        self.logLabel.grid(row=3, column=0)
        self.logClearButton = ttk.Button(self, text="Clear all logs", command=self.clearLogs)
        self.logClearButton.grid(row=3, column=1)
        self.logs = StringVar()
        self.logText = ScrolledText(self, width=60, height=10, state='disabled')
        self.logText.grid(row=4, columnspan=2)
        self.logs.trace_add('write', self.updatelog)
        self.out_buffer = io.StringIO()
        sys.stdout.flush()
        sys.stdout = self.out_buffer
        self.protocol("WM_DELETE_WINDOW", self.on_closing)
        self.logPos = 0


    def insertVehicles(self):
        insertThd = insertThread()
        insertThd.start()
        self.monitorThread(insertThd, self.insertButton)

    def clearLogs(self):
        self.logText.config(state=NORMAL)
        self.logText.delete(0.0, END)
        self.logText.config(state=DISABLED)

    def monitorThread(self, thd:Thread, btn:ttk.Button):
        if thd.is_alive():
            btn.state(['disabled'])
            self.after(100, lambda: self.monitorThread(thd, btn))
        else:
            btn.state(['!disabled'])
        self.out_buffer.seek(self.logPos)
        outValue = self.out_buffer.read()
        #self.out_buffer.truncate(0)
        self.logPos = self.out_buffer.tell()
        if outValue != '':
            self.logs.set(outValue)

    def createMissions(self):
        missionThd = simulationThread(self.missNum.get())
        missionThd.start()
        self.monitorThread(missionThd, self.missionButton)

    def updatelog(self, a, b, c):
        self.logText.config(state=NORMAL)
        self.logText.insert(END, self.logs.get())
        self.logText.update()
        self.logText.config(state=DISABLED)

    def on_closing(self):
    # 处理关闭窗口事件的代码
        sys.stdout=sys.__stdout__
        sys.stdout.flush()
        self.destroy()
        #execl(sys.executable, sys.executable, *sys.argv)


if __name__=="__main__":
    app = App()
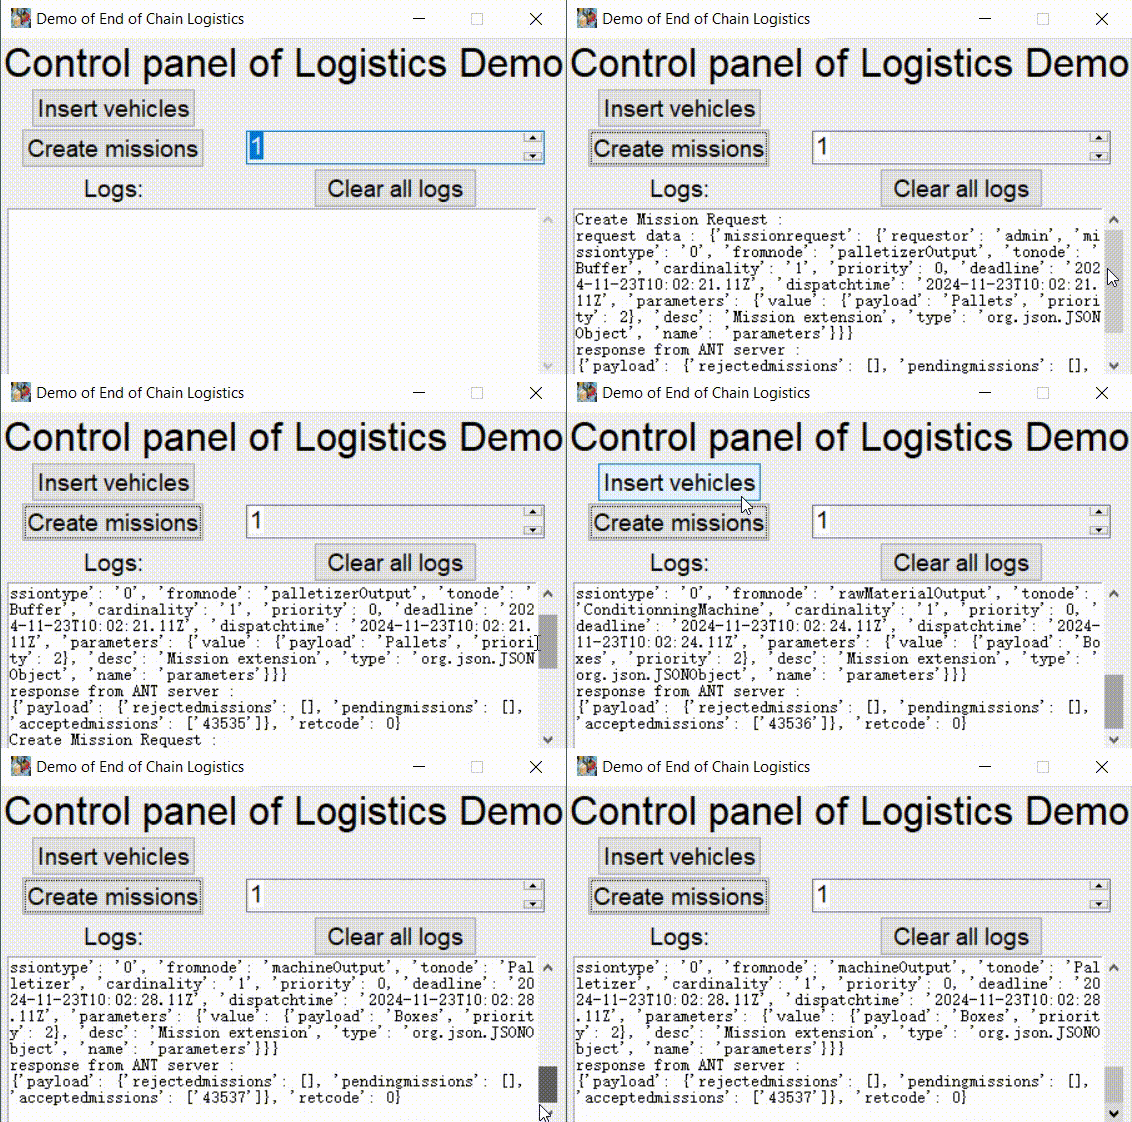
app.mainloop()注意阅读monitorThread()和updatelog()的代码。这里,self.logs存的只是新的日志。运行效果如下:

从动画中看,每次产生新日志时,滚动条不动,新日志只是附在最后。这样的效果是合理的,也是有助于调试的。
三、总结
总之,用tkinter设计程序界面时,若要让日志显示在文本框中,首先要通过几句代码临时修改系统输出的数据流。然后,要将数据流的内容写进文本框。文本框光标可用于只提取最新的几行日志,这样更新文本框时,只需把新内容附在最后,无需全部删除重新赋值。
