es-head插件插入查询以及条件查询(五)
es-head插件插入查询以及条件查询
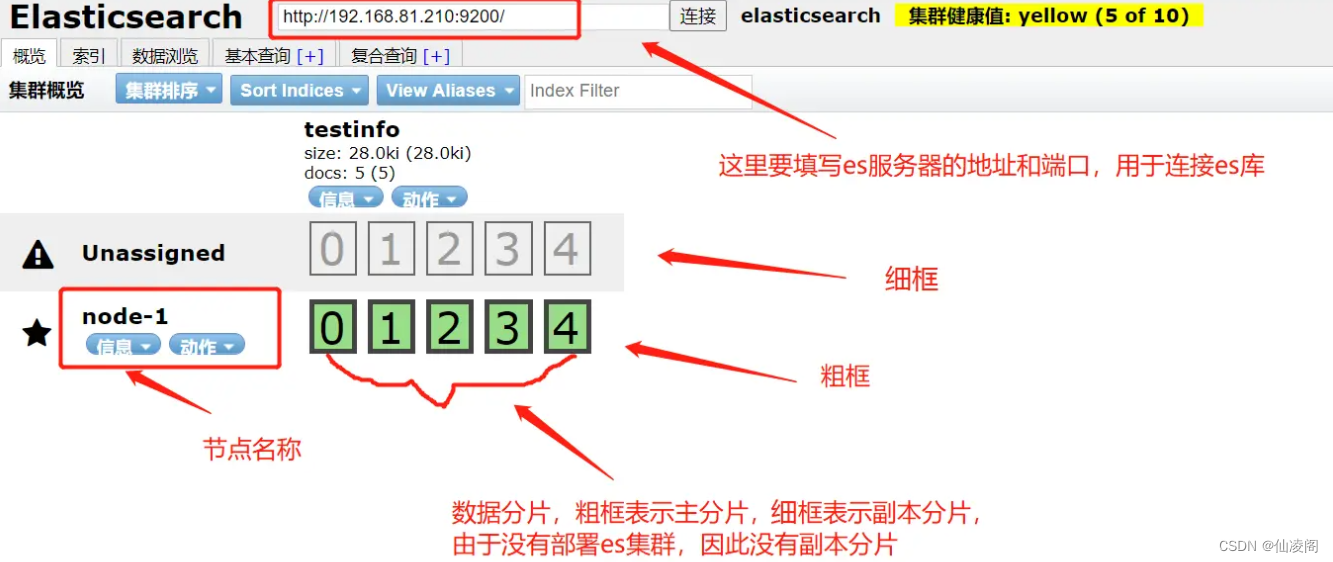
1.es-head插件页面介绍
页面详细介绍
2.es-head查询语句
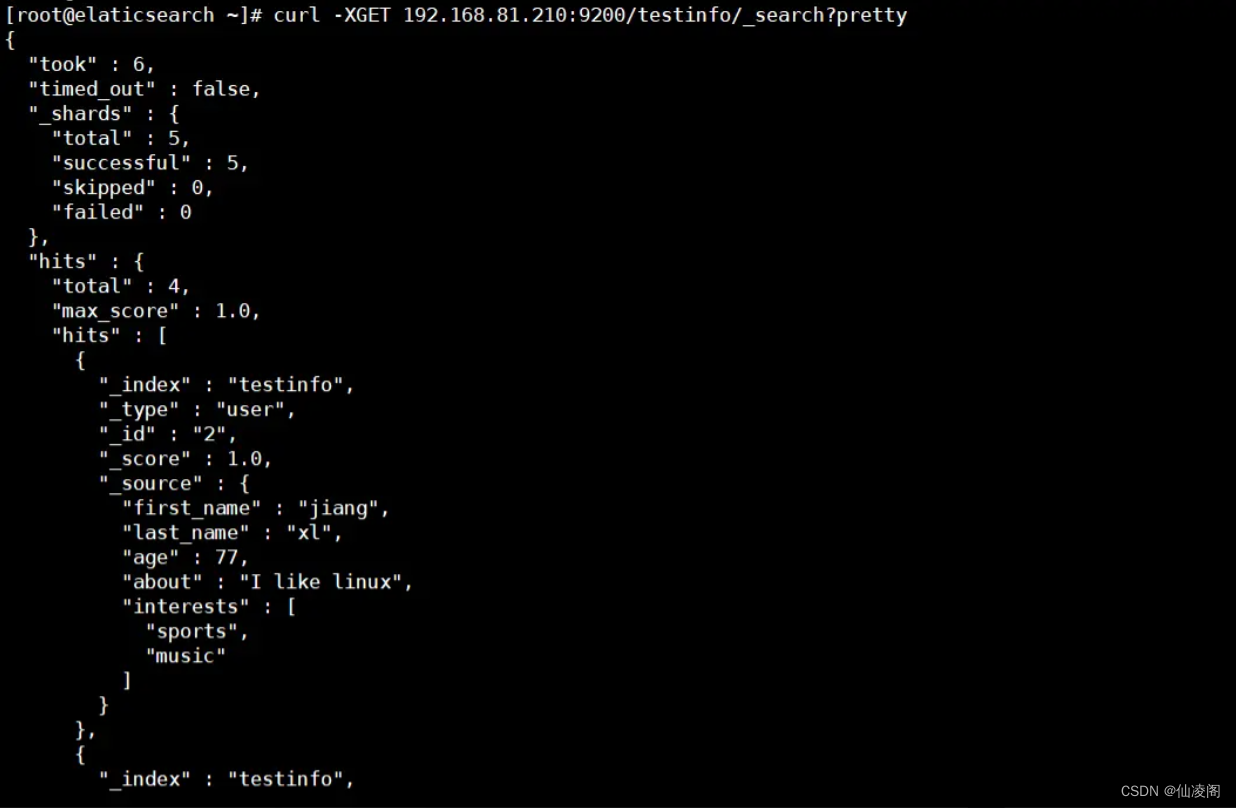
2.1.查询索引中的全部数据
curl命令交互,采用GET请求
语法格式: curl -XGET es地址:9200/索引名/_search?pretty
[root@elaticsearch ~]# curl -XGET 192.168.81.210:9200/testinfo/_search?pretty
复制代码
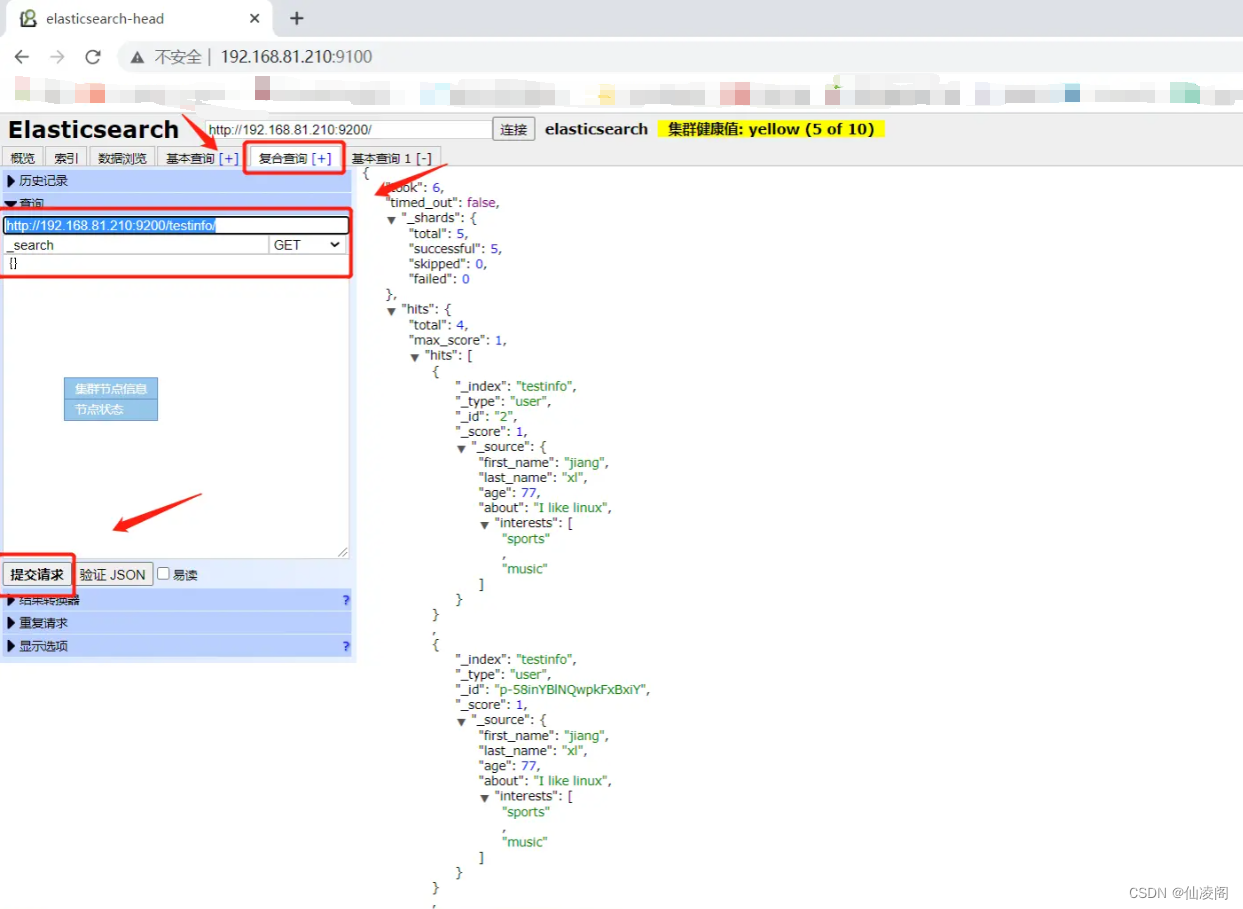
es-head插件查询索引中的全部数据
在查询的框中填写http://192.168.81.210:9200/testinfo/,填写es地址和查询的索引
_search表示查询索引中的所有数据,类型选择GET,最后点击提交请求
2.2.查询一条数据
curl交互式查询
语法格式:curl -XGET es地址:prot/索引/类型/id?pretty
[root@elaticsearch ~]# curl -XGET 192.168.81.210:9200/testinfo/user/1?pretty
复制代码
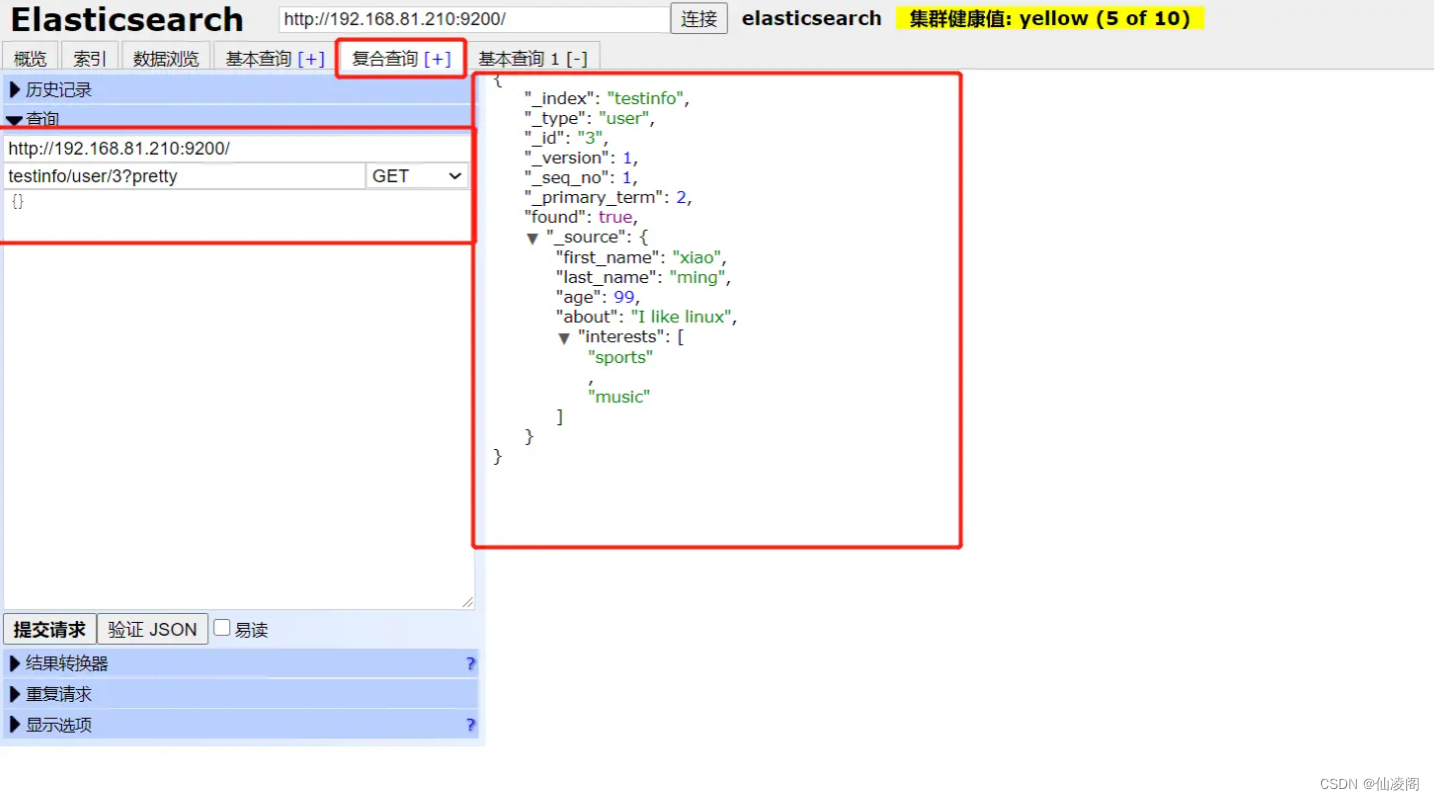
es-head查询
地址:http://192.168.81.210:9200/
查询的数据:testinfo/user/3?pretty
类型:GET
3.es-head插入数据
3.1.插入一条数据
curl交互式插入
curl -XPUT ‘192.168.81.240:9200/testinfo/user/3?pretty’ -H 'COntent-Type:
application/json' -d'
{
	"first_name" : "xiao",
	"last_name" : "ming",
	"age" : 99,
	"about" : "I like linux", "interests": [ "sports", "music" ]
}'
复制代码
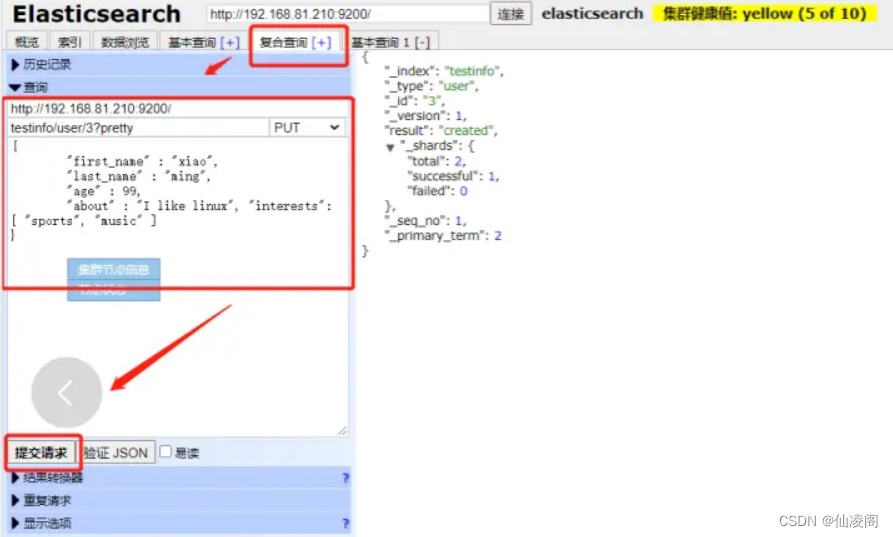
es-head插入
es地址:http://192.168.81.210:9200/
索引:testinfo/user/3?pretty		PUT类型
{
	"first_name" : "xiao",
	"last_name" : "ming",
	"age" : 99,
	"about" : "I like linux", "interests": [ "sports", "music" ]
}
复制代码
3.2.查看数据是否插入
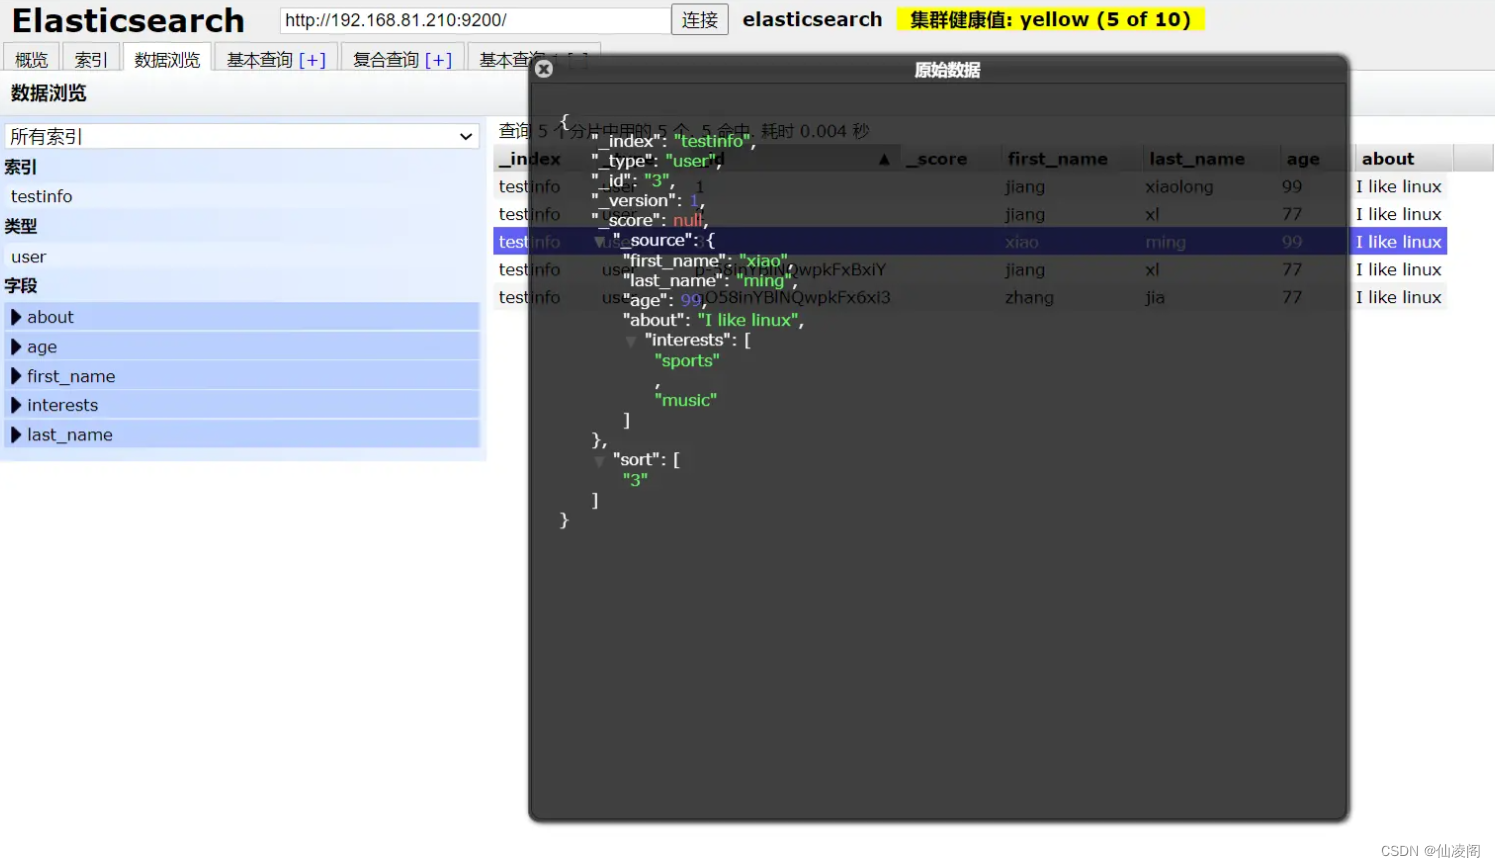
点击数据浏览一栏,索引选择testinfo

数据浏览这里以_下划线开头的表示es内置字段,无法进行修改数据
每点击一条数据都会有json格式的显示
4.es-head数据浏览查询数据
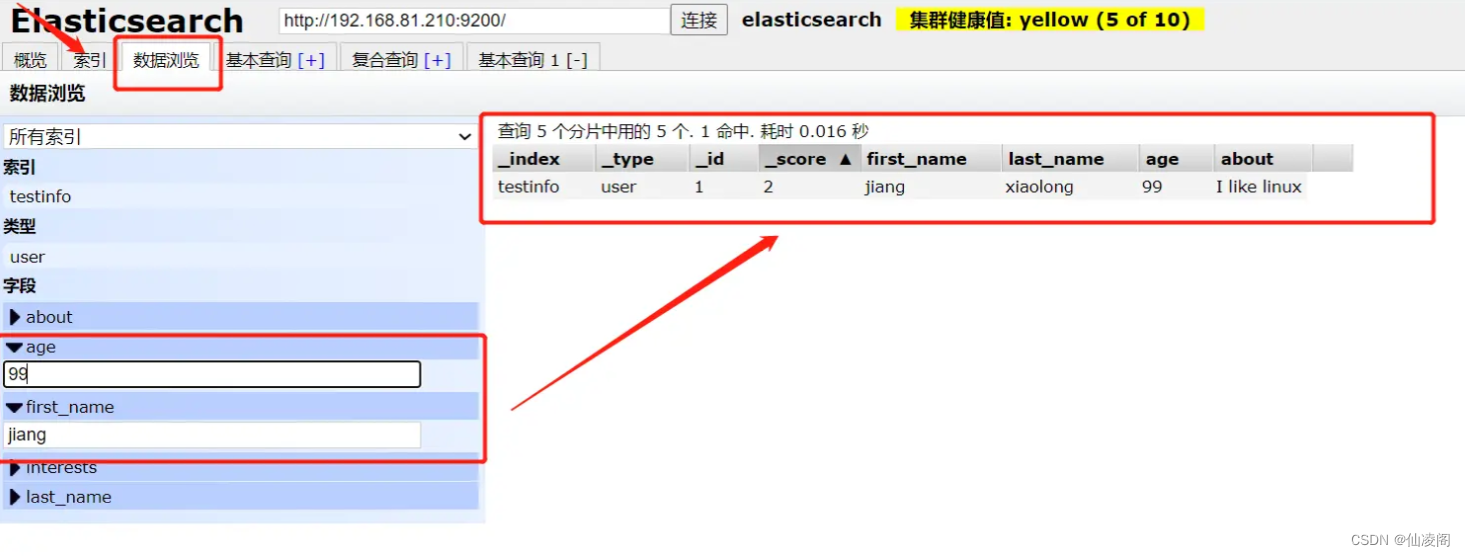
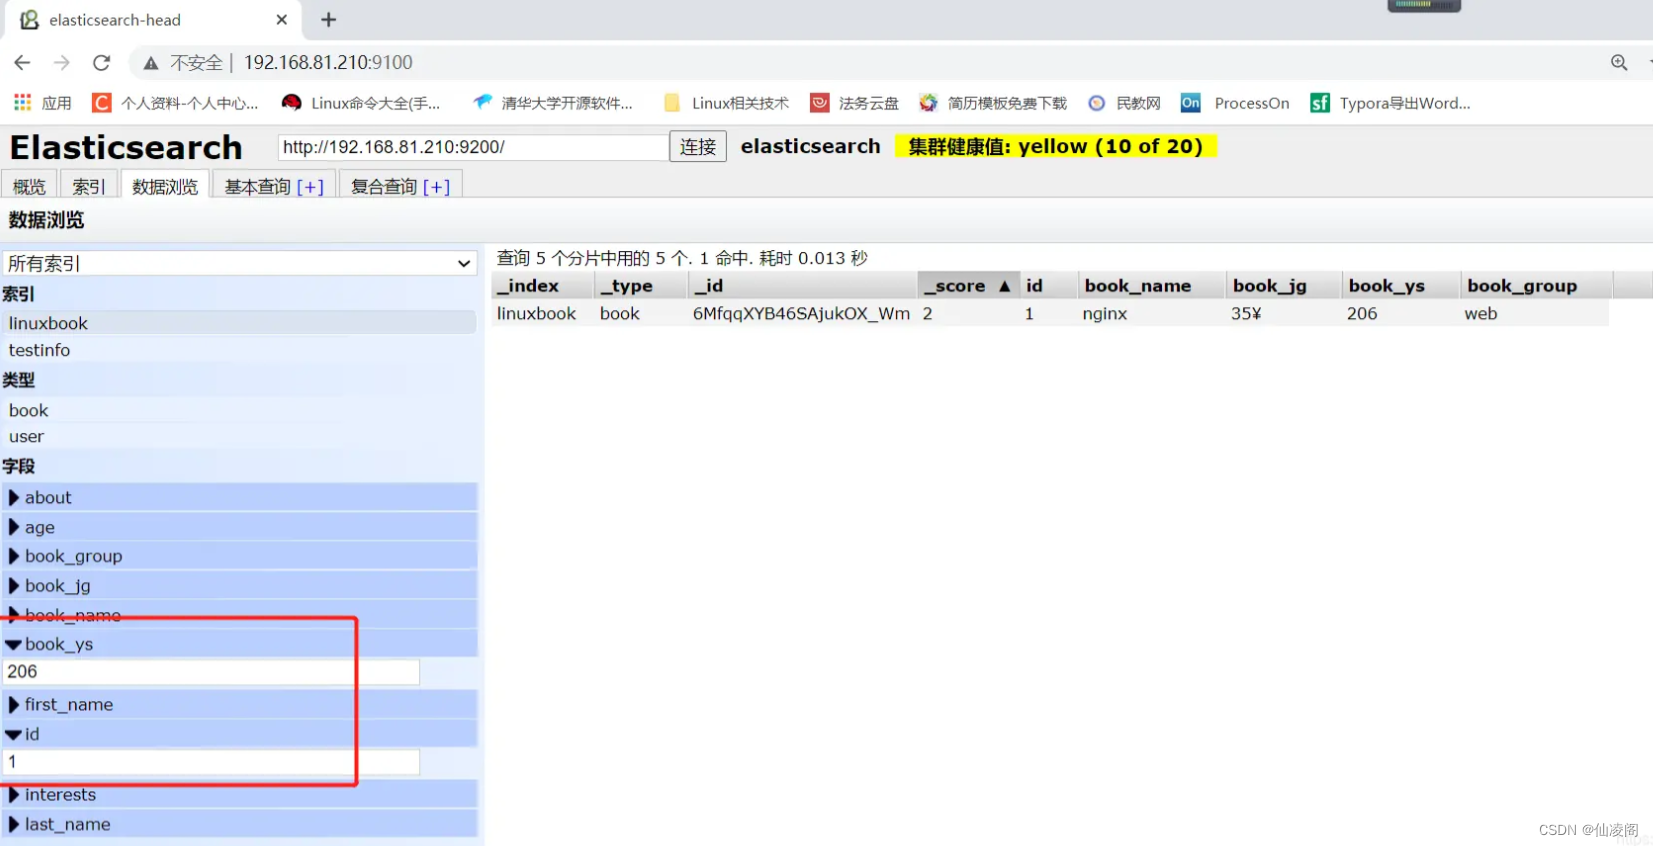
查询一个first_name包含jiang且age为99的数据
点击数据浏览,在左侧选好索引库
县级age的三角即可弹出输入框,在里面写好99,在点击first_name三角弹出输入框,在里面写好jiang即可
5.es-head基本查询实现复合查询
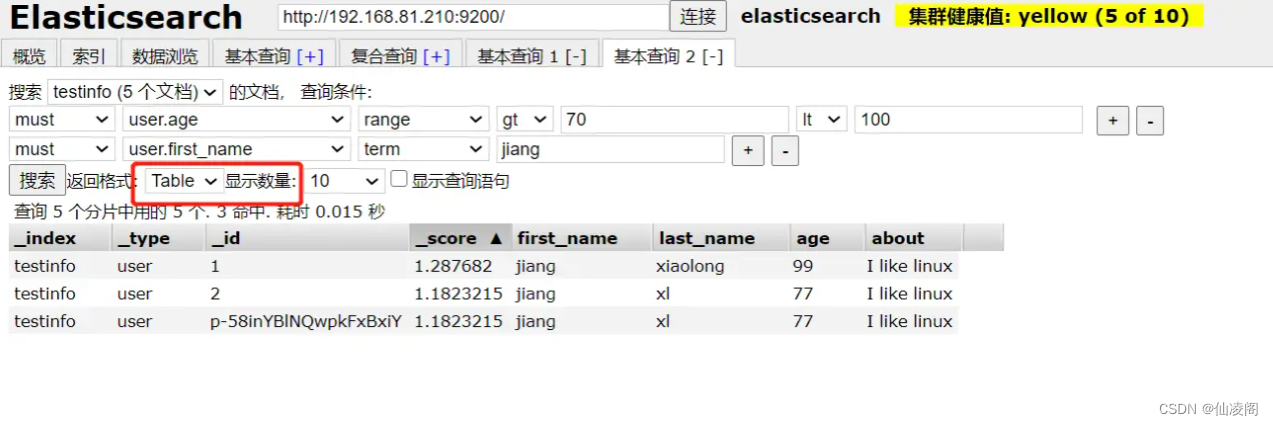
5.1.查询age范围70-100之间的数据
第二列表示字段,选择age,第三列选择查询类型,我们选择range,range表示范围,第四列第五列选择范围值

5.2.姓氏包含将且年龄在50-100的数据
在上一个基础之上增加一个first_name的字段

这里可以选择输出为什么类型的格式,有table、json、csv
6.es-head随机主机和id
我们实际生产环境中经常需要把mysql的数据导到es集群中,实现大数据分析,但是由于每个索引库都有一个系统生成的id,显然和mysql中的会冲突,这时我们可以在增加一个id列,填写mysql对应的id号,然后索引库中的系统id可以让其自动生成并设置成主键就能完美解决这个问题了
最终的思路就是:系统生成的id号做成主键让系统随机生产,再增加一列作为id,存放mysql系统之前的id号
6.1.创建一个带有系统id和自己定义id的索引库并写入数据
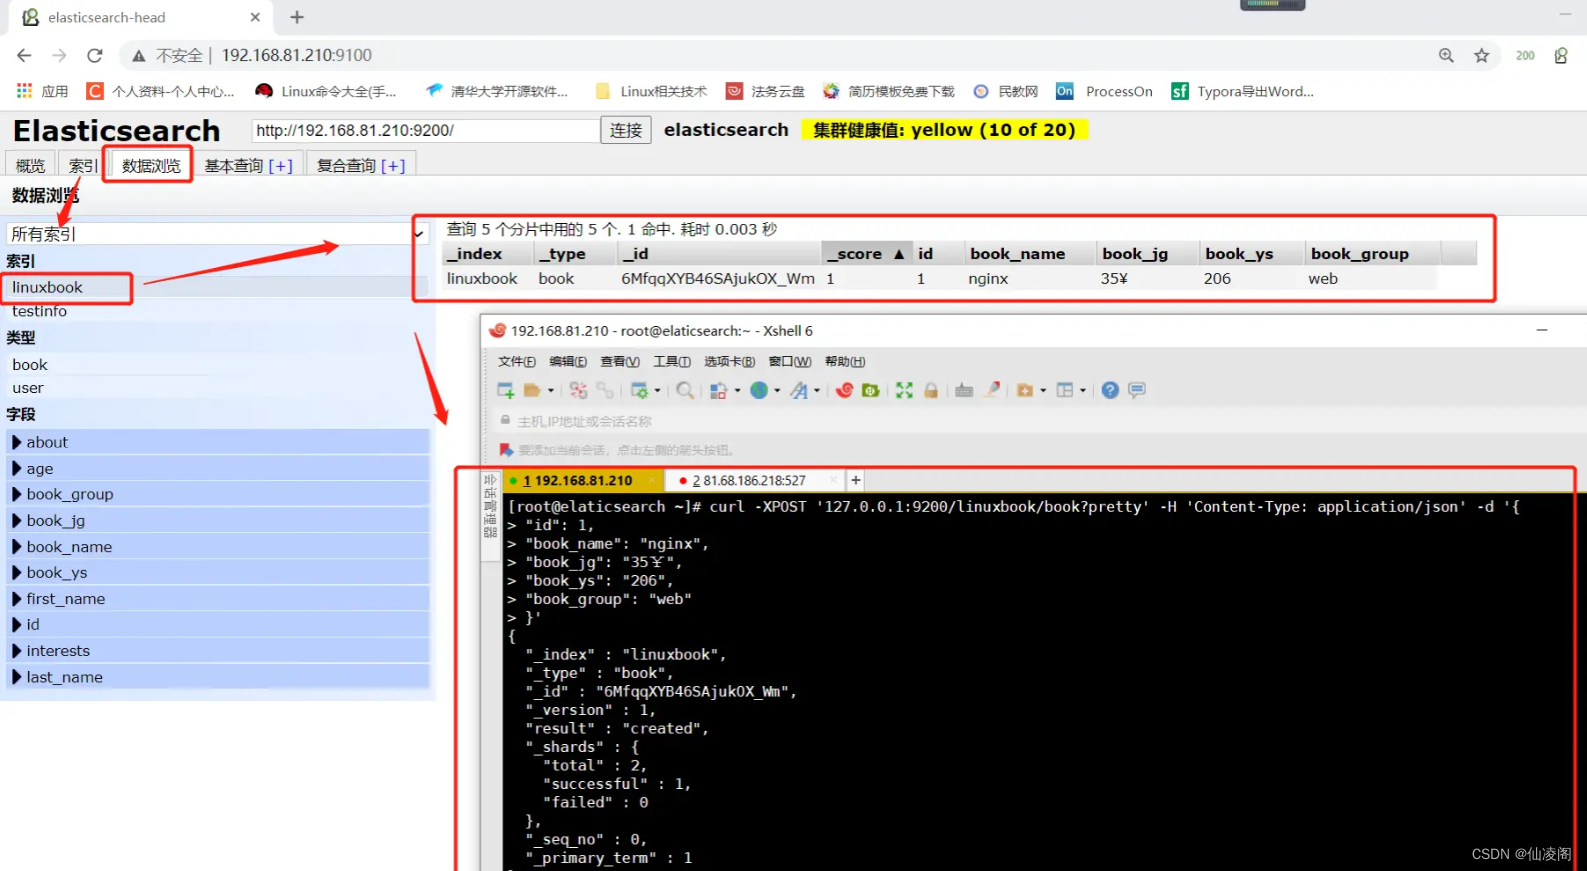
创建一个linuxbook的索引库,类型为book
写入一个数据,id为1,书名称为nginx,书价格为35元,书的页数为206页,书分类为web的数据
[root@elaticsearch ~]# curl -XPOST '127.0.0.1:9200/linuxbook/book?pretty' -H 'Content-Type: application/json' -d '{
"id": 1,
"book_name": "nginx",
"book_jg": "35¥",
"book_ys": "206",
"book_group": "web"
}'
{
  "_index" : "linuxbook",
  "_type" : "book",
  "_id" : "6MfqqXYB46SAjukOX_Wm",
  "_version" : 1,
  "result" : "created",
  "_shards" : {
    "total" : 2,
    "successful" : 1,
    "failed" : 0
  },
  "_seq_no" : 0,
  "_primary_term" : 1
}

复制代码
可以看到新增加了一个索引库
6.2.查看我们写入的数据
点击数据浏览—会看到多了个索引,找到我们的linuxbook索引—查看数据
会看到既有随机生产的_id也有我们新增的id
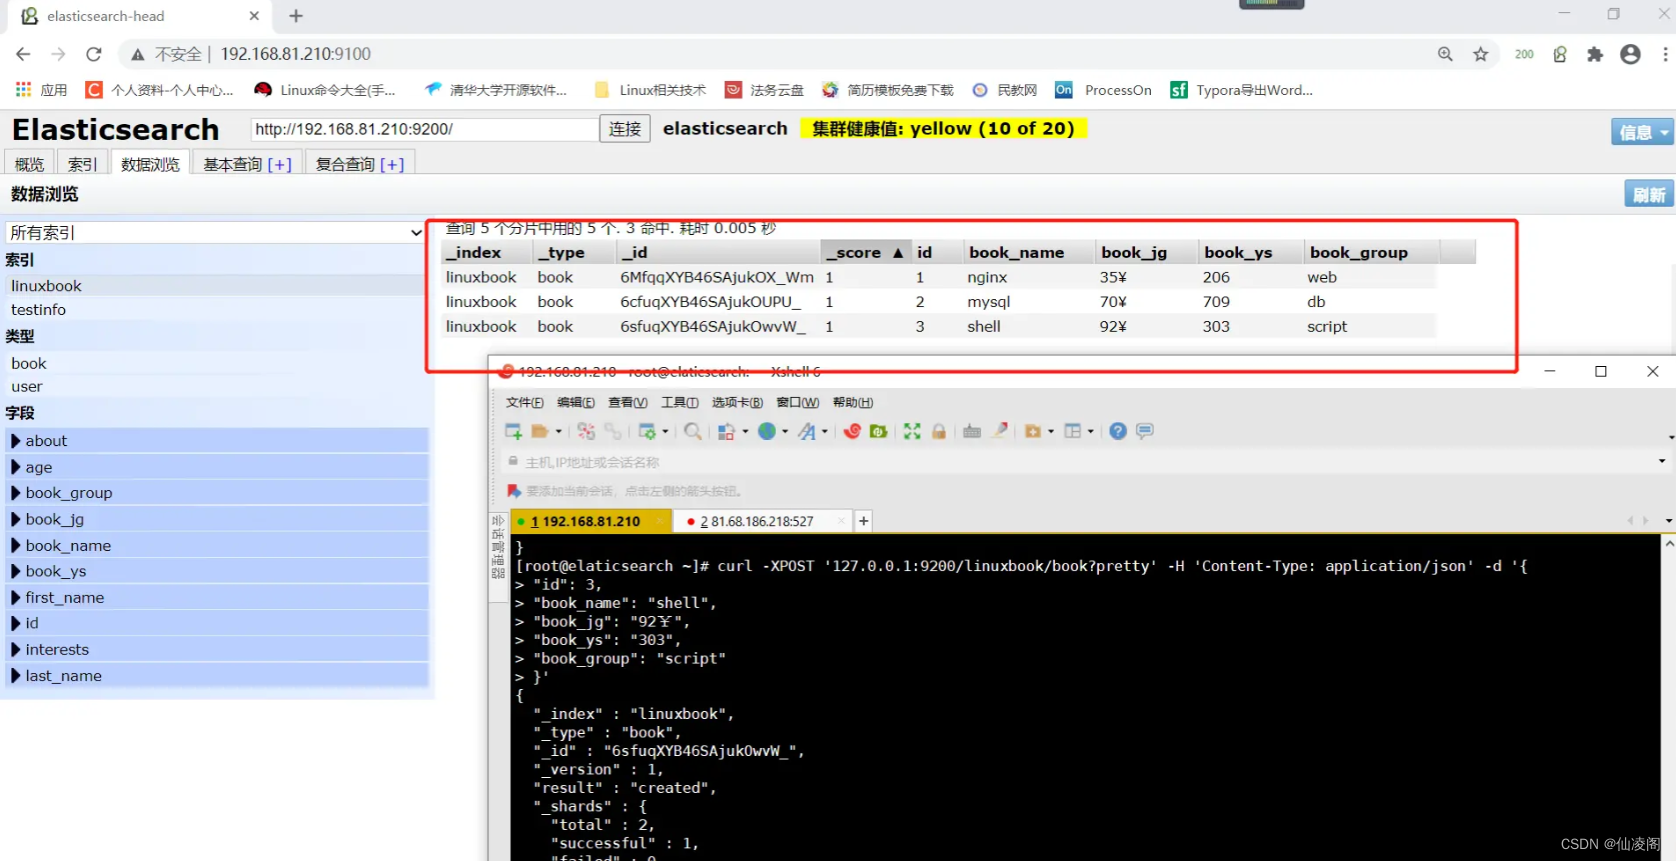
再次插入了几条数据
也可以根据条件去搜索
7.删除索引库
慎用索引库,要删除索引库建议在浏览器页面删除,会有提示
7.1.命令行删除索引库
我们首先创建一个测试库
[root@elaticsearch ~]# curl -XPOST '127.0.0.1:9200/linuxaaa/book?pretty' -H 'Content-Type: application/json' -d '{
"id": 2,
"book_name": "mysql",
"book_jg": "70¥",
"book_ys": "709",
"book_group": "db"
}'
复制代码
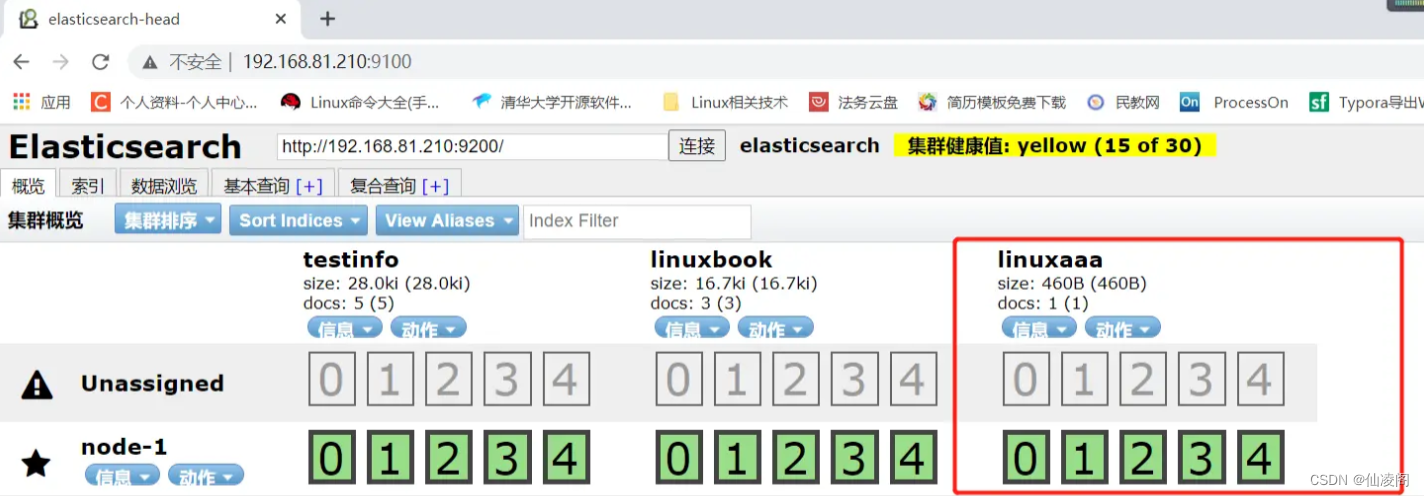
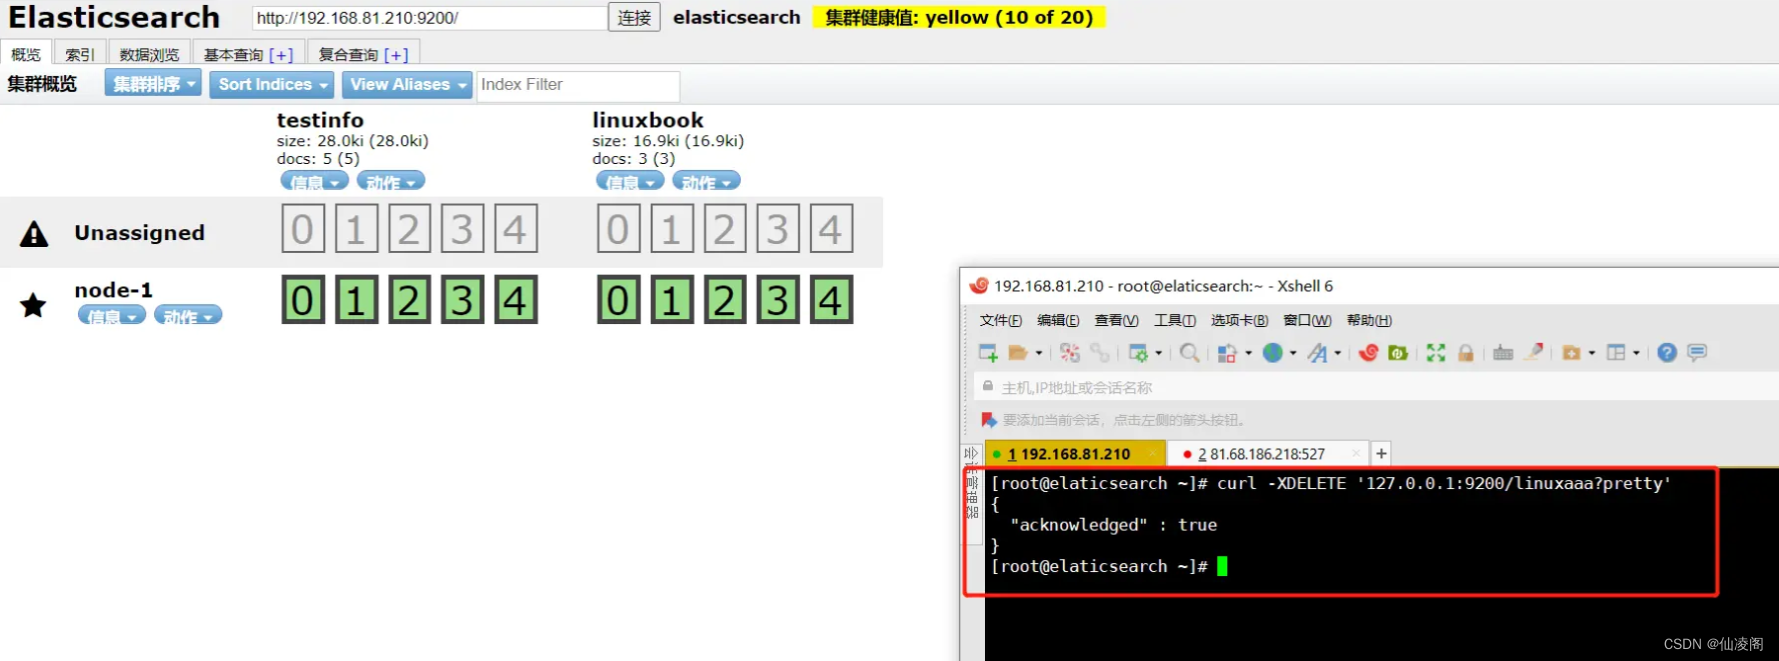
删除索引库
[root@elaticsearch ~]# curl -XDELETE '127.0.0.1:9200/linuxaaa?pretty'
{
  "acknowledged" : true
}

复制代码
删除成功
7.2.浏览器删除索引库
先创建一个索引库
[root@elaticsearch ~]# curl -XPOST '127.0.0.1:9200/linuxaaa/book?pretty' -H 'Content-Type: application/json' -d '{
"id": 2,
"book_name": "mysql",
"book_jg": "70¥",
"book_ys": "709",
"book_group": "db"
}'
复制代码
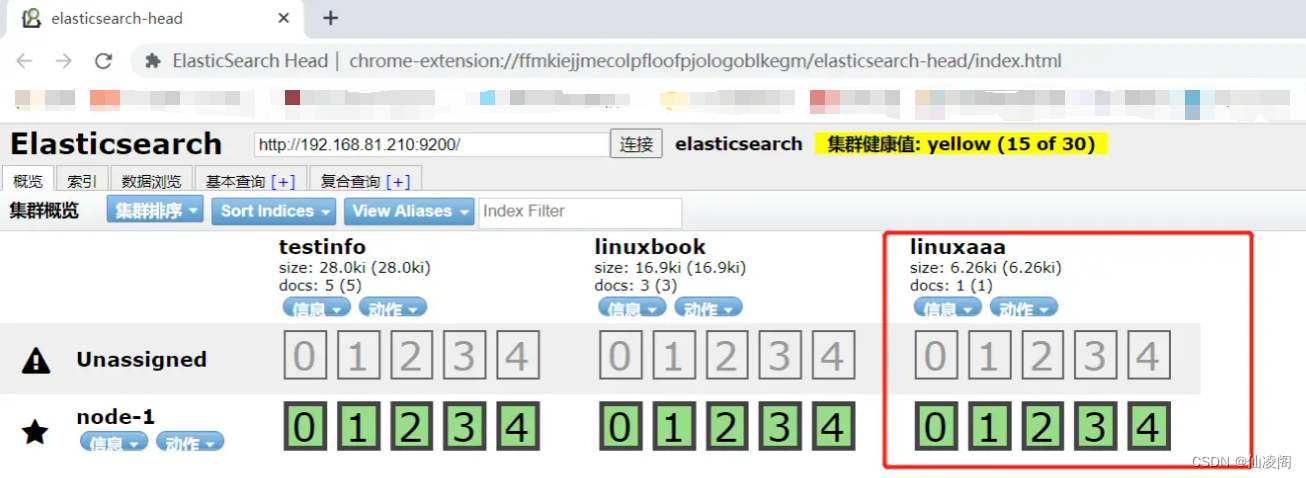
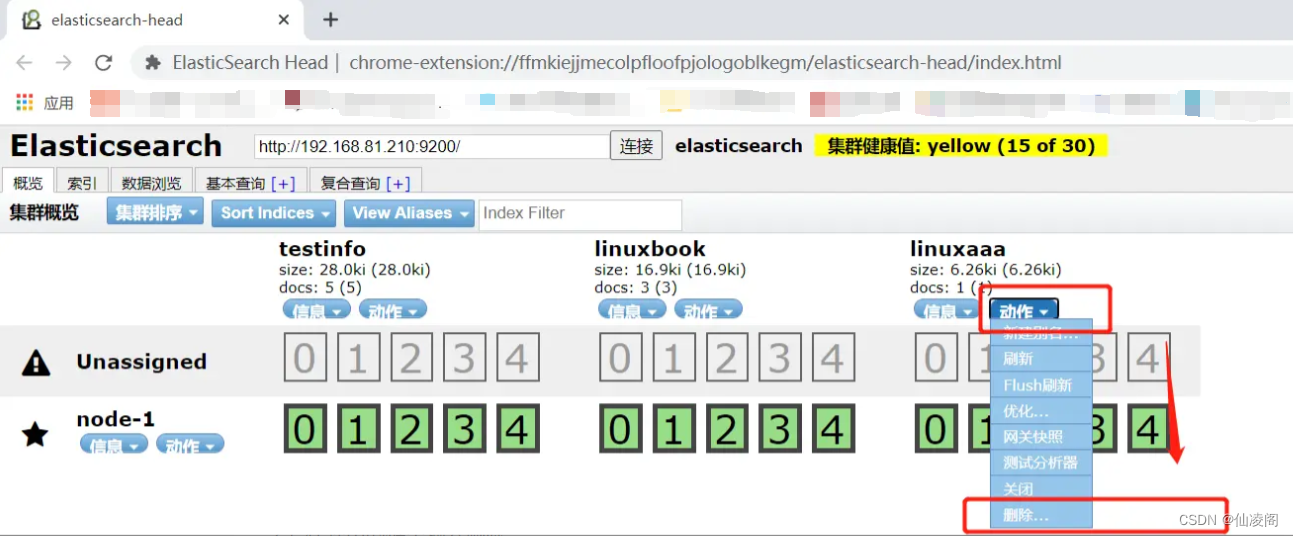
删除索引库
1)点击动作—删除
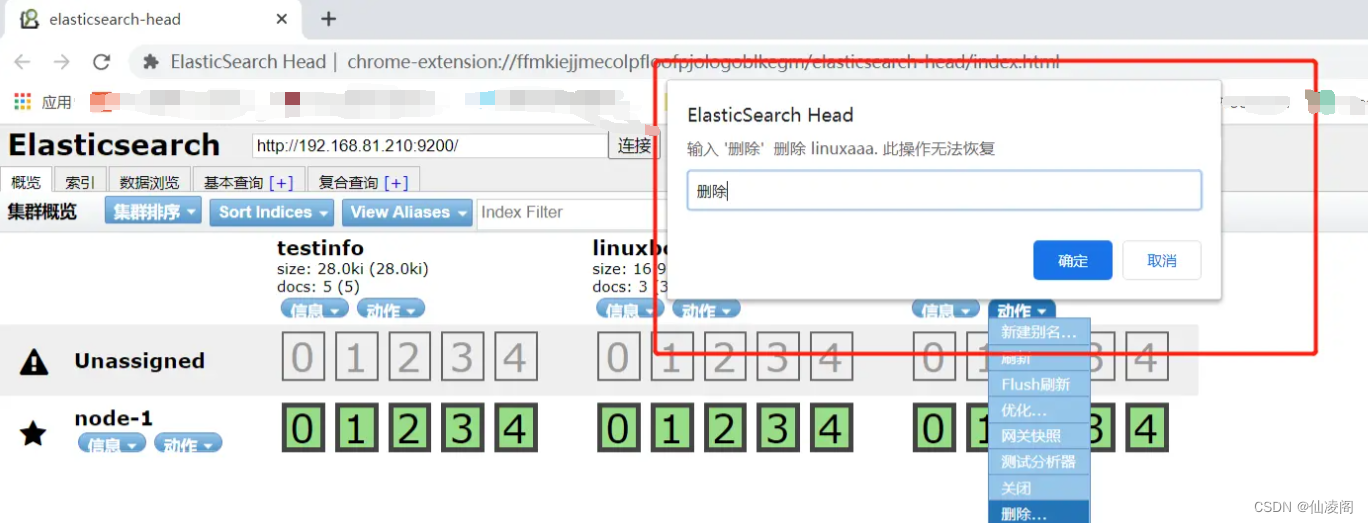
2)在弹出的框中输入删除
3)删除成功
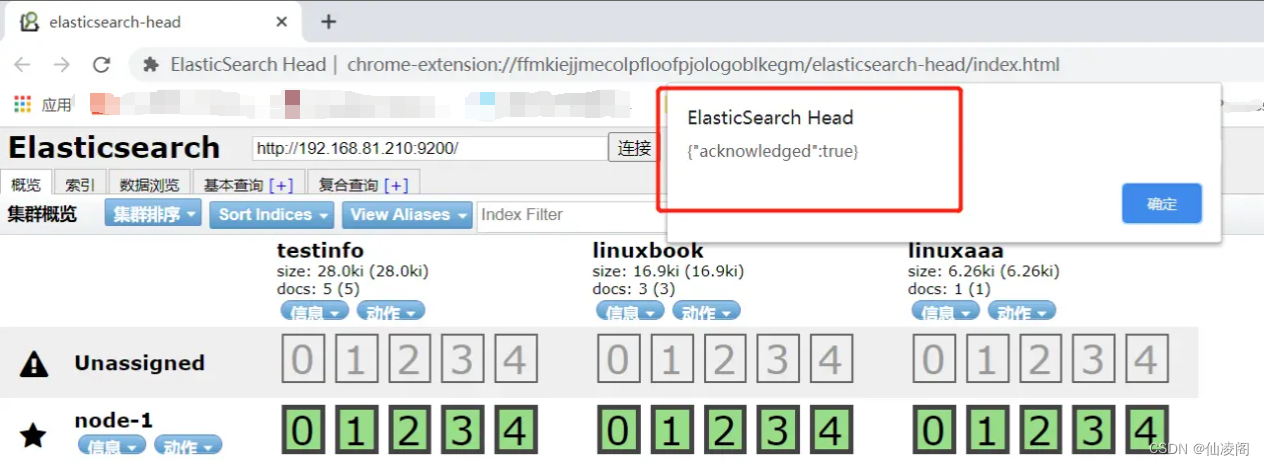
成功删除
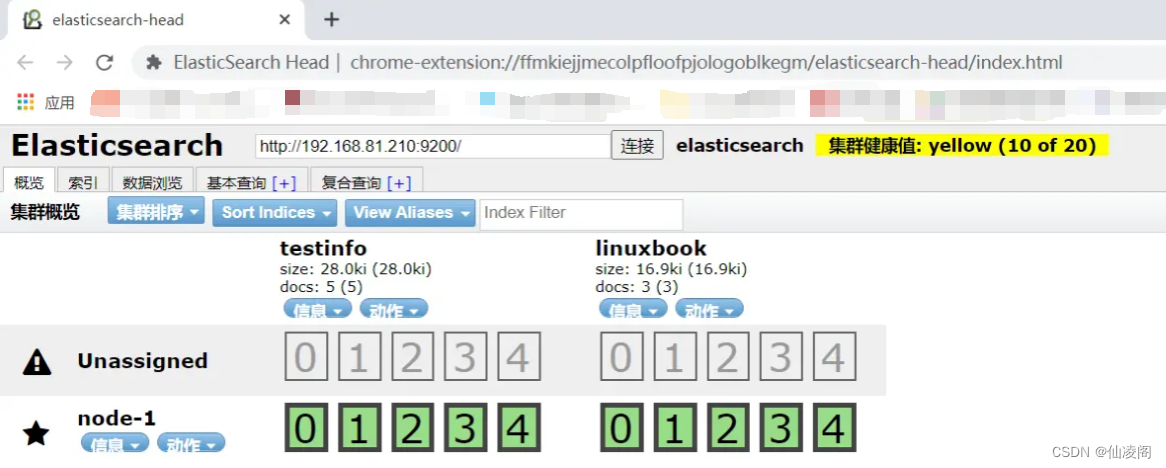
8.用head地址访问
本章操作都是用谷歌的head插件去连接的es服务器,我们用服务器中部署的head访问一次
服务器中安装并启动head
[root@elaticsearch data]# tar xf elasticsearch-head.tar.gz
[root@elaticsearch data]# cd elasticsearch-head
[root@elaticsearch elasticsearch-head]# npm install
npm WARN elasticsearch-head@0.0.0 license should be a valid SPDX license expression
npm WARN optional SKIPPING OPTIONAL DEPENDENCY: fsevents@1.2.13 (node_modules/fsevents):
npm WARN notsup SKIPPING OPTIONAL DEPENDENCY: Unsupported platform for fsevents@1.2.13: wanted {"os":"darwin","arch":"any"} (current: {"os":"linux","arch":"x64"})

up to date in 11.943s


   ?─────────────────────────────────────────────────────────────────?
   │                                                                 │
   │       New minor version of npm available! 6.9.0 → 6.14.10       │
   │   Changelog: https://github.com/npm/cli/releases/tag/v6.14.10   │
   │                Run npm install -g npm to update!                │
   │                                                                 │
   ?─────────────────────────────────────────────────────────────────?

[root@elaticsearch elasticsearch-head]# npm run start &
[1] 87691
[root@elaticsearch elasticsearch-head]#
> elasticsearch-head@0.0.0 start /data/elasticsearch-head
> grunt server

Running "connect:server" (connect) task
Waiting forever...
Started connect web server on http://localhost:9100

[root@elaticsearch elasticsearch-head]#
[root@elaticsearch elasticsearch-head]#
[root@elaticsearch elasticsearch-head]#
[root@elaticsearch elasticsearch-head]# netstat -lnpt | grep 9100
tcp        0      0 0.0.0.0:9100            0.0.0.0:*               LISTEN      87702/grunt
复制代码
源码附件已经打包好上传到百度云了,大家自行下载即可~
链接: https://pan.baidu.com/s/14G-bpVthImHD4eosZUNSFA?pwd=yu27
提取码: yu27
百度云链接不稳定,随时可能会失效,大家抓紧保存哈。
如果百度云链接失效了的话,请留言告诉我,我看到后会及时更新~
开源地址
码云地址:
http://github.crmeb.net/u/defu
Github 地址:
http://github.crmeb.net/u/defu
作者:jiangxl
链接:https://juejin.cn/post/7130049525250523173
