PyQt + OpenCV综合训练
一、PyQt + OpenCV 图像处理应用设计
创建一个 PyQt 应用程序,该应用程序能够:
①使用 OpenCV 加载一张图像。
②在 PyQt 的窗口中显示这张图像。
③提供四个按钮(QPushButton):
- 一个用于将图像转换为灰度图
- 一个用于将图像恢复为原始彩色图
- 一个用于将图像进行翻转
- 一个用于将图像进行旋转
④当用户点击按钮时,相应地更新窗口中显示的图像。
1.思路分析
①功能需求
图像加载:使用 OpenCV 加载一张彩色图像。
图像显示:将图像显示在 PyQt 的窗口中(QLabel)。
按钮功能:
- 灰度化:将图像转换为灰度图。
- 恢复原始图像:将图像恢复到初始状态。
- 翻转图像:水平翻转图像。
- 旋转图像:顺时针旋转图像90度。
动态更新:每次点击按钮后,图像实时更新到窗口中。
②用户界面设计
QLabel:用于显示图像。
QPushButton(四个按钮):分别用于“灰度化”、“恢复原始图像”、“翻转图像”、“旋转图像”。
QFileDialog:用于打开图像文件。
③核心逻辑
图像加载
- 使用 cv2.imread() 加载图像。
- 将 OpenCV 图像转换为 PyQt 支持的 QPixmap 格式。
- 显示在 QLabel 上。
图像处理
- 灰度化:使用 cv2.cvtColor 转换为灰度图。
- 恢复原始图像:使用存储的原始图像副本进行还原。
- 翻转图像:使用 cv2.flip 进行水平翻转。
- 旋转图像:使用 cv2.getRotationMatrix2D 和 cv2.warpAffine 进行旋转。
图像显示
- 每次处理后,将结果通过 QImage 和 QPixmap 转换并实时更新 QLabel。
2.设计到的函数方法
①__init__()
功能:初始化主窗口,设置 UI 元素,连接按钮信号与槽。
主要方法:
- 加载 UI 界面。
- 初始化 QLabel 和 QPushButton。
- 绑定按钮事件。
②open_file_dialog()
功能:打开文件对话框,加载用户选择的图像。
主要方法:
- 使用 QFileDialog.getOpenFileName 选择文件。
- 使用 cv2.imread 读取图像。
- 调用 update_image_label() 显示图像。
③update_image_label(image)
功能:将 OpenCV 图像转换为 QPixmap,并更新到 QLabel 上。
主要方法:
- 使用 QImage 将图像格式转换。
- 使用 QPixmap.fromImage 更新 QLabel。
④convert_to_gray()
功能:将当前图像转换为灰度图像。
主要方法:
- 使用 cv2.cvtColor 将图像转换为灰度。
- 调用 update_image_label() 显示图像。
⑤reset_to_original()
功能:将图像还原到初始状态。
主要方法:
- 使用原始图像副本进行还原。
- 调用 update_image_label() 显示图像。
⑥flip_image()
功能:对图像进行水平翻转。
主要方法:
- 使用 cv2.flip 进行水平翻转。
- 调用 update_image_label() 显示图像。
⑦rotate_image()
功能:顺时针旋转图像90度。
主要方法:
- 使用 cv2.getRotationMatrix2D 计算旋转矩阵。
- 使用 cv2.warpAffine 应用旋转。
- 调用 update_image_label() 显示图像。
3.代码
from PyQt6.QtWidgets import QApplication, QMainWindow, QLabel, QFileDialog, QPushButton
from PyQt6.QtGui import QPixmap, QAction, QImage, QIcon
from PyQt6 import uic
import cv2 # OpenCV 用于处理图像
# 创建主窗口类
class MainWindow(QMainWindow):
def __init__(self):
super().__init__()
# 动态加载 UI 文件
uic.loadUi("picture_editor1.ui", self)
# 设置窗口标题和图标
self.setWindowTitle("图像编辑器1") # 改变窗口标签
self.setWindowIcon(QIcon("picture_photo_image_icon_131252.png"))
# 获取组件
self.open_action = self.findChild(QAction, "open")
self.picture_label = self.findChild(QLabel, "picture") # 获取 QLabel 对象
self.gray_button = self.findChild(QPushButton, "gray_button") # 获取灰度按钮
self.reset_button = self.findChild(QPushButton, "reset_button") # 获取恢复按钮
self.flip_button = self.findChild(QPushButton, "flip_button") # 获取翻转按钮
self.rotate_button = self.findChild(QPushButton, "rotate_button") # 获取旋转按钮
# 连接组件的触发信号
self.open_action.triggered.connect(self.open_file_dialog)
self.gray_button.clicked.connect(self.convert_to_gray) # 连接灰度按钮
self.reset_button.clicked.connect(self.reset_to_original) # 连接恢复按钮
self.flip_button.clicked.connect(self.flip_image) # 连接翻转按钮
self.rotate_button.clicked.connect(self.rotate_image) # 连接旋转按钮
self.current_image = None # 用于存储当前的图像
self.original_image = None # 存储当前图像和原始图像
# 弹出文件对话框并显示选择的图像
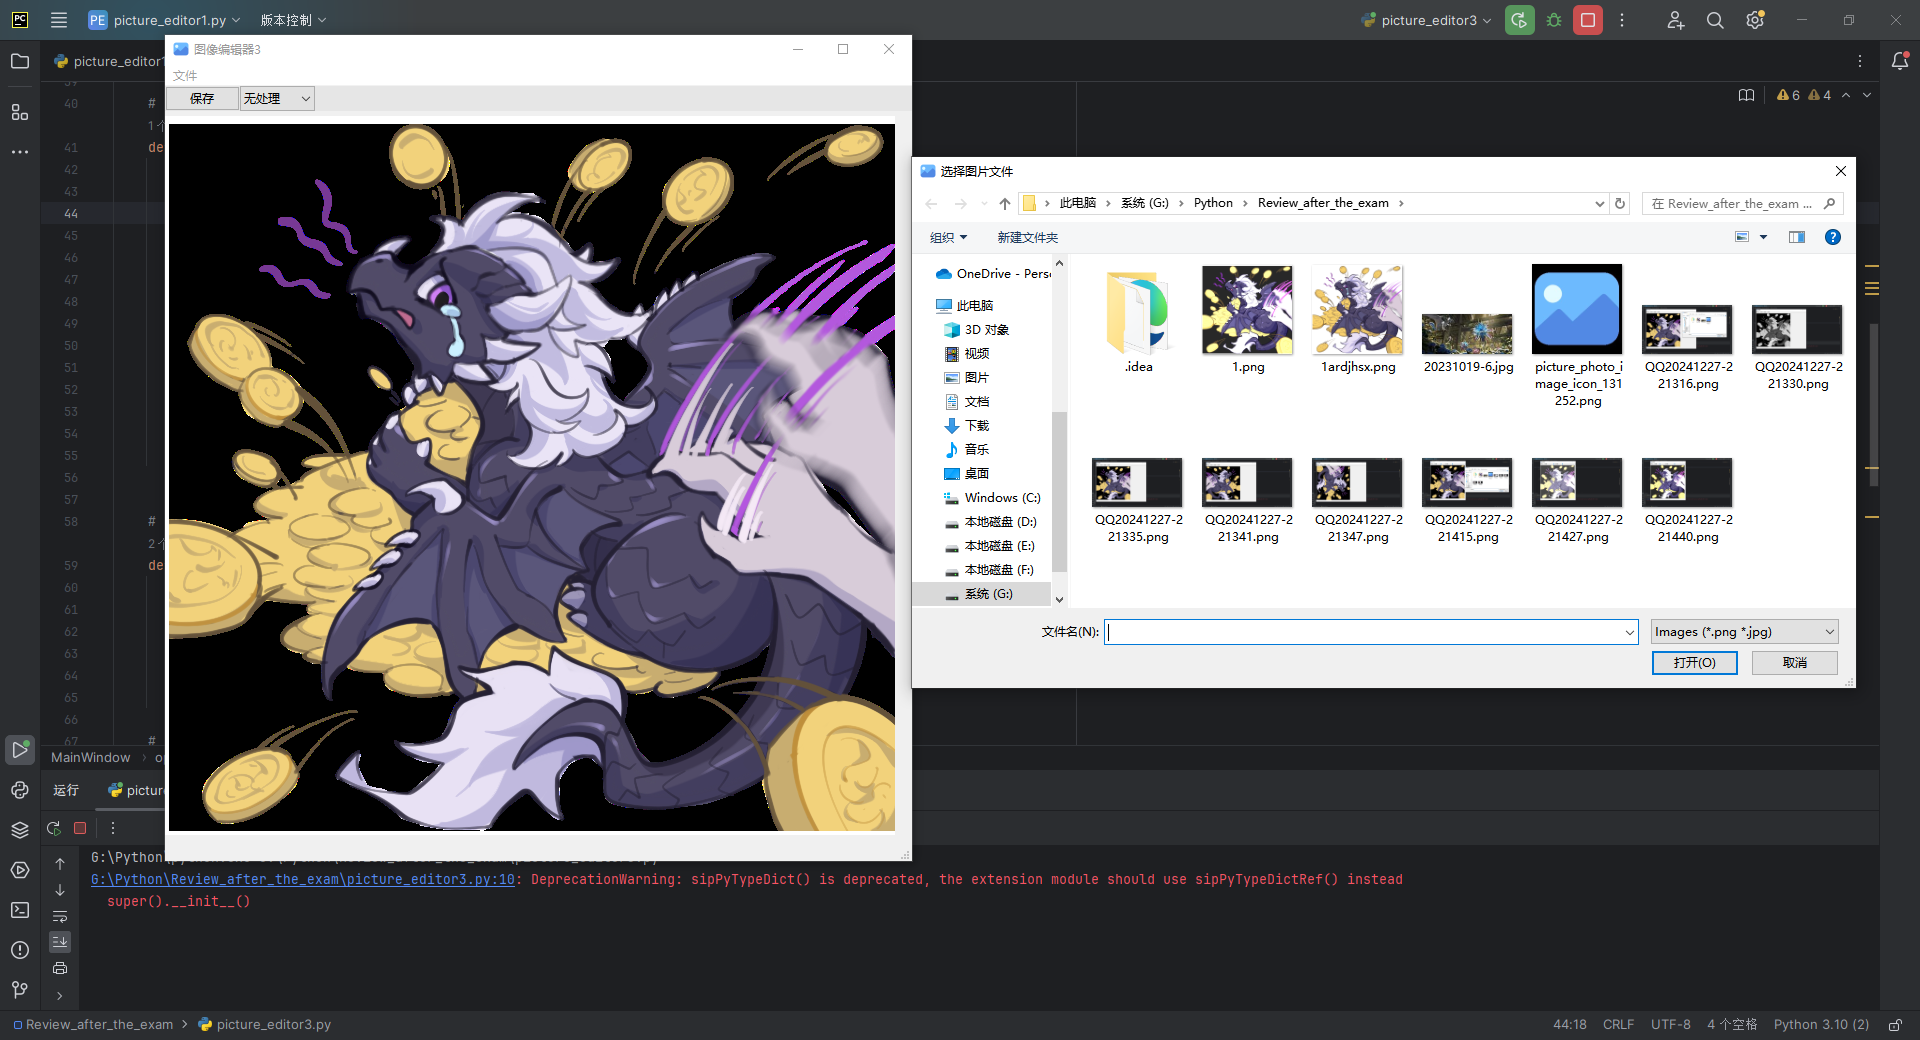
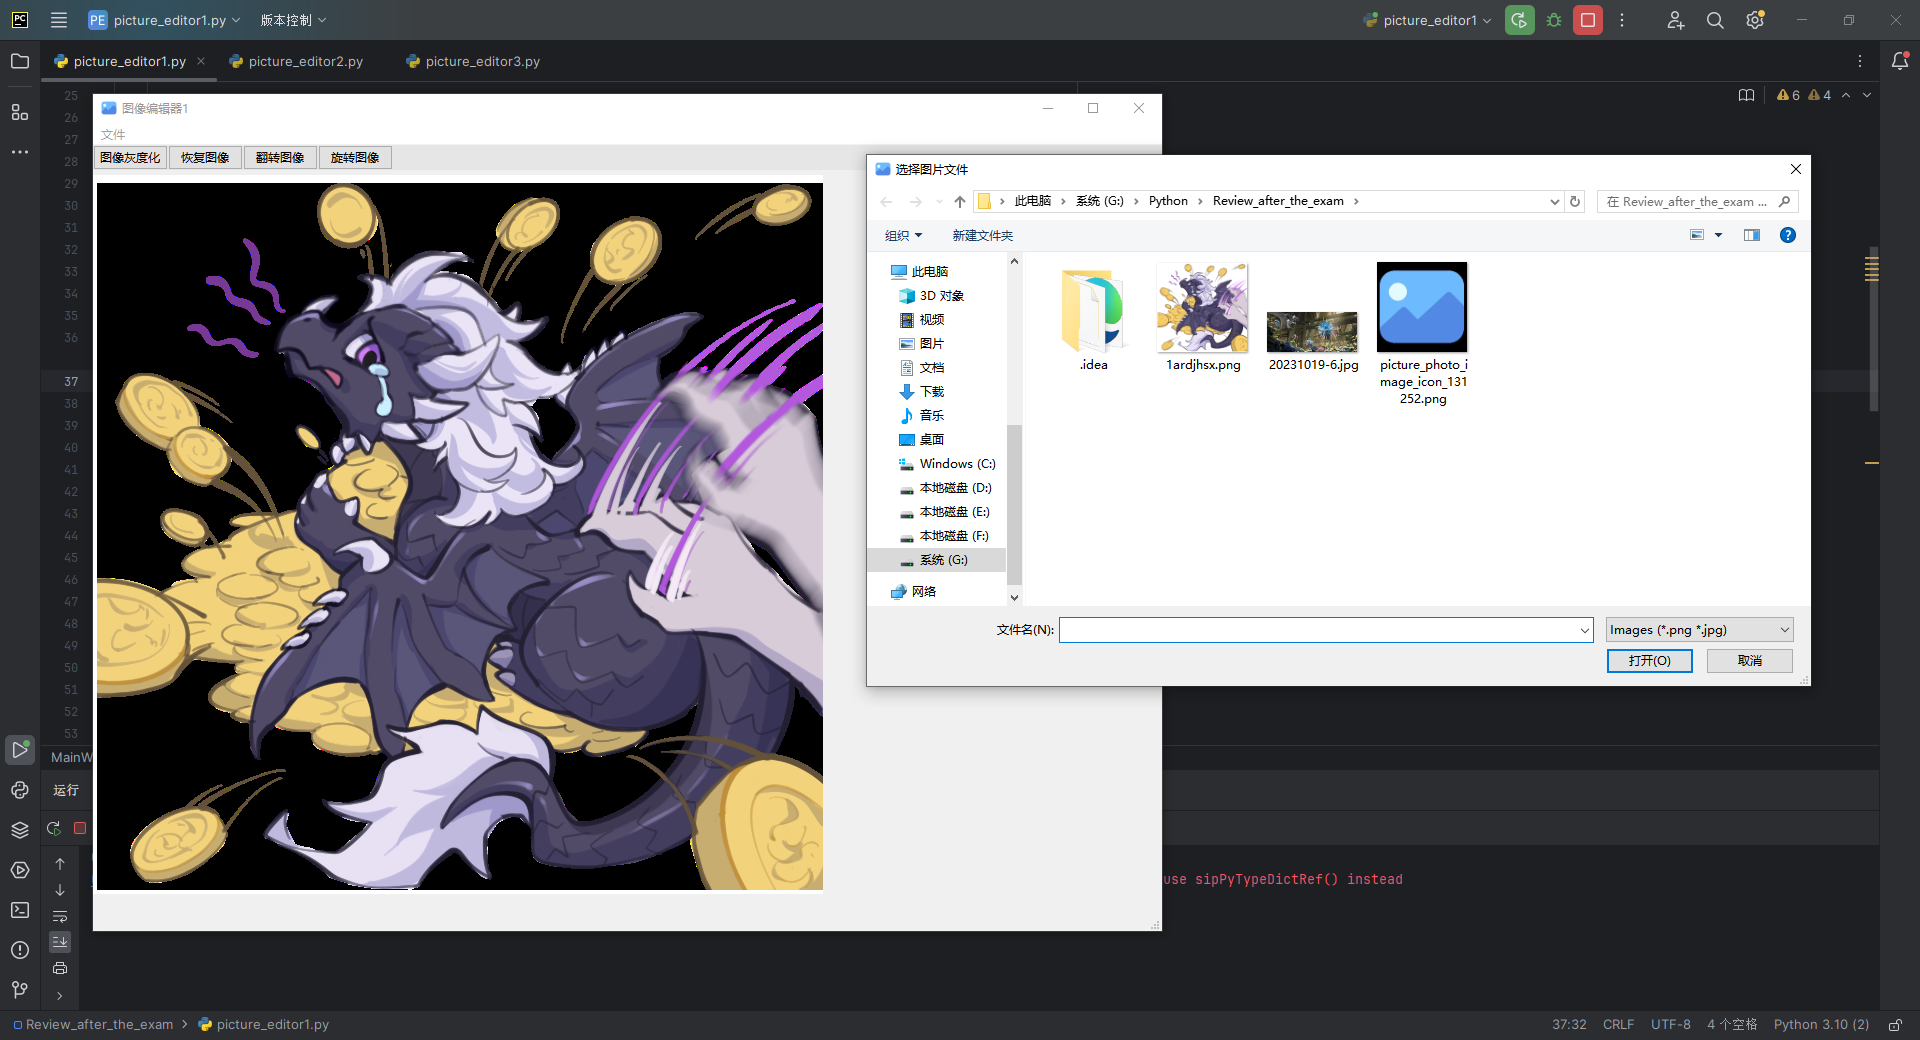
def open_file_dialog(self):
# 弹出文件对话框,限制为 .png 和 .jpg 文件
file_path, _ = QFileDialog.getOpenFileName(
self,
"选择图片文件", # 文件对话框标题
"",
"Images (*.png *.jpg)" # 文件过滤器
)
# 如果选择了文件,加载到 QLabel 中
if file_path:
# 使用 OpenCV 加载图像(彩色图像)
self.original_image = cv2.imread(file_path)
self.current_image = self.original_image.copy() # 初始化 current_image
# 将图像转换为 QPixmap 以显示
self.update_image_label(self.current_image)
# 设置 QLabel 的大小为图片的原始大小
# 更新 QLabel 显示的图像
def update_image_label(self, image):
height, width, channel = image.shape
bytes_per_line = 3 * width
q_image = QImage(image.data, width, height, bytes_per_line, QImage.Format.Format_BGR888)
pixmap = QPixmap.fromImage(q_image)
self.picture_label.setPixmap(pixmap)
self.picture_label.setFixedSize(pixmap.size()) # 设置 QLabel 的大小为图片的原始大小
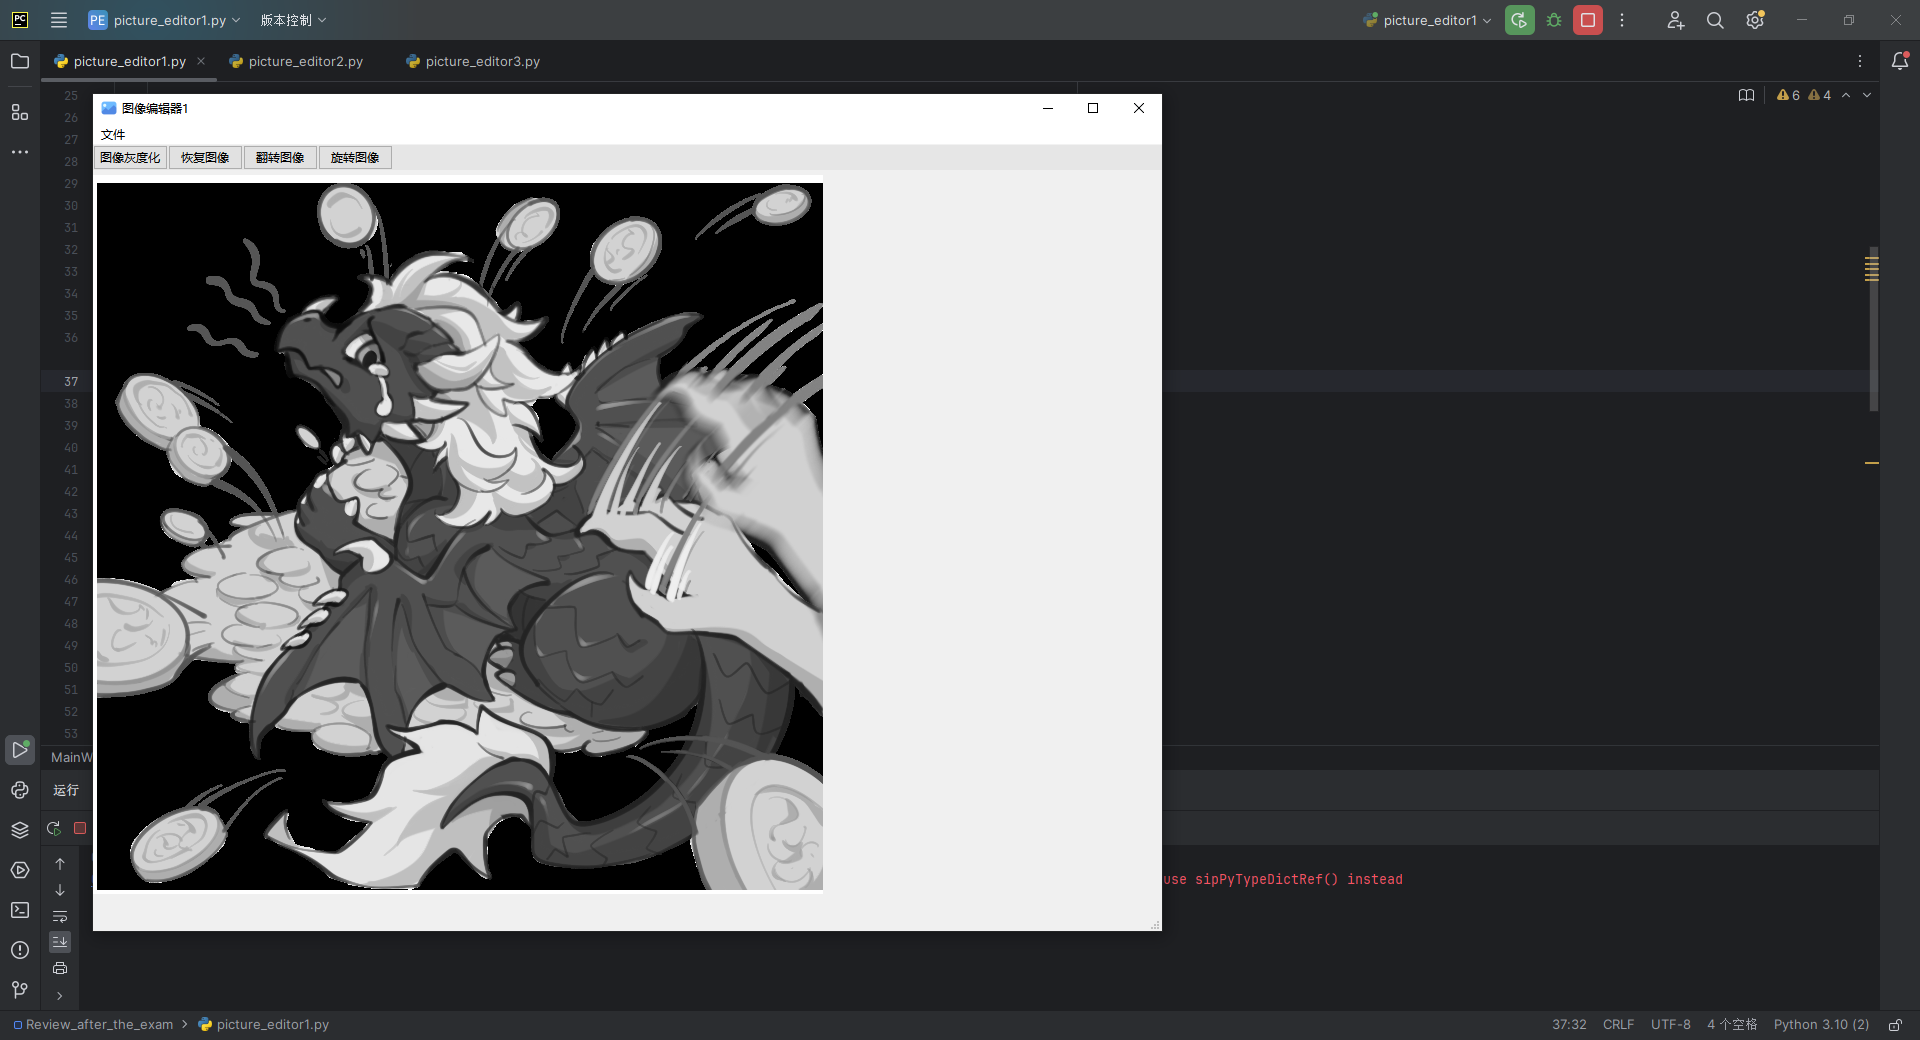
# 将图像转换为灰度图
def convert_to_gray(self):
if self.current_image is None:
return # 如果没有加载图片,则直接返回
gray_image = cv2.cvtColor(self.current_image, cv2.COLOR_BGR2GRAY)
self.current_image = cv2.cvtColor(gray_image, cv2.COLOR_GRAY2BGR)
self.update_image_label(self.current_image)
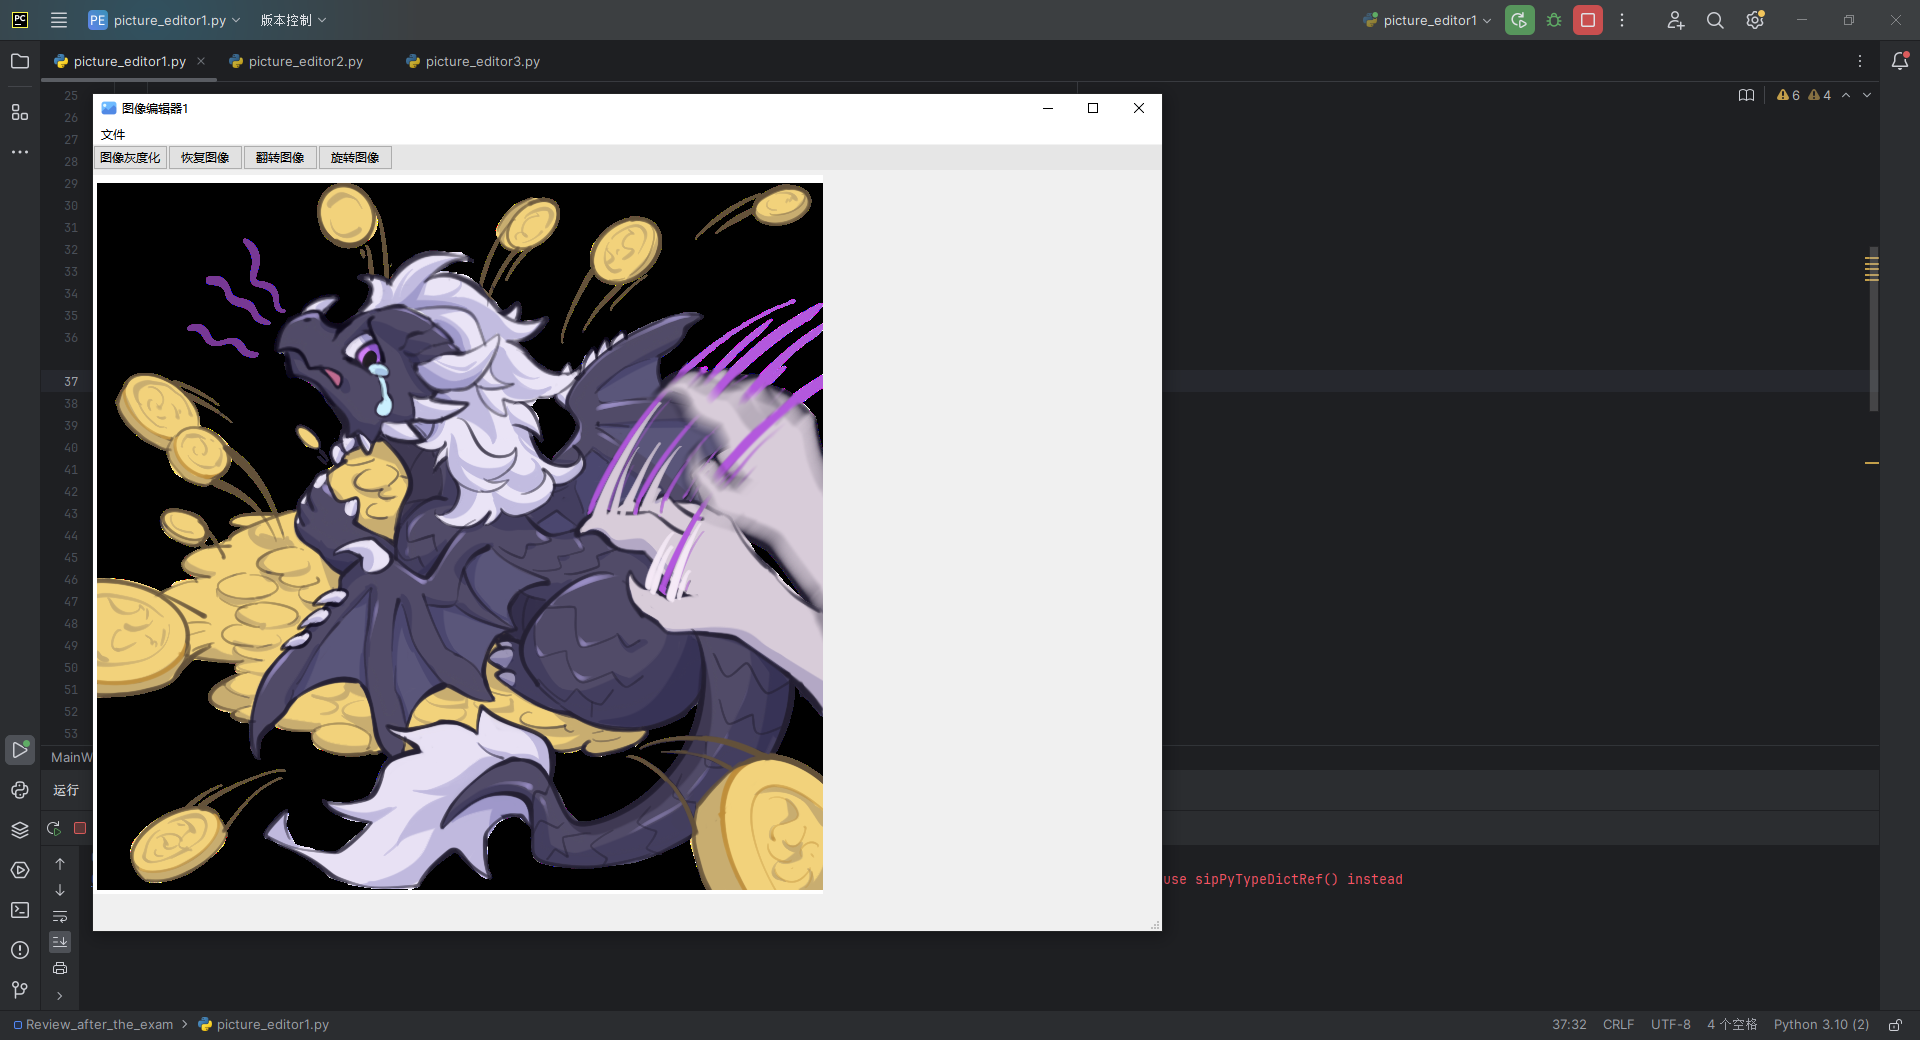
# 恢复原始图像
def reset_to_original(self):
if self.current_image is None:
return # 如果没有加载图片,则直接返回
self.current_image = self.original_image.copy()
self.update_image_label(self.current_image)
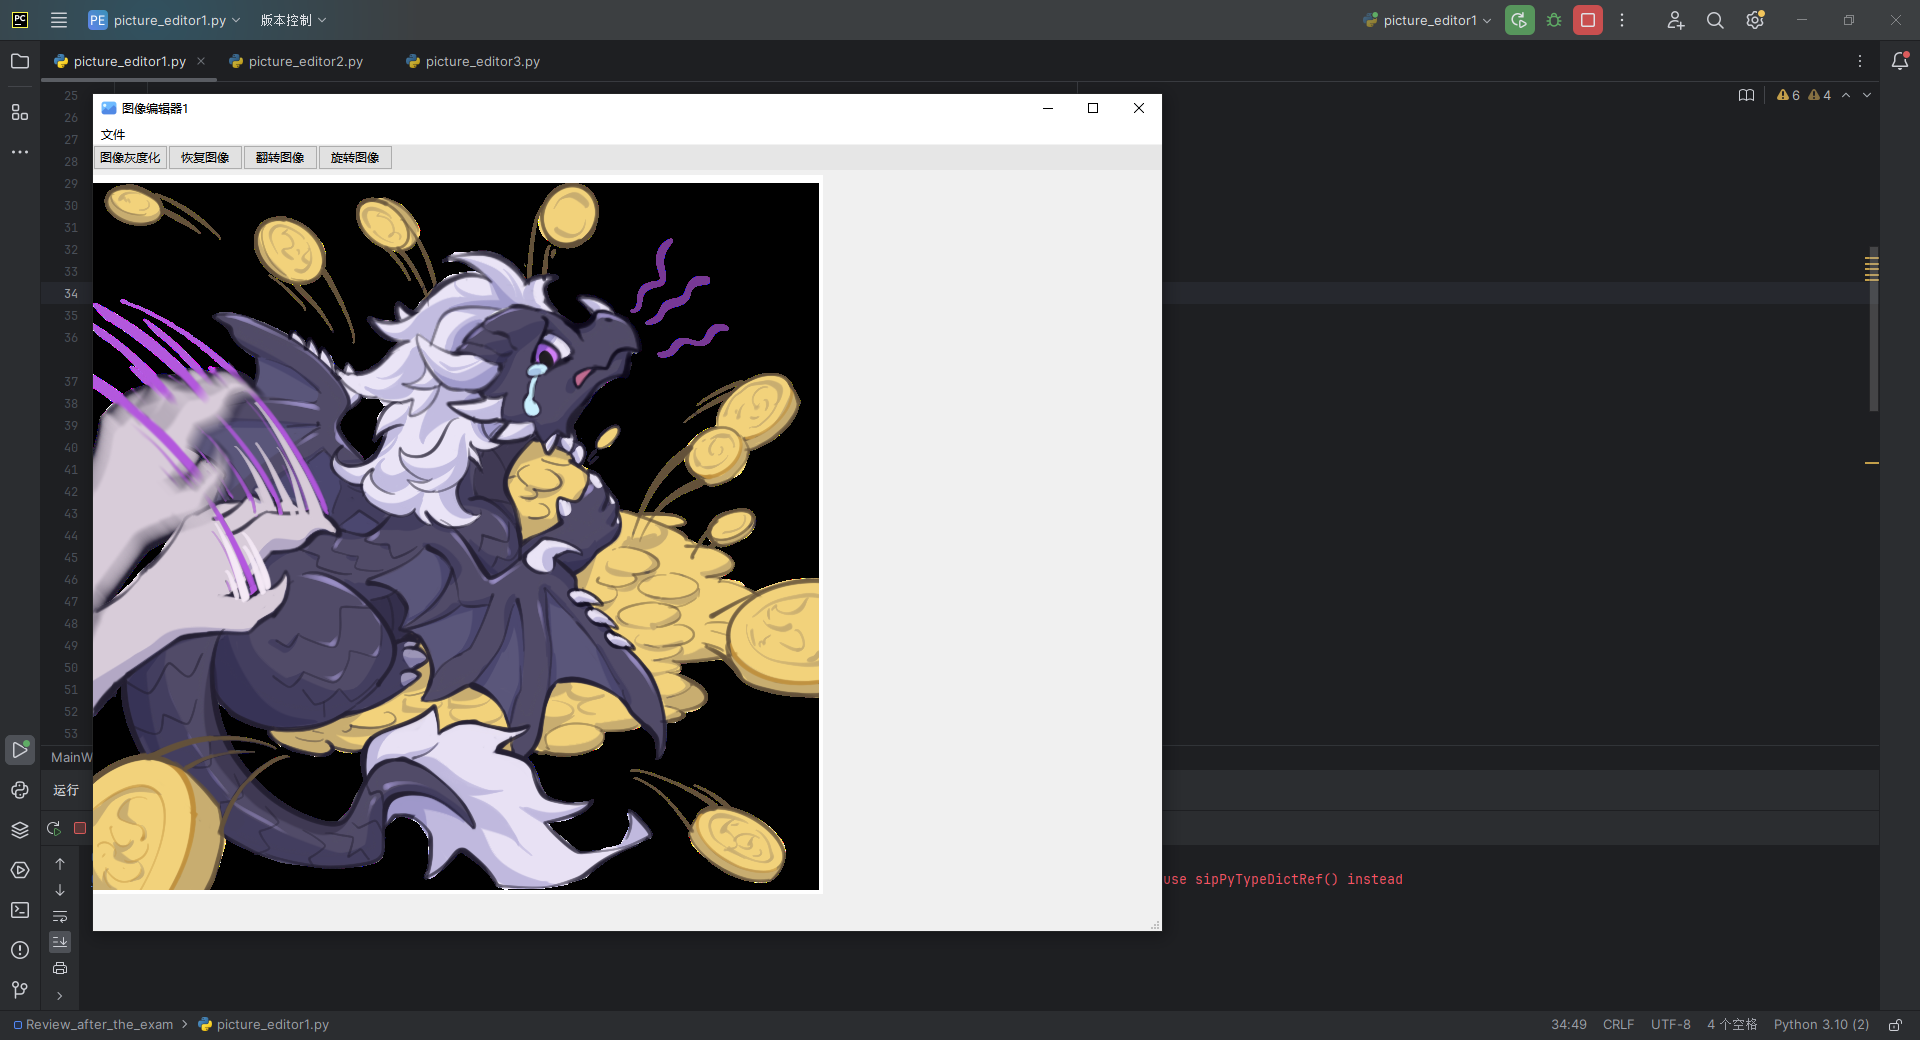
# 翻转图像
def flip_image(self):
if self.current_image is None:
return # 如果没有加载图片,则直接返回
self.current_image = cv2.flip(self.current_image, 1) # 水平翻转
self.update_image_label(self.current_image)
# 旋转图像
def rotate_image(self):
if self.current_image is None:
return # 如果没有加载图片,则直接返回
height, width = self.current_image.shape[:2]
center = (width // 2, width // 2)
rotation_matrix = cv2.getRotationMatrix2D(center, 270, 1.0) # 向右旋转90度
self.current_image = cv2.warpAffine(self.current_image, rotation_matrix, (width, height))
self.update_image_label(self.current_image)
if __name__ == "__main__":
app = QApplication([])
window = MainWindow()
window.show()
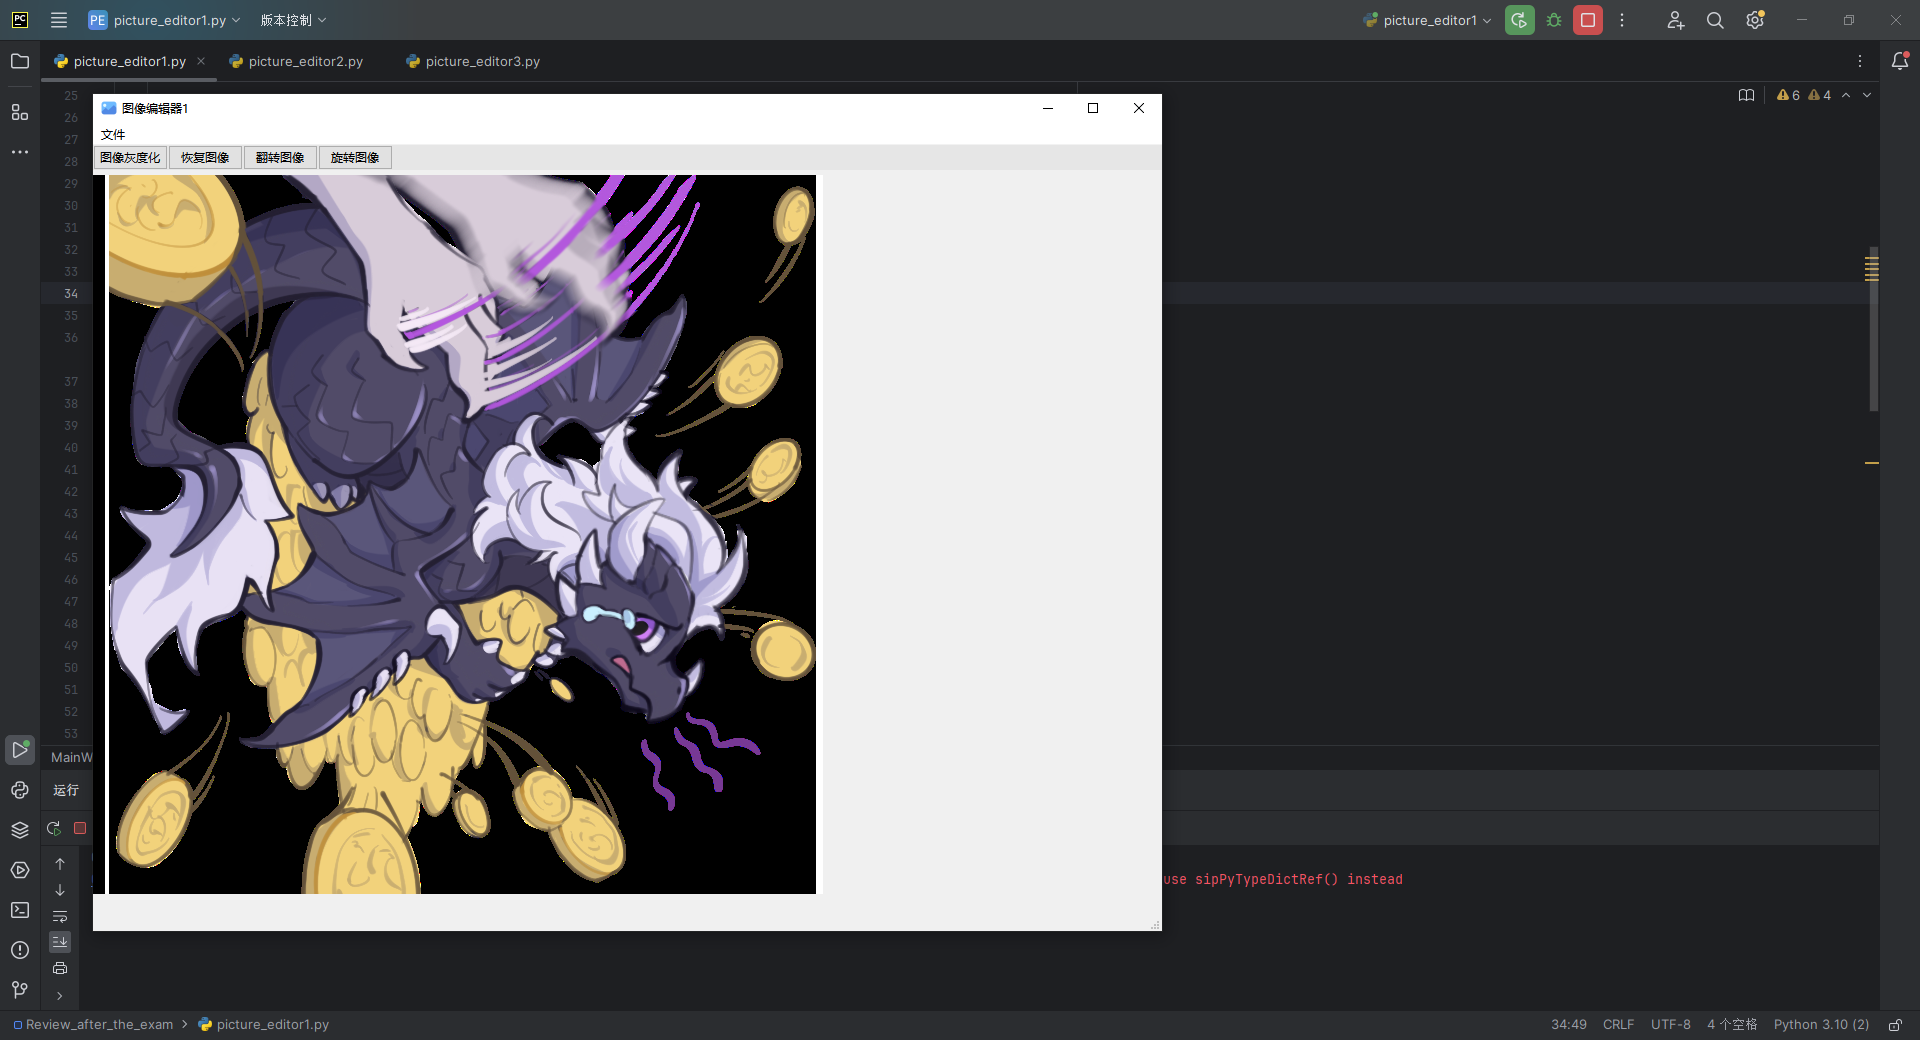
app.exec()4.效果展示
二、PyQt + OpenCV 图像亮度与对比度调整应用设计
根据下列要求写出思路分析和设计到的函数方法:
创建一个 PyQt 应用程序,该应用程序能够:
①使用 OpenCV 加载一张彩色图像,并在 PyQt 的窗口中显示它。
②提供一个滑动条(QSlider),允许用户调整图像的亮度。
③当用户调整滑动条时,实时更新窗口中显示的图像亮度。
④添加另一个滑动条(QSlider),允许用户调整图像的对比度。
⑤当用户调整滚动条时,实时更新窗口中显示的图像对比度。
⑥提供一个按钮(QPushButton),允许用户将图像保存为新的文件。
⑦当用户点击保存按钮时,将调整后的图像保存到指定的路径,OpenCV中使用cv2.imwrite()来保存图片。
1.思路分析
①功能需求
图像加载:使用 OpenCV 加载彩色图像,并在 PyQt 窗口中显示。
亮度调整:通过 QSlider 调整图像的亮度,实时更新显示。
对比度调整:通过 QSlider 调整图像的对比度,实时更新显示。
保存功能:点击 QPushButton,将当前调整后的图像保存到指定路径。
②用户界面设计
QLabel:用于显示图像。
QSlider:
- 亮度滑动条:调整图像亮度。
- 对比度滑动条:调整图像对比度。
QPushButton:
- 保存按钮:将调整后的图像保存到文件。
QFileDialog:用于选择图像文件和保存图像文件。
③关键功能
图像加载
- 使用 cv2.imread() 加载图像。
- 将 OpenCV 图像格式转换为 QPixmap 格式,在 QLabel 中显示。
亮度调整
- 使用公式:result = image + beta(beta 表示亮度值)。
- 通过 QSlider 获取用户选择的亮度值,实时更新图像。
对比度调整
- 使用公式:result = image * alpha(alpha 表示对比度值)。
- 通过 QSlider 获取用户选择的对比度值,实时更新图像。
实时更新
- 每次滑动滑动条时,调用 update_image() 方法,重新计算并显示图像。
保存图像
- 使用 cv2.imwrite() 保存当前图像到用户指定路径。
2.设计到的函数方法
①__init__()
功能:初始化主窗口,设置 UI 元素,连接按钮信号与槽。
主要方法:
- 加载 UI 界面。
- 初始化 QLabel、QSlider 和 QPushButton。
- 绑定按钮事件。
②open_file_dialog()
功能:打开文件对话框,加载用户选择的图像。
主要方法:
- 使用 QFileDialog.getOpenFileName 选择文件。
- 使用 cv2.imread 读取图像。
- 调用 display_image() 显示图像。
③display_image(image)
功能:将 OpenCV 图像转换为 QPixmap,并更新到 QLabel 上。
主要方法:
- 使用 QImage 将图像格式转换。
- 使用 QPixmap.fromImage 更新 QLabel。
④update_image()
功能:调整亮度和对比度。
主要方法:
- 使用cv2.convertScaleAbs()调整图像的亮度和对比度。
- alpha:对比度调整系数。
- beta:亮度调整值。
⑤save_image()
功能:保存当前处理后的图像。
主要方法:
- 使用 QFileDialog.getSaveFileName() 获取保存路径。
- 使用 cv2.imwrite() 保存图像。
3.代码
from PyQt6.QtWidgets import QApplication, QMainWindow, QFileDialog, QSlider, QLabel, QPushButton
from PyQt6.QtGui import QPixmap, QAction, QImage, QIcon
from PyQt6 import uic
import cv2


class MainWindow(QMainWindow):
    def __init__(self):
        super().__init__()
        # 加载 UI 文件
        uic.loadUi("picture_editor2.ui", self)

        # 设置窗口标题和图标
        self.setWindowTitle("图像编辑器2")  # 改变窗口标签
        self.setWindowIcon(QIcon("picture_photo_image_icon_131252.png"))

        # 获取组件
        self.open_action = self.findChild(QAction, "open")
        self.picture_label = self.findChild(QLabel, "picture")  # 获取 QLabel 对象
        self.brightness_slider = self.findChild(QSlider, "brightness_slider")
        self.contrast_slider = self.findChild(QSlider, "contrast_slider")
        self.save_button = self.findChild(QPushButton, "save_button")

        # 设置滑动条范围
        self.brightness_slider.setMinimum(-100)
        self.brightness_slider.setMaximum(100)
        self.brightness_slider.setValue(0)

        self.contrast_slider.setMinimum(-50)
        self.contrast_slider.setMaximum(50)
        self.contrast_slider.setValue(0)

        # 绑定事件
        self.open_action.triggered.connect(self.open_file_dialog)
        self.brightness_slider.valueChanged.connect(self.update_image)
        self.contrast_slider.valueChanged.connect(self.update_image)
        self.save_button.clicked.connect(self.save_image)

        # 初始化变量
        self.original_image = None
        self.processed_image = None

    # 弹出文件对话框并显示选择的图像
    def open_file_dialog(self):
        # 弹出文件对话框,限制为 .png 和 .jpg 文件
        file_path, _ = QFileDialog.getOpenFileName(
            self,
            "选择图片文件",  # 文件对话框标题
            "",
            "Images (*.png *.jpg)"  # 文件过滤器
        )

        # 如果选择了文件,加载到 QLabel 中
        if file_path:
            # 使用 OpenCV 加载图像(彩色图像)
            self.original_image = cv2.imread(file_path)
            self.current_image = self.original_image.copy()  # 初始化 current_image

            # 将图像转换为 QPixmap 以显示
            self.display_image(self.current_image)
            # 设置 QLabel 的大小为图片的原始大小

    # 在 QLabel 中显示图像
    def display_image(self, image):
        height, width, channel = image.shape
        bytes_per_line = 3 * width
        q_image = QImage(image.data, width, height, bytes_per_line, QImage.Format.Format_BGR888)
        pixmap = QPixmap.fromImage(q_image)
        self.picture_label.setPixmap(pixmap)
        self.picture_label.setFixedSize(pixmap.size())  # 设置 QLabel 的大小为图片的原始大小

    # 更新图像亮度和对比度
    def update_image(self):
        if self.original_image is None:
            return

        # 获取亮度和对比度值
        brightness = self.brightness_slider.value()
        contrast = self.contrast_slider.value()

        # 调整对比度和亮度
        alpha = 1.0 + contrast / 50.0  # 对比度调节系数
        beta = brightness  # 亮度调节值
        self.processed_image = cv2.convertScaleAbs(self.original_image, alpha=alpha, beta=beta)

        # 显示调整后的图像
        self.display_image(self.processed_image)

    # 保存调整后的图像
    def save_image(self):

        if self.processed_image is None:
            return

        file_path, _ = QFileDialog.getSaveFileName(
            self,
            "保存图像",
            "",
            "Images (*.png *.jpg *.bmp)"
        )
        if file_path:
            cv2.imwrite(file_path, self.processed_image)


if __name__ == "__main__":
    app = QApplication([])
    window = MainWindow()
    window.show()
    app.exec()
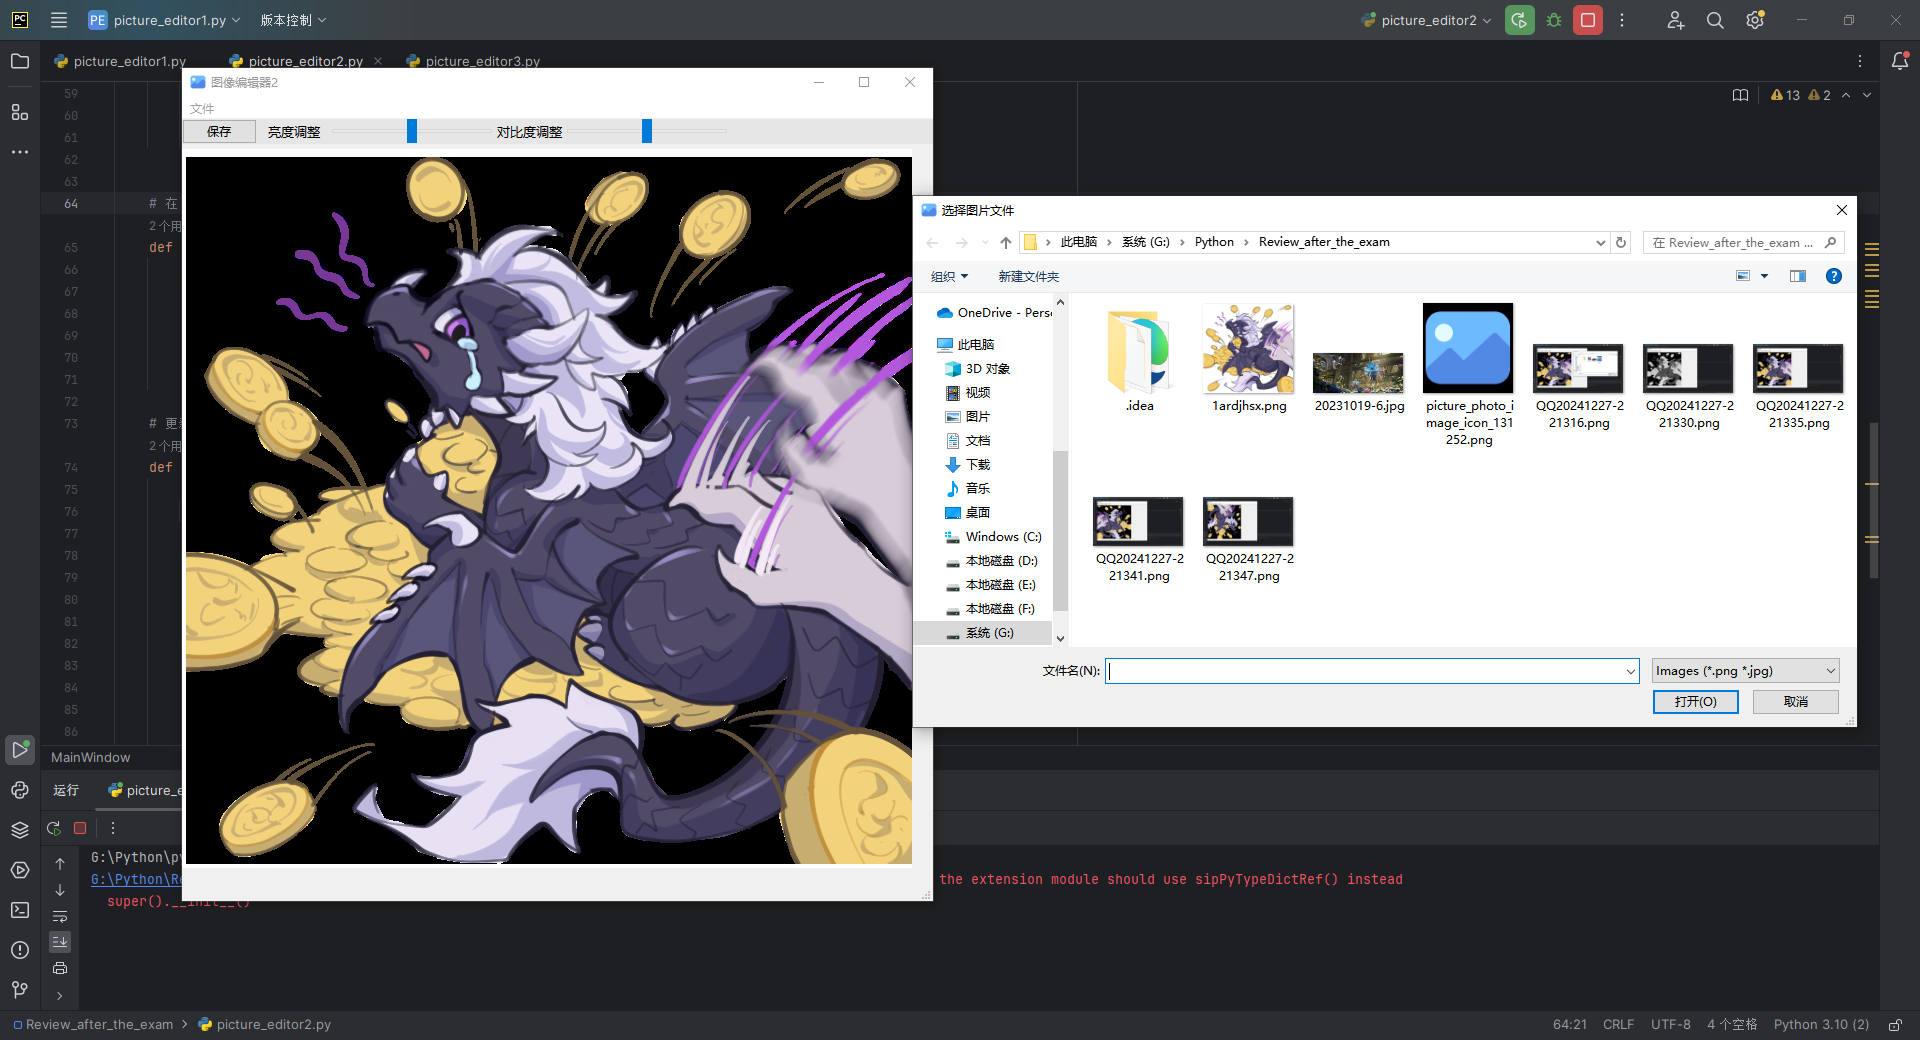
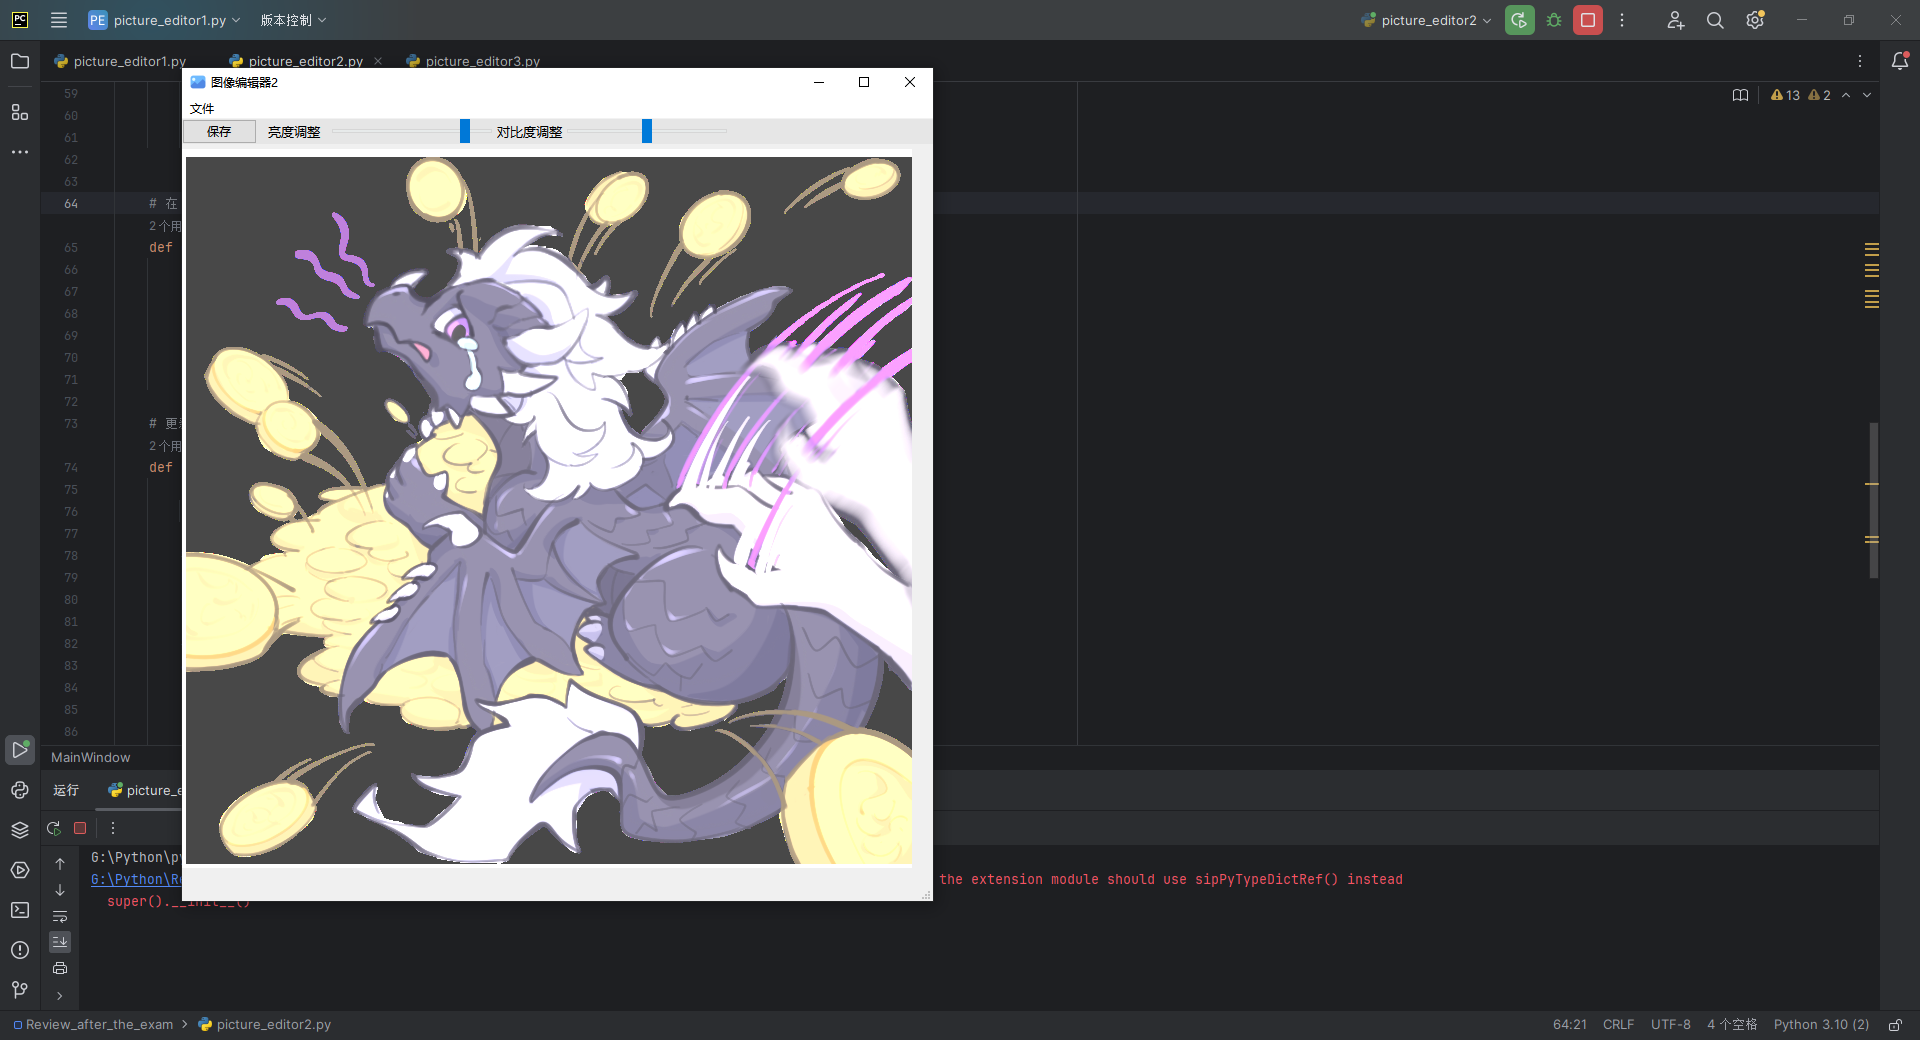
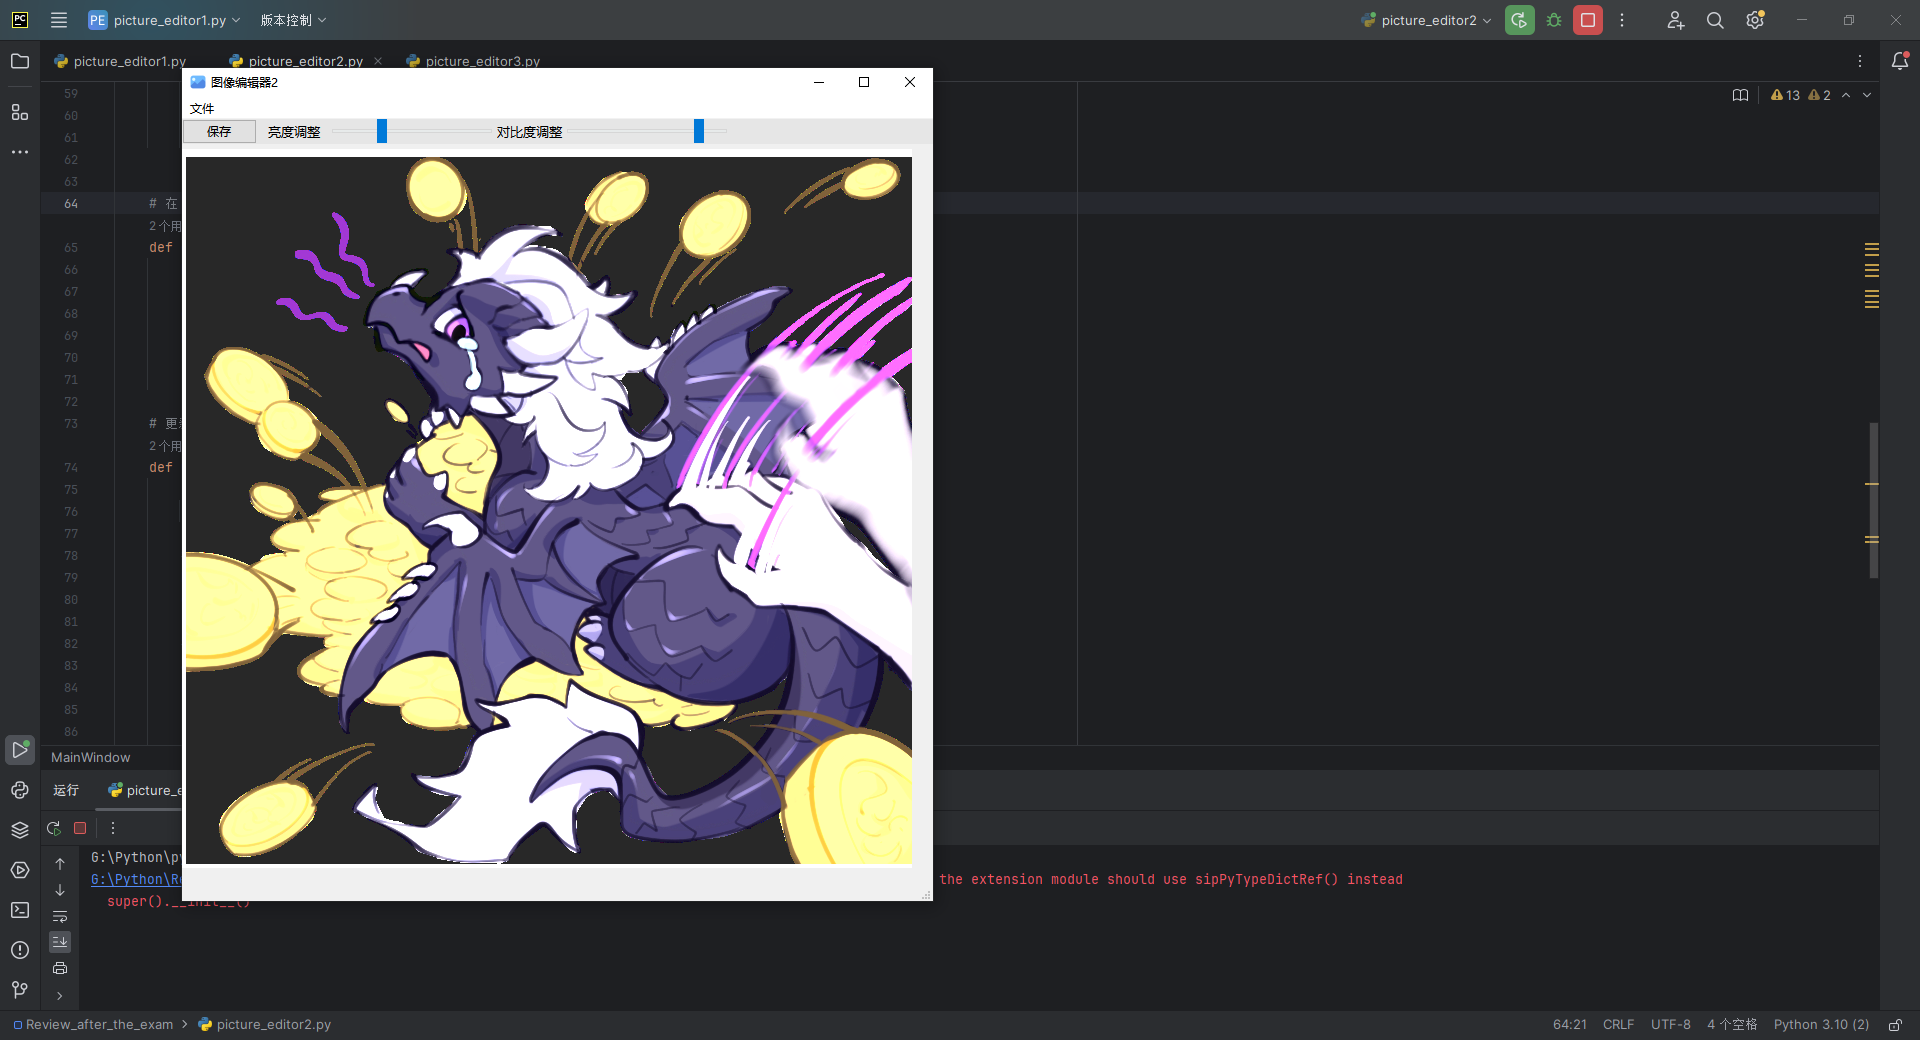
4.效果展示

三、PyQt + OpenCV 图像处理应用设计(模糊、锐化、边缘检测)
根据下列要求写出思路分析和设计到的函数方法:
创建一个 PyQt 应用程序,该应用程序能够:
①使用 OpenCV 加载一张图像。
②在 PyQt 的窗口中显示这张图像。
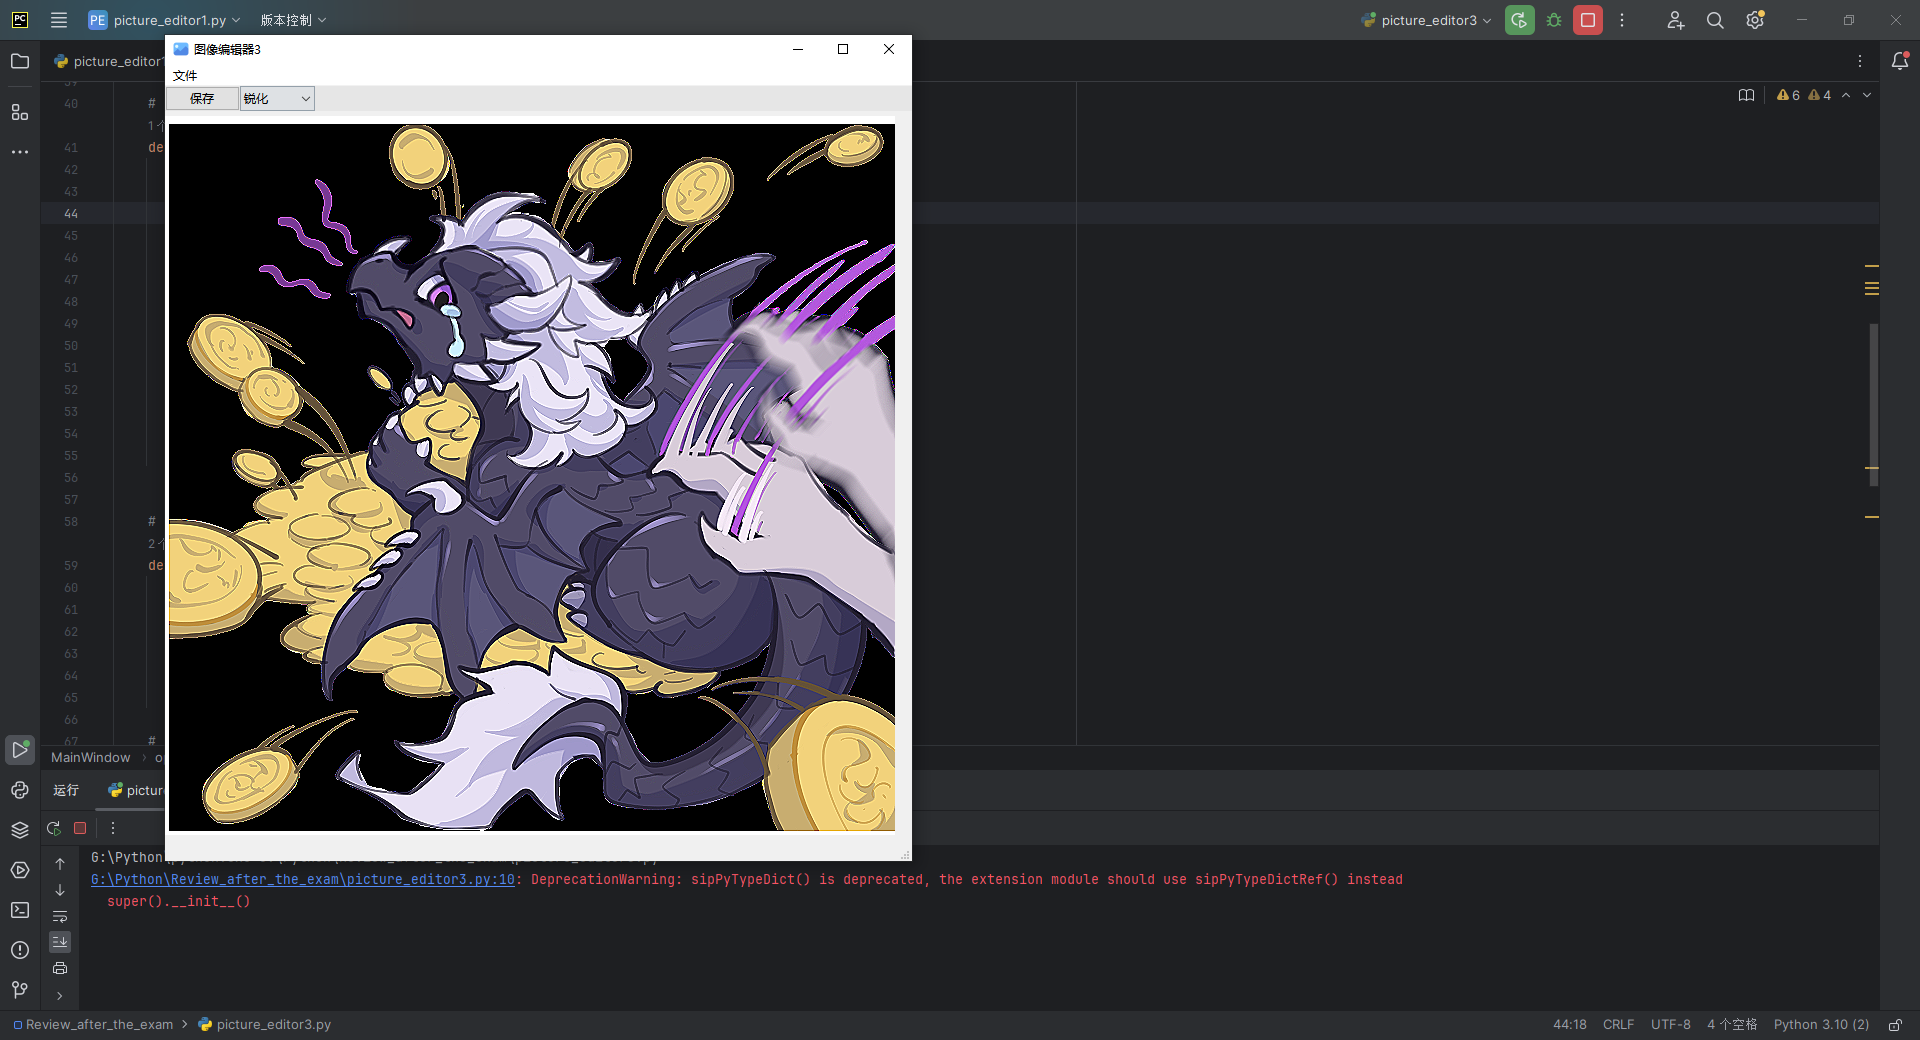
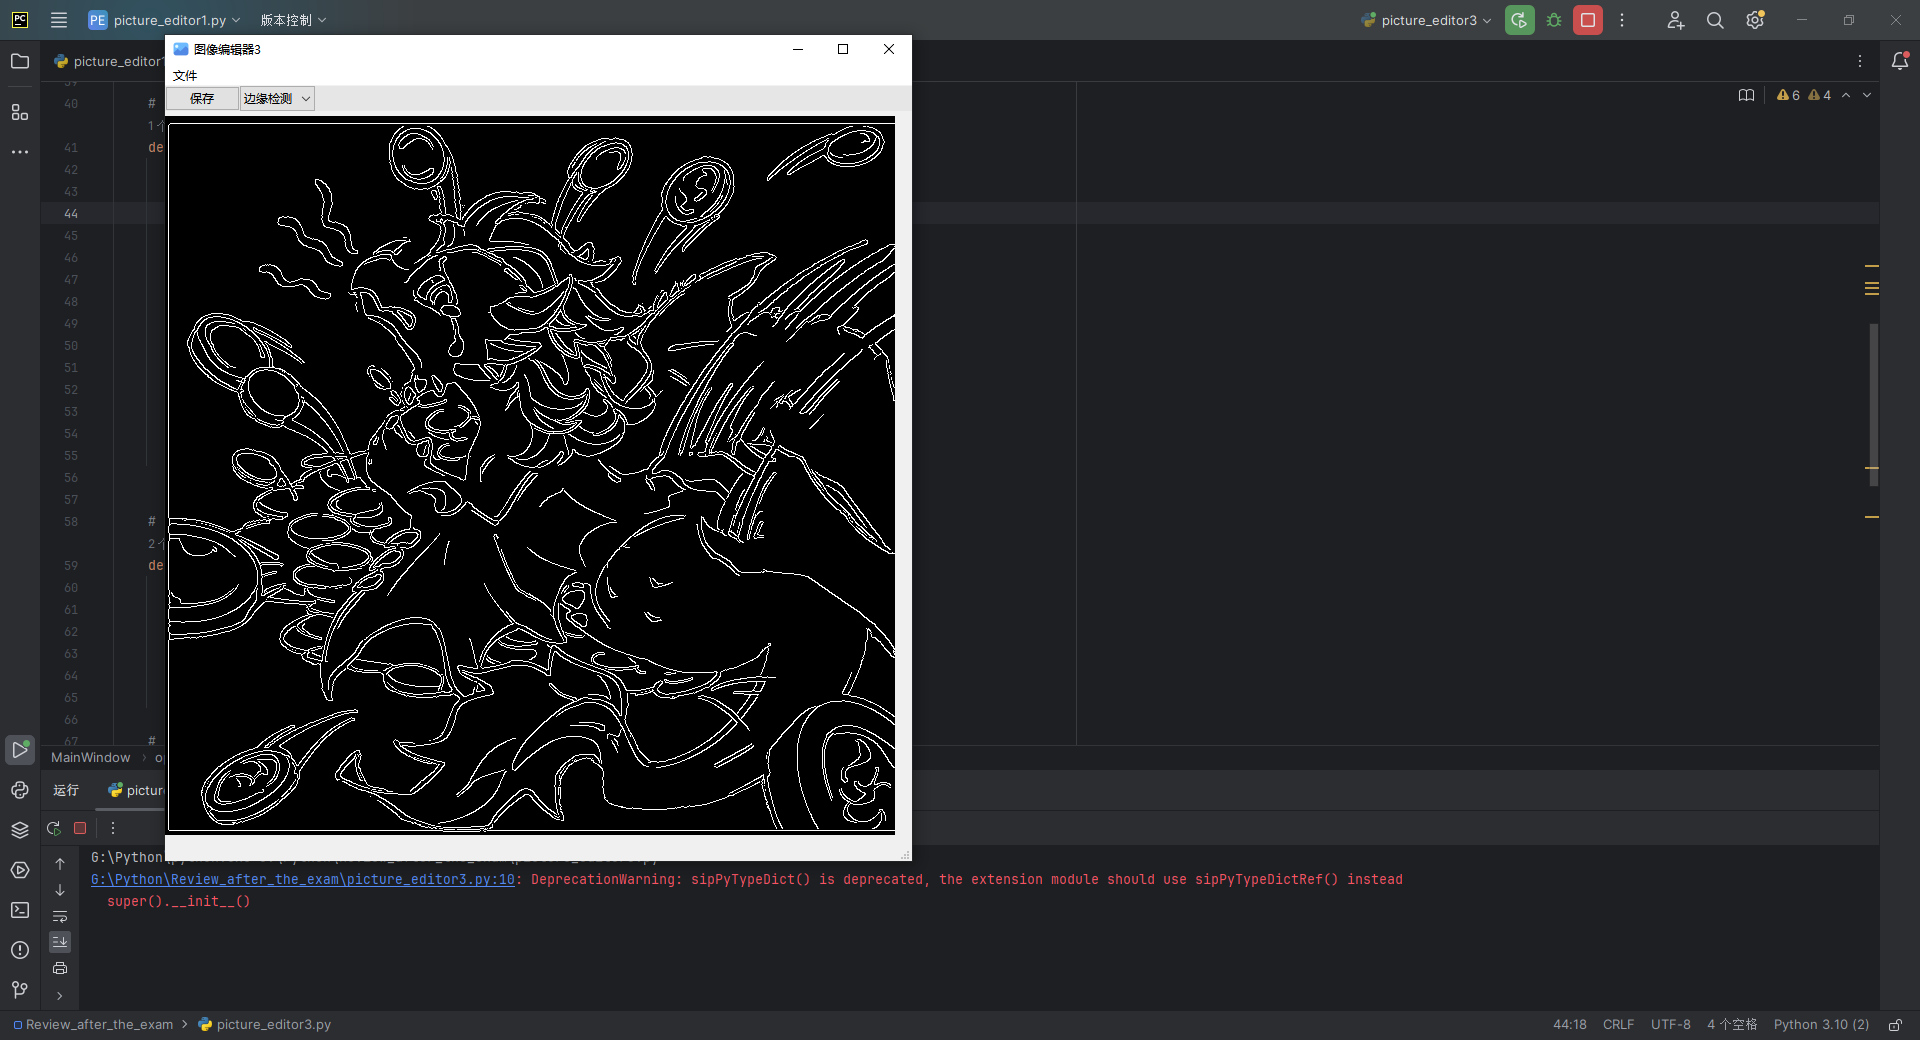
③提供一个下拉列表(QComboBox),对图像做(模糊、锐化、边缘检测)处理:
- 模糊——使用cv2.GaussianBlur()实现
- 锐化——使用cv2.Laplacian()、cv2.Sobel()实现
- 边缘检测——使用cv2.Canny()实现
④当用户点击下拉列表选项时,相应地更新窗口中显示的图像。
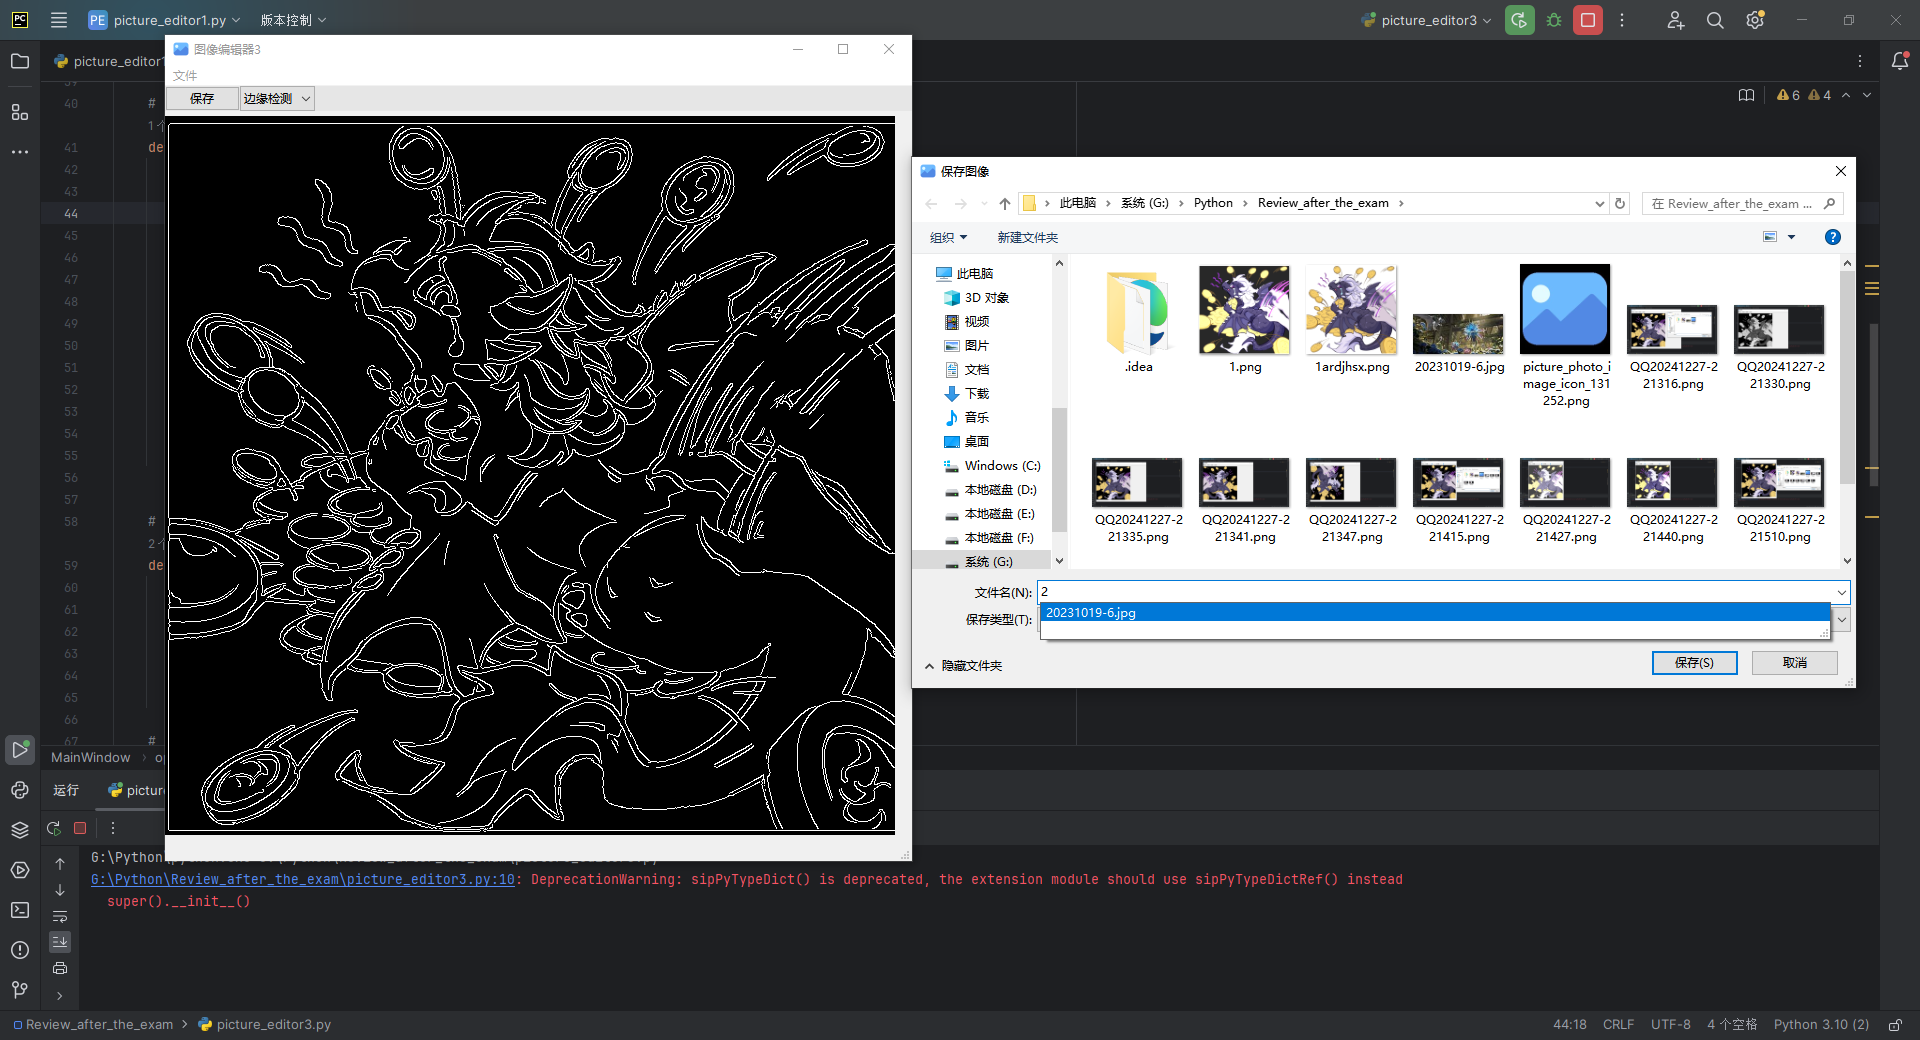
⑤提供一个按钮,当用户点击按钮时,能保存调整后的图像。
1.思路分析
①功能需求
图像加载:使用 OpenCV 加载彩色图像,并在 PyQt 窗口中显示。
图像处理:通过 QComboBox 选择图像处理方式:
- 模糊:使用 cv2.GaussianBlur() 进行模糊处理。
- 锐化:使用 cv2.Laplacian() 和 cv2.Sobel() 进行锐化处理。
- 边缘检测:使用 cv2.Canny() 进行边缘检测。
实时更新:用户选择不同的选项时,实时显示处理后的图像。
图像保存:通过 QPushButton 将当前处理后的图像保存到指定路径。
②用户界面设计
QLabel:用于显示图像。
QComboBox:
- 提供三个选项:模糊、锐化、边缘检测。
QPushButton:
- 保存按钮:将当前处理后的图像保存到文件。
QFileDialog:
- 用于选择图像文件和保存图像文件。
③关键功能
图像加载
- 使用 cv2.imread() 加载图像。
- 将 OpenCV 图像格式转换为 QPixmap 格式,在 QLabel 中显示。
模糊处理
- 使用 cv2.GaussianBlur() 对图像进行模糊处理。
锐化处理
- 使用 cv2.Laplacian() 和 cv2.Sobel() 对图像进行锐化处理。
边缘检测
- 使用 cv2.Canny() 提取图像的边缘信息。
实时更新
- 用户在下拉列表中选择不同的处理方式时,实时调用相应函数,更新图像。
保存图像
- 使用 cv2.imwrite() 将当前显示的图像保存到用户指定路径。
2.设计到的函数方法
①__init__()
功能:初始化窗口、设置 UI 组件、绑定事件。
主要方法:
- 初始化 QLabel、QComboBox 和 QPushButton。
- 绑定按钮和下拉列表的信号与槽。
②open_file_dialog()
功能:弹出文件对话框,加载图像。
主要方法:
- 使用 QFileDialog.getOpenFileName 选择图像文件。
- 使用 cv2.imread() 加载图像。
- 调用display_image() 显示图像。
③display_image(image)
功能:将 OpenCV 图像转换为 QPixmap,并显示在 QLabel 中。
主要方法:
- 使用 QImage 转换图像格式。
- 使用 QPixmap.fromImage() 更新 QLabel。
④process_image()
功能:根据下拉列表选项,应用不同的图像处理操作。
主要方法:
- 模糊:使用 cv2.GaussianBlur()。
- 锐化:使用 cv2.filter2D。
- 边缘检测:使用 cv2.Canny()。
- 调用 display_image() 显示处理后的图像。
⑤save_image()
功能:保存当前处理后的图像。
主要方法:
- 使用 QFileDialog.getSaveFileName() 获取保存路径。
- 使用 cv2.imwrite() 保存图像。
3.代码
from PyQt6.QtWidgets import QApplication, QMainWindow, QLabel, QComboBox, QPushButton, QFileDialog
from PyQt6.QtGui import QPixmap, QAction, QImage, QIcon
from PyQt6 import uic
import cv2
import numpy as np

class MainWindow(QMainWindow):
    def __init__(self):
        super().__init__()
        # 动态加载 UI 文件
        uic.loadUi("picture_editor3.ui", self)

        # 设置窗口标题和图标
        self.setWindowTitle("图像编辑器3")  # 改变窗口标签
        self.setWindowIcon(QIcon("picture_photo_image_icon_131252.png"))

        # 获取 UI 组件
        self.open_action = self.findChild(QAction, "open")
        self.picture_label = self.findChild(QLabel, "picture")  # QLabel 显示图像
        self.process_combo = self.findChild(QComboBox, "comboBox")  # QComboBox 下拉列表
        self.save_button = self.findChild(QPushButton, "save_button")  # QPushButton 保存按钮

        # 初始化变量
        self.original_image = None  # 原始图像
        self.processed_image = None  # 处理后的图像

        # 设置下拉列表选项
        self.process_combo.addItems(["无处理", "模糊", "锐化", "边缘检测"])

        # 连接信号和槽
        self.open_action.triggered.connect(self.open_file_dialog)
        self.process_combo.currentTextChanged.connect(self.process_image)
        self.save_button.clicked.connect(self.save_image)

        # 初始化变量
        self.original_image = None
        self.processed_image = None

    # 弹出文件对话框并显示选择的图像
    def open_file_dialog(self):
        # 弹出文件对话框,限制为 .png 和 .jpg 文件
        file_path, _ = QFileDialog.getOpenFileName(
            self,
            "选择图片文件",  # 文件对话框标题
            "",
            "Images (*.png *.jpg)"  # 文件过滤器
        )
        # 如果选择了文件,加载到 QLabel 中
        if file_path:
            # 使用 OpenCV 加载图像(彩色图像)
            self.original_image = cv2.imread(file_path)
            self.current_image = self.original_image.copy()  # 初始化 current_image
            # 将图像转换为 QPixmap 以显示
            self.display_image(self.current_image)
            # 设置 QLabel 的大小为图片的原始大小

    # 在 QLabel 中显示图像
    def display_image(self, image):
        height, width, channel = image.shape
        bytes_per_line = 3 * width
        q_image = QImage(image.data, width, height, bytes_per_line, QImage.Format.Format_BGR888)
        pixmap = QPixmap.fromImage(q_image)
        self.picture_label.setPixmap(pixmap)
        self.picture_label.setFixedSize(pixmap.size())  # 设置 QLabel 的大小为图片的原始大小

    # 根据下拉列表选择处理图像
    def process_image(self):
        if self.original_image is None:
            return

        option = self.process_combo.currentText()

        if option == "模糊":
            self.processed_image = cv2.GaussianBlur(self.original_image, (11, 11), 0)
        elif option == "锐化":
            kernel = np.array([[0, -1, 0], [-1, 5, -1], [0, -1, 0]])
            self.processed_image = cv2.filter2D(self.original_image, -1, kernel)
        elif option == "边缘检测":
            gray_image = cv2.cvtColor(self.original_image, cv2.COLOR_BGR2GRAY)
            self.processed_image = cv2.Canny(gray_image, 100, 200)
            # 将单通道边缘图像转换为三通道以显示
            self.processed_image = cv2.cvtColor(self.processed_image, cv2.COLOR_GRAY2BGR)
        else:
            self.processed_image = self.original_image.copy()

        self.display_image(self.processed_image)

    # 保存处理后的图像
    def save_image(self):
        if self.processed_image is None:
            return

        file_path, _ = QFileDialog.getSaveFileName(
            self,
            "保存图像",
            "",
            "Images (*.png *.jpg *.bmp)"
        )
        if file_path:
            cv2.imwrite(file_path, self.processed_image)

if __name__ == "__main__":
    app = QApplication([])
    window = MainWindow()
    window.show()
    app.exec()
4.效果展示