Kotlin 协程基础知识总结六 —— 协程 Flow 的综合应用
1、项目描述与搭建
(P92~P94)我们会将几个 Flow 的应用实例放在同一个 Demo 中,主页就是一个 Activity 里包含一个按钮,点击按钮跳转到对应的功能展示页面上。整体架构采用一个 Activity 多个 Fragment 的结构,结合 Jetpack 的 Navigation 和 Room 框架。
配置上在 build.gradle 中导入依赖,开启 ViewBinding:
plugins {
    // 添加 kapt 插件,因为 Room 需要通过 kapt 引入 Room 的注解处理器
    id "org.jetbrains.kotlin.kapt"
}

android {
    // 开启 ViewBinding
    viewBinding {
        enabled = true
    }
}

dependencies {
    implementation 'androidx.constraintlayout:constraintlayout:2.1.3'
    def kotlin_version = "1.8.0"
    implementation "androidx.core:core-ktx:$kotlin_version"

    def material_version = "1.5.0"
    implementation "com.google.android.material:material:$material_version"

    def appcompat_version = "1.4.1"
    implementation "androidx.appcompat:appcompat:$appcompat_version"

    def coroutines_version = "1.4.2"
    implementation "org.jetbrains.kotlinx:kotlinx-coroutines-core:$coroutines_version"
    implementation "org.jetbrains.kotlinx:kotlinx-coroutines-android:$coroutines_version"

    def room_version = "2.3.0"
    implementation "androidx.room:room-runtime:$room_version"
    implementation "androidx.room:room-ktx:$room_version"
    kapt "androidx.room:room-compiler:$room_version"

    def nav_version = "2.3.2"
    implementation "androidx.navigation:navigation-fragment-ktx:$nav_version"
    implementation "androidx.navigation:navigation-ui-ktx:$nav_version"

    def lifecycle_version = "2.2.0"
    implementation "androidx.lifecycle:lifecycle-livedata-ktx:$lifecycle_version"

    def swipe_refresh_layout_version = "1.1.0"
    implementation "androidx.swiperefreshlayout:swiperefreshlayout:$swipe_refresh_layout_version"

    def retrofit_version = "2.9.0"
    implementation "com.squareup.retrofit2:retrofit:$retrofit_version"
    implementation "com.squareup.retrofit2:converter-gson:$retrofit_version"

    def activity_version = "1.7.0"
    implementation "androidx.activity:activity:$activity_version"
}
接下来对 MainActivity 进行 ViewBinding 初始化:
class MainActivity : AppCompatActivity() {

    private val mBinding: ActivityMainBinding by lazy {
        ActivityMainBinding.inflate(layoutInflater)
    }

    override fun onCreate(savedInstanceState: Bundle?) {
        super.onCreate(savedInstanceState)
        setContentView(mBinding.root)
    }
}
Activity 初始化完成,然后就应该创建主 Fragment 了,也就是 HomeFragment。在创建 HomeFragment 之前,先创建导航资源目录以及文件 /main!/res/navigation/navigation.xml,通过图形化工具选择 fragment_home 创建根 Fragment:
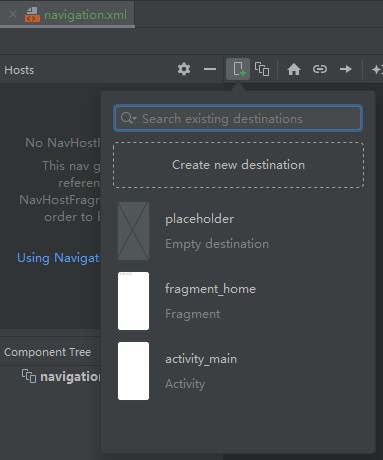
创建后的 navigation.xml 代码如下:
<?xml version="1.0" encoding="utf-8"?>
<navigation xmlns:android="http://schemas.android.com/apk/res/android"
    xmlns:app="http://schemas.android.com/apk/res-auto"
    xmlns:tools="http://schemas.android.com/tools"
    android:id="@+id/navigation"
    app:startDestination="@id/homeFragment">
    <fragment
        android:id="@+id/homeFragment"
        android:name="com.flow.demo.fragment.HomeFragment"
        android:label="fragment_home"
        tools:layout="@layout/fragment_home" />
</navigation>
然后创建 MainActivity 上的 NavHost,在 activity_main.xml 上选中 Containers -> NavHostFragment 拖拽进布局,然后选择在刚创建的 navigation.xml 中添加这组关系,activity_main.xml 会添加 FragmentContainerView:
<?xml version="1.0" encoding="utf-8"?>
<androidx.constraintlayout.widget.ConstraintLayout xmlns:android="http://schemas.android.com/apk/res/android"
    xmlns:app="http://schemas.android.com/apk/res-auto"
    xmlns:tools="http://schemas.android.com/tools"
    android:layout_width="match_parent"
    android:layout_height="match_parent"
    tools:context=".activity.MainActivity">

    <androidx.fragment.app.FragmentContainerView
        android:id="@+id/fragmentContainerView"
        android:name="androidx.navigation.fragment.NavHostFragment"
        android:layout_width="409dp"
        android:layout_height="729dp"
        app:defaultNavHost="true"
        app:navGraph="@navigation/navigation"
        tools:layout_editor_absoluteX="1dp"
        tools:layout_editor_absoluteY="1dp" />
</androidx.constraintlayout.widget.ConstraintLayout>
对以上内容做出适当修改以达到可用状态:
<?xml version="1.0" encoding="utf-8"?>
<androidx.constraintlayout.widget.ConstraintLayout xmlns:android="http://schemas.android.com/apk/res/android"
    xmlns:app="http://schemas.android.com/apk/res-auto"
    xmlns:tools="http://schemas.android.com/tools"
    android:layout_width="match_parent"
    android:layout_height="match_parent"
    tools:context=".activity.MainActivity">

    <androidx.fragment.app.FragmentContainerView
        android:id="@+id/fragmentContainerView"
        android:name="androidx.navigation.fragment.NavHostFragment"
        android:layout_width="match_parent"
        android:layout_height="match_parent"
        app:defaultNavHost="true"
        app:navGraph="@navigation/navigation" />
</androidx.constraintlayout.widget.ConstraintLayout>
随后在 HomeFragment 的布局中添加各个 Demo 的按钮:
<?xml version="1.0" encoding="utf-8"?>
<LinearLayout xmlns:android="http://schemas.android.com/apk/res/android"
    xmlns:tools="http://schemas.android.com/tools"
    android:layout_width="match_parent"
    android:layout_height="match_parent"
    android:orientation="vertical"
    tools:context=".fragment.HomeFragment">

    <Button
        android:id="@+id/btn_flow_and_download"
        android:layout_width="match_parent"
        android:layout_height="wrap_content"
        android:text="@string/flow_and_download" />

    <Button
        android:id="@+id/btn_flow_and_room"
        android:layout_width="match_parent"
        android:layout_height="wrap_content"
        android:text="@string/flow_and_room" />

    <Button
        android:id="@+id/btn_flow_and_retrofit"
        android:layout_width="match_parent"
        android:layout_height="wrap_content"
        android:text="@string/flow_and_retrofit" />

    <Button
        android:id="@+id/btn_state_flow"
        android:layout_width="match_parent"
        android:layout_height="wrap_content"
        android:text="@string/state_flow" />

    <Button
        android:id="@+id/btn_shared_flow"
        android:layout_width="match_parent"
        android:layout_height="wrap_content"
        android:text="@string/shared_flow" />
</LinearLayout>
点击按钮通过 Navigation 跳转到对应的 Fragment。以 DownloadFragment 为例,代码:
class DownloadFragment : Fragment() {

    private val mBinding: FragmentDownloadBinding by lazy {
        FragmentDownloadBinding.inflate(layoutInflater)
    }

    override fun onCreateView(
        inflater: LayoutInflater, container: ViewGroup?,
        savedInstanceState: Bundle?
    ): View? {
        return mBinding.root
    }
}
布局方进度条和提示进度的文字:
<?xml version="1.0" encoding="utf-8"?>
<RelativeLayout xmlns:android="http://schemas.android.com/apk/res/android"
    xmlns:tools="http://schemas.android.com/tools"
    android:layout_width="match_parent"
    android:layout_height="match_parent"
    tools:context=".fragment.DownloadFragment">

    <ProgressBar
        android:id="@+id/progressBar"
        style="?android:attr/progressBarStyleHorizontal"
        android:layout_width="match_parent"
        android:layout_height="wrap_content"
        android:layout_centerInParent="true"
        android:max="100" />

    <TextView
        android:id="@+id/tv_progress"
        android:layout_width="wrap_content"
        android:layout_height="wrap_content"
        android:layout_below="@id/progressBar"
        android:layout_centerHorizontal="true"
        android:textSize="20sp"
        tools:text="10%" />
</RelativeLayout>
然后在 navigation.xml 的 UI 界面中点击 + 号选择 fragment_download 将该布局添加到 navigation.xml 中作为一个目的地:
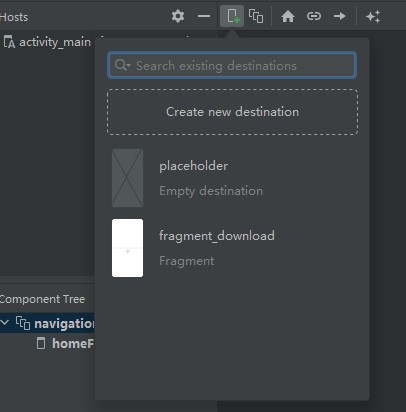
再将 homeFragment 与 downloadFragment 添加上连线表示可跳转:
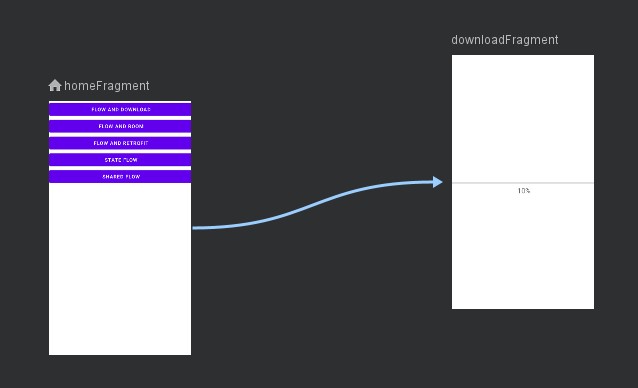
添加后 navigation.xml 的代码内容如下:
<?xml version="1.0" encoding="utf-8"?>
<navigation xmlns:android="http://schemas.android.com/apk/res/android"
    xmlns:app="http://schemas.android.com/apk/res-auto"
    xmlns:tools="http://schemas.android.com/tools"
    android:id="@+id/navigation"
    app:startDestination="@id/homeFragment">
    <fragment
        android:id="@+id/homeFragment"
        android:name="com.flow.demo.fragment.HomeFragment"
        android:label="fragment_home"
        tools:layout="@layout/fragment_home" >
        <action
            android:id="@+id/action_homeFragment_to_downloadFragment"
            app:destination="@id/downloadFragment" />
    </fragment>
    <fragment
        android:id="@+id/downloadFragment"
        android:name="com.flow.demo.fragment.DownloadFragment"
        android:label="fragment_download"
        tools:layout="@layout/fragment_download" />
</navigation>
可以看到两个 Fragment,其中主 Fragment 有跳转到 downloadFragment 的 action,借助该 action 可以在代码中进行跳转:
class HomeFragment : Fragment() {

    private val mBinding: FragmentHomeBinding by lazy {
        FragmentHomeBinding.inflate(layoutInflater)
    }

    override fun onCreateView(
        inflater: LayoutInflater, container: ViewGroup?,
        savedInstanceState: Bundle?
    ): View? {
        return mBinding.root
    }

    // onActivityCreated 已经过时了,换成 onViewCreated
    override fun onViewCreated(view: View, savedInstanceState: Bundle?) {
        super.onViewCreated(view, savedInstanceState)
        mBinding.btnFlowAndDownload.setOnClickListener {
            findNavController().navigate(R.id.action_homeFragment_to_downloadFragment)
        }
    }
}
至此,项目框架搭建完毕。
在进行 gradle 编译时,需要将 Java 版本以及 Kotlin 编译所使用的 JVM 版本统一调到当前所使用的版本。由于现在使用的 AS Flamingo 支持的 gradle 版本为 8.0,该版本不支持 Java 1.8,所以使用的是 JDK17,那么在模块的 build.gradle 中需要做出相应的配置:
android {

 compileOptions {
     // 'compileDebugJavaWithJavac' task (current target is 17) and 'compileDebugKotlin' task
     //  (current target is 1.8) jvm target compatibility should be set to the same Java version.
     sourceCompatibility JavaVersion.VERSION_17
     targetCompatibility JavaVersion.VERSION_17
 }
 kotlinOptions {
     // JVM target version 也得跟着改
     jvmTarget = '17'
 }
}
2、Flow 下载文件
(P95~P96)使用 Flow 下载文件,UI 上更新进度条和文字进度,示意图如下:
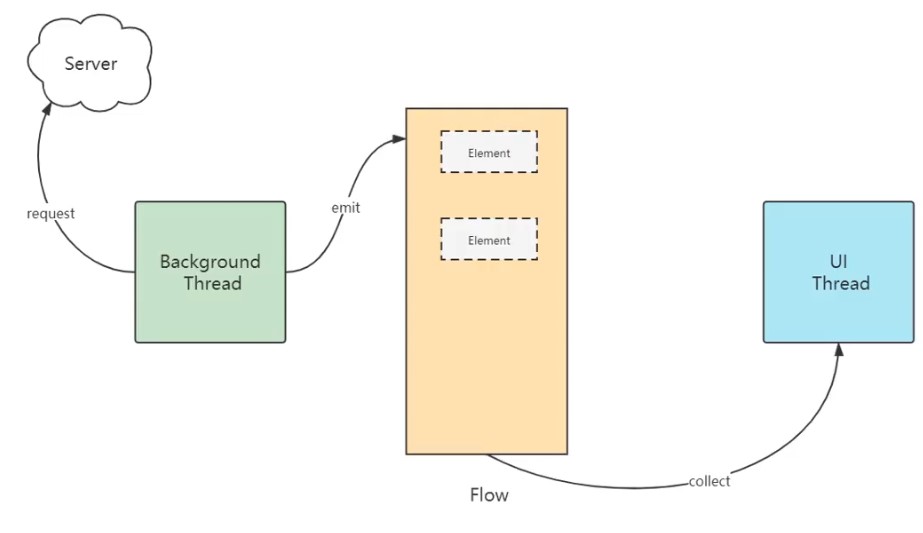
Background Thread 部分通过 Flow 将上游切换到 Dispatchers.IO 向服务器发出请求下载文件,服务端返回的文件在响应体中,将响应体中的文件通过 IO 流拷贝到 Android 设备的文件中,以拷贝的字节数对整个文件大小的占比作为下载进度传给下游,下游在 UI 线程中拿到下载进度更新进度条与文字提示。
功能实现过程,首先我们定义一个表示下载状态的类 DownloadStatus:
// 密封类的所有成员都是其子类
sealed class DownloadStatus {

    object None : DownloadStatus()
    data class Progress(val value: Int) : DownloadStatus()
    data class Error(val throwable: Throwable) : DownloadStatus()
    data class Done(val file: File) : DownloadStatus()
}
将其做成密封类是因为密封类的所有成员都是其子类。
然后将文件下载的功能放到 DownloadManager 中:
object DownloadManager {

    fun download(url: String, file: File): Flow<DownloadStatus> {
        return flow {
            val request = Request.Builder().url(url).get().build()
            val response = OkHttpClient.Builder().build().newCall(request).execute()
            if (response.isSuccessful) {
                // body() 可能返回空,这里我们不用 ?. 来调用,而是在结果为空时让其
                // 爆出异常,这样在 Flow 体系下,可以通过 catch 来捕获异常进行后续处理
                response.body()!!.let { responseBody ->
                    val totalBytes = responseBody.contentLength()
                    // 文件读写
                    file.outputStream().use { outputStream ->
                        val input = responseBody.byteStream()
                        var emittedProgress = 0L
                        input.copyTo(outputStream) { bytesCopied ->
                            val progress = bytesCopied * 100 / totalBytes
                            // 进度值大于 5 才发送
                            if (progress - emittedProgress > 5) {
                                // 下载速度太快了,为了看清出现象,加一些延迟
                                kotlinx.coroutines.delay(100)
                                emit(DownloadStatus.Progress(progress.toInt()))
                                emittedProgress = progress
                            }
                        }
                    }
                }
                emit(DownloadStatus.Done(file))
            } else {
                // response 不成功就抛出异常
                throw IOException(response.toString())
            }
        }.catch {
            file.delete()
            emit(DownloadStatus.Error(it))
        }.flowOn(Dispatchers.IO)
    }
}
要注意的几点:
- 像这种创建一个对象要耗费很多资源的类,最好声明为单例类,因此使用 object
- 因为正常下载状态下要不断更新下载进度,因此返回 Flow 正合适,结果就是下载状态 DownloadStatus,因此 download 的返回值类型为
Flow<DownloadStatus> - 例子中给的下载只使用了 OkHttp,没用到 Retrofit。使用 OkHttp 构建请求 request,传入 newCall 生成一个网络请求对象 Call,最后使用同步方法 execute 得到响应体 response
- 如果请求成功,则获取响应体,通过 IO 流将响应体,也就是要下载的文件拷贝到 Android 设备中,使用已经拷贝的字节占比作为下载进度发射给下游,如全部拷贝完,则发射
DownloadStatus.Done(file)给下游;如果请求失败,则抛出 IO 异常 - 除了上面抛的 IO 异常,在获取响应体时,如果响应体为空,也会通过 !! 抛出异常。这是因为 Flow 可以通过 catch 进行异常处理,发生异常说明文件下载失败了,那么就删除文件并发射
DownloadStatus.Error(it)给下游 - 最后要记得上游的这些网络请求、IO 流操作需要在后台线程中进行,因此通过
flowOn(Dispatchers.IO)进行切换
还有一点,就是 copyTo 函数,为了能实时获取到已经拷贝的字节数,我们通过扩展函数的形式在系统的 copyTo 中增加了一个回调函数:
inline fun InputStream.copyTo(
    out: OutputStream,
    bufferSize: Int = DEFAULT_BUFFER_SIZE,
    progress: (Long) -> Unit
): Long {
    var bytesCopied: Long = 0
    val buffer = ByteArray(bufferSize)
    var bytes = read(buffer)
    while (bytes >= 0) {
        out.write(buffer, 0, bytes)
        bytesCopied += bytes
        bytes = read(buffer)

        // 将已经拷贝的字节数传递出去
        progress(bytesCopied)
    }

    return bytesCopied
}
相比于 IOStreams.kt 提供的 copyTo,实际上就加了一个 progress:
public fun InputStream.copyTo(out: OutputStream, bufferSize: Int = DEFAULT_BUFFER_SIZE): Long {
    var bytesCopied: Long = 0
    val buffer = ByteArray(bufferSize)
    var bytes = read(buffer)
    while (bytes >= 0) {
        out.write(buffer, 0, bytes)
        bytesCopied += bytes
        bytes = read(buffer)
    }
    return bytesCopied
}
最后来到 UI 这边,在 DownloadFragment 给按钮设置下载的监听事件:
	override fun onViewCreated(view: View, savedInstanceState: Bundle?) {
        super.onViewCreated(view, savedInstanceState)

        // launchWhenXXX 系列函数因为在某些场景下会浪费资源,因此被弃用了,替代方式
        // 是使用 Lifecycle.repeatOnLifecycle(Lifecycle.State.XXX)
        /*lifecycleScope.launchWhenCreated {}*/

        // 因为 repeatOnLifecycle 是挂起函数需要在挂起函数或者协程环境中调用,因此使用
        // lifecycleScope 开启一个协程
        lifecycleScope.launch {
            lifecycle.repeatOnLifecycle(Lifecycle.State.CREATED) {
                // 需要通过 context 创建文件,因此如果 context 为空后续就都无法执行,将其提出来
                context?.apply {
                    val file = File(getExternalFilesDir(null)?.path, "pic.jpg")
                    DownloadManager.download(URL, file).collect { status ->
                        when (status) {
                            is DownloadStatus.Progress -> {
                                mBinding.apply {
                                    progressBar.progress = status.value
                                    tvProgress.text = "${status.value}%"
                                }
                            }

                            is DownloadStatus.Error -> {
                                Toast.makeText(this, "下载错误", Toast.LENGTH_SHORT).show()
                            }

                            is DownloadStatus.Done -> {
                                mBinding.apply {
                                    progressBar.progress = 100
                                    tvProgress.text = "100%"
                                }
                                Toast.makeText(this, "下载完成", Toast.LENGTH_SHORT).show()
                            }
                            else -> {
                                Log.d("Frank", "下载失败")
                            }
                        }
                    }
                }
            }
        }
    }
这里需要注意的就是协程的环境问题。因为 onViewCreated 被明确标记是在主线程中运行的:
	@MainThread
    public void onViewCreated(@NonNull View view, @Nullable Bundle savedInstanceState) {
    }
所以 lifecycleScope.launch 继承外部环境,也就是在主线程中开启协程。一直到 collect 就再没有改变协程环境的代码了,所以流的下游是在主线程中执行的,可以去直接更新 UI。
最后要去 AndroidManifest 中增加一些配置:
	<uses-permission android:name="android.permission.INTERNET" />

	<application
        android:networkSecurityConfig="@xml/network_security_config"
     </application>
如果网络请求涉及到 Http 协议的地址,那么需要进行一个网络安全配置:
<?xml version="1.0" encoding="utf-8"?>
<network-security-config>
    <base-config cleartextTrafficPermitted="true"/>
</network-security-config>
由于 getExternalFilesDir 获取外部存储上应用专属目录的文件是不需要特定权限即可读写 /sdcard/Android/data/your.package.name/files/ 目录下文件的权限,所以没有声明存储相关权限。下载后的文件在 /sdcard/Android/data/com.flow.demo/files/pic.jpg,可以打开查看。
3、Flow 与 Room
(P97~P98)输入用户 ID 以及姓名,点击 ADD USER 按钮后会添加到数据库,同时在按钮下方显示数据库中已有的数据:

呈现该功能的页面为 UserFragment,从 HomeFragment 导航到 UserFragment 的代码与前面的类似,不再赘述(新建 UserFragment 后去 navigation.xml 在 HomeFragment 与 UserFragment 之间加个连接的 action 即可)。
3.1 Room 部分
我们先实现数据库部分的功能。首先是数据实体 User:
@Entity
data class User(
    @PrimaryKey val uid: Int,
    @ColumnInfo(name = "first_name") val firstName: String,
    @ColumnInfo(name = "last_name") val lastName: String
)
然后是包含操作数据方法的接口 UserDao:
@Dao
interface UserDao {

    // ID 相同的 User 执行插入时进行替换
    @Insert(onConflict = OnConflictStrategy.REPLACE)
    suspend fun insert(user: User)

    // 不需要也不能加 suspend,返回值类型是 LiveData 也不需要加
    @Query("SELECT * FROM user")
    fun getAll(): Flow<List<User>>
}
最后是数据库类 APPDatabase,需要将该类做成单例:
@Database(entities = [User::class], version = 1, exportSchema = false)
abstract class AppDatabase : RoomDatabase() {

    abstract fun userDao(): UserDao

    companion object {
        private var instance: AppDatabase? = null

        fun getInstance(context: Context): AppDatabase {
            // companion object 内的 this 指向该 companion object 自身,全局唯一
            return instance ?: synchronized(this) {
                Room.databaseBuilder(context, AppDatabase::class.java, "AppDatabase")
                    .build().also { instance = it }
            }
        }
    }
}
数据库部分的基本功能就是这样,需要说明两点。
一是 UserDao 内的两个方法只有一个添加了 suspend 修饰,这是因为 Room 支持 Flow 与 LiveData,所以当返回值类型是它们两个的时候,函数就不用、也必须不能声明为挂起函数。去看 Room 自动生成的代码 UserDao_Impl 就知道为什么了:
  @Override
  public Object insert(final User user, final Continuation<? super Unit> continuation) {
    return CoroutinesRoom.execute(__db, true, new Callable<Unit>() {
      @Override
      public Unit call() throws Exception {
        __db.beginTransaction();
        try {
          __insertionAdapterOfUser.insert(user);
          __db.setTransactionSuccessful();
          return Unit.INSTANCE;
        } finally {
          __db.endTransaction();
        }
      }
    }, continuation);
  }

  @Override
  public Flow<List<User>> getAll() {
    final String _sql = "SELECT * FROM user";
    final RoomSQLiteQuery _statement = RoomSQLiteQuery.acquire(_sql, 0);
    return CoroutinesRoom.createFlow(__db, false, new String[]{"user"}, new Callable<List<User>>() {
      @Override
      public List<User> call() throws Exception {
        final Cursor _cursor = DBUtil.query(__db, _statement, false, null);
        try {
          final int _cursorIndexOfUid = CursorUtil.getColumnIndexOrThrow(_cursor, "uid");
          final int _cursorIndexOfFirstName = CursorUtil.getColumnIndexOrThrow(_cursor, "first_name");
          final int _cursorIndexOfLastName = CursorUtil.getColumnIndexOrThrow(_cursor, "last_name");
          final List<User> _result = new ArrayList<User>(_cursor.getCount());
          while(_cursor.moveToNext()) {
            final User _item;
            final int _tmpUid;
            _tmpUid = _cursor.getInt(_cursorIndexOfUid);
            final String _tmpFirstName;
            if (_cursor.isNull(_cursorIndexOfFirstName)) {
              _tmpFirstName = null;
            } else {
              _tmpFirstName = _cursor.getString(_cursorIndexOfFirstName);
            }
            final String _tmpLastName;
            if (_cursor.isNull(_cursorIndexOfLastName)) {
              _tmpLastName = null;
            } else {
              _tmpLastName = _cursor.getString(_cursorIndexOfLastName);
            }
            _item = new User(_tmpUid,_tmpFirstName,_tmpLastName);
            _result.add(_item);
          }
          return _result;
        } finally {
          _cursor.close();
        }
      }
insert() 执行的 CoroutinesRoom.execute() 返回的就是参数 Callable 内的泛型类型,而 getAll() 执行的 CoroutinesRoom.createFlow() 返回的是 Flow:
package androidx.room

@androidx.annotation.RestrictTo public final class CoroutinesRoom private constructor() {
    public companion object {
        @kotlin.jvm.JvmStatic public final fun <R> createFlow(db: androidx.room.RoomDatabase, inTransaction: kotlin.Boolean, tableNames: kotlin.Array<kotlin.String>, callable: java.util.concurrent.Callable<R>): kotlinx.coroutines.flow.Flow<@kotlin.jvm.JvmSuppressWildcards R> { /* compiled code */ }

        @kotlin.jvm.JvmStatic public final suspend fun <R> execute(db: androidx.room.RoomDatabase, inTransaction: kotlin.Boolean, cancellationSignal: android.os.CancellationSignal, callable: java.util.concurrent.Callable<R>): R { /* compiled code */ }

        @kotlin.jvm.JvmStatic public final suspend fun <R> execute(db: androidx.room.RoomDatabase, inTransaction: kotlin.Boolean, callable: java.util.concurrent.Callable<R>): R { /* compiled code */ }
    }
}
第二点是我们完成 Room 相关代码去编译时会报错:
 错误: Type of the parameter must be a class annotated with @Entity or a collection/array of it.
    kotlin.coroutines.Continuation<? super kotlin.Unit> continuation);

 错误: Not sure how to handle insert method's return type.
    public abstract java.lang.Object insertAll(@org.jetbrains.annotations.NotNull()
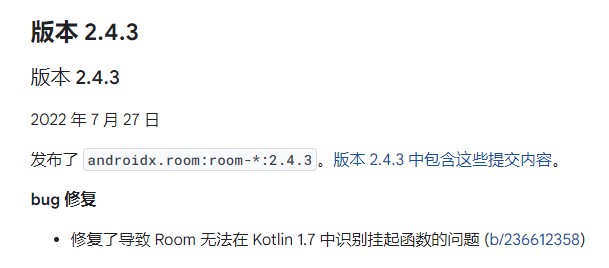
这是 Room 无法在 Kotlin 1.7 识别挂起函数的问题,在 Room 2.4.3 版本中才得以解决:
在我们当前使用的 2.3.0 版本中,UserDao_Impl 对挂起函数 insert() 生成的代码是不完整的,只有一句话,造成了上述的编译错误。所以我们更新 Room 版本到 2.4.3 即可:
	def room_version = "2.4.3"
    implementation "androidx.room:room-runtime:$room_version"
    implementation "androidx.room:room-ktx:$room_version"
    kapt "androidx.room:room-compiler:$room_version"
3.2 ViewModel 部分
Room 作为一个相对较底层的部分,提供了数据库的单例以及 Dao 去操作数据库中的数据。而使用 Room 的就是在它上面一层的 UserViewModel:
/**
 * 由于需要使用上下文,所以需要继承 AndroidViewModel,而不是 ViewModel
 * 此外,如果需要使用系统服务(例如获取资源、启动 Activity 等),也应该继承 AndroidViewModel。
 * 这样做可以方便在 ViewModel 中使用上下文,并且可以避免内存泄漏等问题。
 */
class UserViewModel(application: Application) : AndroidViewModel(application) {

    fun insert(uid: String, firstName: String, lastName: String) {
        // 由于 insert 是挂起函数,所以这里用 viewModelScope 开一个协程
        viewModelScope.launch {
            AppDatabase.getInstance(getApplication())
                .userDao()
                .insert(User(uid.toInt(), firstName, lastName))
            Log.d("Frank", "insert user: $uid")
        }
    }

    fun getAll(): Flow<List<User>> =
        AppDatabase.getInstance(getApplication())
            .userDao()
            .getAll()
            .catch { e -> e.printStackTrace() } // 可以抛到 UI 界面上去,这里从简了
            .flowOn(Dispatchers.IO)
}
UserViewModel 其实就是根据 AppDatabase 的单例获取 UserDao,然后调用操作数据的方法。
3.3 Fragment 部分
UserViewModel 再向上一层就是 Fragment 了,UserFragment 持有 UserViewModel 对象,借助后者进行数据库操作。
以上是一个整体思路,当然 Fragment 一定涉及到 UI,因此我们还是从 UI 开始简单说说。
首先,UserFragment 的布局:
<?xml version="1.0" encoding="utf-8"?>
<LinearLayout xmlns:android="http://schemas.android.com/apk/res/android"
    xmlns:app="http://schemas.android.com/apk/res-auto"
    xmlns:tools="http://schemas.android.com/tools"
    android:layout_width="match_parent"
    android:layout_height="match_parent"
    android:orientation="vertical"
    tools:context=".fragment.UserFragment">

    <LinearLayout
        android:layout_width="match_parent"
        android:layout_height="wrap_content"
        android:orientation="horizontal">

        <EditText
            android:id="@+id/et_user_id"
            android:layout_width="0dp"
            android:layout_height="wrap_content"
            android:layout_weight="1"
            android:hint="USER ID" />

        <EditText
            android:id="@+id/et_first_name"
            android:layout_width="0dp"
            android:layout_height="wrap_content"
            android:layout_weight="1"
            android:hint="FIRST NAME" />

        <EditText
            android:id="@+id/et_last_name"
            android:layout_width="0dp"
            android:layout_height="wrap_content"
            android:layout_weight="1"
            android:hint="LAST NAME" />

    </LinearLayout>

    <Button
        android:id="@+id/btn_add_user"
        android:layout_width="match_parent"
        android:layout_height="wrap_content"
        android:text="ADD USER" />

    <androidx.recyclerview.widget.RecyclerView
        android:id="@+id/recyclerView"
        android:layout_width="match_parent"
        android:layout_height="match_parent"
        android:orientation="vertical"
        app:layoutManager="androidx.recyclerview.widget.LinearLayoutManager" />
</LinearLayout>
有了这个布局我们就可以通过 ViewBinding 先初始化 UserFragment:
class UserFragment : Fragment() {

    private val mBinding: FragmentUserBinding by lazy {
        FragmentUserBinding.inflate(layoutInflater)
    }

    override fun onCreateView(
        inflater: LayoutInflater, container: ViewGroup?,
        savedInstanceState: Bundle?
    ): View? {
        return mBinding.root
    }
}
接下来要解决 RecyclerView 相关的组件,首先是每个 Item 的布局:
<?xml version="1.0" encoding="utf-8"?>
<LinearLayout xmlns:android="http://schemas.android.com/apk/res/android"
    android:layout_width="match_parent"
    android:layout_height="wrap_content"
    android:orientation="vertical">

    <androidx.appcompat.widget.AppCompatTextView
        android:id="@+id/text"
        android:layout_width="match_parent"
        android:layout_height="wrap_content"
        android:layout_gravity="center"
        android:gravity="center"
        android:paddingVertical="4dp"
        android:textSize="26sp" />
</LinearLayout>
然后可以创建适配器 UserAdapter:
class UserAdapter(private val context: Context) : RecyclerView.Adapter<BindingViewHolder>() {

    private val data = ArrayList<User>()

    @SuppressLint("NotifyDataSetChanged")
    fun setData(data: List<User>) {
        this.data.clear()
        this.data.addAll(data)
        notifyDataSetChanged()
    }

    override fun onCreateViewHolder(parent: ViewGroup, viewType: Int): BindingViewHolder {
        val binding = ItemUserBinding.inflate(LayoutInflater.from(context), parent, false)
        return BindingViewHolder(binding)
    }

    override fun getItemCount() = data.size

    override fun onBindViewHolder(holder: BindingViewHolder, position: Int) {
        val item = data[position]
        (holder.binding as ItemUserBinding).apply {
            text.text = "${item.uid} ${item.firstName} ${item.lastName}"
        }
    }
}
其中 BindingViewHolder 只需继承 RecyclerView.ViewHolder 即可,无需复杂操作:
class BindingViewHolder(val binding: ViewBinding) : RecyclerView.ViewHolder(binding.root)
一切准备就绪后,回到 UserFragment,为按钮设置监听,另外在 RecyclerView 中显示数据库中的内容:
	// viewModels 会为 UserViewModel 类型的 viewModel 进行初始化,
	// 该初始化会在 Fragment.onAttach() 之后进行,如果超前访问会抛异常
	private val viewModel by viewModels<UserViewModel>()

	override fun onViewCreated(view: View, savedInstanceState: Bundle?) {
        super.onViewCreated(view, savedInstanceState)

        // 为按钮添加监听,点击时插入数据
        mBinding.apply {
            btnAddUser.setOnClickListener {
                viewModel.insert(
                    etUserId.text.toString(),
                    etFirstName.text.toString(),
                    etLastName.text.toString()
                )
            }
        }


        context?.let {
            val adapter = UserAdapter(it)
            mBinding.recyclerView.adapter = adapter

            lifecycleScope.launch {
                lifecycle.repeatOnLifecycle(Lifecycle.State.CREATED) {
                    viewModel.getAll().collect { userList ->
                        adapter.setData(userList)
                    }
                }
            }
        }
    }
todo 为什么这里 getAll() 不用一直监听数据就能做到 userList 在 UI 上的实时更新?
4、Flow 与 Retrofit
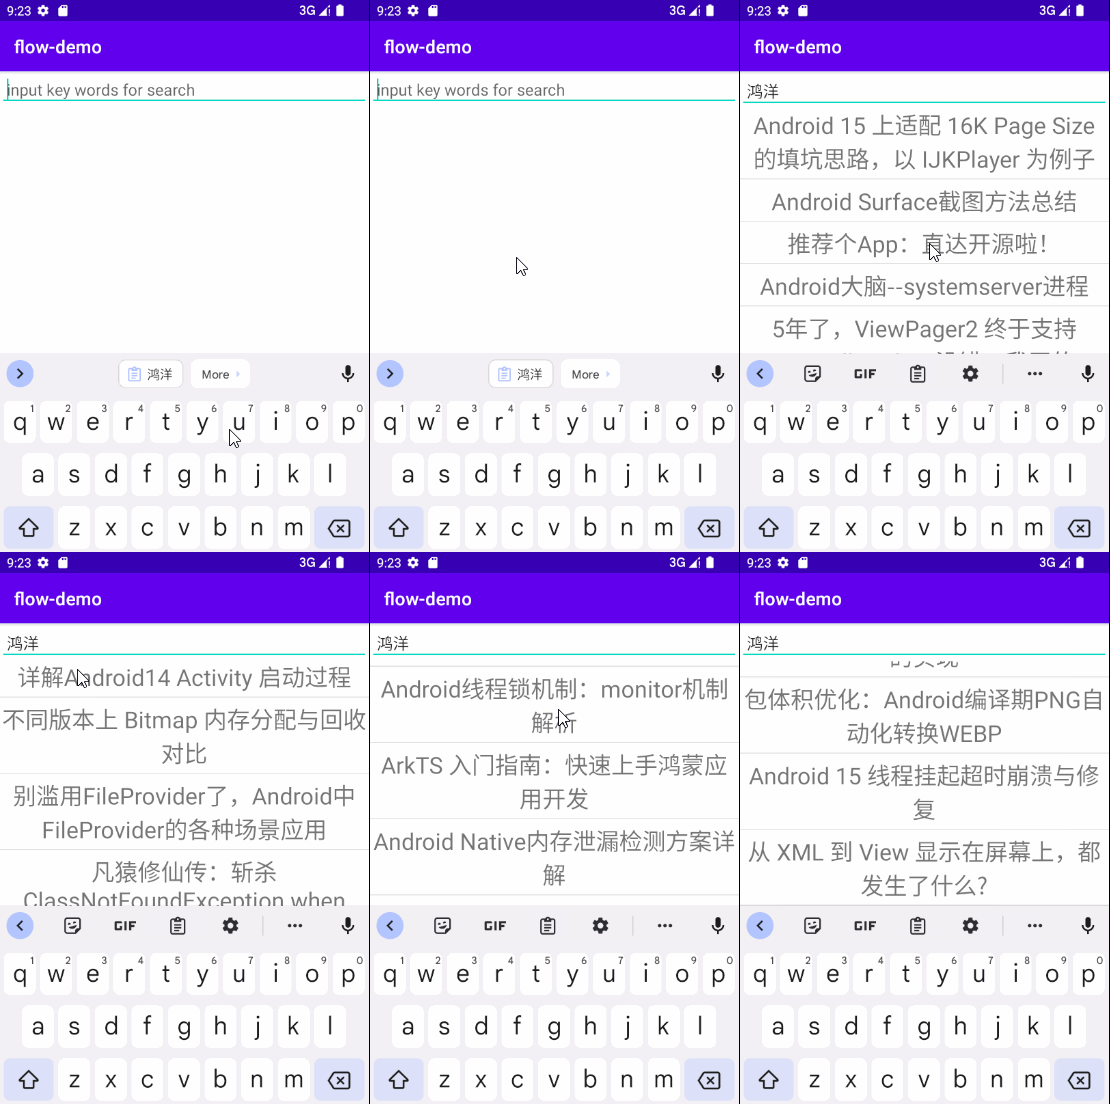
(P99~P100)课程使用的是自己搭建的服务器,在输入框输入关键字后返回相应的文章内容。而我们无法使用该服务器,所以改用 WanAndroid 接口,输入文章作者姓名(不支持模糊搜素),返回该作者的文章标题:
4.1 Retrofit 部分
首先我们要构建一个单例的 RetrofitClient:
object RetrofitClient {

    // 创建 Retrofit 单例
    private val instance: Retrofit by lazy {
        Retrofit.Builder()
            .client(OkHttpClient.Builder().build())
            .baseUrl("https://wanandroid.com")
            .addConverterFactory(GsonConverterFactory.create())
            .build()
    }

    // 创建 ArticleApi 单例
    val articleApi: ArticleApi by lazy {
        instance.create(ArticleApi::class.java)
    }
}
ArticleApi 内定义网络请求方法:
interface ArticleApi {

    // https://wanandroid.com/article/list/0/json?author=鸿洋
    @GET("article/list/0/json")
    suspend fun searchArticles(@Query("author") author: String): ArticleModel
}
返回的数据格式定义在 ArticleModel 中:
data class ArticleModel(
    val `data`: Data,
    val errorCode: Int,
    val errorMsg: String
)

data class Data(
    val curPage: Int,
    val datas: List<Article>,
    val offset: Int,
    val over: Boolean,
    val pageCount: Int,
    val size: Int,
    val total: Int
)

data class Article(
    val adminAdd: Boolean,
    val apkLink: String,
    val audit: Int,
    val author: String,
    val canEdit: Boolean,
    val chapterId: Int,
    val chapterName: String,
    val collect: Boolean,
    val courseId: Int,
    val desc: String,
    val descMd: String,
    val envelopePic: String,
    val fresh: Boolean,
    val host: String,
    val id: Int,
    val isAdminAdd: Boolean,
    val link: String,
    val niceDate: String,
    val niceShareDate: String,
    val origin: String,
    val prefix: String,
    val projectLink: String,
    val publishTime: Long,
    val realSuperChapterId: Int,
    val selfVisible: Int,
    val shareDate: Long,
    val shareUser: String,
    val superChapterId: Int,
    val superChapterName: String,
    val tags: List<Tag>,
    val title: String,
    val type: Int,
    val userId: Int,
    val visible: Int,
    val zan: Int
)

data class Tag(
    val name: String,
    val url: String
)
至此,Retrofit 工作藏獒段落。
4.2 ViewModel 部分
使用 ArticleViewModel 来操纵 Retrofit 发送网络请求:
class ArticleViewModel(app: Application) : AndroidViewModel(app) {

    fun searchArticles(key: String) = flow {
        val articleModel = RetrofitClient.articleApi.searchArticles(key)
        emit(articleModel.data.datas)
    }.flowOn(Dispatchers.IO)
}
目前是将网络请求得到的 ArticleModel 的 data 属性的 datas,也就是文章列表发射出去,最终返回类型为 Flow<List<Article>>。但是后续会为了避免出现流的嵌套而改造这里,到了我们再说。
4.3 Fragment 部分
我们创建 ArticleFragment 来展示功能,有关从 HomeFragment 跳转到 ArticleFragment 的部分,与前面类似,不多赘述。
首先来看 ArticleFragment 的布局,就是一个 EditText 下面放一个展示结果的 RecyclerView:
<?xml version="1.0" encoding="utf-8"?>
<LinearLayout xmlns:android="http://schemas.android.com/apk/res/android"
    xmlns:app="http://schemas.android.com/apk/res-auto"
    xmlns:tools="http://schemas.android.com/tools"
    android:layout_width="match_parent"
    android:layout_height="match_parent"
    tools:context=".fragment.ArticleFragment"
    android:orientation="vertical">

    <androidx.appcompat.widget.AppCompatEditText
        android:id="@+id/et_search"
        android:layout_width="match_parent"
        android:layout_height="wrap_content"
        android:hint="input key words for search"
        android:padding="8dp" />

    <androidx.recyclerview.widget.RecyclerView
        android:id="@+id/recyclerView"
        android:layout_width="match_parent"
        android:layout_height="match_parent"
        android:orientation="vertical"
        app:layoutManager="androidx.recyclerview.widget.LinearLayoutManager" />
</LinearLayout>
然后初始化 ArticleFragment:
class ArticleFragment : Fragment() {

    private val mBinding: FragmentArticleBinding by lazy {
        FragmentArticleBinding.inflate(layoutInflater)
    }

    override fun onCreateView(
        inflater: LayoutInflater, container: ViewGroup?,
        savedInstanceState: Bundle?
    ): View? {
        return mBinding.root
    }
}
接下来要实现 Fragment 这边的主要功能,监听 EditText 上的内容,将其作为查询内容发送网络请求。监听 EditText 使用 TextWatcher 即可,在 afterTextChanged() 回调中获取新的文字内容然后拿去发送请求就行了。但是课程似乎是为了用这个例子演示复杂需求下流的使用,因此有意的将简单问题进行复杂处理了,它将 afterTextChanged() 获取的文字内容封装到 Flow 中最终返回该 Flow 对象,正常情况下做项目不会这样滥用 Flow,务必须知。
通过 callbackFlow 创建需要接收回调函数监听结果的流:
	// callbackFlow 用于创建一个可被挂起的生产者,在这里用于创建流发送 EditText 的文字变化
    private fun TextView.textWatcherFlow()/*: Flow<String>*/ = callbackFlow {
        // 通过 TextWatcher 监听文字变化
        val textWatcher = object : TextWatcher {
            override fun beforeTextChanged(s: CharSequence?, start: Int, count: Int, after: Int) {}

            override fun onTextChanged(s: CharSequence?, start: Int, before: Int, count: Int) {}

            override fun afterTextChanged(s: Editable?) {
                // offer 已经弃用并且会导致编译报错
//                offer(s.toString())
                // trySend 将元素发送到流中,如果流已关闭,则会抛出异常或返回 false
                trySend(s.toString())
                    .onClosed {
                        // 如果调用 trySend 是流已经关闭,则抛出异常
                        throw it ?: ClosedSendChannelException("Channel was closed normally")
                    }
                    .isSuccess
            }
        }
        // this 是被扩展的 TextView,因此可直接调用 addTextChangedListener
        addTextChangedListener(textWatcher)
        // Flow 关闭时,移除监听
        awaitClose { removeTextChangedListener(textWatcher) }
    }
在 TextWatcher 的 afterTextChanged() 回调函数中,获取最新的文字通过 trySend() 发送到流中(offer 是此前将数据发送到流中的方法,但是已经过时并且会导致编译报错),如果发送时流已经关闭,则执行 onClosed 抛出异常。
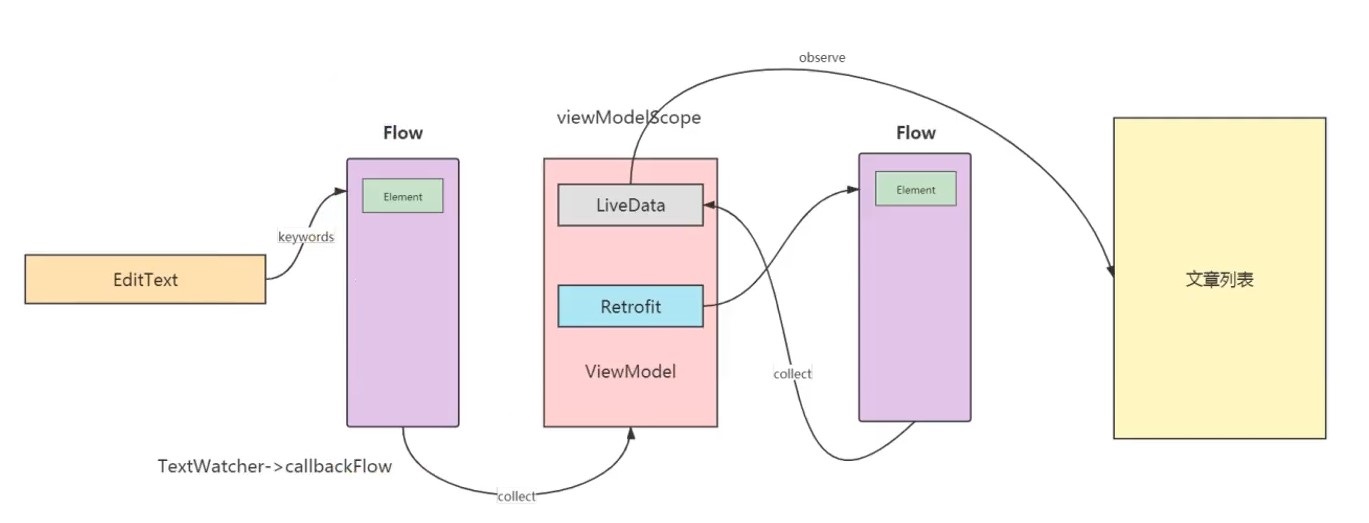
接下来就是拿着这个流的结果,通过 ArticleViewModel 去做网络请求,按照当前 ArticleViewModel 的内容,会产生流的嵌套调用:
		lifecycleScope.launch {
            lifecycle.repeatOnLifecycle(Lifecycle.State.CREATED) {
                mBinding.etSearch.textWatcherFlow().collect {
                    Log.d(TAG, "collect key words: $it")
                    viewModel.searchArticles(it).collect { articles.value = it }
                }
            }
        }
为了避免流的嵌套,我们改造 ArticleViewModel,将位于内层,也就是 ArticleViewModel 的请求结果存入 LiveData 中:
class ArticleViewModel(app: Application) : AndroidViewModel(app) {

    val articles = MutableLiveData<List<Article>>()

    fun searchArticles(key: String) {
        viewModelScope.launch {
            flow {
                val articleModel = RetrofitClient.articleApi.searchArticles(key)
                emit(articleModel.data.datas)
            }.flowOn(Dispatchers.IO)
                .catch { e -> e.printStackTrace() }
                .collect { articles.value = it }
        }
    }
}
当然你需要对这个 articles 进行监听,当它发生变化时,要更新 RecyclerView 适配器上的数据:
	override fun onViewCreated(view: View, savedInstanceState: Bundle?) {
        super.onViewCreated(view, savedInstanceState)

        lifecycleScope.launch {
            lifecycle.repeatOnLifecycle(Lifecycle.State.CREATED) {
                mBinding.etSearch.textWatcherFlow().collect {
                    Log.d(TAG, "collect key words: $it")
                    // 将内层嵌套的流的 collect 结果存入 LiveData 中
                    viewModel.searchArticles(it)
                }
            }
        }

        context?.let {
            // ArticleAdapter 与 UserAdapter 几乎一致,就是放个 TextView 展示标题
            val adapter = ArticleAdapter(it)
            mBinding.recyclerView.adapter = adapter
            mBinding.recyclerView.addItemDecoration(
                DividerItemDecoration(
                    it,
                    DividerItemDecoration.VERTICAL
                )
            )
            // 监听 LiveData 数据变化以实时更新 RecyclerView 中的内容
            viewModel.articles.observe(viewLifecycleOwner) { articleList ->
                adapter.setData(articleList)
            }
        }
    }
最终的数据流向图如下:
5、StateFlow 与 SharedFlow
(P101~P102)冷流与热流:
- 冷流是指流有了订阅者以后,流发射出来的值才会实实在在存在于内存之中,与懒加载的概念很像。Flow 是冷流
- 热流是与冷流相对的概念,在垃圾回收之前,数据都存在于内存之中,并且处于活动状态。StateFlow 与 SharedFlow 是热流
5.1 StateFlow
StateFlow 是一个状态容器式的可观察数据流,可以向其收集器发出当前状态更新和新状态更新,还可以通过其 value 属性读取当前状态值。StateFlow 与 LiveData 很像,甚至被认为会替代 LiveData,因为不仅包含 LiveData 的特性,还具有流的操作属性。
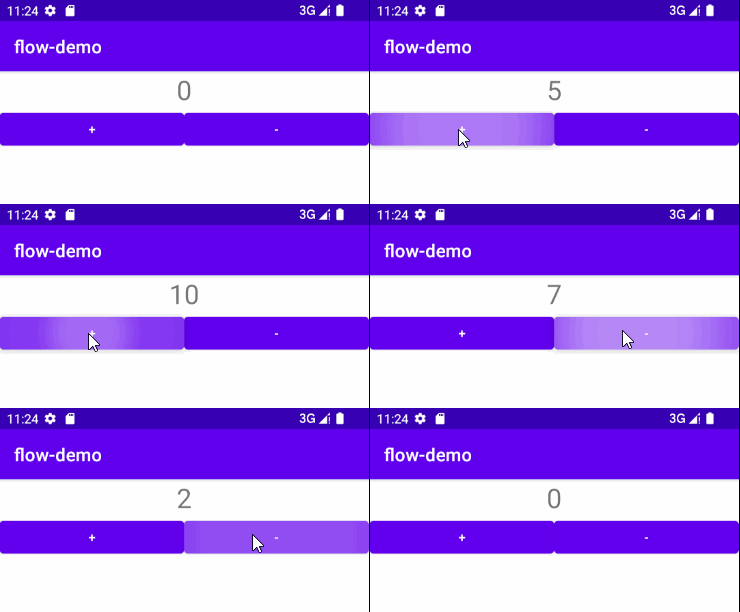
功能演示,NumberFragment 有一个 TextView 展示初始值为 0 的数字,然后两个按钮分别对该数字进行加减。NumberViewModel 中使用 StateFlow 定义要展示的数字数据流:
class NumberViewModel : ViewModel() {

    // 被展示的数字流,初始值为 0
    val number = MutableStateFlow(0)

    fun increment() {
        number.value++
    }

    fun decrement() {
        number.value--
    }
}
NumberFragment 开启协程,对 number 这个流进行收集,将获取到的值给到 TextView:
class NumberFragment : Fragment() {

    private val viewModel: NumberViewModel by viewModels()

    private val mBinding: FragmentNumberBinding by lazy {
        FragmentNumberBinding.inflate(layoutInflater)
    }

    override fun onCreateView(
        inflater: LayoutInflater, container: ViewGroup?,
        savedInstanceState: Bundle?
    ): View? {
        return mBinding.root
    }

    override fun onViewCreated(view: View, savedInstanceState: Bundle?) {
        super.onViewCreated(view, savedInstanceState)

        mBinding.apply {
            btnAdd.setOnClickListener {
                viewModel.increment()
            }
            btnMinus.setOnClickListener {
                viewModel.decrement()
            }
        }

        lifecycleScope.launch {
            viewModel.number.collect {
                mBinding.tvNumber.text = it.toString()
            }
        }
    }
}
点击两个按钮可以看到数字实时变化:
5.2 SharedFlow
SharedFlow 会向从其中收集值的所有使用方发出数据,类似于订阅者模式,一方发送数据多方可以收到。
我们在页面上放三个 Fragment 显示当前时间,并通过两个按钮控制数据流的开启和停止:
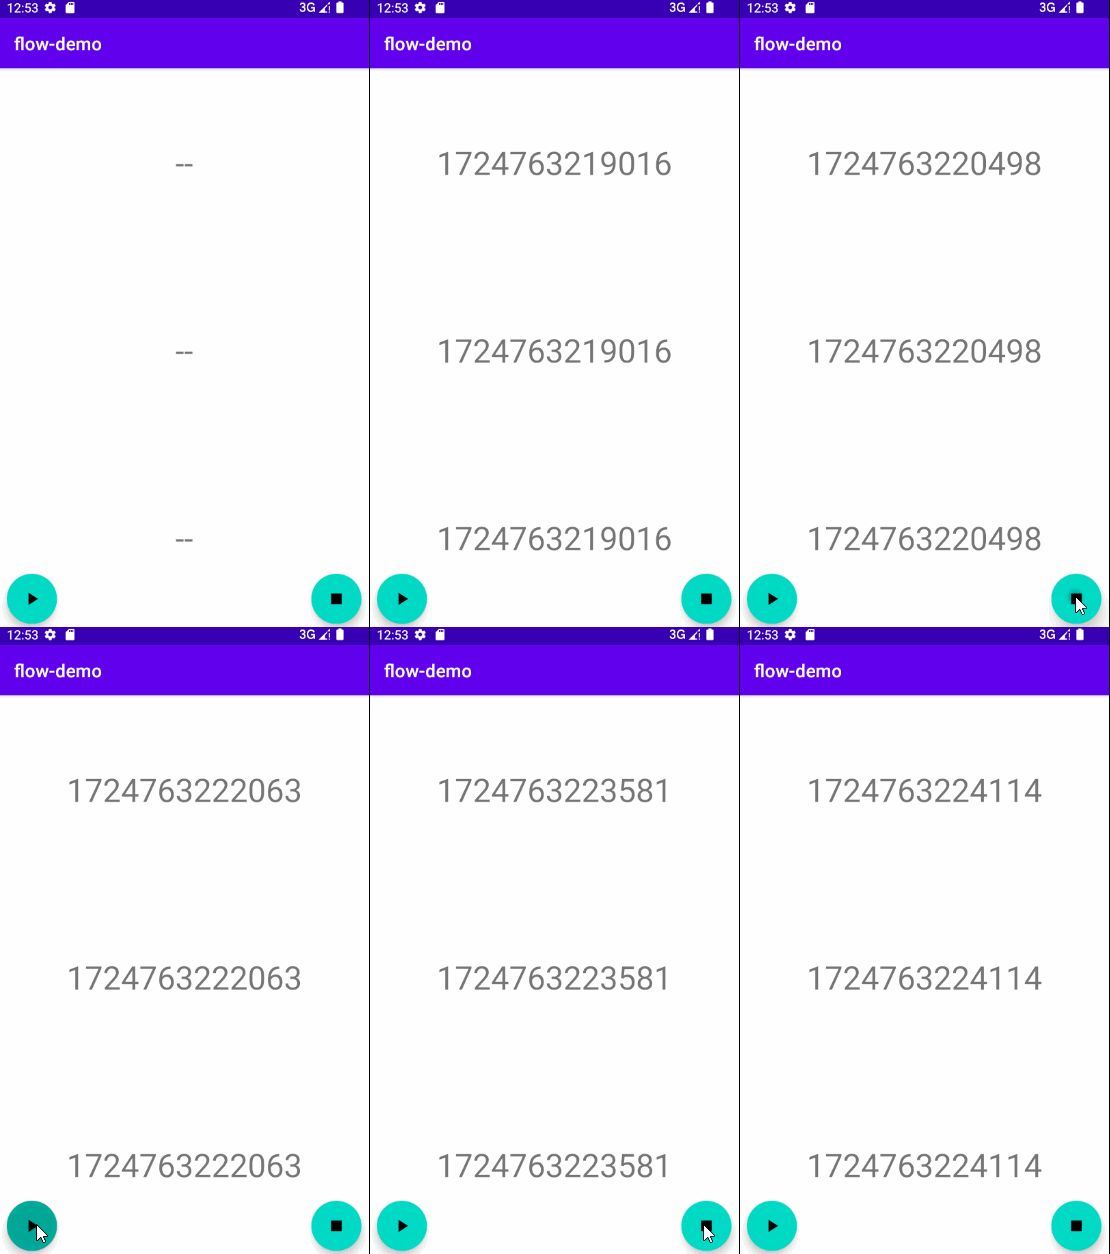
首先来看数据源,使用 LocalEventBus 来模拟事件总线,将事件源做成一个 MutableSharedFlow:
// 模拟事件总线
object LocalEventBus {

    // 事件源,是一个流
    val events = MutableSharedFlow<Event>()

    // 发送事件
    suspend fun postEvent(event: Event) {
        events.emit(event)
    }
}

data class Event(val timestamp: Long)
SharedFlowViewModel 控制 LocalEventBus 发送不断地事件,当然也可以停止事件发送:
class SharedFlowViewModel : ViewModel() {

    private lateinit var job: Job

    fun startRefresh() {
        // 由于是在 while (true) 中不断发送,因此不能放在主线程中
        job = viewModelScope.launch(Dispatchers.IO) {
            while (true) {
                LocalEventBus.postEvent(Event(System.currentTimeMillis()))
            }
        }
    }

    fun stopRefresh() {
        job.cancel()
    }
}
然后显示数据的 TextFragment 直接通过 LocalEventBus 去拿 MutableSharedFlow 收集数据:
class TextFragment : Fragment() {

    private val mBinding: FragmentTextBinding by lazy {
        FragmentTextBinding.inflate(layoutInflater)
    }

    override fun onCreateView(
        inflater: LayoutInflater, container: ViewGroup?,
        savedInstanceState: Bundle?
    ): View? {
        return mBinding.root
    }

    override fun onViewCreated(view: View, savedInstanceState: Bundle?) {
        super.onViewCreated(view, savedInstanceState)

        // collect 是挂起函数,要在协程中执行
        lifecycleScope.launch {
            lifecycle.repeatOnLifecycle(Lifecycle.State.CREATED) {
                LocalEventBus.events.collect {
                    mBinding.tvTime.text = it.timestamp.toString()
                }
            }
        }
    }
}
而控制数据开启与停止的按钮在 SharedFlowFragment 中,通过操纵 SharedFlowViewModel 的对应方法控制启停:
class SharedFlowFragment : Fragment() {

    private val viewModel by viewModels<SharedFlowViewModel>()

    private val mBinding: FragmentSharedFlowBinding by lazy {
        FragmentSharedFlowBinding.inflate(layoutInflater)
    }

    override fun onCreateView(
        inflater: LayoutInflater, container: ViewGroup?,
        savedInstanceState: Bundle?
    ): View? {
        return mBinding.root
    }

    override fun onViewCreated(view: View, savedInstanceState: Bundle?) {
        super.onViewCreated(view, savedInstanceState)

        mBinding.apply {
            btnStart.setOnClickListener {
                viewModel.startRefresh()
            }
            btnStop.setOnClickListener {
                viewModel.stopRefresh()
            }
        }
    }
}
