第 31 章 - 源码篇 - Elasticsearch 写入流程深入分析
写入源码分析
接收与处理
请求首先会被 Netty4HttpServerTransport 接收,接着交由 RestController 进行路由分发。
private void tryAllHandlers(final RestRequest request, final RestChannel channel, final ThreadContext threadContext) throws Exception {

    // 从 tier 树中,找到该请求路径对应的 RestHandler
    Iterator<MethodHandlers> allHandlers = getAllHandlers(request.params(), rawPath);
    while (allHandlers.hasNext()) {
        final RestHandler handler;
        final MethodHandlers handlers = allHandlers.next();
        if (handlers == null) {
            handler = null;
        } else {
            handler = handlers.getHandler(requestMethod, restApiVersion);
        }
        if (handler == null) {
            if (handleNoHandlerFound(rawPath, requestMethod, uri, channel)) {
                return;
            }
        } else {
            // 找到后,将本次请求转发给该 RestHandler
            dispatchRequest(request, channel, handler, threadContext);
            return;
        }
    }
}
那么 ES 如何知道对应的路由应该由谁处理呢?
在 Node 初始化时,会执行 ActionModule#initRestHandlers(...)
public void initRestHandlers(Supplier<DiscoveryNodes> nodesInCluster) {
    ...
    ...
    // 注册路由
    registerHandler.accept(new RestIndexAction());
    ...
    ...
}
RestIndexAction 注册的路由如下所示
public List<Route> routes() {
    return List.of(
        new Route(POST, "/{index}/_doc/{id}"),
        new Route(PUT, "/{index}/_doc/{id}"),
        Route.builder(POST, "/{index}/{type}/{id}").deprecated(TYPES_DEPRECATION_MESSAGE, RestApiVersion.V_7).build(),
        Route.builder(PUT, "/{index}/{type}/{id}").deprecated(TYPES_DEPRECATION_MESSAGE, RestApiVersion.V_7).build()
    );
}
每个 RestHandler 在 prepareRequest(final RestRequest request, final NodeClient client) 都会声明与之绑定的 TransportAction,之后所有逻辑会交由 TransportAction 处理。
其绑定的 TransportAction 为 TransportIndexAction。
RestIndexAction#prepareRequest(...)
public RestChannelConsumer prepareRequest(final RestRequest request, final NodeClient client) throws IOException {
    ...
    ...
    return channel -> client.index(
            indexRequest,
            new RestStatusToXContentListener<>(channel, r -> r.getLocation(indexRequest.routing()))
        );
}
AbstractClient#index(final IndexRequest request, final ActionListener<IndexResponse> listener)
@Override
public void index(final IndexRequest request, final ActionListener<IndexResponse> listener) {
    execute(IndexAction.INSTANCE, request, listener);
}
对于写入类型的 TransportAction 在内部又会通过协调节点(接收客户端请求的就是协调节点)先将请求转发给对应主分片所在的节点,主分片节点写入后,主分片节点又会转发给副本分片,副本分片写入后,返回给主分片,主分片再返回给协调节点,最后协调节点返回给客户端。
整体流程如下图所示:
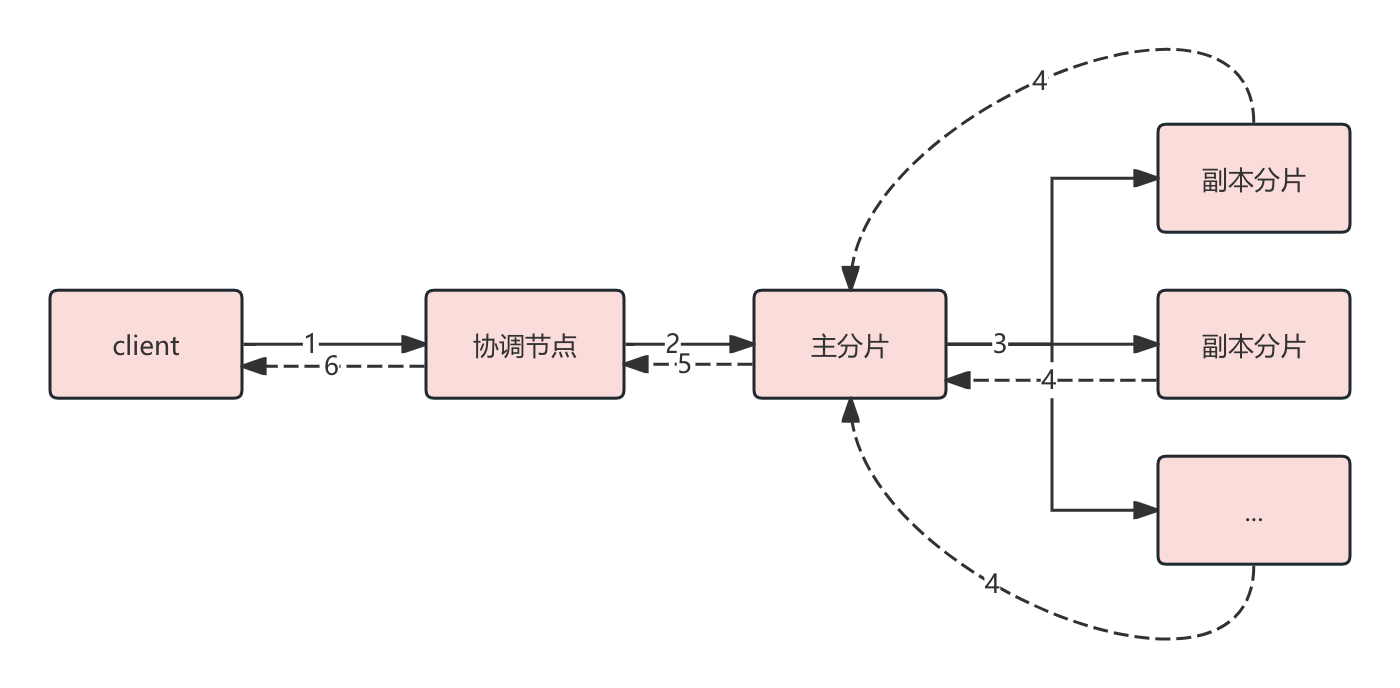
协调节点分发请求
上文 search 读流程有提到,TansportAction 定义了基本流程,每个子类实现 doExecute(...) 方法,自定义执行逻辑,因此我们只需要看 TransportIndexAction#doExecute(...) 即可。
不存在索引则创建
当索引不存在时,则会先创建索引,接着再执行写入操作。如果索引存在,则直接执行写入操作。
TransportBulkAction#doInternalExecute(...)
protected void doInternalExecute(Task task, BulkRequest bulkRequest, String executorName, ActionListener<BulkResponse> listener) {
    for (String index : autoCreateIndices) {
        // 创建索引
        createIndex(index, bulkRequest.timeout(), minNodeVersion, new ActionListener<>() {
            @Override
            public void onResponse(CreateIndexResponse result) {
                // 创建索引成功回调函数,
                if (counter.decrementAndGet() == 0) {
                    // 执行写入操作
                    threadPool.executor(executorName).execute(new ActionRunnable<>(listener) {
                        @Override
                        protected void doRun() {
                            executeBulk(
                                task,
                                bulkRequest,
                                startTime,
                                listener,
                                executorName,
                                responses,
                                indicesThatCannotBeCreated
                            );
                        }
                    });
                }
            }
        }
    }
}
executeBulk(..) 方法内部会创建 BulkOperation 交由该类做处理
void executeBulk(
        Task task,
        BulkRequest bulkRequest,
        long startTimeNanos,
        ActionListener<BulkResponse> listener,
        String executorName,
        AtomicArray<BulkItemResponse> responses,
        Map<String, IndexNotFoundException> indicesThatCannotBeCreated
    ) {
        new BulkOperation(task, bulkRequest, listener, executorName, responses, startTimeNanos, indicesThatCannotBeCreated).run();
    }
BulkOperation 继承自 AbstractRunnable。AbstractRunnable 定义了执行的基本流程,子类需要实现 doRun() 方法,因此,只需要关注 BulkOperation#doRun() 方法。
路由计算
BulkOperation#doRun()
protected void doRun() {
    // 获取路由计算规则
    IndexRouting indexRouting = concreteIndices.routing(concreteIndex);
}
IndexRouting#fromIndexMetadata(...)
public static IndexRouting fromIndexMetadata(IndexMetadata indexMetadata) {
    // 索引配置上是否设置 routing_path
    if (false == indexMetadata.getRoutingPaths().isEmpty()) {
            if (indexMetadata.isRoutingPartitionedIndex()) {
                throw new IllegalArgumentException("routing_partition_size is incompatible with routing_path");
            }
            return new ExtractFromSource(
                indexMetadata.getRoutingNumShards(),
                indexMetadata.getRoutingFactor(),
                indexMetadata.getIndex().getName(),
                indexMetadata.getRoutingPaths()
            );
        }
    // 索引配置上是否设置了分区索引相关参数
    if (indexMetadata.isRoutingPartitionedIndex()) {
        return new Partitioned(
            indexMetadata.getRoutingNumShards(),
            indexMetadata.getRoutingFactor(),
            indexMetadata.getRoutingPartitionSize()
        );
    }
    // 正常写入
    return new Unpartitioned(indexMetadata.getRoutingNumShards(), indexMetadata.getRoutingFactor());
}
上诉 3 个路由算法,底层算法都是类似的,都是基于一致性 hash 计算对应的路由。
hash 计算函数 Murmur3HashFunction#hash(String routing)
我们可以简单将路由算法理解为如下:
- 先计算 hash
- 再根据 hash 计算路由
计算 hash 可以又分为以下几种情况:
- 如果索引配置了 routing_path,则 hash = Murmur3HashFunction#hash(routing_path_value)
- 如果路径上有路由参数,则 hash = Murmur3HashFunction#hash(routing)
- 否则 hash = Murmur3HashFunction#hash(_id)
根据 hash 计算路由的规则如下:
IndexRouting#hashToShardId(...)
protected final int hashToShardId(int hash) {
    return Math.floorMod(hash, routingNumShards) / routingFactor;
}
- routingNumShards
值默认依赖主分片数(number_of_shards),如果创建索引时未指定,默认按因子2拆分,并且最多可拆分为1024个分片。例如原索引主分片数为1,则可拆分为1~1024中的任意数;原索引主分片为5,则支持拆分的分片数为:10、20、40、80、160、320以及最大数640(不能超过1024)。 可通过索引的index.number_of_routing_shards配置,但不建议配置。 - routingFactor
默认为routingNumShards/number_of_shards
简单说,你可以将 number_of_routing_shards 理解为虚拟的分片数、 number_of_shards 则为物理的分片数。其本质就是 一致性 hash。
分发请求至主分片
TransportReplicationAction#doExecute(...)
@Override
protected void doExecute(Task task, Request request, ActionListener<Response> listener) {
    assert request.shardId() != null : "request shardId must be set";
    runReroutePhase(task, request, listener, true);
}
ReroutePhase#doRun()
protected void doRun() {
    if (primary.currentNodeId().equals(state.nodes().getLocalNodeId())) {
        // 主分片节点在协调节点上
        performLocalAction(state, primary, node, indexMetadata);
    } else {
        // 主分片节点不在协调节点上
        performRemoteAction(state, primary, node);
    }
}
主分片写入
接收请求
TransportReplicationAction 构造函数,注册了主分片写入的处理函数
protected TransportReplicationAction(
    ...
    ...
) {
    transportService.registerRequestHandler(
        transportPrimaryAction,
        executor,
        forceExecutionOnPrimary,
        true,
        in -> new ConcreteShardRequest<>(requestReader, in),
        this::handlePrimaryRequest
    );
}
主分片写入
TransportShardBulkAction#dispatchedShardOperationOnPrimary(...)
@Override
protected void dispatchedShardOperationOnPrimary(
    BulkShardRequest request,
    IndexShard primary,
    ActionListener<PrimaryResult<BulkShardRequest, BulkShardResponse>> listener
) {
    ...
    ...
    // 在主分片上执行
    performOnPrimary(request, primary, updateHelper, threadPool::absoluteTimeInMillis, (update, shardId, mappingListener) -> {
        ...
    }), listener, threadPool, executor(primary));
}
异步转发请求至副本分片
转发请求至副本分片,是在主分片写入数据后,才执行的
ReplicationOperation#execute(...)
public void execute() throws Exception {
    ...
    ...
    // 执行主分片写入
    primary.perform(request, ActionListener.wrap(this::handlePrimaryResult, this::finishAsFailed));
}
handlePrimaryResult() 方法是写入主分片后的回调函数
ReplicationOperation#handlePrimaryResult(..)
private void handlePrimaryResult(final PrimaryResultT primaryResult) {
    ...
    // 异步发送同步副本分片请求
    performOnReplicas(replicaRequest, globalCheckpoint, maxSeqNoOfUpdatesOrDeletes, replicationGroup, pendingReplicationActions);
    ...
}
副本分片写入
接收请求
类似的,TransportReplicationAction 构造函数,注册了副本分片写入的处理函数
transportService.registerRequestHandler(
    transportReplicaAction,
    executor,
    true,
    true,
    in -> new ConcreteReplicaRequest<>(replicaRequestReader, in),
    this::handleReplicaRequest
);
数据写入
而后请求交给 AsyncReplicaAction#doRun() 处理
@Override
protected void doRun() throws Exception {
    ...
    ...
    // 获取写入许可后,会回调至 AsyncReplicaAction#onResponse()
    acquireReplicaOperationPermit(
        replica,
        replicaRequest.getRequest(),
        this,
        replicaRequest.getPrimaryTerm(),
        replicaRequest.getGlobalCheckpoint(),
        replicaRequest.getMaxSeqNoOfUpdatesOrDeletes()
    );
}
AsyncReplicaAction#onResponse()
@Override
public void onResponse(Releasable releasable) {
    ...
    // 执行写入
    shardOperationOnReplica(...);
    ...
}
调用该函数后,最后代码会走到 TransportShardBulkAction#dispatchedShardOperationOnReplica(...)
@Override
protected void dispatchedShardOperationOnReplica(BulkShardRequest request, IndexShard replica, ActionListener<ReplicaResult> listener) {
    ActionListener.completeWith(listener, () -> {
        final long startBulkTime = System.nanoTime();

        // 执行写入
        final Translog.Location location = performOnReplica(request, replica);
        replica.getBulkOperationListener().afterBulk(request.totalSizeInBytes(), System.nanoTime() - startBulkTime);
        return new WriteReplicaResult<>(request, location, null, replica, logger);
    });
}