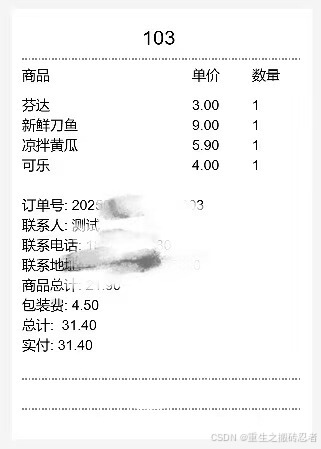
uniapp使用canvas生成订单小票图片
<view class="button-cc" @click="handleCreateImg()">
						生成订单图片
					</view>


<canvas canvas-id="receiptCanvas"
				:style="{ width: '300px', height: totalHeight + 'px' }" style="margin-top: 20rpx;"></canvas>
在获取订单信息的位置设置自适应的高度 :
// 设置canvas画布的高度
						const lineHeight = 20; // 每行的高度
						const headerHeight = 110; // 标题和表头的高度
						const footerHeight = 240; // 底部信息和商家信息的高度
						const goodsLines = this.orderDetail.goods.length;
						const goodsHeight = goodsLines * lineHeight;
						const totalHeight = headerHeight + goodsHeight + footerHeight;
						this.totalHeight = `${totalHeight}`;
						console.log(this.totalHeight);
handleCreateImg() {
const ctx = uni.createCanvasContext('receiptCanvas');
// 设置背景色为白色
ctx.setFillStyle('white');
// 计算所需的 canvas 高度
// 设置 canvas 的尺寸
ctx.fillRect(0, 0, 300, this.totalHeight);
// ctx.fillRect(0, 0, 300, 600); // 这里的坐标 (0, 0) 表示从左上角开始,宽300px、高400px是之前设置的canvas尺寸
// 后续设置绘图样式以及绘制小票内容等操作
ctx.setFontSize(14);
ctx.setTextAlign('left');
ctx.setTextBaseline('top');
ctx.setFillStyle('black');
ctx.font = '20px Arial';
ctx.fillText(`${this.orderDetail.no}`, 130, 20);
ctx.beginPath();
ctx.setLineDash([5, 5]);
ctx.moveTo(10, 50); // 起点坐标
ctx.lineTo(290, 50); // 终点坐标,宽度是之前设置的300px,适当减去一点边界值
ctx.setStrokeStyle('black'); // 设置线条颜色为灰色
ctx.setLineWidth(1); // 设置线条宽度
ctx.stroke();
ctx.font = '14px Arial';
ctx.fillText('商品', 10, 60);
ctx.fillText('单价', 180, 60);
ctx.fillText('数量', 240, 60);
let y = 90; // 起始纵坐标,从分割线下方开始
this.orderDetail.goods.forEach(item => {
ctx.fillText(`${item.name} `, 10, y);
ctx.fillText(`${item.money} `, 180, y);
ctx.fillText(`${item.num}`, 240, y);
y += 20; // 每绘制一行商品信息,纵坐标往下移动一定距离,便于换行显示
});
ctx.fillText(`订单号: ${this.orderDetail.order_sn}`, 10, y += 20);
ctx.fillText(`联系人: ${this.orderDetail.nickname}`, 10, y += 20);
ctx.fillText(`联系电话: ${this.orderDetail.mobile}`, 10, y += 20);
ctx.fillText(`联系地址: ${this.orderDetail.address}`, 10, y += 20);
ctx.fillText(`商品总计: ${this.orderDetail.goods_total}`, 10, y += 20);
ctx.fillText(`包装费: ${this.orderDetail.packing}`, 10, y += 20);
ctx.fillText(`总计: ${this.orderDetail.pay}`, 10, y += 20);
ctx.fillText(`实付: ${this.orderDetail.pay}`, 10, y += 20);
// 绘制虚线
ctx.beginPath();
ctx.setLineDash([5, 5]);
ctx.moveTo(10, y += 40); // 起点坐标
ctx.lineTo(290, y); // 终点坐标,宽度是之前设置的300px,适当减去一点边界值
ctx.setStrokeStyle('black'); // 设置线条颜色为灰色
ctx.setLineWidth(1); // 设置线条宽度
ctx.stroke();
ctx.fillText('同城配送', 120, y += 10);
// 绘制虚线
ctx.beginPath();
ctx.setLineDash([5, 5]); // 第一个参数表示线段长度,第二个参数表示间隔长度 绘制虚线
ctx.moveTo(10, y += 20);
ctx.lineTo(290, y);
ctx.strokeStyle = 'black';
ctx.lineWidth = 1;
ctx.stroke();
ctx.draw(false, () => {
uni.canvasToTempFilePath({
canvasId: 'receiptCanvas',
success: (res) => {
const imageDataURL = res.tempFilePath;
// 此时,imageDataURL 可以用于在页面中显示图片,比如在 <image> 组件中
this.imageDataURL = imageDataURL;
this.handleLook(this.imageDataURL)
// this.saveReceiptImage()
},
fail: (err) => {
console.log(err);
}
});
});
},// 保存图片
saveReceiptImage(url) {
uni.saveImageToPhotosAlbum({
filePath: url,
success: () => {
uni.showToast({
title: '图片保存成功',
duration: 2000
});
},
fail: (err) => {
console.log(err);
uni.showToast({
title: '图片保存失败,请检查权限等设置',
duration: 2000
});
}
});
},
// 预览图片
handleLook(url) {
uni.previewImage({
urls: [url], //需要预览的图片http链接列表,多张的时候,url直接写在后面就行了
current: '', // 当前显示图片的http链接,默认是第一个
success: function(res) {},
fail: function(res) {},
complete: function(res) {},
// 长按保存图片
longPressActions: {
itemList: ['保存图片'],
success: function(ress) {
uni.saveImageToPhotosAlbum({
filePath: url,
success: () => {
uni.showToast({
title: '图片保存成功',
duration: 2000
});
},
fail: (err) => {
console.log(err);
uni.showToast({
title: '图片保存失败,请检查权限等设置',
duration: 2000
});
}
});
},
fail: function(res) {
console.log(res.errMsg);
}
}
})
},绘制如图所示:

