Graphics2D绘制图形详解
最近在使用Java开发一个二维码生成器。其中涉及到二维码码点、码眼睛、背景图、logo等绘制,都需要使用到Graphics2D,Graphics2D绘制图形就变成了必须会的储备知识,但是网上针对Graphics2D使用详解的不够细致,自己又翻阅官网从头学了一遍,下面我将分两篇将Graphics2D绘制简单图形到复杂图形的绘制全部实例代码记录下来,希望能帮到大家。
官网地址: https://docs.oracle.com/javase/tutorial/2d/geometry/primitives.html
生成二维码效果:https://blog.csdn.net/u011837804/article/details/129229973
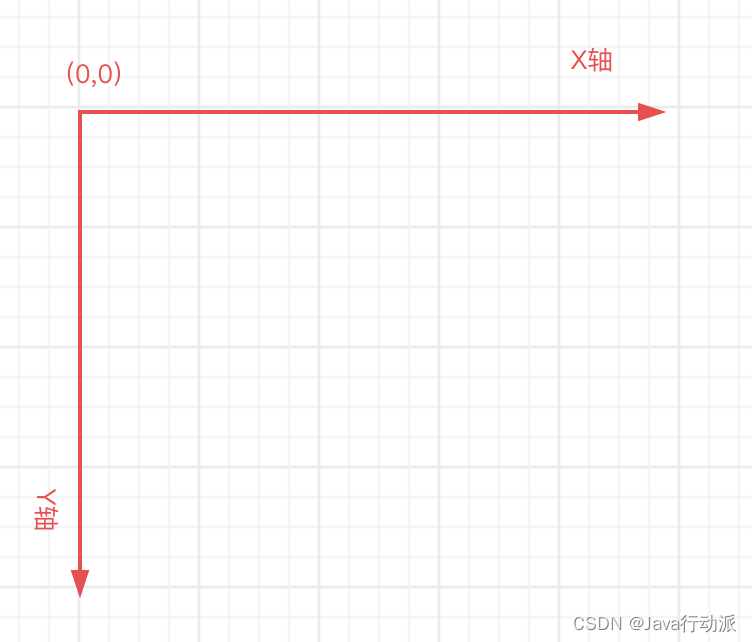
先说下绘制的基本要求:原点(0,0)坐标是在绘图区域的左上角
1、Point
Point代表图中的一个点,用(x,y)表示,创建方式如下
        // int
        Point point = new Point(0, 0);
        // double
        Point2D point1 = new Point2D.Double(1D, 1D);
        // float
Point2D point2 = new Point2D.Float(1.0F, 1.0F);2、Line
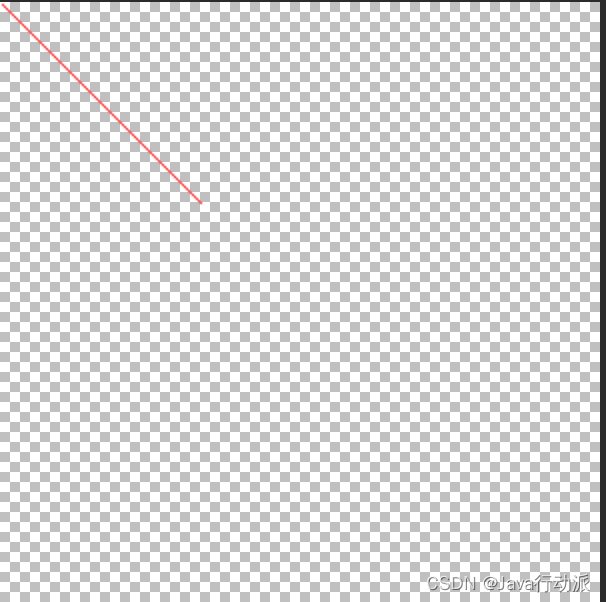
该类 Line2D表示 (x, y) 坐标空间中的线段实现创建方式如下
        Line2D line2D = new Line2D.Double(0D, 0D, 100D, 100D);
        Line2D line2D1 = new Line2D.Float(0F, 0F, 100F, 100F);
创建一条线代码实例:
        public BufferedImage loadImage() {
            return new BufferedImage(300, 300, BufferedImage.TYPE_INT_ARGB);
        }

        BufferedImage image = loadImage();
        Graphics2D graphics2D = image.createGraphics();
        graphics2D.setColor(Color.RED);
        //代表 从坐标  (1,1)   到  (100,100) 坐标画一条红线
        graphics2D.draw(new Line2D.Double(1, 1, 100, 100));
        graphics2D.dispose();
        image.flush();
        ImgUtil.write(image, new File(SAVE_FILE_PATH + "line.png"));
执行结果:
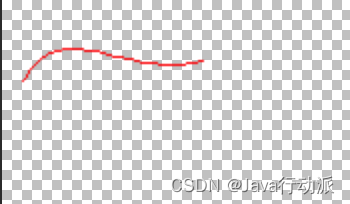
3、二次曲线段
使QuadCurve2D能够创建二次参数曲线段。二次曲线由两个端点和一个控制点定义。
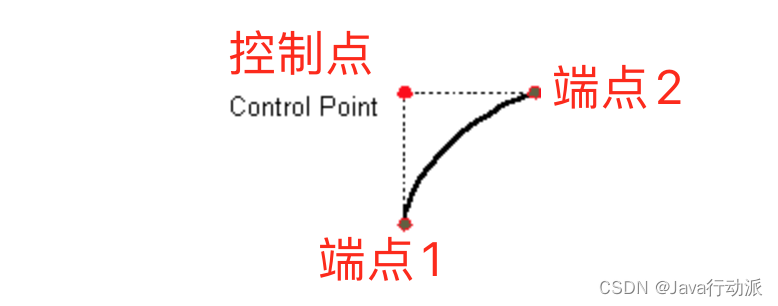
该类实现Shape接口。此类表示 (x, y) 坐标空间中的二次参数曲线段。和子类指定浮点和双精度QuadCurve2D.Float的QuadCurve2D.Double二次曲线。
有几种setCurve方法用于指定曲线的两个端点和一个控制点,其坐标可以通过其他点的坐标和使用给定的数组直接定义。
一种非常有用的方法 ,setCurve(QuadCurve2D)将具有相同端点和控制点的二次曲线设置为提供的曲线
代码:
BufferedImage image = loadImage();
Graphics2D graphics2D = image.createGraphics();
graphics2D.setColor(Color.RED);
// 创建新的 QuadCurve2D.Float
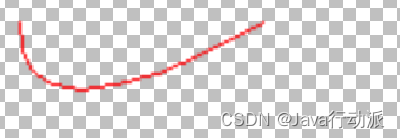
QuadCurve2D q = new QuadCurve2D.Float();
//使用设置的坐标绘制 QuadCurve2D.Float
double x1 = 10; //起点X坐标
double y1 = 10; //起点Y轴坐标
double ctrlx = 10; //控制点x坐标
double ctrly = 60; //控制点y坐标
double x2 = 100; //终点x坐标
double y2 = 10; //终点y坐标
q.setCurve(x1, y1, ctrlx, ctrly, x2, y2);
graphics2D.draw(q);
graphics2D.dispose();
image.flush();
ImgUtil.write(image, new File(SAVE_FILE_PATH + "Curve.png"));实现效果:
4、三次曲线段
该类 CubicCurve2D实现 Shape接口。表示 (x, y) 坐标空间中的三次参数化曲线段。CubicCurve2D.Float和CubicCurve2D.Double子类指定浮点和双精度的三次曲线。
代码:
        BufferedImage image = loadImage();
        Graphics2D graphics2D = image.createGraphics();
        graphics2D.setColor(Color.RED);

        // 创建新的 CubicCurve2D.Double
        CubicCurve2D c = new CubicCurve2D.Double();
        // 使用设置的坐标绘制 CubicCurve2D.Double
        c.setCurve(10, 40, 30,
                5, 60, 40, 100, 30);
        graphics2D.draw(c);
        graphics2D.dispose();
        image.flush();
        ImgUtil.write(image, new File(SAVE_FILE_PATH + "Curve2.png"));
效果:
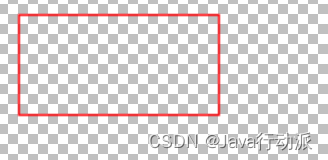
5、长方形
绘制长方形使用Rectangle2D绘制,该类扩展了类RectangularShape,RectangularShape实现了Shape接口并添加了一些自己的方法。
        BufferedImage image = loadImage();
        Graphics2D graphics2D = image.createGraphics();
        graphics2D.setColor(Color.RED);
        // 绘制 Rectangle2D.Double
        int x = 10;//矩形起始坐标x  从左上角
        int y = 10;//矩形起始坐标y  从左上角
        int rectWidth = 100; //矩形宽
        int rectHeight = 50; //矩形高度
        graphics2D.draw(new Rectangle2D.Double(x, y,
                rectWidth,
                rectHeight));
        graphics2D.dispose();
        image.flush();
        ImgUtil.write(image, new File(SAVE_FILE_PATH + "Rectangle.png"));
效果:
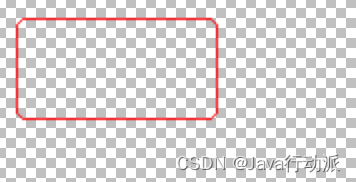
6、圆角矩形
通过RoundRectangle2D实现圆角矩形绘制,也继承至RectangularShape
        BufferedImage image = loadImage();
        Graphics2D graphics2D = image.createGraphics();
        graphics2D.setColor(Color.RED);

        int x = 10;//矩形起始坐标x  从左上角
        int y = 10;//矩形起始坐标y  从左上角
        int rectWidth = 100; //矩形宽
        int rectHeight = 50; //矩形高度
        double arcw = 10; //角弧宽度
        double arch = 10; //角弧高度
        graphics2D.draw(new RoundRectangle2D.Double(x, y,
                rectWidth,
                rectHeight, arcw, arch));

        graphics2D.dispose();
        image.flush();
        ImgUtil.write(image, new File(SAVE_FILE_PATH + "RoundRectangle2D.png"));
效果:
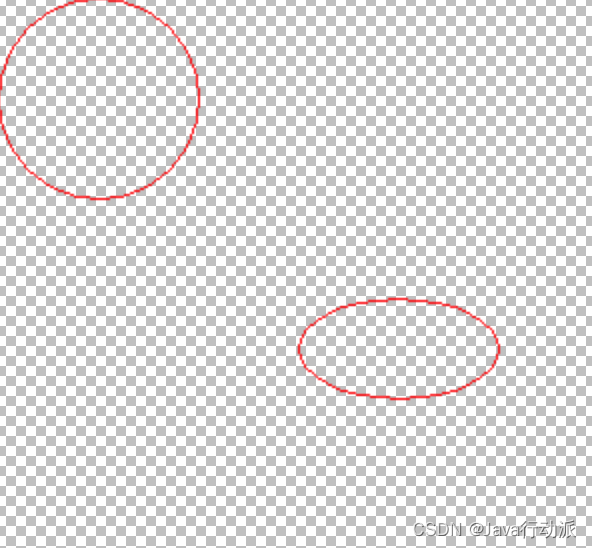
7、椭圆、圆
绘制椭圆、圆由Ellipse2D类实现
        BufferedImage image = loadImage();
        Graphics2D graphics2D = image.createGraphics();
        graphics2D.setColor(Color.RED);

        int x = 1;//矩形起始坐标x  左上角点
        int y = 1;//矩形起始坐标y  左上角点
        //宽度和高度 相等则是画原型
        int rectWidth = 100; //椭圆宽度
        int rectHeight = 100; //椭圆高度

        // 绘制圆
        graphics2D.draw(new Ellipse2D.Double(x, y,
                rectWidth,
                rectHeight));

        // 绘制椭圆
        graphics2D.draw(new Ellipse2D.Double(x + 150, y + 150,
                rectWidth,
                rectHeight / 2));

        graphics2D.dispose();
        image.flush();
        ImgUtil.write(image, new File(SAVE_FILE_PATH + "Ellipse2D.png"));
效果:
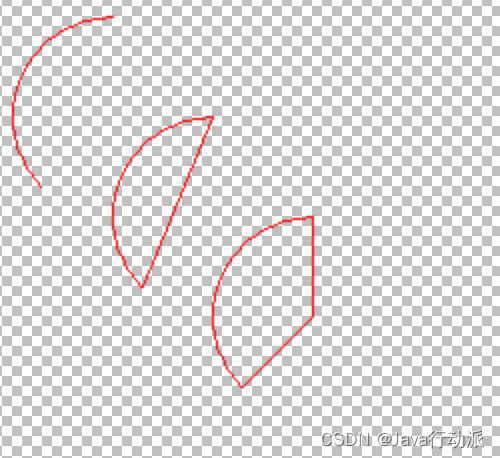
8、圆弧、闭合圆弧、扇形
通过Arc2D类绘制实现圆弧、闭合圆弧、扇形
实例:
        BufferedImage image = loadImage();
        Graphics2D graphics2D = image.createGraphics();
        graphics2D.setColor(Color.RED);

        int x = 10;//矩形起始坐标x  左上角点
        int y = 10;//矩形起始坐标y  左上角点
        int rectWidth = 100; //椭圆宽度
        int rectHeight = 100; //椭圆高度
        int start = 90; //弧的起始角度
        int extent = 135;//弧的角度范围

        // 圆弧
        graphics2D.draw(new Arc2D.Double(x, y,
                rectWidth,
                rectHeight,
                90, 135,
                Arc2D.OPEN));

        // 圆弧闭合
        graphics2D.draw(new Arc2D.Double(x + 50, y + 50,
                rectWidth,
                rectHeight,
                90, 135,
                Arc2D.CHORD));

        // 扇形
        graphics2D.draw(new Arc2D.Double(x + 100, y + 100,
                rectWidth,
                rectHeight,
                90, 135,
                Arc2D.PIE));


        graphics2D.dispose();
        image.flush();
        ImgUtil.write(image, new File(SAVE_FILE_PATH + "Arc2D.png"));
效果:
下篇文章我们继续通过Graphics2D类绘制包含菱形、五角星等任意复杂图形,喜欢的朋友记得关注,下篇见。