Stable Diffusion vue本地api接口对接,模型切换, ai功能集成开源项目 ollama-chat-ui-vue
1.开启Stable Diffusion的api服务
编辑webui-user.bat 添加 –api 开启api服务,然后保存启动就可以了

2.api 文档地址
http://127.0.0.1:7860/docs

3. 文生图 接口
地址
/sdapi/v1/txt2img //post 请求
入参
{
  enable_hr: false, // 开启高清hr
  denoising_strength: 0, // 降噪强度
  hr_scale: 2, // 高清级别
  hr_upscaler: "",
  hr_second_pass_steps: 0,
  hr_resize_x: 0,
  hr_resize_y: 0,
  hr_sampler_name: "",
  hr_prompt: "",
  hr_negative_prompt: "",
  prompt: "", // 正向关键字
  styles: [],
  seed: -1, // 随机种子
  subseed: -1, // 子级种子
  subseed_strength: 0, // 子级种子影响力度
  seed_resize_from_h: -1,
  seed_resize_from_w: -1,
  sampler_name: "",
  batch_size: 1, // 每次生成的张数
  n_iter: 1, // 生成批次
  steps: 50, // 生成步数
  cfg_scale: 7, // 关键词相关性
  width: 512, // 生成图像宽度
  height: 512, // 生成图像高度
  restore_faces: false, // 面部修复
  tiling: false, // 平铺
  do_not_save_samples: false,
  do_not_save_grid: false,
  negative_prompt: "", // 反向关键字
  eta: 0, // 等待时间
  s_min_uncond: 0,
  s_churn: 0,
  s_tmax: 0,
  s_tmin: 0,
  s_noise: 1,
  override_settings: {}, // 覆盖性配置
  override_settings_restore_afterwards: true,
  script_args: [], // lora 模型参数配置
  sampler_index: "Euler", // 采样方法
  script_name: "",
  send_images: true, // 是否发送图像
  save_images: false, // 是否在服务端保存生成的图像
  alwayson_scripts: {}, // alwayson配置
  //模型
  model_name: "",
};
实现逻辑
import {txt2img} from "@/api/sd/index";
const img = ref('')
const txt2imgFun = async () => {
  const response = await txt2img(txt2imgData.value);
  if (response.status === 200 && response.data) {
    try {
      const images = response.data.images;
      if (images.length === 0) return;
      //单图,多图得用数组遍历
      img.value = images.map((item) => `data:image/png;base64,${item}`);
    } catch (err) {
      console.log("err", err);
    }
}
生成进度接口
接口
/sdapi/v1/progress //get请求
参数
无
实现逻辑
  import {progress} from "@/api/sd/index";
  const img = ref('')
  const progressNum = ref(0)
  const progressFun=()=>{
	 let { data } = await progress();
 	 progressNum.value = parseInt(data.progress * 100);
     img.value = `data:image/png;base64,${data.current_image}`;
 }
终止生成接口
接口
/sdapi/v1/interrupt //post请求
参数
无
实现逻辑
import {interrupt} from "@/api/sd/index";
const termination = async () => {
  await interrupt();
};
4.模型切换
(1)api.py 文件
这块需要修改sdwebui的源码
首先打开 \modules\api下的 api.py 文件

注意一点
得先在头部引入 sd_models
from modules import sd_models

在 api.py 下的 text2imgapi这个类里面 添加代码

代码如下
send_images = args.pop('send_images', True)
args.pop('save_images', None)
model_name = img2imgreq.model_name  #新增
with self.queue_lock:
    if model_name is not None:  #新增
       pathName = os.path.abspath('..')  #新增
       pathName = pathName.replace('\\','/')  #新增
       w_info = sd_models.CheckpointInfo(os.path.join(pathName+'/webui/models/Stable-diffusion/'+model_name)) #新增,这里的地址参考自己的路径,我这个是旧版
       sd_models.reload_model_weights(info=w_info)	#新增
	with closing(StableDiffusionProcessingImg2Img(sd_model=shared.sd_model, **args)) as p:
然后另外一个 img2imgapi 类同理

代码如下
send_images = args.pop('send_images', True)
args.pop('save_images', None)
model_name = img2imgreq.model_name  #新增
with self.queue_lock:
    if model_name is not None:  #新增
       pathName = os.path.abspath('..')  #新增
       pathName = pathName.replace('\\','/')  #新增
       w_info = sd_models.CheckpointInfo(os.path.join(pathName+'/webui/models/Stable-diffusion/'+model_name)) #新增,这里的地址参考自己的路径,我这个是旧版
       sd_models.reload_model_weights(info=w_info)	#新增
	with closing(StableDiffusionProcessingImg2Img(sd_model=shared.sd_model, **args)) as p:
(2)models.py 文件
首先打开 \modules\api下的 models.py 文件

找到StableDiffusionTxt2ImgProcessingAPI和StableDiffusionImg2ImgProcessingAPI这两个类添加代码
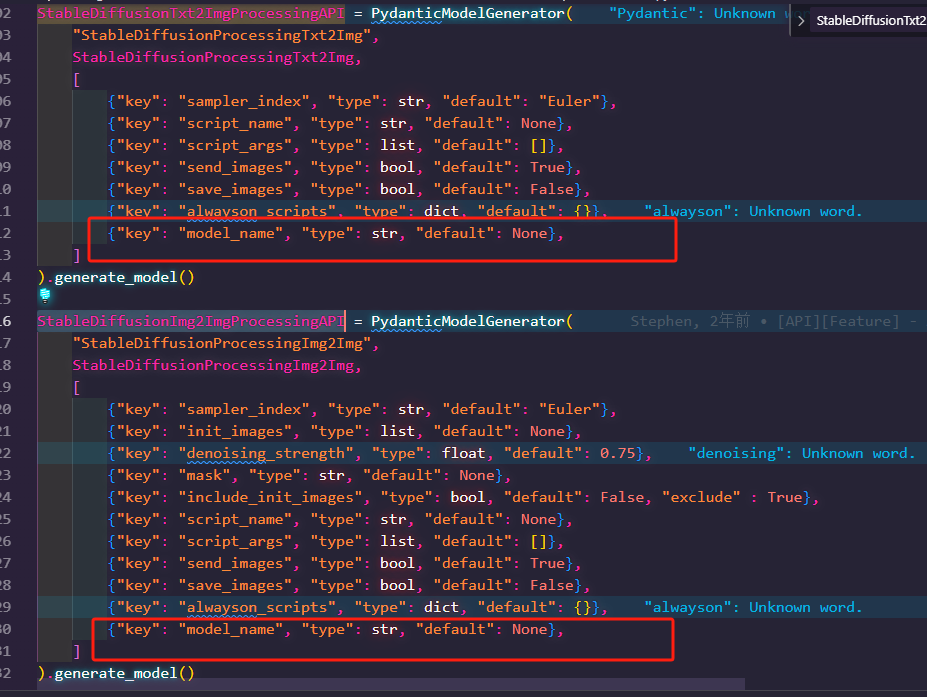
代码
{"key": "model_name", "type": str, "default": None},
(3)processing.py 文件
首先打开 \modules下的 processing.py 文件
在StableDiffusionProcessingTxt2Img 和 StableDiffusionProcessingImg2Img 新增代码


model_name: str = None
然后源码这块已经修改完成了
注意:py的代码格式,不要多一个空格或者少一个,因为可能会导致控制台报错
然后在vue前端接口调用,文生图接口,图生图接口 ,新增个 model_name 的字段即可完成,通过修改model_name字段即可切换模型,如下
文生图接口地址
/sdapi/v1/txt2img //post 请求
入参
{
  enable_hr: false, // 开启高清hr
  denoising_strength: 0, // 降噪强度
  hr_scale: 2, // 高清级别
  hr_upscaler: "",
  hr_second_pass_steps: 0,
  hr_resize_x: 0,
  hr_resize_y: 0,
  hr_sampler_name: "",
  hr_prompt: "",
  hr_negative_prompt: "",
  prompt: "", // 正向关键字
  styles: [],
  seed: -1, // 随机种子
  subseed: -1, // 子级种子
  subseed_strength: 0, // 子级种子影响力度
  seed_resize_from_h: -1,
  seed_resize_from_w: -1,
  sampler_name: "",
  batch_size: 1, // 每次生成的张数
  n_iter: 1, // 生成批次
  steps: 50, // 生成步数
  cfg_scale: 7, // 关键词相关性
  width: 512, // 生成图像宽度
  height: 512, // 生成图像高度
  restore_faces: false, // 面部修复
  tiling: false, // 平铺
  do_not_save_samples: false,
  do_not_save_grid: false,
  negative_prompt: "", // 反向关键字
  eta: 0, // 等待时间
  s_min_uncond: 0,
  s_churn: 0,
  s_tmax: 0,
  s_tmin: 0,
  s_noise: 1,
  override_settings: {}, // 覆盖性配置
  override_settings_restore_afterwards: true,
  script_args: [], // lora 模型参数配置
  sampler_index: "Euler", // 采样方法
  script_name: "",
  send_images: true, // 是否发送图像
  save_images: false, // 是否在服务端保存生成的图像
  alwayson_scripts: {}, // alwayson配置
  //********************模型
  model_name: "",
};
5.项目实例
github开源项目,ollama-chat-ui-vue,该项目包涵 stable diffusion 和 ollama,deepseek 本地接口对接,后续支持更多ai功能集成包括,ai生音乐,生成ppt等 ,最后githut开源项目不易,帮忙点点star


stable diffusion 的内容在 develop-stablediffusion 分支中

https://github.com/LovelittleBears/ollama-chat-ui-vue
关于:
(1)stable diffusion 本地部署教程
(2) ollama-chat-ui-vue,一个可以用vue对接ollama的开源项目,可接入deepSeek