c++全排列 next_permutation()函数
c++全排列
转载博客:https://www.cnblogs.com/cstdio1/p/11311500.html
对于next_permutation函数,其函数原型为:
#include < algorithm>
bool next_permutation(iterator start,iterator end)
当当前序列不存在下一个排列时,函数返回false,否则返回true
同时,相对应的,上一个排列即为prev_permutation(int *begin, int end)
看如下代码:
#include <iostream>
#include <algorithm>
using namespace std;
int main()
{
    int num[3]={1,2,3};
    do
    {
        cout<<num[0]<<" "<<num[1]<<" "<<num[2]<<endl;
    }while(next_permutation(num,num+3));
    return 0;
}

注意:当我们把while(next_permutation(num,num+3))中的3改为2时,输出就变为了下图所示:
说明此时只针对1,2进行了全排列,有两个,后面的3没有变化,同时改变了数组前两个的值。
由此可以看出,next_permutation(num,num+n)函数是对数组num中的前n个元素进行全排列,同时并改变num数组的值。
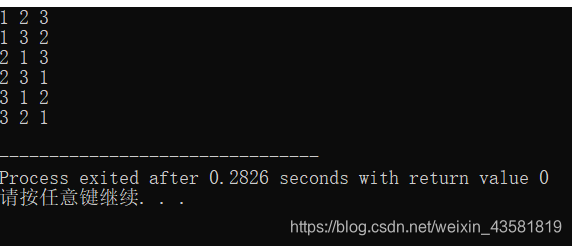
另外,需要强调的是,next_permutation()在使用前需要对欲排列数组按升序排序,否则只能找出该序列之后的全排列数。
比如,如果数组num初始化为3,1,2,那么输出就变为了:
维基百科上全排列的实现:
循环法:
#include <iostream>
using namespace std;
bool arrsame(int* arr, int len, int num) {
int i;
for (i = 0; i < len; i++)
if (arr[i] == num)
break;
return i != len;
}
bool next_perm(int* perm, const int k, const int n) {
int i = k - 1;
do
perm[i]++;
while (arrsame(perm, i, perm[i]) || (perm[i] >= n && i--));
if (perm[0] >= n)
return 0;
for (int num = 0, seat = i + 1; seat < k; num++)
if (!arrsame(perm, i + 1, num))
perm[seat++] = num;
return 1;
}
int main() {
int n, k;
cout << "perm(n,k):" << endl;
cin >> n >> k;
if (n < k || k <= 0)
return 0;
int* perm = new int[k];
for (int i = 0; i < k; i++)
perm[i] = i;
do
for (int i = 0; i < k; cout << ((++i < k) ? ',' : '\n'))
cout << perm[i] + 1;
while (next_perm(perm, k, n));
delete[] perm;
return 0;
}
递归法:
#include <bits/stdc++.h>
using namespace std;

struct prem {
    int len;
    vector<int> used, position;
    function<void(vector<int>&)> action;
    prem(int l = 0, function<void(vector<int>&)> a = [](vector<int>& position) {}) : len(l), used(l, -1), position(l), action(a) {}
    void run(int now = -1) {
        if (now == len - 1) {
            action(position);
            return;
        }
        int next = now + 1;
        for (int i = 0; i < len; i++) {
            if (used[i] == -1) {
                used[i] = next;
                position[next] = i;
                run(next);
                used[i] = -1;
            }
        }
    }
};
int main() {
    ios::sync_with_stdio(false), cin.tie(0);
    int len = 4;
    prem p(len, [&](vector<int>& p) {
        for (int i = 0; i < len; i++) {
            cout << p[i] << " ";
        }
        cout << endl;
    });
    p.run();
    return 0;
}
next_permutation 可以自定义比较函数 例如:POJ 1256
题目中要求的字典序是:A’<‘a’<‘B’<‘b’<…<‘Z’<‘z’,所以在用函数之前必须得按照题目要求的进行排序
#include<iostream> //poj 1256 Anagram
#include<string.h>
#include<algorithm>
using namespace std;
int cmp(char a,char b) {
	if(tolower(a)!=tolower(b))//tolower 是将大写字母转化为小写字母.
		return tolower(a)<tolower(b);
	else
		return a<b;
}
int main() {
	char ch[20];
	int n;
	cin>>n;
	while(n--) {
		scanf("%s",ch);
		sort(ch,ch+strlen(ch),cmp);
		do {
			printf("%s\n",ch);
		} while(next_permutation(ch,ch+strlen(ch),cmp));
	}
	return 0;
}