【SSM】Spring6(七.Spring IoC注解式开发)
文章目录
- 1.声明Bean的注解
- 2.Spring注解的使用
- 2.1 添加aop的依赖
- 2.2 在配置文件中添加context命名空间
- 2.3 在配置文件中指定要扫描的包
- 2.4 在Bean上使用注解
- 2.5 细节
- 3.选择实例化Bean
- 3.1 方案一
- 3.2 方案二
- 4.负责注入的注解
- 4.1 @value
- 4.2 @Autowired @Qualifier
- 4.3 @Resource
- 5.全注解式开发
1.声明Bean的注解
常见的声明Bean的注解注意包括以下4个:
● @Component
● @Controller
● @Service
● @Repository
@Controller、@Service、@Repository这三个注解都是@Component注解的别名。
也就是说:这四个注解的功能都一样。用哪个都可以。
只是为了增强程序的可读性,建议:
● 控制器类上使用:Controller
● service类上使用:Service
● dao类上使用:Repository
他们都是只有一个value属性。value属性用来指定bean的id,也就是bean的名字。
2.Spring注解的使用
四个步骤
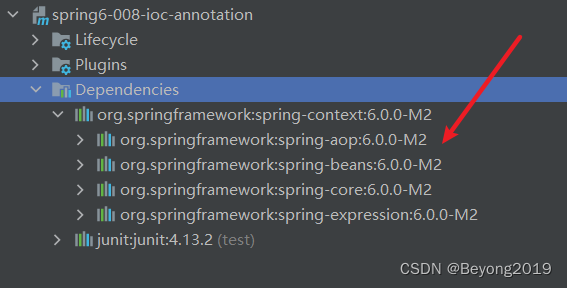
2.1 添加aop的依赖
当加入spring-context依赖之后,会关联加入aop的依赖。

2.2 在配置文件中添加context命名空间

spring配置文件
<?xml version="1.0" encoding="UTF-8"?>
<beans xmlns="http://www.springframework.org/schema/beans"
       xmlns:xsi="http://www.w3.org/2001/XMLSchema-instance"
       xmlns:context="http://www.springframework.org/schema/context"
       xsi:schemaLocation="http://www.springframework.org/schema/beans http://www.springframework.org/schema/beans/spring-beans.xsd
       http://www.springframework.org/schema/context http://www.springframework.org/schema/beans/spring-context.xsd">
</beans>
2.3 在配置文件中指定要扫描的包
<?xml version="1.0" encoding="UTF-8"?>
<beans xmlns="http://www.springframework.org/schema/beans"
       xmlns:xsi="http://www.w3.org/2001/XMLSchema-instance"
       xmlns:context="http://www.springframework.org/schema/context"
       xsi:schemaLocation="http://www.springframework.org/schema/beans http://www.springframework.org/schema/beans/spring-beans.xsd
       http://www.springframework.org/schema/context http://www.springframework.org/schema/context/spring-context.xsd">

    <context:component-scan base-package="com.sdnu.spring6.bean"/>
</beans>
2.4 在Bean上使用注解
package com.sdnu.spring6.bean;

import org.springframework.stereotype.Component;

@Component(value = "userBean")
public class User {
}
2.5 细节
(1)属性名value可以省略
(2)如果把value属性彻底去掉,spring会被Bean自动取名,默认名字的规律是:Bean类名首字母小写即可。
(3)多个包
方法一:在配置文件中指定多个包,用逗号隔开。
<context:component-scan base-package="com.sdnu.spring6.bean, com.sdnu.spring6.dao"/>
方法二:指定多个包的共同的父包。
3.选择实例化Bean
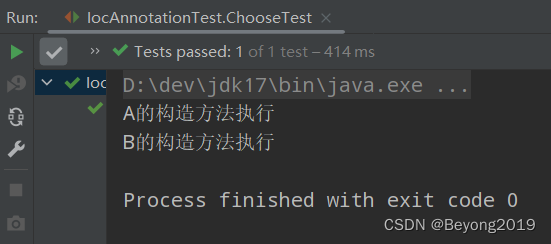
假设在某个包下有很多Bean,有的Bean上标注了Component,有的标注了Controller,有的标注了Service,有的标注了Repository,现在由于某种特殊业务的需要,只允许其中所有的Controller参与Bean管理,其他的都不实例化。这应该怎么办呢?
package com.sdnu.spring6.bean2;

import org.springframework.stereotype.Component;
import org.springframework.stereotype.Controller;
import org.springframework.stereotype.Repository;
import org.springframework.stereotype.Service;

@Component
public class A {
    public A() {
        System.out.println("A的构造方法执行");
    }
}

@Repository
class B{
    public B() {
        System.out.println("B的构造方法执行");
    }
}

@Controller
class C{
    public C() {
        System.out.println("C的构造方法执行");
    }
}

@Service
class D{
    public D() {
        System.out.println("D的构造方法执行");
    }
}
3.1 方案一
use-default-filters=“false”:不再spring默认实例化规则,即使有Component、Controller、Service、Repository这些注解标注,也不再实例化
spring配置文件
<?xml version="1.0" encoding="UTF-8"?>
<beans xmlns="http://www.springframework.org/schema/beans"
       xmlns:xsi="http://www.w3.org/2001/XMLSchema-instance"
       xmlns:context="http://www.springframework.org/schema/context"
       xsi:schemaLocation="http://www.springframework.org/schema/beans http://www.springframework.org/schema/beans/spring-beans.xsd
                           http://www.springframework.org/schema/context http://www.springframework.org/schema/context/spring-context.xsd">

    <!--表示com.sdnu.spring6.bean2包下所有带有声明Bean的注解全部失效-->
    <context:component-scan base-package="com.sdnu.spring6.bean2" use-default-filters="false">
        <!--只有@Controller和@Service被包含进来,生效-->
        <context:include-filter type="annotation" expression="org.springframework.stereotype.Controller"/>
        <context:include-filter type="annotation" expression="org.springframework.stereotype.Service"/>
    </context:component-scan>
</beans>
测试
@Test
    public void ChooseTest(){
        ApplicationContext applicationContext = new ClassPathXmlApplicationContext("spring-choose.xml");
    }

3.2 方案二
use-default-filters=“true” 表示:使用spring默认的规则,只要有Component、Controller、Service、Repository中的任意一个注解标注,则进行实例化。
spring配置文件
<?xml version="1.0" encoding="UTF-8"?>
<beans xmlns="http://www.springframework.org/schema/beans"
       xmlns:xsi="http://www.w3.org/2001/XMLSchema-instance"
       xmlns:context="http://www.springframework.org/schema/context"
       xsi:schemaLocation="http://www.springframework.org/schema/beans http://www.springframework.org/schema/beans/spring-beans.xsd
                           http://www.springframework.org/schema/context http://www.springframework.org/schema/context/spring-context.xsd">

    <!--表示com.sdnu.spring6.bean2包下所有带有声明Bean的注解全部生效-->
    <context:component-scan base-package="com.sdnu.spring6.bean2" use-default-filters="true">
        <!--排出哪些注解标注的Bean不参与实例化,即@Controller @Service失效-->
        <context:exclude-filter type="annotation" expression="org.springframework.stereotype.Controller"/>
        <context:exclude-filter type="annotation" expression="org.springframework.stereotype.Service"/>
    </context:component-scan>
</beans>
测试
@Test
    public void ChooseTest(){
        ApplicationContext applicationContext = new ClassPathXmlApplicationContext("spring-choose.xml");
    }

4.负责注入的注解
● @Value
● @Autowired
● @Qualifier
● @Resource
4.1 @value
当属性的类型是简单类型时,可以使用@Value注解进行注入。
@Value注解可以出现在属性上、setter方法上、以及构造方法的形参上。
package com.sdnu.spring6.bean3;

import org.springframework.beans.factory.annotation.Value;
import org.springframework.stereotype.Component;

import javax.sql.DataSource;
import java.io.PrintWriter;
import java.sql.Connection;
import java.sql.SQLException;
import java.sql.SQLFeatureNotSupportedException;
import java.util.logging.Logger;

@Component
public class MyDataSource implements DataSource {
    @Value(value = "com.mysql.jdbc.driver")
    private String driver;
    @Value(value = "jdbc:mysql://localhost:3306")
    private String url;
    @Value(value = "root")
    private String username;
    @Value(value = "123456")
    private String password;

    public void setDriver(String driver) {
        this.driver = driver;
    }

    public void setUrl(String url) {
        this.url = url;
    }

    public void setUsername(String username) {
        this.username = username;
    }

    public void setPassword(String password) {
        this.password = password;
    }

    @Override
    public String toString() {
        return "MyDataSource{" +
                "driver='" + driver + '\'' +
                ", url='" + url + '\'' +
                ", username='" + username + '\'' +
                ", password='" + password + '\'' +
                '}';
    }

    @Override
    public Connection getConnection() throws SQLException {
        return null;
    }

    @Override
    public Connection getConnection(String username, String password) throws SQLException {
        return null;
    }

    @Override
    public PrintWriter getLogWriter() throws SQLException {
        return null;
    }

    @Override
    public void setLogWriter(PrintWriter out) throws SQLException {

    }

    @Override
    public void setLoginTimeout(int seconds) throws SQLException {

    }

    @Override
    public int getLoginTimeout() throws SQLException {
        return 0;
    }

    @Override
    public Logger getParentLogger() throws SQLFeatureNotSupportedException {
        return null;
    }

    @Override
    public <T> T unwrap(Class<T> iface) throws SQLException {
        return null;
    }

    @Override
    public boolean isWrapperFor(Class<?> iface) throws SQLException {
        return false;
    }
}
配置文件
<?xml version="1.0" encoding="UTF-8"?>
<beans xmlns="http://www.springframework.org/schema/beans"
       xmlns:xsi="http://www.w3.org/2001/XMLSchema-instance"
       xmlns:context="http://www.springframework.org/schema/context"
       xsi:schemaLocation="http://www.springframework.org/schema/beans http://www.springframework.org/schema/beans/spring-beans.xsd
                           http://www.springframework.org/schema/context http://www.springframework.org/schema/context/spring-context.xsd">

    <context:component-scan base-package="com.sdnu.spring6.bean3"/>
</beans>
测试
    @Test
    public void testDiAnnotation(){
        ApplicationContext applicationContext = new ClassPathXmlApplicationContext("spring-di-annotation.xml");
        MyDataSource myDataSource = applicationContext.getBean("myDataSource", MyDataSource.class);
        System.out.println(myDataSource);
    }
4.2 @Autowired @Qualifier
(1)
@Autowired注解可以用来注入非简单类型。被翻译为:自动连线的,或者自动装配。
单独使用@Autowired注解,默认根据类型装配。【默认是byType】
(2)
@Autowired注解有一个required属性,默认值是true,表示在注入的时候要求被注入的Bean必须是存在的,如果不存在则报错。如果required属性设置为false,表示注入的Bean存在或者不存在都没关系,存在的话就注入,不存在的话,也不报错。
(3)
● @Autowired注解可以出现在:属性上、构造方法上、构造方法的参数上、setter方法上。
● 当带参数的构造方法只有一个,@Autowired注解可以省略。
● @Autowired注解默认根据类型注入。如果要根据名称注入的话,需要配合@Qualifier注解一起使用。
4.3 @Resource
@Resource注解也可以完成非简单类型注入。
@Resource与@Autowired的区别:
(1)
● @Resource注解是JDK扩展包中的,也就是说属于JDK的一部分。所以该注解是标准注解,更加具有通用性。(JSR-250标准中制定的注解类型。JSR是Java规范提案。)
● @Autowired注解是Spring框架自己的。
(2)
● @Resource注解默认根据名称装配byName,未指定name时,使用属性名作为name。通过name找不到的话会自动启动通过类型byType装配。
● @Autowired注解默认根据类型装配byType,如果想根据名称装配,需要配合@Qualifier注解一起用。
(3)
● @Resource注解用在属性上、setter方法上。
● @Autowired注解用在属性上、setter方法上、构造方法上、构造方法参数上。
引入额外依赖:
spring 6
<dependency>
  <groupId>jakarta.annotation</groupId>
  <artifactId>jakarta.annotation-api</artifactId>
  <version>2.1.1</version>
</dependency>
spring5-
<dependency>
  <groupId>javax.annotation</groupId>
  <artifactId>javax.annotation-api</artifactId>
  <version>1.3.2</version>
</dependency>
5.全注解式开发
全注解式开发就是不再使用spring配置文件了。而是写一个配置类来代替配置文件。
import org.springframework.context.annotation.ComponentScan;
import org.springframework.context.annotation.Configuration;

/**
 * 编写一个类,代替spring配置文件
 */
@Configuration
@ComponentScan({"cn.sdnu.dao", "cn.sdnu.service"})
public class Spring6Config {
}
