nginx--基本配置
目录
1.安装目录
2.文件详解
2.编译参数
3.Nginx基本配置语法
1./etc/nginx/nginx.conf
2./etc/nginx/conf.d/default.conf
3.启动重启命令
4.设置404跳转页面
1./etc/nginx/conf.d/default.conf修改
2. 重启
5.最前面内容模块
6.事件模块
1.安装目录
# etc
cd /etc/nginx/ && ls
conf.d fastcgi_params mime.types modules nginx.conf scgi_params uwsgi_params
# usr
cd /usr/lib/nginx/modules && ls
# html
cd /usr/share/nginx/html && ls2.文件详解
| 路径 | 类型 | 作用 | ||
|---|---|---|---|---|
| /etc/logrotate.d/nginx | 配置文件 | Nginx日志轮询,用于logrotate服务的日志切割; | ||
| /etc/nginx/conf.d/default.conf、/etc/nginx/nginx.conf | 配置文件 | nginx主配置文件 | ||
| /etc/nginx/fastcgi_params、scgi_params、uwsgi_params | 配置文件 | cgi和fastcgi的配置文件 | ||
| /etc/nginx/win-utf、koi-utf、koi-win | 配置文件 | 编码转换映射转换文件 | ||
| /etc/nginx/mime.types | 配置文件 | 设置http协议的Content-Type与扩展名对应关系 | ||
| /etc/nginx/modules、/usr/lib64/nginx/modules | 目录 | nginx模块目录 | ||
| /usr/sbin/nginx、/usr/sbin/nginx-debug | 命令 | Nginx 服务的启动管理的终端命令 | ||
| /usr/share/doc/nginx | 目录 | 帮助文档 | ||
| /var/cache/nginx | 目录 | nginx的缓存目录 | ||
| /var/log/nginx/ | 目录 | nginx的日志目录 |
2.编译参数
| 编译选项 | 作用 |
|---|---|
| --prefix=/etc/nginx --sbin-path=/usr/sbin/nginx --modules-path=/usr/lib64/nginx/modules --conf-path=/etc/nginx/nginx.conf --error-log-path=/var/log/nginx/error.log --http-log-path=/var/log/nginx/access.log --pid-path=/var/run/nginx.pid --lock-path=/var/run/nginx.lock | 安装目的目录或路径 |
| --http-client-body-temp-path=/var/cache/nginx/client_temp --http-proxy-temp-path=/var/cache/nginx/proxy_temp --http-fastcgi-temp-path=/var/cache/nginx/fastcgi_temp --http-uwsgi-temp-path=/var/cache/nginx/uwsgi_temp --http-scgi-temp-path=/var/cache/nginx/scgi_temp | 执行对应模块Nginx所保留的临时性文件 |
| --user=nginx --group=nginx | 设定nginx进程启动的用户和用户组 |
| with-cc-opt=parameters | 设置额外的参数将被添加到CFALAGS变量 |
| with-ld-opt=parameters | 设置附加的参数,连接系统库 |
3.Nginx基本配置语法
1./etc/nginx/nginx.conf
user nginx;
# 1.9.10版本后可以配置
# worker_processes auto;
# worker_cpu_affinity auto;
# 相当于
# worker_processes 4;
# worker_cpu_affinity 0001 0010 0100 1000;
worker_processes auto;
worker_cpu_affinity auto;
error_log /var/log/nginx/error.log notice;
pid /var/run/nginx.pid;
events {
worker_connections 1024;
}
http {
# 设置content-type映射
include /etc/nginx/mime.types;
default_type application/octet-stream;
# 通过nginx内置变量拼接的日志字符串 相当于方法名称为 main
log_format main '$remote_addr - $remote_user [$time_local] "$request" '
'$status $body_bytes_sent "$http_referer" '
'"$http_user_agent" "$http_x_forwarded_for"';
# 日志存储位置,使用的日至格式方法为main
access_log /var/log/nginx/access.log main;
# 当 nginx 是静态文件服务器时,能极大提高nginx的性能表现
sendfile on;
#tcp_nopush on;
# 超时时间
keepalive_timeout 65;
#gzip on;
# 包含下面 /etc/nginx/conf.d/的.conf结尾的所有文件
include /etc/nginx/conf.d/*.conf;
}2./etc/nginx/conf.d/default.conf
# 一个http中可以有多个server
server {
# 这个server 监听的端口
listen 80;
# 域名、ip
server_name localhost;
#access_log /var/log/nginx/host.access.log main;
# 一个server 可以允许多个location
location / {
# 这个location 返回的页面路径 html是一个目录
root /usr/share/nginx/html;
# index 首页默认访问的页面 index.html index.htm 按照顺序访问index.html ,访问不到访问 index.htm
index index.html index.htm;
}
#error_page 404 /404.html;
# redirect server error pages to the static page /50x.html
# 错误页面 根据错误码返回页面
error_page 500 502 503 504 404 /50x.html;
location = /50x.html {
root /usr/share/nginx/html;
}
}
3.启动重启命令
# 启动
systemctl start nginx.service
# 停止
systemctl stop nginx.service
# 重启
systemctl restart nginx.service
# 重启
systemctl reload nginx.service
[root@localhost html]# systemctl start nginx.service
[root@localhost html]# systemctl stop nginx.service
[root@localhost html]# systemctl stop nginx.service
[root@localhost html]# systemctl restart nginx.service
4.设置404跳转页面
# 进入nginx html文件位置
cd /usr/share/nginx/html
cp 50x.html 404x.html
# 修改内容保存
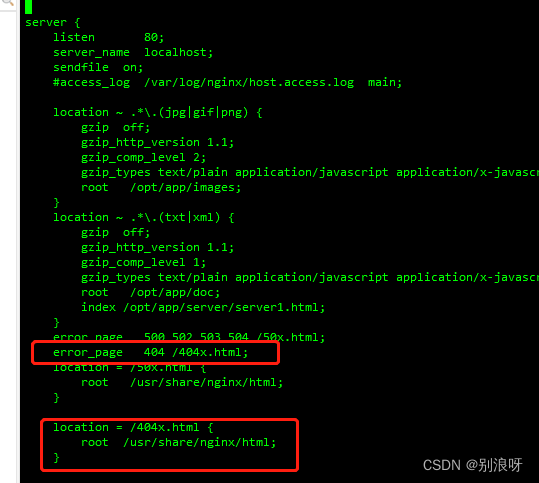
vi 404x.html1./etc/nginx/conf.d/default.conf修改
server 下添加下面内容即可
server {

    error_page   404 /404x.html;
    location = /404x.html {
        root  /usr/share/nginx/html;
    }
}
2. 重启
# 重启访问一个nginx不存在的页面即可
systemctl reload nginx.service
5.最前面内容模块
| user | 设置nginx服务的系统使用用户 |
|---|---|
| worker_processes | 工作进程数和cpu保持一致即可 |
| error_log | 错误日志 |
| pid | nginx服务启动时候pid |
6.事件模块
| worker_connections | 每个进程允许最大连接数,1worker_processes个进程处理的最大连接数,一般6535 |
|---|---|
| use | 定义使用的内核模型 |

