Java集成腾讯云OCR身份证识别接口
一、背景
项目用到身份证识别获取人员信息的功能,于是想到了腾讯云提供这样的API。在整合代码过程都很顺利,利用腾讯云官方SDK很快集成进来。但是在上测试环境部署时有了新的问题,通过Nginx代理后的环境无法访问到目标腾讯云接口,遂有了如下的改造过程。
二、SDK集成Demo
首先是Maven依赖树:
        <dependency>
            <groupId>com.tencentcloudapi</groupId>
            <artifactId>tencentcloud-sdk-java</artifactId>
            <version>4.0.11</version>
        </dependency>
然后是腾讯云提供的调试代码,改造了一部分:
import com.tencentcloudapi.common.Credential;
import com.tencentcloudapi.common.exception.TencentCloudSDKException;
import com.tencentcloudapi.common.profile.ClientProfile;
import com.tencentcloudapi.common.profile.HttpProfile;
import com.tencentcloudapi.ocr.v20181119.OcrClient;
import com.tencentcloudapi.ocr.v20181119.models.IDCardOCRRequest;
import com.tencentcloudapi.ocr.v20181119.models.IDCardOCRResponse;
import lombok.extern.slf4j.Slf4j;
import org.springframework.beans.factory.annotation.Value;
import org.springframework.context.annotation.PropertySource;
import org.springframework.stereotype.Component;

import java.text.ParseException;

@Component
@Slf4j
@PropertySource("classpath:/properties/tencentCard.properties")
public class TencentUtil {

    @Value("${secretId}")
    private String secretId;

    @Value("${secretKey}")
    private String secretKey;

    @Value("${tencentUrl}")
    private String tencentUrl;


    public RecognitionView recognition(String cBase64) {
        if (cBase64.length() > 10485760) {
            throw new BusinessException("证件识别失败:图片文件太大");
        }
        RecognitionView tRecognitionView = new RecognitionView();
        try{
            // 实例化一个认证对象,入参需要传入腾讯云账户 SecretId 和 SecretKey,此处还需注意密钥对的保密
            // 代码泄露可能会导致 SecretId 和 SecretKey 泄露,并威胁账号下所有资源的安全性。以下代码示例仅供参考,建议采用更安全的方式来使用密钥,请参见:https://cloud.tencent.com/document/product/1278/85305
            // 密钥可前往官网控制台 https://console.cloud.tencent.com/cam/capi 进行获取
            Credential cred = new Credential(secretId, secretKey);
            // 实例化一个http选项,可选的,没有特殊需求可以跳过
            HttpProfile httpProfile = new HttpProfile();
            httpProfile.setEndpoint(tencentUrl);
            // 实例化一个client选项,可选的,没有特殊需求可以跳过
            ClientProfile clientProfile = new ClientProfile();
            clientProfile.setHttpProfile(httpProfile);
            // 实例化要请求产品的client对象,clientProfile是可选的
            OcrClient client = new OcrClient(cred, "ap-beijing", clientProfile);
            // 实例化一个请求对象,每个接口都会对应一个request对象
            IDCardOCRRequest req = new IDCardOCRRequest();
            req.setImageBase64(cBase64);
            // 返回的resp是一个IDCardOCRResponse的实例,与请求对象对应
            IDCardOCRResponse resp = client.IDCardOCR(req);
            tRecognitionView.setRecognitionView(resp);
            // 输出json格式的字符串回包
            log.info("证件识别返回参数:" + IDCardOCRResponse.toJsonString(resp));
        } catch (Exception e) {
            String tError = "证件识别失败:" + e.getMessage();
            log.error(tError);
            throw new BusinessException(tError);
        }
        return tRecognitionView;
    }

}
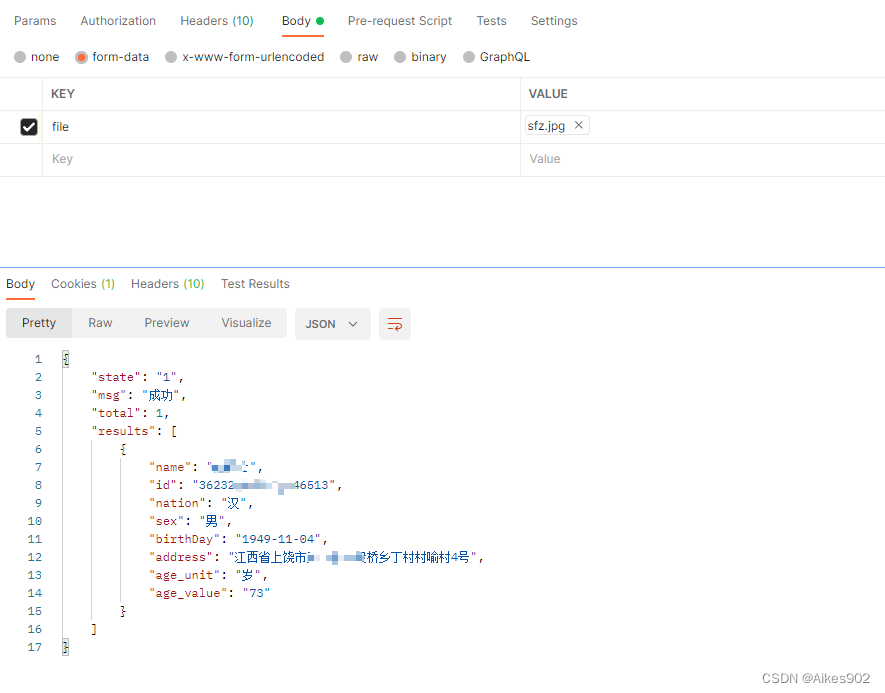
postman调试后可以正常获取到解析内容

三、Nginx调用失败及解决
部署到测试环境后,由于内网服务器需要代理到外网服务器进行外网地址的访问,此时便提示证书找不到的错误。

找问题的过程很坎坷,从证书的有效性、代理的连通性、SDK的限制性等等,研究了将近三天,就连做梦都在思考哪里有问题。最后实在没了方向,决定从根上入手,跳过证书验证。
跳过验证分为两步,1、放弃SDK请求方式,需要手写Connection;2、增加跳过证书的代码逻辑。于是便有了如下代码:
import com.alibaba.fastjson.JSON;
import com.google.gson.Gson;
import com.google.gson.reflect.TypeToken;
import com.tencentcloudapi.common.Credential;
import com.tencentcloudapi.common.JsonResponseModel;
import com.tencentcloudapi.common.profile.ClientProfile;
import com.tencentcloudapi.common.profile.HttpProfile;
import com.tencentcloudapi.ocr.v20181119.OcrClient;
import com.tencentcloudapi.ocr.v20181119.models.IDCardOCRRequest;
import com.tencentcloudapi.ocr.v20181119.models.IDCardOCRResponse;
import lombok.extern.slf4j.Slf4j;
import okhttp3.*;
import org.apache.commons.codec.binary.Base64;
import org.springframework.beans.factory.annotation.Value;
import org.springframework.context.annotation.PropertySource;
import org.springframework.stereotype.Component;

import javax.crypto.Mac;
import javax.crypto.spec.SecretKeySpec;
import javax.xml.bind.DatatypeConverter;
import java.lang.reflect.Type;
import java.nio.charset.Charset;
import java.nio.charset.StandardCharsets;
import java.security.MessageDigest;
import java.text.SimpleDateFormat;
import java.util.*;

@Component
@Slf4j
@PropertySource("classpath:/properties/tencentCard.properties")
public class TencentUtil {

    @Value("${secretId}")
    private String secretId;

    @Value("${secretKey}")
    private String secretKey;

    @Value("${tencentUrl}")
    private String tencentUrl;

    private final static String CT_JSON = "application/json; charset=utf-8"; // 请求头内容类型
    private final static Charset UTF8 = StandardCharsets.UTF_8; // 编码格式
    static final OkHttpClient HTTP_CLIENT = new BaiduUtil().getUnsafeOkHttpClient();

    public RecognitionView recognitionPassSSL(byte[] cbyte) {
        String ImageBase64 = Base64.encodeBase64String(cbyte);
        Map<String, Object> tRequest = new HashMap<>();
        tRequest.put("ImageBase64", ImageBase64);
        String requestData = JSON.toJSONString(tRequest);
        RecognitionView tRecognitionView = new RecognitionView();
        try {
            MediaType mediaType = MediaType.parse(CT_JSON);
            RequestBody body = RequestBody.create(mediaType, requestData);
            Request.Builder tBuilder = new Request.Builder()
                    .url("https://" + tencentUrl)
                    .method("POST", body);
            this.assembleHeader(tBuilder,this.sign(requestData));
            Request request = tBuilder.build();
            Response response = HTTP_CLIENT.newCall(request).execute();
            String tResult = response.body().string();
            Gson gson = new Gson();
            log.info("证件识别返回参数:" + tResult);
            if (tResult.contains("Error")) {
                //{"Response":{"RequestId":"4dd26ba4-3e0e-412b-b5a3-047829d5541f","Error":{"Code":"FailedOperation.ImageNoIdCard","Message":"照片未检测到身份证"}}}
                JsonResponseModel resp = JSON.parseObject(tResult,JsonResponseModel.class);
                TencentErrorView tTencentErrorView = JSON.parseObject(JSON.toJSONString(resp.response),TencentErrorView.class);
                throw new BusinessException(tTencentErrorView.getError().getMessage());
            } else {
                //{"name": "吕能仕","id": "362323194911046513","nation": "汉","sex": "男","birthDay": "1949-11-04","address": "江西省上饶市玉山县四股桥乡丁村村喻村4号","age_unit": "岁","age_value": "73"}
                Type type = new TypeToken<JsonResponseModel<IDCardOCRResponse>>() {}.getType();
                JsonResponseModel<IDCardOCRResponse> resp = gson.fromJson(tResult, type);
                tRecognitionView.setRecognitionView(resp.response);
            }
        } catch (Exception e) {
            String tError = "证件识别失败:" + e.getMessage();
            log.error(tError);
            throw new BusinessException(tError);
        }
        return tRecognitionView;
    }

    private void assembleHeader(Request.Builder tBuilder, Map<String, String> sign) {
        Set<String> strings = sign.keySet();
        for (String tName : strings) {
            tBuilder.addHeader(tName, sign.get(tName));
        }
    }

    public RecognitionView recognition(byte[] cbyte) {
        String tBase64 = Base64.encodeBase64String(cbyte);
        RecognitionView tRecognitionView = new RecognitionView();
        try {
            // 实例化一个认证对象,入参需要传入腾讯云账户 SecretId 和 SecretKey,此处还需注意密钥对的保密
            // 代码泄露可能会导致 SecretId 和 SecretKey 泄露,并威胁账号下所有资源的安全性。以下代码示例仅供参考,建议采用更安全的方式来使用密钥,请参见:https://cloud.tencent.com/document/product/1278/85305
            // 密钥可前往官网控制台 https://console.cloud.tencent.com/cam/capi 进行获取
            Credential cred = new Credential(secretId, secretKey);
            // 实例化一个http选项,可选的,没有特殊需求可以跳过
            HttpProfile httpProfile = new HttpProfile();
            httpProfile.setEndpoint(tencentUrl);
            // 实例化一个client选项,可选的,没有特殊需求可以跳过
            ClientProfile clientProfile = new ClientProfile();
            clientProfile.setHttpProfile(httpProfile);
            // 实例化要请求产品的client对象,clientProfile是可选的
            OcrClient client = new OcrClient(cred, "ap-beijing", clientProfile);
            // 实例化一个请求对象,每个接口都会对应一个request对象
            IDCardOCRRequest req = new IDCardOCRRequest();
            req.setImageBase64(tBase64);
            // 返回的resp是一个IDCardOCRResponse的实例,与请求对象对应
            IDCardOCRResponse resp = client.IDCardOCR(req);
            tRecognitionView.setRecognitionView(resp);
            // 输出json格式的字符串回包
            log.info("证件识别返回参数:" + IDCardOCRResponse.toJsonString(resp));
        } catch (Exception e) {
            String tError = "证件识别失败:" + e.getMessage();
            log.error(tError);
            throw new BusinessException(tError);
        }
        return tRecognitionView;
    }


    /**
     * API签名方法
     * @param data 发送的json串数据
     * @return 请求头map
     * @throws Exception 异常
     */
    @SuppressWarnings({"JsonStandardCompliance", "DuplicatedCode"})
    private Map<String,String> sign(String data) throws Exception {
        String service = "ocr"; // 腾讯云服务器
        String host = "ocr.tencentcloudapi.com"; // 服务器地址
        String region = "ap-beijing"; // 服务器区域
        String action = "IDCardOCR"; // api接口名称
        String version = "2018-11-19"; // 接口版本号
        String algorithm = "TC3-HMAC-SHA256";
        // String timestamp = "1551113065";
        String timestamp = String.valueOf(System.currentTimeMillis() / 1000); // 时间戳
        SimpleDateFormat sdf = new SimpleDateFormat("yyyy-MM-dd");
        // 注意时区,否则容易出错
        sdf.setTimeZone(TimeZone.getTimeZone("UTC"));
        String date = sdf.format(new Date(Long.valueOf(timestamp + "000")));

        // ************* 步骤 1:拼接规范请求串 *************
        String httpRequestMethod = "POST"; // 请求方法
        String canonicalUri = "/";
        String canonicalQueryString = "";
        String canonicalHeaders = "content-type:application/json; charset=utf-8\n" + "host:" + host + "\n"; // 请求头信息
        String signedHeaders = "content-type;host"; // 签名头包含内容

        String payload = data; // 请求内容
        String hashedRequestPayload = sha256Hex(payload);
        String canonicalRequest = httpRequestMethod + "\n" + canonicalUri + "\n" + canonicalQueryString + "\n"
                + canonicalHeaders + "\n" + signedHeaders + "\n" + hashedRequestPayload;

        // ************* 步骤 2:拼接待签名字符串 *************
        String credentialScope = date + "/" + service + "/" + "tc3_request";
        String hashedCanonicalRequest = sha256Hex(canonicalRequest);
        String stringToSign = algorithm + "\n" + timestamp + "\n" + credentialScope + "\n" + hashedCanonicalRequest;

        // ************* 步骤 3:计算签名 *************
        byte[] secretDate = hmac256(("TC3" + secretKey).getBytes(UTF8), date);
        byte[] secretService = hmac256(secretDate, service);
        byte[] secretSigning = hmac256(secretService, "tc3_request");
        String signature = DatatypeConverter.printHexBinary(hmac256(secretSigning, stringToSign)).toLowerCase();

        // ************* 步骤 4:拼接 Authorization *************
        String authorization = algorithm + " " + "Credential=" + secretId + "/" + credentialScope + ", "
                + "SignedHeaders=" + signedHeaders + ", " + "Signature=" + signature;

        TreeMap<String, String> headers = new TreeMap<String, String>();
        headers.put("Authorization", authorization);
        headers.put("Content-Type", CT_JSON);
        headers.put("Host", host);
        headers.put("X-TC-Action", action);
        headers.put("X-TC-Timestamp", timestamp);
        headers.put("X-TC-Version", version);
        headers.put("X-TC-Region", region);
        return headers;
    }

    private static byte[] hmac256(byte[] key, String msg) throws Exception {
        Mac mac = Mac.getInstance("HmacSHA256");
        SecretKeySpec secretKeySpec = new SecretKeySpec(key, mac.getAlgorithm());
        mac.init(secretKeySpec);
        return mac.doFinal(msg.getBytes(UTF8));
    }

    private static String sha256Hex(String s) throws Exception {
        MessageDigest md = MessageDigest.getInstance("SHA-256");
        byte[] d = md.digest(s.getBytes(UTF8));
        return DatatypeConverter.printHexBinary(d).toLowerCase();
    }
}
四、总结
经过验证,该方式可以访问经过Nginx代理的腾讯云接口。整个解决过程缺少对问题现状的分析,并没有制定切入点,而是想到哪里改哪里,所以修改的过程异常煎熬。
后续对于问题的挖掘及解决要整体分析然后列出各个怀疑的情况和解决方案,然后对照着清单逐一排查,如此条理清晰的处理过程才会更有效的解决问题。
