【STM32】GPIO控制LED(HAL库版)
STM32最新固件库v3.5/Libraries/CMSIS/CM3/DeviceSupport/ST/STM32F10x/system_stm32f10x.c · 林何/STM32F103C8 - 码云 - 开源中国 (gitee.com)
STM32最新固件库v3.5/Libraries/STM32F10x_StdPeriph_Driver/src/stm32f10x_gpio.c · 林何/STM32F103C8 - 码云 - 开源中国 (gitee.com)
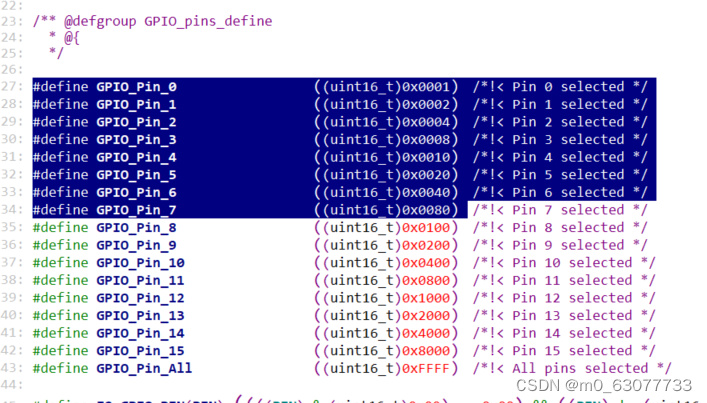
1.宏定义
/* ------------ GPIO registers bit address in the alias region ----------------*/
//AFIO:复用寄存器
#define AFIO_OFFSET                 (AFIO_BASE - PERIPH_BASE)

/* --- EVENTCR Register -----*/

/* Alias word address of EVOE bit */
#define EVCR_OFFSET                 (AFIO_OFFSET + 0x00)
#define EVOE_BitNumber              ((uint8_t)0x07)
#define EVCR_EVOE_BB                (PERIPH_BB_BASE + (EVCR_OFFSET * 32) + (EVOE_BitNumber * 4))


/* ---  MAPR Register ---*/
/* Alias word address of MII_RMII_SEL bit */
#define MAPR_OFFSET                 (AFIO_OFFSET + 0x04)
#define MII_RMII_SEL_BitNumber      ((u8)0x17)
#define MAPR_MII_RMII_SEL_BB        (PERIPH_BB_BASE + (MAPR_OFFSET * 32) + (MII_RMII_SEL_BitNumber * 4))

//位掩码
#define EVCR_PORTPINCONFIG_MASK     ((uint16_t)0xFF80)
#define LSB_MASK                    ((uint16_t)0xFFFF)
#define DBGAFR_POSITION_MASK        ((uint32_t)0x000F0000)
#define DBGAFR_SWJCFG_MASK          ((uint32_t)0xF0FFFFFF)
#define DBGAFR_LOCATION_MASK        ((uint32_t)0x00200000)
#define DBGAFR_NUMBITS_MASK         ((uint32_t)0x00100000)
2..GPIO模块标准库
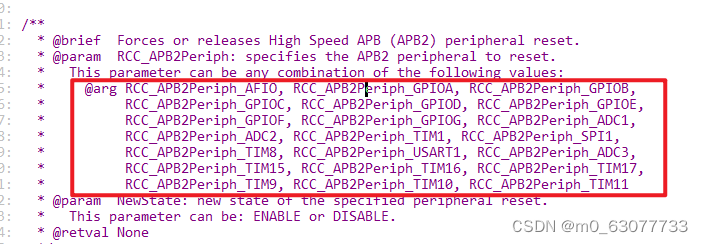
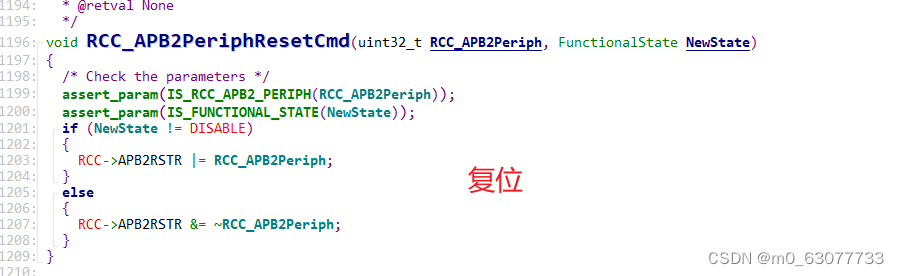
1.GPIO_DeInit


/**
  * @brief  Deinitializes the GPIOx peripheral registers to their default reset values.
  * @param  GPIOx: where x can be (A..G) to select the GPIO peripheral.
  * @retval None
  */
void GPIO_DeInit(GPIO_TypeDef* GPIOx)
{
  /* Check the parameters */
  assert_param(IS_GPIO_ALL_PERIPH(GPIOx));

  if (GPIOx == GPIOA)
  {
    RCC_APB2PeriphResetCmd(RCC_APB2Periph_GPIOA, ENABLE);
    RCC_APB2PeriphResetCmd(RCC_APB2Periph_GPIOA, DISABLE);
  }
  else if (GPIOx == GPIOB)
  {
    RCC_APB2PeriphResetCmd(RCC_APB2Periph_GPIOB, ENABLE);
    RCC_APB2PeriphResetCmd(RCC_APB2Periph_GPIOB, DISABLE);
  }
  else if (GPIOx == GPIOC)
  {
    RCC_APB2PeriphResetCmd(RCC_APB2Periph_GPIOC, ENABLE);
    RCC_APB2PeriphResetCmd(RCC_APB2Periph_GPIOC, DISABLE);
  }
  else if (GPIOx == GPIOD)
  {
    RCC_APB2PeriphResetCmd(RCC_APB2Periph_GPIOD, ENABLE);
    RCC_APB2PeriphResetCmd(RCC_APB2Periph_GPIOD, DISABLE);
  }
  else if (GPIOx == GPIOE)
  {
    RCC_APB2PeriphResetCmd(RCC_APB2Periph_GPIOE, ENABLE);
    RCC_APB2PeriphResetCmd(RCC_APB2Periph_GPIOE, DISABLE);
  }
  else if (GPIOx == GPIOF)
  {
    RCC_APB2PeriphResetCmd(RCC_APB2Periph_GPIOF, ENABLE);
    RCC_APB2PeriphResetCmd(RCC_APB2Periph_GPIOF, DISABLE);
  }
  else
  {
    if (GPIOx == GPIOG)
    {
      RCC_APB2PeriphResetCmd(RCC_APB2Periph_GPIOG, ENABLE);
      RCC_APB2PeriphResetCmd(RCC_APB2Periph_GPIOG, DISABLE);
    }
  }
}
2.GPIO_Init

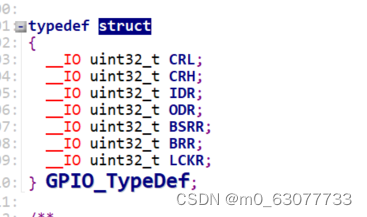
1.参数1:GPIO_TypeDef*
表示哪一个端口是(CRL还是CRH还是IDR)
记录的是寄存器地址
定义在system.stm32f10x.h中【因为外部可能要使用到】
2.参数2:GPIO_InitTypeDef*
描述对GPIO的初始化(形容词)
定义在gpio.h

/**
* @brief GPIO Init structure definition
*/
typedef struct
{
uint16_t GPIO_Pin; /*!< Specifies the GPIO pins to be configured.
This parameter can be any value of @ref GPIO_pins_define */
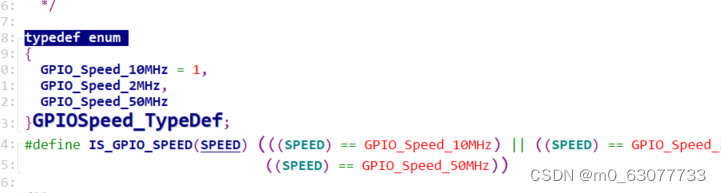
GPIOSpeed_TypeDef GPIO_Speed; /*!< Specifies the speed for the selected pins.
This parameter can be a value of @ref GPIOSpeed_TypeDef */
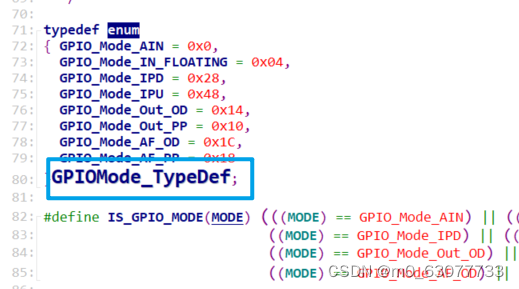
GPIOMode_TypeDef GPIO_Mode; /*!< Specifies the operating mode for the selected pins.
This parameter can be a value of @ref GPIOMode_TypeDef */
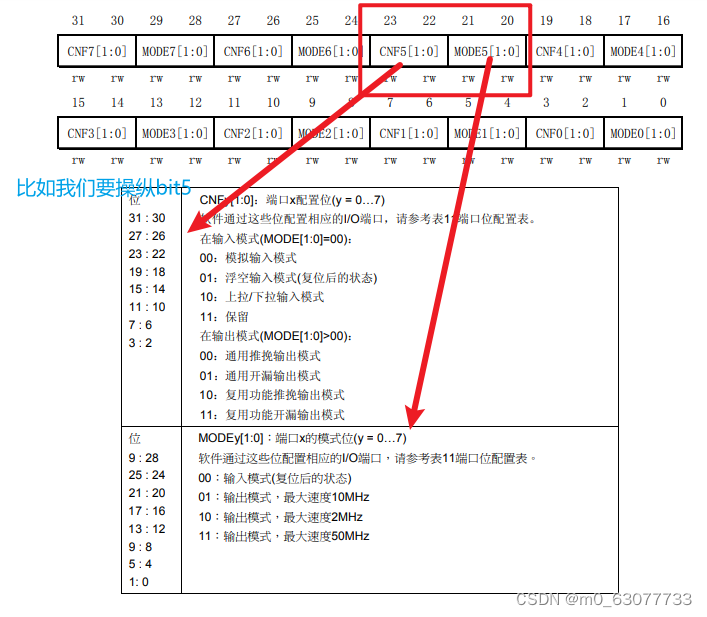
}GPIO_InitTypeDef;3.步骤1:GPIO Mode Configuration
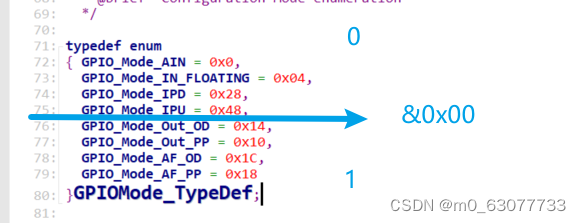
输入模式全是0,输出模式全是1
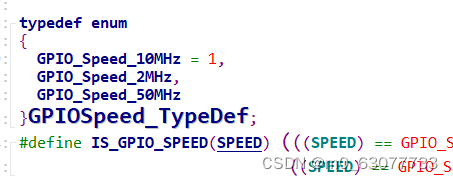
速度初始化
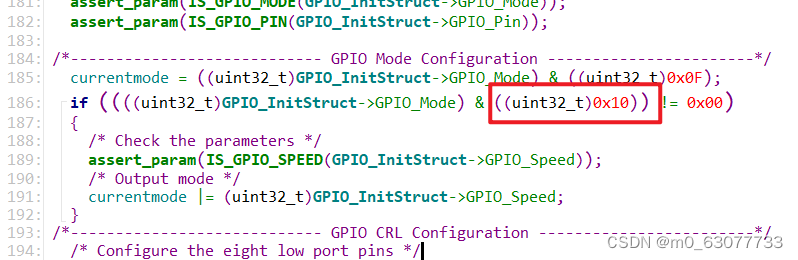
/*---------------------------- GPIO Mode Configuration -----------------------*/
  //取出bit0-bit3
  currentmode = ((uint32_t)GPIO_InitStruct->GPIO_Mode) & ((uint32_t)0x0F);
  if ((((uint32_t)GPIO_InitStruct->GPIO_Mode) & ((uint32_t)0x10)) != 0x00)
  	//判断出等于1(输出模式)的进入
  {
    /* Check the parameters */
    assert_param(IS_GPIO_SPEED(GPIO_InitStruct->GPIO_Speed));
    /* Output mode */
    currentmode |= (uint32_t)GPIO_InitStruct->GPIO_Speed;
  }
4.步骤2:GPIO CRL Configuration
/*---------------------------- GPIO CRL Configuration ------------------------*/
  /* Configure the eight low port pins */
  //判断此时的控制器在CRL(bit0-bit7)还是CRH(bit7-bit15)
  if (((uint32_t)GPIO_InitStruct->GPIO_Pin & ((uint32_t)0x00FF)) != 0x00)
  	//如果进入表示bit0-bit7有为1的,则表示要使用CRL
  {
    tmpreg = GPIOx->CRL;
	//pinpos < 0x08:表示从bit0-bit7开始找
    for (pinpos = 0x00; pinpos < 0x08; pinpos++)
    {
      pos = ((uint32_t)0x01) << pinpos;
      /* Get the port pins position */
	  //判断当前的Pin是哪一个
      currentpin = (GPIO_InitStruct->GPIO_Pin) & pos;
      if (currentpin == pos)//表示这位Pin是1,找到了
      {
        pos = pinpos << 2;
        /* Clear the corresponding low control register bits */
        pinmask = ((uint32_t)0x0F) << pos;
        tmpreg &= ~pinmask;//清零
        /* Write the mode configuration in the corresponding bits */
        tmpreg |= (currentmode << pos);
        /* Reset the corresponding ODR bit */
        if (GPIO_InitStruct->GPIO_Mode == GPIO_Mode_IPD)
        {
          GPIOx->BRR = (((uint32_t)0x01) << pinpos);
        }
        else
        {
          /* Set the corresponding ODR bit */
          if (GPIO_InitStruct->GPIO_Mode == GPIO_Mode_IPU)
          {
            GPIOx->BSRR = (((uint32_t)0x01) << pinpos);
          }
        }
      }
    }
    GPIOx->CRL = tmpreg;
  }
5.步骤3:GPIO CRH Configuration
/*---------------------------- GPIO CRH Configuration ------------------------*/
  /* Configure the eight high port pins */
  if (GPIO_InitStruct->GPIO_Pin > 0x00FF)
  {
    tmpreg = GPIOx->CRH;
    for (pinpos = 0x00; pinpos < 0x08; pinpos++)
    {
      pos = (((uint32_t)0x01) << (pinpos + 0x08));
      /* Get the port pins position */
      currentpin = ((GPIO_InitStruct->GPIO_Pin) & pos);
      if (currentpin == pos)
      {
        pos = pinpos << 2;
        /* Clear the corresponding high control register bits */
        pinmask = ((uint32_t)0x0F) << pos;
        tmpreg &= ~pinmask;
        /* Write the mode configuration in the corresponding bits */
        tmpreg |= (currentmode << pos);
        /* Reset the corresponding ODR bit */
        if (GPIO_InitStruct->GPIO_Mode == GPIO_Mode_IPD)
        {
          GPIOx->BRR = (((uint32_t)0x01) << (pinpos + 0x08));
        }
        /* Set the corresponding ODR bit */
        if (GPIO_InitStruct->GPIO_Mode == GPIO_Mode_IPU)
        {
          GPIOx->BSRR = (((uint32_t)0x01) << (pinpos + 0x08));
        }
      }
    }
    GPIOx->CRH = tmpreg;
  }
3.GPIO_StructInit
对GPIO初始化类型
GPIO_Pin_All:是用于判断此时这个GPIO是否初始化
/**
  * @brief  Fills each GPIO_InitStruct member with its default value.
  * @param  GPIO_InitStruct : pointer to a GPIO_InitTypeDef structure which will
  *         be initialized.
  * @retval None
  */
void GPIO_StructInit(GPIO_InitTypeDef* GPIO_InitStruct)
{
  /* Reset GPIO init structure parameters values */
//GPIO_Pin_All:表示此时初始化到的这个pin是不存在的,表示此时还未指向
  GPIO_InitStruct->GPIO_Pin  = GPIO_Pin_All;
  GPIO_InitStruct->GPIO_Speed = GPIO_Speed_2MHz;
  GPIO_InitStruct->GPIO_Mode = GPIO_Mode_IN_FLOATING;
}
4.GPIO_ReadInputDataBit
读取哪一个引脚的值
/**
  * @brief  Reads the specified input port pin.
  * @param  GPIOx: where x can be (A..G) to select the GPIO peripheral.
  * @param  GPIO_Pin:  specifies the port bit to read.
  *   This parameter can be GPIO_Pin_x where x can be (0..15).
  * @retval The input port pin value.
  */
uint8_t GPIO_ReadInputDataBit(GPIO_TypeDef* GPIOx, uint16_t GPIO_Pin)
{
  uint8_t bitstatus = 0x00;

  /* Check the parameters */
  assert_param(IS_GPIO_ALL_PERIPH(GPIOx));
  assert_param(IS_GET_GPIO_PIN(GPIO_Pin));

  if ((GPIOx->IDR & GPIO_Pin) != (uint32_t)Bit_RESET)
  {
    bitstatus = (uint8_t)Bit_SET;
  }
  else
  {
    bitstatus = (uint8_t)Bit_RESET;
  }
  return bitstatus;
}
5.GPIO_ReadInputData
读取整个端口
/**
  * @brief  Reads the specified GPIO input data port.
  * @param  GPIOx: where x can be (A..G) to select the GPIO peripheral.
  * @retval GPIO input data port value.
  */
uint16_t GPIO_ReadInputData(GPIO_TypeDef* GPIOx)
{
  /* Check the parameters */
  assert_param(IS_GPIO_ALL_PERIPH(GPIOx));

  return ((uint16_t)GPIOx->IDR);
}
6.GPIO_ReadOutputDataBit/GPIO_ReadOutputData
/**
* @brief Reads the specified output data port bit.
* @param GPIOx: where x can be (A..G) to select the GPIO peripheral.
* @param GPIO_Pin: specifies the port bit to read.
* This parameter can be GPIO_Pin_x where x can be (0..15).
* @retval The output port pin value.
*/
uint8_t GPIO_ReadOutputDataBit(GPIO_TypeDef* GPIOx, uint16_t GPIO_Pin)
{
uint8_t bitstatus = 0x00;
/* Check the parameters */
assert_param(IS_GPIO_ALL_PERIPH(GPIOx));
assert_param(IS_GET_GPIO_PIN(GPIO_Pin));
if ((GPIOx->ODR & GPIO_Pin) != (uint32_t)Bit_RESET)
{
bitstatus = (uint8_t)Bit_SET;
}
else
{
bitstatus = (uint8_t)Bit_RESET;
}
return bitstatus;
}
/**
* @brief Reads the specified GPIO output data port.
* @param GPIOx: where x can be (A..G) to select the GPIO peripheral.
* @retval GPIO output data port value.
*/
uint16_t GPIO_ReadOutputData(GPIO_TypeDef* GPIOx)
{
/* Check the parameters */
assert_param(IS_GPIO_ALL_PERIPH(GPIOx));
return ((uint16_t)GPIOx->ODR);
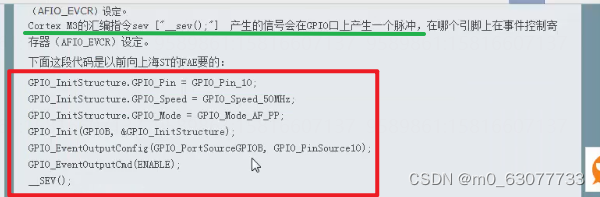
}7. GPIO_EventOutputConfig
/**
  * @brief  Selects the GPIO pin used as Event output.
  * @param  GPIO_PortSource: selects the GPIO port to be used as source
  *   for Event output.
  *   This parameter can be GPIO_PortSourceGPIOx where x can be (A..E).
  * @param  GPIO_PinSource: specifies the pin for the Event output.
  *   This parameter can be GPIO_PinSourcex where x can be (0..15).
  * @retval None
  */
void GPIO_EventOutputConfig(uint8_t GPIO_PortSource, uint8_t GPIO_PinSource)
{
  uint32_t tmpreg = 0x00;
  /* Check the parameters */
  assert_param(IS_GPIO_EVENTOUT_PORT_SOURCE(GPIO_PortSource));
  assert_param(IS_GPIO_PIN_SOURCE(GPIO_PinSource));

  tmpreg = AFIO->EVCR;
  /* Clear the PORT[6:4] and PIN[3:0] bits */
  tmpreg &= EVCR_PORTPINCONFIG_MASK;
  tmpreg |= (uint32_t)GPIO_PortSource << 0x04;
  tmpreg |= GPIO_PinSource;
  AFIO->EVCR = tmpreg;
}
8.GPIO_PinRemapConfig
当我们要使用的引脚不够时,就要将其他不需要使用到的引脚进行复用
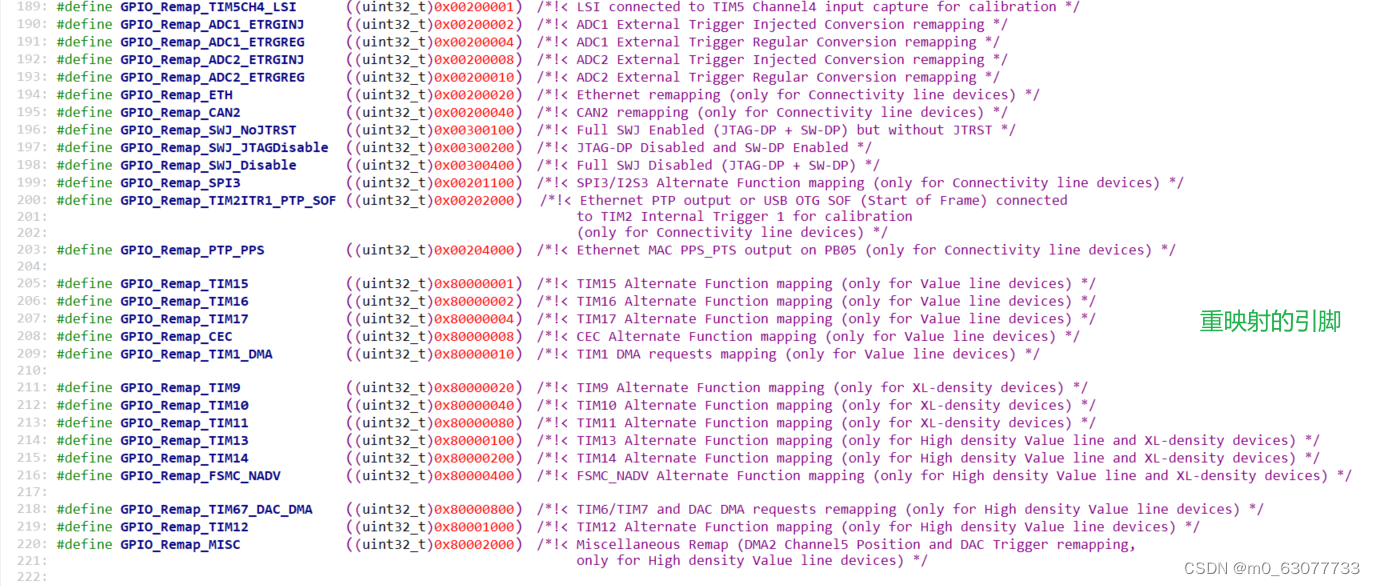
void GPIO_PinRemapConfig(uint32_t GPIO_Remap, FunctionalState NewState)
{
  uint32_t tmp = 0x00, tmp1 = 0x00, tmpreg = 0x00, tmpmask = 0x00;

  /* Check the parameters */
  assert_param(IS_GPIO_REMAP(GPIO_Remap));
  assert_param(IS_FUNCTIONAL_STATE(NewState));

  if((GPIO_Remap & 0x80000000) == 0x80000000)
  {
    tmpreg = AFIO->MAPR2;
  }
  else
  {
    tmpreg = AFIO->MAPR;
  }

  tmpmask = (GPIO_Remap & DBGAFR_POSITION_MASK) >> 0x10;
  tmp = GPIO_Remap & LSB_MASK;

  if ((GPIO_Remap & (DBGAFR_LOCATION_MASK | DBGAFR_NUMBITS_MASK)) == (DBGAFR_LOCATION_MASK | DBGAFR_NUMBITS_MASK))
  {
    tmpreg &= DBGAFR_SWJCFG_MASK;
    AFIO->MAPR &= DBGAFR_SWJCFG_MASK;
  }
  else if ((GPIO_Remap & DBGAFR_NUMBITS_MASK) == DBGAFR_NUMBITS_MASK)
  {
    tmp1 = ((uint32_t)0x03) << tmpmask;
    tmpreg &= ~tmp1;
    tmpreg |= ~DBGAFR_SWJCFG_MASK;
  }
  else
  {
    tmpreg &= ~(tmp << ((GPIO_Remap >> 0x15)*0x10));
    tmpreg |= ~DBGAFR_SWJCFG_MASK;
  }

  if (NewState != DISABLE)
  {
    tmpreg |= (tmp << ((GPIO_Remap >> 0x15)*0x10));
  }

  if((GPIO_Remap & 0x80000000) == 0x80000000)
  {
    AFIO->MAPR2 = tmpreg;
  }
  else
  {
    AFIO->MAPR = tmpreg;
  }
}
9.GPIO_EXTILineConfig
与外部中断有关
/**
  * @brief  Selects the GPIO pin used as EXTI Line.
  * @param  GPIO_PortSource: selects the GPIO port to be used as source for EXTI lines.
  *   This parameter can be GPIO_PortSourceGPIOx where x can be (A..G).
  * @param  GPIO_PinSource: specifies the EXTI line to be configured.
  *   This parameter can be GPIO_PinSourcex where x can be (0..15).
  * @retval None
  */
void GPIO_EXTILineConfig(uint8_t GPIO_PortSource, uint8_t GPIO_PinSource)
{
  uint32_t tmp = 0x00;
  /* Check the parameters */
  assert_param(IS_GPIO_EXTI_PORT_SOURCE(GPIO_PortSource));
  assert_param(IS_GPIO_PIN_SOURCE(GPIO_PinSource));

  tmp = ((uint32_t)0x0F) << (0x04 * (GPIO_PinSource & (uint8_t)0x03));
  AFIO->EXTICR[GPIO_PinSource >> 0x02] &= ~tmp;
  AFIO->EXTICR[GPIO_PinSource >> 0x02] |= (((uint32_t)GPIO_PortSource) << (0x04 * (GPIO_PinSource & (uint8_t)0x03)));
}
3.使用GPIO库函数点亮LED
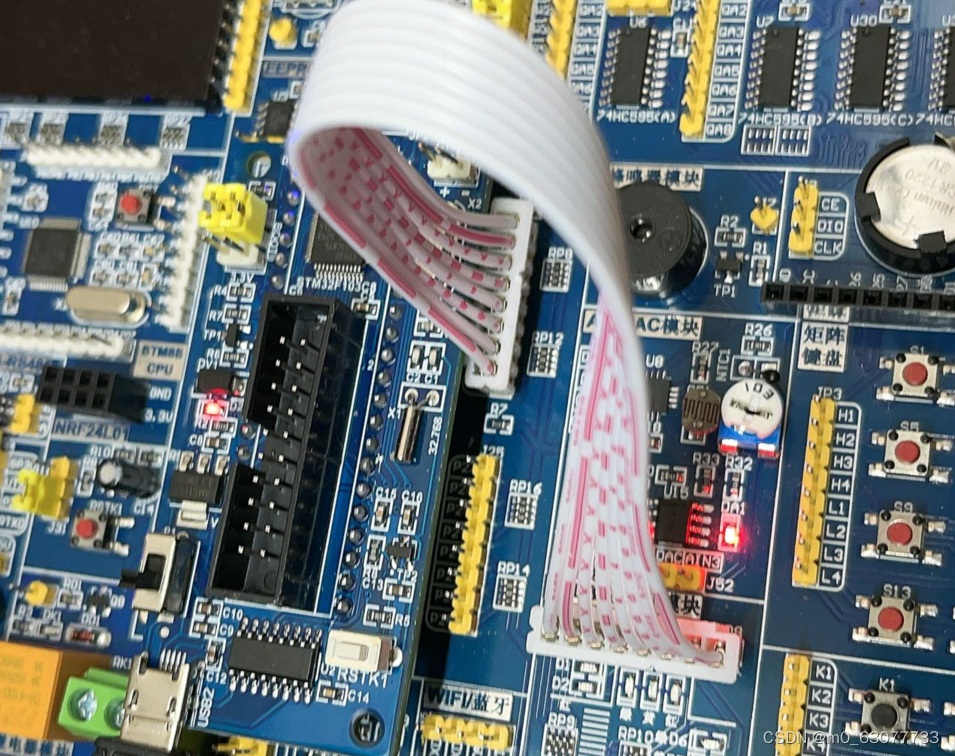
1.接线
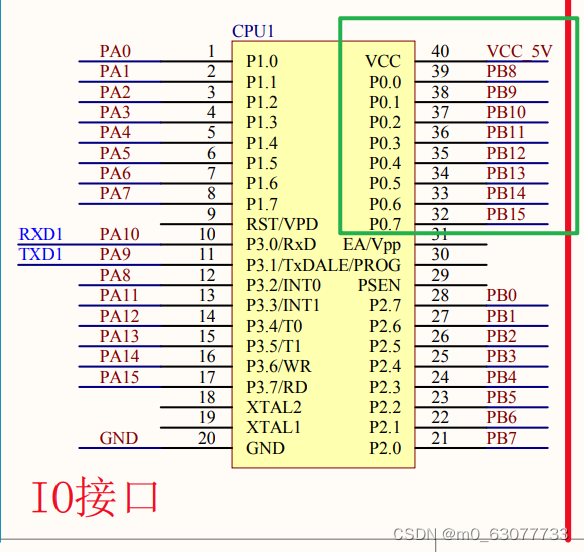
我们连接的是GPIOB8-GPIOB15
注意点:我们这里是反着接的【要将引脚一一对应】
2.代码实现
#include "led.h"
#include "stm32f10x.h"                  // Device header

static void delay(){
	unsigned int i=0,j=0;
	for(i=0;i<1000;i++){
		for(j=0;j<2000;j++){
		}
	}
}
/*
void led_init(){

	//因为RCC部分还没有定义结构体,所以还是按照原来的方式去操作
	RCC->APB2ENR = 0x00000008;

	GPIOB->CRH=0x33333333;

	GPIOB->ODR=0x00000000;
}

void delay(){
	unsigned int i=0,j=0;
	for(i=0;i<1000;i++){
		for(j=0;j<2000;j++){
		}
	}
}
void led_flash(void){
	unsigned int i=0;
	for(i=0;i<3;i++){
		GPIOB->ODR = 0x00000000;//全亮
		delay();
		GPIOB->ODR = 0x0000ff00;//全灭
		delay();
	}
}

*/

//硬件实际用到的是GPIOB8-GPIOB15
//使用标准库中的GPIO进行封装API来进行GPIO设置,以点亮LED


//定义一个结构体:描述GPIO的速度,频率等
GPIO_InitTypeDef gpio_InitStructure;

/**
	注意点:如果我们没有去操纵某一个引脚的时候
	默认上电后,灯全部亮
*/
void led_init(){

	//一、通过GPIO初始化来实现

	//记得一定要加上时钟
	RCC->APB2ENR=0x00000008;

	//单独设置
	//实际操纵寄存器去将GPB8设置为推挽输出模式,并且速率50MHZ
	gpio_InitStructure.GPIO_Pin=GPIO_Pin_9;
	gpio_InitStructure.GPIO_Speed=GPIO_Speed_2MHz;
	gpio_InitStructure.GPIO_Mode=GPIO_Mode_Out_PP;
	//void GPIO_Init(GPIO_TypeDef* GPIOx, GPIO_InitTypeDef* GPIO_InitStruct)
	GPIO_Init(GPIOB,&gpio_InitStructure);

	//二、设置LED亮,则需要输出模式
	//此时操纵一个引脚
	//操纵BSRR寄存器设置GPB8输出1,让LED点亮
	//void GPIO_SetBits(GPIO_TypeDef* GPIOx, uint16_t GPIO_Pin)
	GPIO_SetBits(GPIOB,GPIO_Pin_9);

}


void led_flash(){

	unsigned int i=0;
	for(i=0;i<3;i++){
		GPIO_SetBits(GPIOB,GPIO_Pin_9);//GPB9亮
		delay();
		GPIO_SetBits(GPIOB,GPIO_Pin_9);//GPB9灭
		delay();

	}


}