聊聊装饰模式
缘起
某日,阳光明媚,绿草花香。Leader突然找到了小明:“小明,如果让你将一个人的穿着使用代码来实现,你该怎么完成呢?”
小明一听,回答道:“Leader,这个不难,马上就完事儿。”,于是第一版就出炉了。
Person类
public class Person {

    private String name;

    public Person(String name) {
        this.name = name;
    }

    public void wearTShirts() {
        System.out.println("T恤");
    }

    public void wearBigTrouser() {
        System.out.println("垮裤");
    }

    public void wearSneakers() {
        System.out.println("球鞋");
    }

    public void wearSuit() {
        System.out.println("西装");
    }

    public void wearTie() {
        System.out.println("领带");
    }

    public void show() {
        System.out.println("装扮的" + name);
    }

}
客户端
Person x = new Person("小明");
System.out.println("第一种装扮:");
x.wearBigTrouser();
x.wearSneakers();
x.wearSuit();
x.show();


System.out.println("第二种装扮:");
x.wearTie();
x.wearBigTrouser();
x.wearTShirts();
x.show();
看完后,Leader又问道:“那如果我要增加新的装束呢?”
小明想了想:“改改Person类就行了,哎不对,这样就违背开放-封闭原则了,我再改下,应该是把这些装饰全都写成子类就好了”。
于是,第二版出炉
代码结构图

- Person类
public class Person {

    private String name;

    public Person(String name) {
        this.name = name;
    }

    public void show() {
        System.out.println("装扮的" + name);
    }
}
- 服饰抽象类
public abstract class Finery {

    public abstract void show();

}
- 各种服饰子类
public class TShirts extends Finery {
    @Override
    public void show() {
        System.out.println("T恤");
    }
}

public class BigTrouser extends Finery {
    @Override
    public void show() {
        System.out.println("垮裤");
    }
}

public class Sneakers extends Finery {
    @Override
    public void show() {
        System.out.println("垮裤");
    }
}
...
客户端
Person x = new Person("小明");
System.out.println("第一种装扮:");
Finery dtx = new TShirts();
Finery trouser = new BigTrouser();
Finery sneakers = new Sneakers();

dtx.show();
trouser.show();
sneakers.show();
x.show();
完成后,Leader看了下,问道:“你下面这段代码,各种show()调用不是显得很麻烦吗,我们可以在内部全部组装完毕后,再展示出来。但是要注意这跟建造者模式是不同的哦,建造者模式要求建造的过程必须是稳定的,而我们这个例子,穿衣的过程顺序可是不能够保证的,比如我先穿T恤,我还能先穿垮裤。方案都是不固定的。需要把所需的功能按正确的顺序串联起来进行控制,那么就需要用到装饰模式”
装饰模式
装饰模式:动态给一个对象添加一些额外的职责,就增加功能来说,装饰模式比生成子类,更加灵活。
结构图
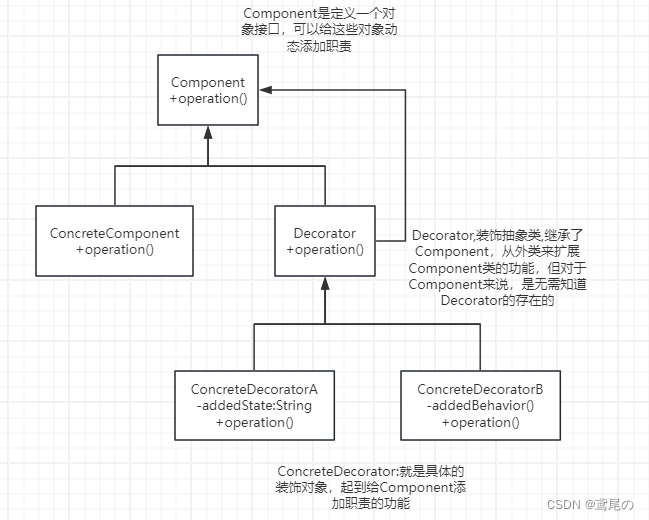
Component是定义一个对象接口,可以给这些对象动态添加职责.
Decorator,装饰抽象类,继承了Component,从外类来扩展Component类的功能,但对于Component来说,是无需知道Decorator的存在的.
ConcreteDecorator:就是具体的装饰对象,起到给Component添加职责的功能
看下如何实现:
- Component
public abstract class Component {

    public abstract void operation();
}
- ConcreteComponent
public class ConcreteComponent extends Component {
    @Override
    public void operation() {
        System.out.println("具体对象操作");
    }
}
- Decorator
public class Decorator extends Component {

    // 装饰一个component对象
    protected Component component;
    public void setComponent(Component component) {
        this.component = component;
    }
    @Override
    public void operation() {
        if (component != null) {
            component.operation();
        }
    }
}
- ConcreteDecoratorA
public class ConcreteDecoratorA extends Decorator {

    private String addedState; // 本类独有字段,区别于B类

    @Override
    public void operation() {
        super.operation();
        this.addedState = "具体装饰对象A的独有操作";
        System.out.println(this.addedState);
    }
}
- ConcreteDecoratorB
public class ConcreteDecoratorB extends Decorator {
    @Override
    public void operation() {
        super.operation();   // 先运行原有Component的功能
        this.addedBehavior();   // 运行本类独有功能
    }
    private void addedBehavior() {
        System.out.println("具体装饰对象B的独有操作");
    }
}
- 客户端
ConcreteComponent c = new ConcreteComponent();
ConcreteDecoratorA d1 = new ConcreteDecoratorA();
ConcreteDecoratorB d2 = new ConcreteDecoratorB();

d1.setComponent(c);	// 先用d1包装c
d2.setComponent(d1); // 再用d2包装d1
d2.operation();	// 最终执行d2的operation()
装饰模式是利用setComponent来对对象进行包装。这样每个装饰对象的实现就和如何使用这个对象分离开了,每个装饰对象只关心自己的功能,不需要关心如何被添加到对象链当中。
如果只有一个ConcreteComponent类,没有Component抽象类,那么Decorator类是可以是ConcreteComponent类的一个子类。
同样道理,如果只有一个ConcreteDecorator的类,那么就没有必要建立一个单独的Decorator类,而可以将Decorator和ConcreteDecorator的责任合并成一个类。
小明第三版代码
- ICharacter(Component)
// 人物形象接口
public interface ICharacter {
    void show();
}
- Person类(ConcreteComponent)
public class Person implements ICharacter {

    private String name;

    public Person(String name) {
        this.name = name;
    }

    public void show() {
        System.out.println("装扮的" + name);
    }

}
- Finery类(Decorator)
public class Finery implements ICharacter {

    protected ICharacter component;

    public void setComponent(ICharacter component) {
        this.component = component;
    }

    @Override
    public void show() {
        if (this.component != null) {
            component.show();
        }
    }
}
- 具体服饰类(ConcreteDecorator),其余代码省略
public class TShirts extends Finery {
    @Override
    public void show() {
        System.out.println("T恤");
        super.show();
    }
}
- 客户端
Person x = new Person("小明");
System.out.println("装扮");

Sneakers sneakers = new Sneakers();		// 生成球鞋实例
TShirts tShirts = new TShirts();		// 生成T恤实例
BigTrouser bigTrouser = new BigTrouser();// 生成垮裤实例

sneakers.setComponent(x);			// 球鞋装饰小明
tShirts.setComponent(sneakers);		// T恤装饰有球鞋装饰的小明
bigTrouser.setComponent(tShirts);	// 垮裤装饰有球鞋和T恤装饰的小明

bigTrouser.show();	// 展示形象
Leader看后很满意:“你这样后面如果再增加新的服饰时,只需要这样”
public class Strawhat extends Finery {

    @Override
    public void show() {
        System.out.println("草帽");
        super.show();
    }
}
简单工厂+策略+装饰模式实现
Leader又问道:“还记得上次的商场收银功能吗,如果我再增加在打8折的基础上,再满300返100或者别的,改动要求尽量的小,你如何实现呢?”
小明想了想,开始码代码。增加一个新的算法类
public class CashReturnRebate extends CashSuper {

    private double moneyRebate = 1d;
    private double moneyCondition = 0d; // 返利条件
    private double moneyReturn = 0d;    // 返利值

    public CashReturnRebate(double moneyRebate, double moneyCondition, double moneyReturn) {
        this.moneyRebate = moneyRebate;
        this.moneyCondition = moneyCondition;
        this.moneyReturn = moneyReturn;
    }

    @Override
    public double acceptCash(double price, int num) {
        double result = price * num * this.moneyRebate;
        if (moneyCondition > 0 && result >= moneyCondition) {
            result = result - Math.floor(result / moneyCondition) * moneyReturn;
        }
        return result;
    }
}
- 再去修改CashContext类,增加一个先打折再满减的算法实例对象。
public class CashContext {
    private CashSuper cs;

    // 通过构造方法传入收费策略
    public CashContext(int cashType) {
        CashSuper cs = null;
        switch (cashType) {
            case 1:
                this.cs = new CashNormal();//正常收费
                break;
            case 2:
                this.cs = new CashRebate(0.8d); // 八折
                break;
            case 3:
                this.cs = new CashRebate(0.7d); // 七折
                break;
            case 4:
                this.cs = new CashReturn(300d, 100d);    // 满300返100
                break;
            case 5:
                this.cs = new CashReturnRebate(0.8d, 300d, 100d);
                break;
        }
    }

    public CashContext(CashSuper cs) {
        this.cs = cs;
    }
    public double getResult(double price, int num) {
        return cs.acceptCash(price, num);
    }
}
Leader看了后,又问:“你有没有发现,你新增的CashReturnRebate类和CashReturn和CashRebate有大量重复代码呢?”
小明看后,:“确实是哎,等于是把这两个类的代码合并写了一遍,变成了CashReturnRebate类,等一下,刚说的装饰模式好像能解决这个问题。我先试下”

- ISale
public interface ISale {
    double acceptCash(double price, double num);
}
- CashSuper改成普通类,实现ISale接口
public class CashSuper implements ISale {

    protected ISale component;

    public void decorate(ISale component) {
        this.component = component;
    }

    @Override
    public double acceptCash(double price, double num) {

        double result = 0d;
        if (this.component != null) {
            result = this.component.acceptCash(price, num);
        }
        return result;
    }
}
- CashNormal类扮演ConcreteComponent角色,也是最基本的功能实现,单价*数量的原价算法
public class CashNormal implements ISale {

    @Override
    public double acceptCash(double price, double num) {
        return price * num;
    }
}
另外两个CashSuper的子算法,都在计算后,再增加一个super.acceptCash(result, 1)的返回
public class CashRebate extends CashSuper {

    private double moneyRebate = 1d;

    // 初始化时必须输入打折的折扣,八折就是0.8
    public CashRebate(double moneyRebate){
        this.moneyRebate = moneyRebate;
    }

    @Override
    public double acceptCash(double price, double num) {
        double result = price * num * moneyRebate;
        return super.acceptCash(result, num);
    }
}
public class CashReturn extends CashSuper {

    private double moneyCondition = 0d; // 返利条件
    private double moneyReturn = 0d;    // 返回金额

    // 返利收费,初始化时必须输入返利条件和返利值
    // 如300返100,moneyCondition = 300 , moneyReturn = 100
    public CashReturn(double moneyCondition, double moneyReturn) {
        this.moneyCondition = moneyCondition;
        this.moneyReturn = moneyReturn;
    }

    @Override
    public double acceptCash(double price, double num) {
        double result = price * num;
        if (moneyCondition > 0 && result >= moneyCondition) {
            result = result - Math.floor(result / moneyCondition) * moneyReturn;
        }
        return super.acceptCash(result, num);
    }
}
重点在CashContext类,因为涉及组合算法,所以用装饰模式的方式进行包装,这里需要注意包装的顺序,先打折后满多少返多少,和先满多少再打折多少是两种不同的意思。
public class CashContext {
    private ISale cs;

    // 通过构造方法传入收费策略
    public CashContext(int cashType) {
        CashSuper cs = null;
        switch (cashType) {
            case 1:
                this.cs = new CashNormal();//正常收费
                break;
            case 2:
                this.cs = new CashRebate(0.8d); // 八折
                break;
            case 3:
                this.cs = new CashRebate(0.7d); // 七折
                break;
            case 4:
                this.cs = new CashReturn(300d, 100d);    // 满300返100
                break;
            case 5:
                CashNormal cn = new CashNormal();
                CashReturn cr1 = new CashReturn(300d, 100d);
                CashRebate cr2 = new CashRebate(0.8d);

                cr1.decorate(cn);
                cr2.decorate(cr1);
                this.cs = cr2;
                break;
        }
    }

    public CashContext(CashSuper cs) {
        this.cs = cs;
    }
    public double getResult(double price, int num) {
        return cs.acceptCash(price, num);
    }
}
客户端算法依旧不用改变。
总结
起初的设计中,当系统需要新的功能时,再向旧的类中添加新的代码。这些新的代码通常是装饰了原有类的核心职责或主要行为。
在主类中加入新的字段或方法,增加了主类的复杂度。这些新加入的东西仅仅是为了满足一些只在某种特定情况下才会执行的特殊行为的需要。而装饰模式提供了一个很好的方案,它把每个要装饰的功能放在单独的类中,并且让这个类包装它所要装饰的对象,因此当需要执行特殊行为时,客户代码就可以在运行时根据需要有选择、按顺序的使用装饰功能包装对象了。
优点就是,将类中的装饰功能从类中移除,可以简化原有的类。
有效把类的核心职责和装饰功能都区分开,而且可以去除相关类中重复的装饰行为。