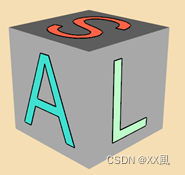
场景中的解剖学方向标记_vtkAnnotatedCubeActor
开发环境:
- Windows 11 家庭中文版
- Microsoft Visual Studio Community 2019
- VTK-9.3.0.rc0
- vtk-example
- 参考代码
demo解决问题:显示标记当前视角、空间的方位,关键对象vtkAnnotatedCubeActor:
vtkAnnotatedCubeActor 是一个混合3D 演员,用于表示场景中的解剖学方向标记。该类由一个以原点为中心的三维单位立方体组成,每个面对应于一个特定的坐标方向进行标记。例如,对于笛卡尔方向,用户定义的文本标签可以是: + X,-X,+ Y,-Y,+ Z,-Z,而对于解剖方向: A,P,L,R,S,I。文本自动以每个立方体面为中心,不限于单个字符。除了实体文本标签表示法外,还可以显示标签的轮廓边缘。多维数据集、表面标签和文本轮廓的各个属性可以像它们的可见性一样进行操作。
医学影像方位相关概念参考链接:
链接1
链接2
cube设置:
  /*
    上下方向:Superior,Inferior(您的图中是H和F)
    左右方向:Left, Right
    前后方向:Anterior,Posterior
  */
  cube->SetXPlusFaceText("A");      //以cube重心为原点的+x方向面
  cube->SetXMinusFaceText("P");     //以cube重心为原点的-x方向面
  cube->SetYPlusFaceText("L");      //以cube重心为原点的+y方向面
  cube->SetYMinusFaceText("R");     //以cube重心为原点的-y方向面
  cube->SetZPlusFaceText("S");      //以cube重心为原点的+z方向面
  cube->SetZMinusFaceText("I");     //以cube重心为原点的-z方向面
相机设置:
  vtkCamera* camera = renderer->GetActiveCamera();
  camera->SetViewUp(0, 0, 1);
  camera->SetFocalPoint(0, 0, 0);
  camera->SetPosition(4.5, 4.5, 2.5);
  //根据可见的actor自动设置摄像机。
  //摄像机将重新定位自身以查看actor的中心点,
  //并沿着其初始视角平面法线(即从摄像机位置到焦点定义的矢量)移动,以便可以看到所有actor。
  renderer->ResetCamera();
  //将相机与焦点的距离除以给定的推车值。
  //使用大于 1 的值向焦点推入,使用小于 1 的值推移远离焦点。
  camera->Dolly(1.0);
  //根据可见actor的边界重置摄像机剪裁范围。这样可以确保没有对象被切断
  renderer->ResetCameraClippingRange();

其他参考链接
prj name: AnnotatedCubeActor
#include <vtkAnnotatedCubeActor.h>
#include <vtkCamera.h>
#include <vtkNamedColors.h>
#include <vtkNew.h>
#include <vtkProperty.h>
#include <vtkRenderWindow.h>
#include <vtkRenderWindowInteractor.h>
#include <vtkRenderer.h>

int main(int, char*[])
{
  vtkNew<vtkNamedColors> colors;

  // Set up the renderer, window, and interactor.
  //
  vtkNew<vtkRenderer> renderer;
  renderer->SetBackground(colors->GetColor3d("Wheat").GetData());

  vtkNew<vtkRenderWindow> renderWindow;
  renderWindow->AddRenderer(renderer);
  renderWindow->SetSize(640, 480);
  renderWindow->SetWindowName("AnnotatedCubeActor");

  vtkNew<vtkRenderWindowInteractor> interactor;
  interactor->SetRenderWindow(renderWindow);

  vtkNew<vtkAnnotatedCubeActor> cube;
  cube->SetFaceTextScale(2.0 / 3.0);

  // Anatomic labelling.
  /*
    上下方向:Superior,Inferior(您的图中是H和F)
    左右方向:Left, Right
    前后方向:Anterior,Posterior
  */
  cube->SetXPlusFaceText("A");      //以cube重心为原点的+x方向面
  cube->SetXMinusFaceText("P");     //以cube重心为原点的-x方向面
  cube->SetYPlusFaceText("L");      //以cube重心为原点的+y方向面
  cube->SetYMinusFaceText("R");     //以cube重心为原点的-y方向面
  cube->SetZPlusFaceText("S");      //以cube重心为原点的+z方向面
  cube->SetZMinusFaceText("I");     //以cube重心为原点的-z方向面

  // Change the vector text colors.
  //
  cube->GetTextEdgesProperty()->SetColor(colors->GetColor3d("Black").GetData());
  cube->GetTextEdgesProperty()->SetLineWidth(4);

  // clang-format off
  cube->GetXPlusFaceProperty()->SetColor(
      colors->GetColor3d("Turquoise").GetData());
  cube->GetXMinusFaceProperty()->SetColor(
      colors->GetColor3d("Turquoise").GetData());
  cube->GetYPlusFaceProperty()->SetColor(
      colors->GetColor3d("Mint").GetData());
  cube->GetYMinusFaceProperty()->SetColor(
      colors->GetColor3d("Mint").GetData());
  cube->GetZPlusFaceProperty()->SetColor(
      colors->GetColor3d("Tomato").GetData());
  cube->GetZMinusFaceProperty()->SetColor(
      colors->GetColor3d("Tomato").GetData());
  // clang-format on

  renderer->AddActor(cube);

  // Set up an interesting view.
  //
  vtkCamera* camera = renderer->GetActiveCamera();
  camera->SetViewUp(0, 0, 1);
  camera->SetFocalPoint(0, 0, 0);
  camera->SetPosition(4.5, 4.5, 2.5);
  //根据可见的演员自动设置摄像机。
  //摄像机将重新定位自身以查看演员的中心点,
  //并沿着其初始视角平面法线(即从摄像机位置到焦点定义的矢量)移动,以便可以看到所有演员。
  renderer->ResetCamera();
  //将相机与焦点的距离除以给定的推车值。
  //使用大于 1 的值向焦点推入,使用小于 1 的值推移远离焦点。
  camera->Dolly(1.0);
  //根据可见 actor 的边界重置摄像机剪裁范围。这样可以确保没有对象被切断
  renderer->ResetCameraClippingRange();

  renderWindow->Render();
  interactor->Start();

  return EXIT_SUCCESS;
}
