【pytorch】深度学习入门一:pytorch的安装与配置(Windows版)
请支持原创,认准DannisTang(tangweixuan1995@foxmail.com)
文章目录
- 第〇章 阅读前提示
- 第一章 准备工作
- 第一节 Python下载
- 第二节 Python安装
- 第三节 Python配置
- 第四节 Pycharm下载
- 第五节 Pycharm安装
- 第六节 CUDA的安装
- 第二章 Anaconda安装与配置
- 第一节 Anaconda下载与环境变量配置
- 1、Anaconda下载与安装
- 2、Anaconda配置环境变量
- 第二节 Anaconda镜像源配置
- 1、查看
- 2、配置(命令行)
- 1)直接输入命令行配置
- 2)文件夹进行输入配置(Windows版)
- 3、配置(界面配置)
- 4、删除(命令行)
- 5、修改配置源(Linux版)
- 6、常用命令
- 1)环境类
- 2)包类
- 第三节 Pytorch安装与配置
- 1、创建Pytorch环境
- 2、激活Pytorch环境
- 3、关闭Pytorch环境(可选)
- 4、找到pytorch命令
- 5、验证pytorch安装
- 附节一、报错的场景和方法
- 1、创建环境报错
- 2、创建pytorch报错
- 3、下载时间超时
- 4、报错信息
- 第四节 进入pycharm
- 1、添加环境
- 2、小试牛刀
第〇章 阅读前提示
本文重点放在深度学习上,因此,对于Python部分的内容,会稍显不足。如果本文的读者想重点了解Python相关的知识,请查看其他的文章。但是为了方便入门,本文在前面依然会描述Python配置相关的内容,以及一些需要用到的Python相关的命令等。
同时值得注意的是,本文如果没有特殊说明,均是在Windows平台下进行开发和调试等。
并且为了保证兼容性,硬件设备(即你的电脑主机)最好为英特尔的CPU与英伟达的GPU(通俗理解为显卡)。
第一章 准备工作
本章将讲解深度学习的准备工作,因为不是本文的主要目的,所以不会花费很大的篇幅去讲解, 如果在本章的过程中出现问题,可以在网络中搜索下出现的问题。
本章讲解,在windows下安装和配置python和pycharm以及英伟达的cuda的安装。
第一节 Python下载
Python官网下载,下载版本为3.11.5。下载地址链接(Windows版本)
选择自己的版本进行下载,不同Python的版本可能会有兼容性的问题
(版本兼容性:通常情况来说,大版本不同,不兼容性较大,小版本不同,兼容性较小。版本号大的会兼容版本号小的。但不排除有特殊情况)
第二节 Python安装
如果选择exe的安装包的方式的话,直接下一步下一步的安装即可
第三节 Python配置
exe安装包的方法进行默认的配置
第四节 Pycharm下载
在jetbrain的官网下载Pycharm下载地址链接(Windows版本)
第五节 Pycharm安装
因为是exe安装包,所以直接下一步即可。安装完成之后,需要license,请自行解决license。
第六节 CUDA的安装
在cmd命令窗口下面,执行命令
nvidia-smi
查看自己的cuda版本,如果版本太低的话,可以下载Nvidia GeForce Experience进行更新驱动

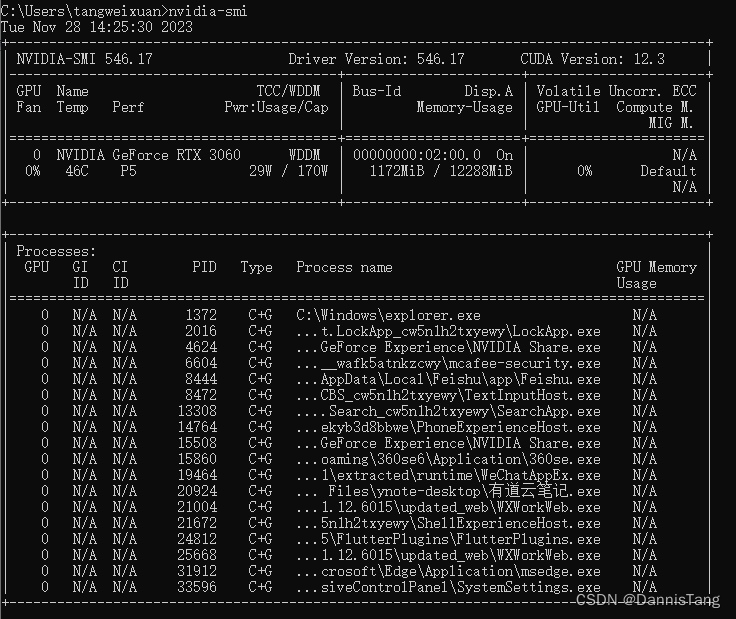
注:这里我更新过英伟达的显卡驱动,用的是Nvidia GeForce Experience,直接自动更新,所以前后的版本不一致(第一次是516.94,cuda是11.7;第二次是546.17,cuda是12.3)。
并且如果使用Nvidia GeForce Experience的话,需要登录Nvidia的账号,自行注册一个即可,这里不再赘述。
Nvidia GeForce Experience下载地址(下载安装后自动更新驱动,含CUDA)
第二章 Anaconda安装与配置
第一节 Anaconda下载与环境变量配置
1、Anaconda下载与安装
先下载anaconda,因为是免费的,所以官网下载即可
下载地址链接(Windows版本)
下载完成后,进行安装,安装后即可使用,安装过程中直接点下一步即可。安装的路径为,需要记录这两个路径,后面在pycharm需要用到,如果是你自己安装的(并且是默认的路径),将用户名替换成你自己的用户名即可
C:\Users\用户名\AppData\Local\anaconda3
C:\Users\用户名\AppData\Local\anaconda3\Scripts\conda.exe
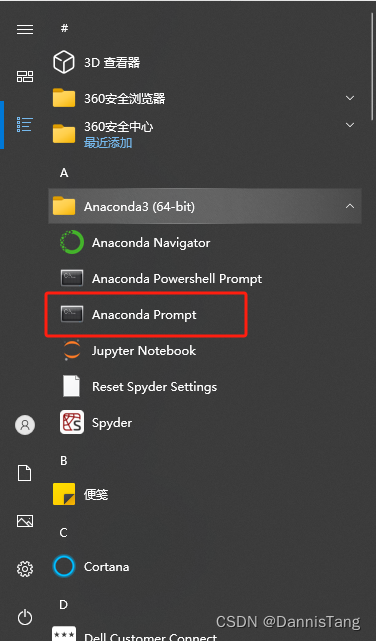
安装完成后(如果是默认安装的话),可以在开始菜单中看到这些选项,其中用的最多的就是这个Anaconda Prompt后面也会重点用到。
2、Anaconda配置环境变量
进入控制面板,然后输入环境变量,编辑Path即可
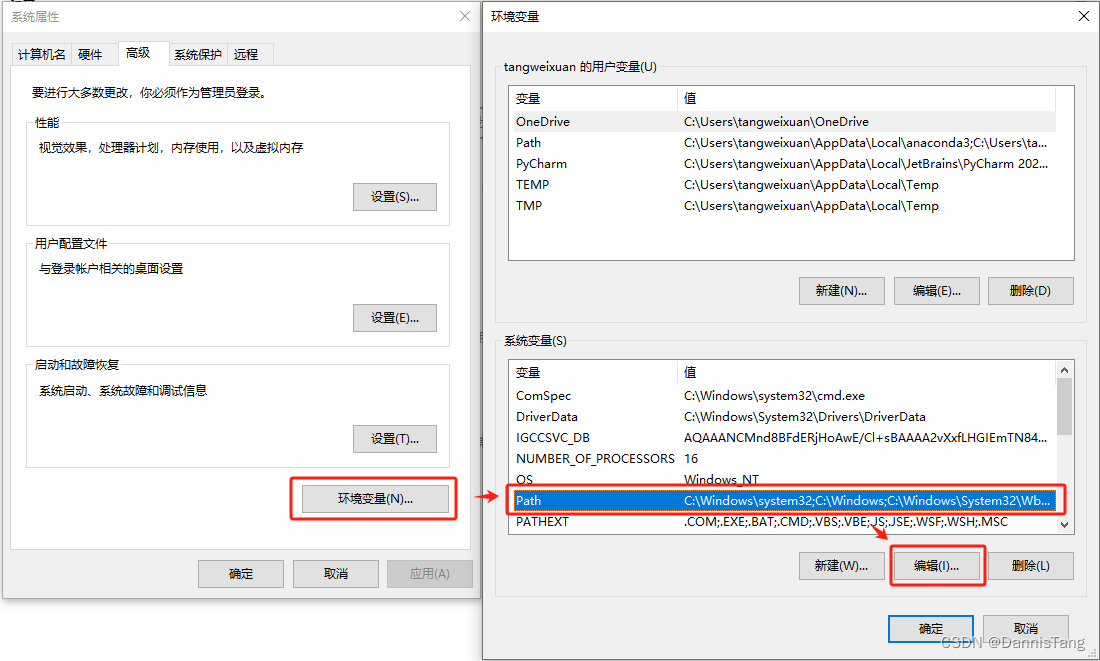
然后添加以下三个路径即可
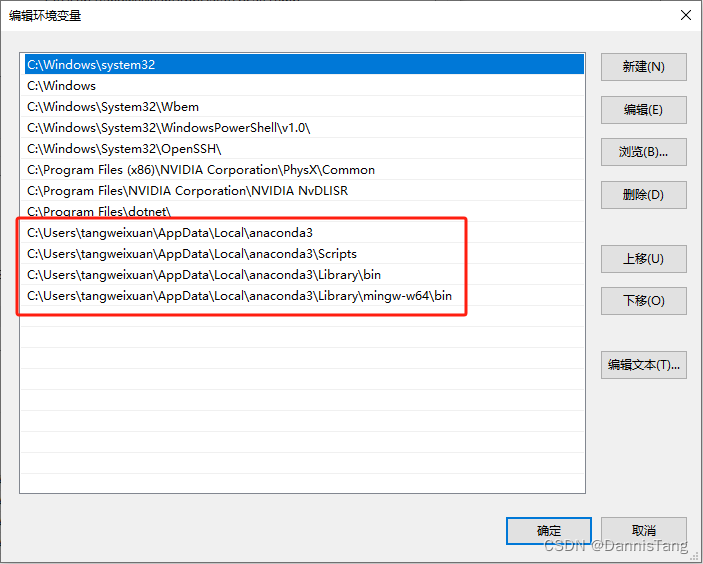
点击确定即可完成添加。
第二节 Anaconda镜像源配置
1、查看
在Anaconda prompt中输入以下的命令以查看当前的镜像源
# 查看镜像源
conda config --show channels

# 查看默认镜像源
conda config --show default_channels
2、配置(命令行)
1)直接输入命令行配置
在Anaconda prompt中输入以下的命令(选择性添加)
# 添加阿里源
conda config --add channels https://mirrors.aliyun.com/anaconda/pkgs/main/
conda config --add channels https://mirrors.aliyun.com/anaconda/pkgs/free/
conda config --add channels https://mirrors.aliyun.com/anaconda/pkgs/r/
conda config --add channels https://mirrors.aliyun.com/anaconda/pkgs/msys2/

# 添加清华源(不建议用)
conda config --add channels https://mirrors.tuna.tsinghua.edu.cn/anaconda/pkgs/free/
conda config --add channels https://mirrors.tuna.tsinghua.edu.cn/anaconda/pkgs/main/
conda config --add channels https://mirrors.tuna.tsinghua.edu.cn/anaconda/cloud/conda-forge/
conda config --add channels https://mirrors.tuna.tsinghua.edu.cn/anaconda/cloud/pytorch/
conda config --add channels https://mirrors.tuna.tsinghua.edu.cn/anaconda/pkgs/pro/

# (这几条是删除清华源的命令)
conda config --remove channels https://mirrors.tuna.tsinghua.edu.cn/anaconda/pkgs/free/
conda config --remove channels https://mirrors.tuna.tsinghua.edu.cn/anaconda/pkgs/main/
conda config --remove channels https://mirrors.tuna.tsinghua.edu.cn/anaconda/cloud/conda-forge/
conda config --remove channels https://mirrors.tuna.tsinghua.edu.cn/anaconda/cloud/pytorch/
conda config --remove channels https://mirrors.tuna.tsinghua.edu.cn/anaconda/pkgs/pro/

# 添加中科大源
conda config --add channels https://mirrors.ustc.edu.cn/anaconda/pkgs/free/
conda config --add channels https://mirrors.ustc.edu.cn/anaconda/pkgs/main/
conda config --add channels https://mirrors.ustc.edu.cn/anaconda/cloud/conda-forge/
conda config --add channels https://mirrors.ustc.edu.cn/anaconda/cloud/msys2/
conda config --add channels https://mirrors.ustc.edu.cn/anaconda/cloud/bioconda/
conda config --add channels https://mirrors.ustc.edu.cn/anaconda/cloud/menpo/

# 如果是使用命令行进行镜像源配置,这里需要补充一条命令,在后续使用会有帮助
# 设置搜索时显示通道地址
conda config --set show_channel_urls yes
2)文件夹进行输入配置(Windows版)
直接打开文件夹窗口,输入
C:/user/你的用户/.condarc
这里将你的用户换成你的Windows的电脑的用户即可,直接回车,会弹出打开方式,采用记事本或是你常用笔记软件打开都行,但是建议用记事本,因为常用的软件(比如UE或是notepad++会修改编码,然后用不了)。
然后换成以下的配置(全量替换),直接保存关闭就行(可以自行备份之前的配置信息)
# 以下为阿里源(推荐使用)
channels:
  - defaults
show_channel_urls: true
default_channels:
  - https://mirrors.aliyun.com/anaconda/pkgs/main/
  - https://mirrors.aliyun.com/anaconda/pkgs/free/
  - https://mirrors.aliyun.com/anaconda/pkgs/r/
  - https://mirrors.aliyun.com/anaconda/pkgs/msys2/
custom_channels:
  conda-forge: https://mirrors.aliyun.com/anaconda/cloud
  msys2: https://mirrors.aliyun.com/anaconda/cloud
  bioconda: https://mirrors.aliyun.com/anaconda/cloud
  menpo: https://mirrors.aliyun.com/anaconda/cloud
  pytorch: https://mirrors.aliyun.com/anaconda/cloud
  pytorch-lts: https://mirrors.aliyun.com/anaconda/cloud
  simpleitk: https://mirrors.aliyun.com/anaconda/cloud
remote_read_timeout_secs: 10000.0


# 以下为清华源(不建议用,不太行,可能网络会有问题)
channels:
  - defaults
show_channel_urls: true
default_channels:
  - https://mirrors.tuna.tsinghua.edu.cn/anaconda/pkgs/main
  - https://mirrors.tuna.tsinghua.edu.cn/anaconda/pkgs/r
  - https://mirrors.tuna.tsinghua.edu.cn/anaconda/pkgs/msys2
custom_channels:
  conda-forge: https://mirrors.tuna.tsinghua.edu.cn/anaconda/cloud
  msys2: https://mirrors.tuna.tsinghua.edu.cn/anaconda/cloud
  bioconda: https://mirrors.tuna.tsinghua.edu.cn/anaconda/cloud
  menpo: https://mirrors.tuna.tsinghua.edu.cn/anaconda/cloud
  pytorch: https://mirrors.tuna.tsinghua.edu.cn/anaconda/cloud
  pytorch-lts: https://mirrors.tuna.tsinghua.edu.cn/anaconda/cloud
  simpleitk: https://mirrors.tuna.tsinghua.edu.cn/anaconda/cloud
remote_read_timeout_secs: 10000.0
3、配置(界面配置)
该步骤与上步骤(步骤2)能实现同样的配置,因此,该步骤和上步骤二选一进行操作即可。
在Anaconda navigator中操作,
1)点击environment,点击channels,点击添加
2)输入以下的配置源(可以按需选择),输入完成后按回车确认
https://mirrors.tuna.tsinghua.edu.cn/anaconda/pkgs/free/
https://mirrors.tuna.tsinghua.edu.cn/anaconda/cloud/conda-forge/
https://mirrors.tuna.tsinghua.edu.cn/anaconda/cloud/pytorch/
https://mirrors.aliyun.com/anaconda/pkgs/free/
https://mirrors.aliyun.com/anaconda/pkgs/main/
3)删除默认的配置源defaults
4)点击update channels进行更新
4、删除(命令行)
在Anaconda prompt中输入以下的命令
# 以下为几个例子,如有需要,则进行替换源即可
conda config --remove channels defaults
conda config --remove channels https://mirrors.aliyun.com/anaconda/pkgs/free/
conda config --remove channels https://mirrors.tuna.tsinghua.edu.cn/anaconda/cloud/pro/

conda config --remove default_channels https://mirrors.aliyun.com/anaconda/pkgs/free/
这里采用界面操作形式删除也可以,具体方法参照上步骤(步骤3)
5、修改配置源(Linux版)
1)使用vim修改的配置文件
vim ~/.condarc
2)清空内容,然后复制下午并保存
#以下是阿里源(推荐使用)
channels:
  - defaults
show_channel_urls: true
default_channels:
  - https://mirrors.aliyun.com/anaconda/pkgs/main/
  - https://mirrors.aliyun.com/anaconda/pkgs/free/
  - https://mirrors.aliyun.com/anaconda/pkgs/r/
  - https://mirrors.aliyun.com/anaconda/pkgs/msys2/
custom_channels:
  conda-forge: https://mirrors.aliyun.com/anaconda/cloud
  msys2: https://mirrors.aliyun.com/anaconda/cloud
  bioconda: https://mirrors.aliyun.com/anaconda/cloud
  menpo: https://mirrors.aliyun.com/anaconda/cloud
  pytorch: https://mirrors.aliyun.com/anaconda/cloud
  pytorch-lts: https://mirrors.aliyun.com/anaconda/cloud
  simpleitk: https://mirrors.aliyun.com/anaconda/cloud
remote_read_timeout_secs: 10000.0

# 以下是清华源(不建议使用)
channels:
  - defaults
show_channel_urls: true
default_channels:
  - http://mirrors.tuna.tsinghua.edu.cn/anaconda/pkgs/main
  - http://mirrors.tuna.tsinghua.edu.cn/anaconda/pkgs/r
  - http://mirrors.tuna.tsinghua.edu.cn/anaconda/pkgs/msys2
custom_channels:
  conda-forge: http://mirrors.tuna.tsinghua.edu.cn/anaconda/cloud
  msys2: http://mirrors.tuna.tsinghua.edu.cn/anaconda/cloud
  bioconda: http://mirrors.tuna.tsinghua.edu.cn/anaconda/cloud
  menpo: http://mirrors.tuna.tsinghua.edu.cn/anaconda/cloud
  pytorch: http://mirrors.tuna.tsinghua.edu.cn/anaconda/cloud
  simpleitk: http://mirrors.tuna.tsinghua.edu.cn/anaconda/cloud
6、常用命令
1)环境类
# 进入(激活)环境(将命令中的中文替换对应的英文名)
activate 环境名

# 退出(关闭)环境(将命令中的中文替换对应的英文名)
deactivate 环境名

#列出所有环境(三条命令皆可)
conda env list
conda info --envs
conda info -e

# 删除环境及下属所有包(将命令中的中文替换对应的英文名)
conda remove -n 环境名 --all

# 删除本环境下的所有包(不删除环境)
conda clean -all

# 复制环境(将命令中的中文替换对应的英文名)
conda create --name 新环境名 --clone 旧环境名
2)包类
# 查看conda的版本号,通常都是查看版本号以验证某软件是否安装
conda --version

# 列出当前环境的所有包
conda list

# 查看当前环境已安装包
conda list

# 查找可安装的包(将命令中的中文替换对应的英文名)
conda search 包名

# 在当前环境安装包(将命令中的中文替换对应的英文名)
conda install 包名

# 在指定环境安装包(将命令中的中文替换对应的英文名)
conda install --name 环境名 包名

# 在当前环境更新包(将命令中的中文替换对应的英文名)
conda update 包名

# 在当前环境更新所有包(以下两条命令皆可)
conda update --all
conda upgrade --all

# 在当前环境卸载包(将命令中的中文替换对应的英文名)
conda remove 包名

# 在指定环境卸载包(将命令中的中文替换对应的英文名)
conda remove --name 环境名 包名

# 精确查找包
conda search --full-name 精确包名
# 例子:conda search --full-name python

# 模糊查找包
conda search 模糊包名
# 例子:conda search py
第三节 Pytorch安装与配置
1、创建Pytorch环境
使用 Anaconda Prompt (菜单栏中选项,如果不记得了,查看第二章第一节的第1步)进入命令行,创建一个pytorch环境
# 命令模板
conda create -n 环境名称 python=实际安装Python版本
# 实际执行
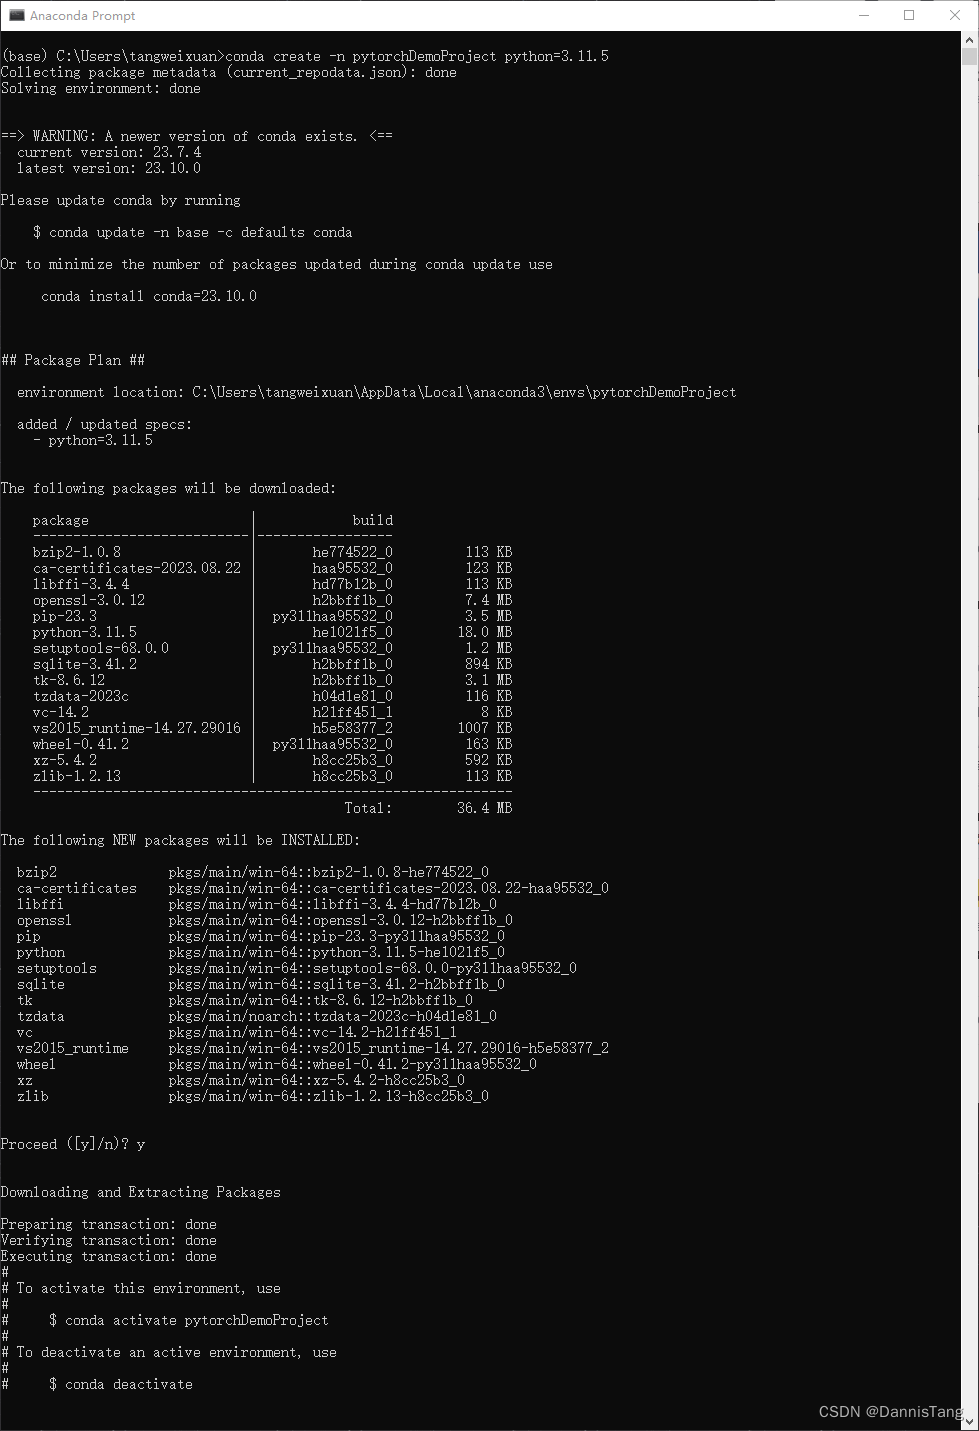
conda create -n pytorchDemoProject python=3.11.5
我这里创建的环境名称为pytorchDemoProject,实际的Python的版本为3.11.5
注:如果不指定python版本,则会安装anaconda的相应的版本的。如anaconda是第二版,则会安装python2的版本;如anaconda是第三版,则会安装python3的版本
在安装过程中,先会找到对应的包,然后过程中提提示是否安装Y/N,这时候输入y并回车即可。
如图,第一张图为更新升级conda。再执行一次,即为安装pytorch。
 作者注:这里在安装过程中实际上出现了一些问题,作者解决了之后,即可成功安装。但因如此,没能成功截取到图片。因此这里少了一张安装的图片,但安装过程如上文所述,只需在过程中按y并回车以确认安装即可。
2、激活Pytorch环境
然后激活刚刚创建的pytorchDemoProject 环境,这里的激活也可以理解为进入的意思
conda activate pytorchDemoProject
如图

3、关闭Pytorch环境(可选)
这一步是可选的,有激活的命令,也就有对应的关闭命令,关闭刚刚创建的pytorchDemoProject环境
conda deactivate pytorchDemoProject
4、找到pytorch命令
去官网找到安装命令
然后根据图示的方法选择命令
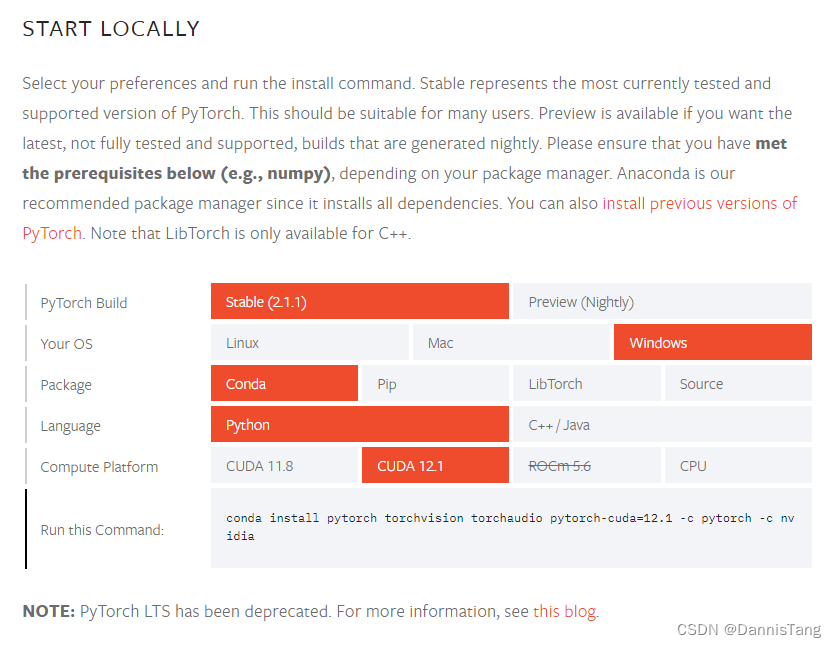
复制这里生成的命令(即Run this Command中的命令,也就是下面这条),然后执行生成的命令,以安装pytorch
conda install pytorch torchvision torchaudio pytorch-cuda=12.1 -c pytorch -c nvidia
安装过程中还要输入一次y进行确认,在安装过程中会遇到很多问题,请查看下面的附节一进行排查和解决
5、验证pytorch安装
使用命令先查看是否安装成功
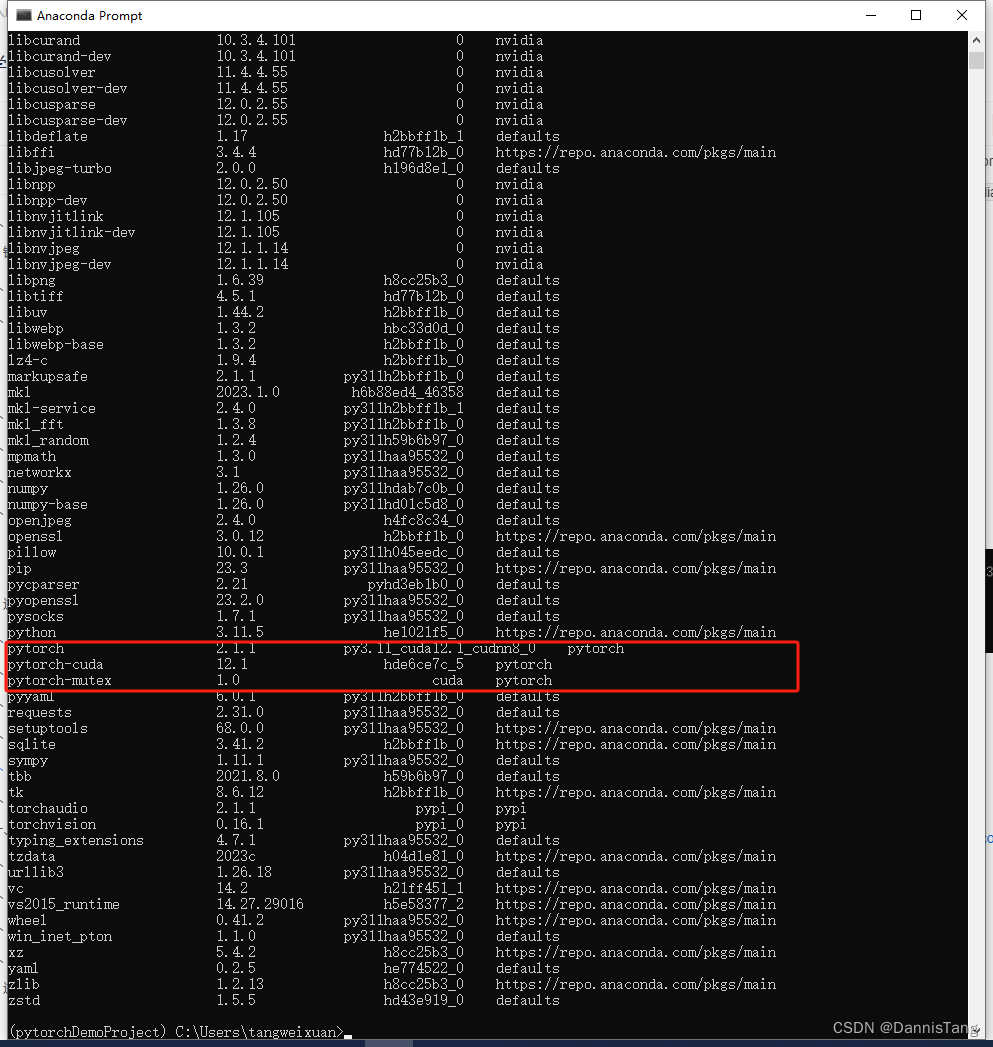
conda list
如图,显示如下,即表示该环境下有这些包了
安装完了之后,输入python命令进入python界面
然后输入import torch进行导入
然后输入torch.cuda.is_available()进行验证是否成功,如图

如图,即表示安装成功
附节一、报错的场景和方法
1、创建环境报错
报错提示如下
CondaHTTPError: HTTP 000 CONNECTION FAILED for url https://conda.anaconda.org/pytorch/win-64/pytorch-2.1.1-py3.11_cuda12.1_cudnn8_0.tar.bz2
Elapsed: -
An HTTP error occurred when trying to retrieve this URL.
HTTP errors are often intermittent, and a simple retry will get you on your way.
没有更新配置镜像源所致,需要更新一下镜像源
2、创建pytorch报错
报错提示如下

配置了错误的镜像源所致,需要更新一下配置的镜像源
3、下载时间超时
有时候也会报超时的错误,如图
CondaError: Downloaded bytes did not match Content-Length
url: https://conda.anaconda.org/pytorch/win-64/pytorch-2.1.1-py3.11_cuda12.1_cudnn8_0.tar.bz2
target_path: C:\Users\tangweixuan\AppData\Local\anaconda3\pkgs\pytorch-2.1.1-py3.11_cuda12.1_cudnn8_0.tar.bz2
Content-Length: 1339118426
downloaded bytes: 26179998
解决方法1:
直接命令行
# 设置100000.0秒的超时时长
conda config --set remote_read_timeout_secs 100000.0
解决方法2:
找到.condarc配置文件,在配置文件最后添加
remote_read_timeout_secs: 100000.0
4、报错信息
Downloading and Extracting Packages
Preparing transaction: done
Verifying transaction: failed
CondaVerificationError: The package for libcurand-dev located at C:\Users\tangweixuan\AppData\Local\anaconda3\pkgs\libcurand-dev-10.3.4.101-0
appears to be corrupted. The path 'bin/curand64_10.dll'
specified in the package manifest cannot be found.
CondaVerificationError: The package for libcurand-dev located at C:\Users\tangweixuan\AppData\Local\anaconda3\pkgs\libcurand-dev-10.3.4.101-0
appears to be corrupted. The path 'include/curand_precalc.h'
specified in the package manifest cannot be found.
ClobberError: This transaction has incompatible packages due to a shared path.
packages: nvidia/win-64::cuda-cupti-12.1.105-0, nvidia/win-64::cuda-nvtx-12.1.105-0, nvidia/win-64::cuda-profiler-api-12.3.101-0
path: 'license'
ClobberError: This transaction has incompatible packages due to a shared path.
packages: https://mirrors.tuna.tsinghua.edu.cn/anaconda/pkgs/main/win-64::jpeg-9e-h2bbff1b_1, https://mirrors.tuna.tsinghua.edu.cn/anaconda/pkgs/main/win-64::libjpeg-turbo-2.0.0-h196d8e1_0
path: 'library/bin/cjpeg.exe'
ClobberError: This transaction has incompatible packages due to a shared path.
packages: https://mirrors.tuna.tsinghua.edu.cn/anaconda/pkgs/main/win-64::jpeg-9e-h2bbff1b_1, https://mirrors.tuna.tsinghua.edu.cn/anaconda/pkgs/main/win-64::libjpeg-turbo-2.0.0-h196d8e1_0
path: 'library/bin/djpeg.exe'
ClobberError: This transaction has incompatible packages due to a shared path.
packages: https://mirrors.tuna.tsinghua.edu.cn/anaconda/pkgs/main/win-64::jpeg-9e-h2bbff1b_1, https://mirrors.tuna.tsinghua.edu.cn/anaconda/pkgs/main/win-64::libjpeg-turbo-2.0.0-h196d8e1_0
path: 'library/bin/jpegtran.exe'
ClobberError: This transaction has incompatible packages due to a shared path.
packages: https://mirrors.tuna.tsinghua.edu.cn/anaconda/pkgs/main/win-64::jpeg-9e-h2bbff1b_1, https://mirrors.tuna.tsinghua.edu.cn/anaconda/pkgs/main/win-64::libjpeg-turbo-2.0.0-h196d8e1_0
path: 'library/bin/rdjpgcom.exe'
ClobberError: This transaction has incompatible packages due to a shared path.
packages: https://mirrors.tuna.tsinghua.edu.cn/anaconda/pkgs/main/win-64::jpeg-9e-h2bbff1b_1, https://mirrors.tuna.tsinghua.edu.cn/anaconda/pkgs/main/win-64::libjpeg-turbo-2.0.0-h196d8e1_0
path: 'library/bin/wrjpgcom.exe'
ClobberError: This transaction has incompatible packages due to a shared path.
packages: https://mirrors.tuna.tsinghua.edu.cn/anaconda/pkgs/main/win-64::jpeg-9e-h2bbff1b_1, https://mirrors.tuna.tsinghua.edu.cn/anaconda/pkgs/main/win-64::libjpeg-turbo-2.0.0-h196d8e1_0
path: 'library/include/jconfig.h'
ClobberError: This transaction has incompatible packages due to a shared path.
packages: https://mirrors.tuna.tsinghua.edu.cn/anaconda/pkgs/main/win-64::jpeg-9e-h2bbff1b_1, https://mirrors.tuna.tsinghua.edu.cn/anaconda/pkgs/main/win-64::libjpeg-turbo-2.0.0-h196d8e1_0
path: 'library/include/jerror.h'
ClobberError: This transaction has incompatible packages due to a shared path.
packages: https://mirrors.tuna.tsinghua.edu.cn/anaconda/pkgs/main/win-64::jpeg-9e-h2bbff1b_1, https://mirrors.tuna.tsinghua.edu.cn/anaconda/pkgs/main/win-64::libjpeg-turbo-2.0.0-h196d8e1_0
path: 'library/include/jmorecfg.h'
ClobberError: This transaction has incompatible packages due to a shared path.
packages: https://mirrors.tuna.tsinghua.edu.cn/anaconda/pkgs/main/win-64::jpeg-9e-h2bbff1b_1, https://mirrors.tuna.tsinghua.edu.cn/anaconda/pkgs/main/win-64::libjpeg-turbo-2.0.0-h196d8e1_0
path: 'library/include/jpeglib.h'
ClobberError: This transaction has incompatible packages due to a shared path.
packages: https://mirrors.tuna.tsinghua.edu.cn/anaconda/pkgs/main/win-64::jpeg-9e-h2bbff1b_1, https://mirrors.tuna.tsinghua.edu.cn/anaconda/pkgs/main/win-64::libjpeg-turbo-2.0.0-h196d8e1_0
path: 'library/lib/jpeg.lib'
暂时没找到这个报错的原因,直接从头开始来一遍了
第四节 进入pycharm
1、添加环境
直接使用命令行的形式来操作不好操作,这个时候用pycharm进行操作与开发。使用pycharm可以把刚刚创建好的anaconda的环境添加进去,就无需使用命令行进行开发了。
打开pycharm,任意创建一个pure python的project(为了方便看,我这里创建的是一个名叫pytorchProject的项目),你也可以随意命名。然后进入setting设置,然后添加接口

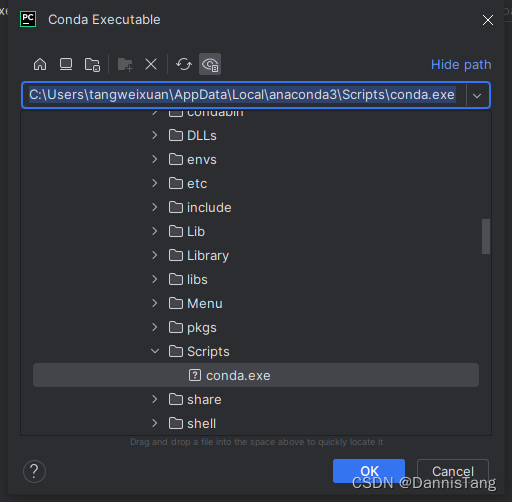
然后选择路径
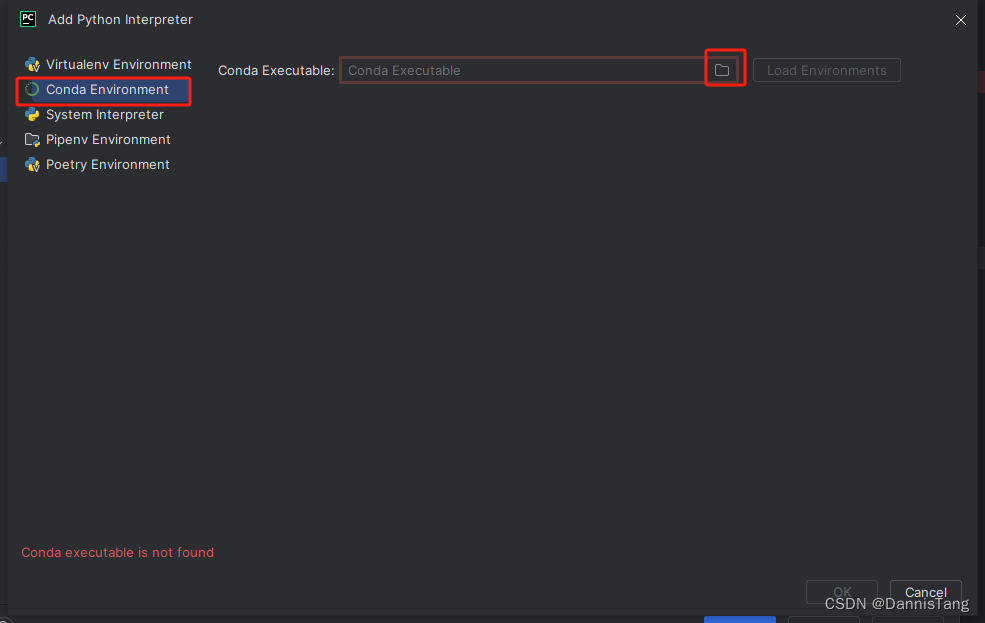
使用我们刚刚的路径
# 注意:这里是我的电脑用户tangweixuan,你自己的电脑用户不一定是这个,请注意替换
C:\Users\tangweixuan\AppData\Local\anaconda3\Scripts\conda.exe
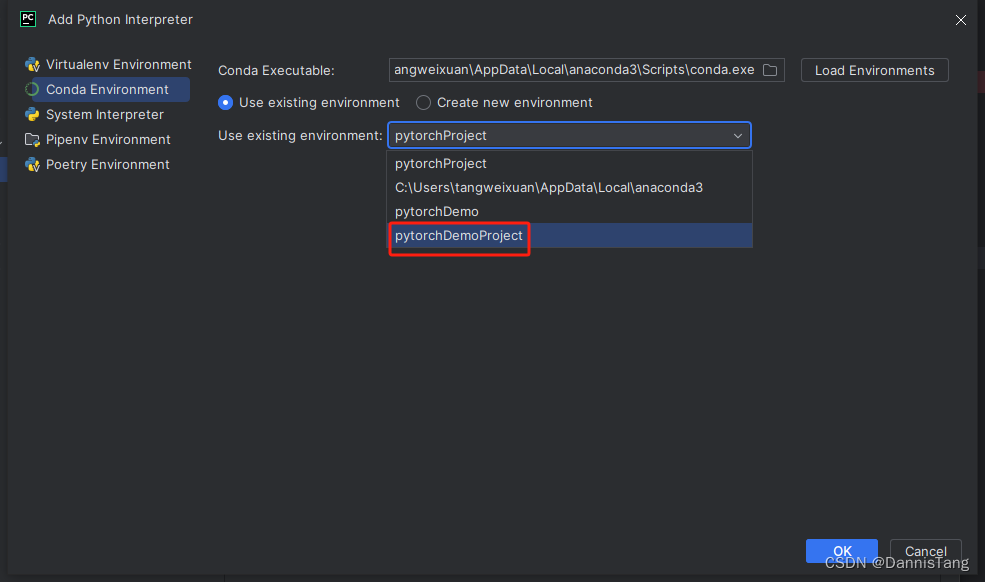
然后加载一下,并且选择我们在Anaconda中创建pytorchDemoProject(此刻,教育完成了闭环了。请给自己鼓掌打打气,你基本已经完成了安装和配置了),并且点击OK即可
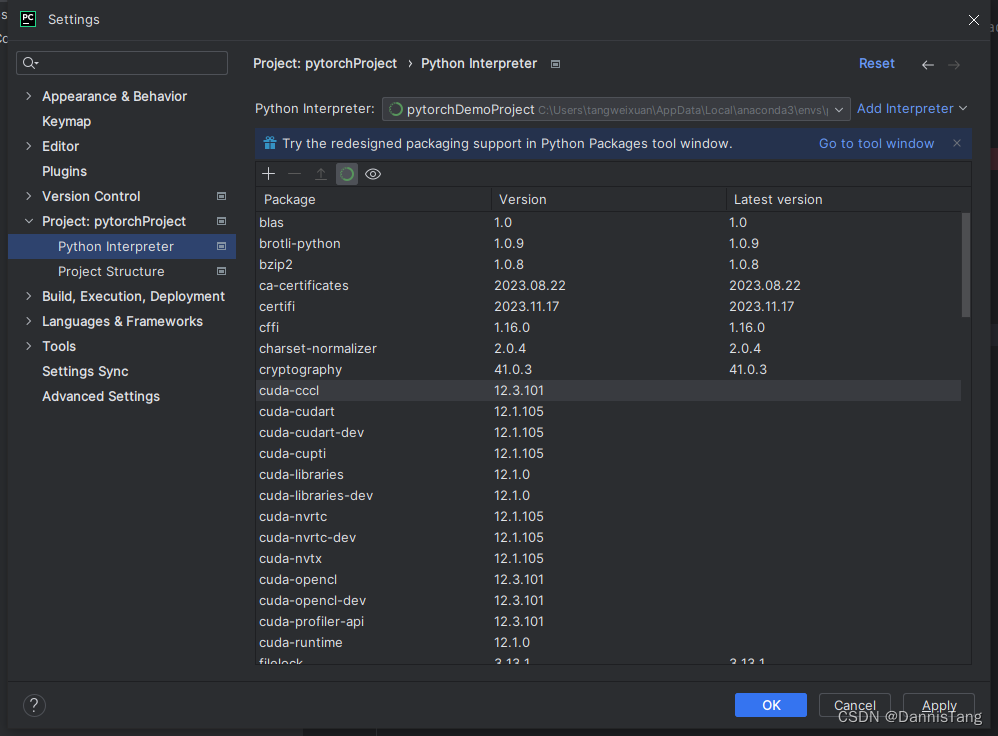
可以看到我们刚刚安装的环境里面的包,都有了
然后点击ok,回到主界面;在main.py中输入
import torch
print(torch.cuda.is_available())
点击右上的播放按键进行执行
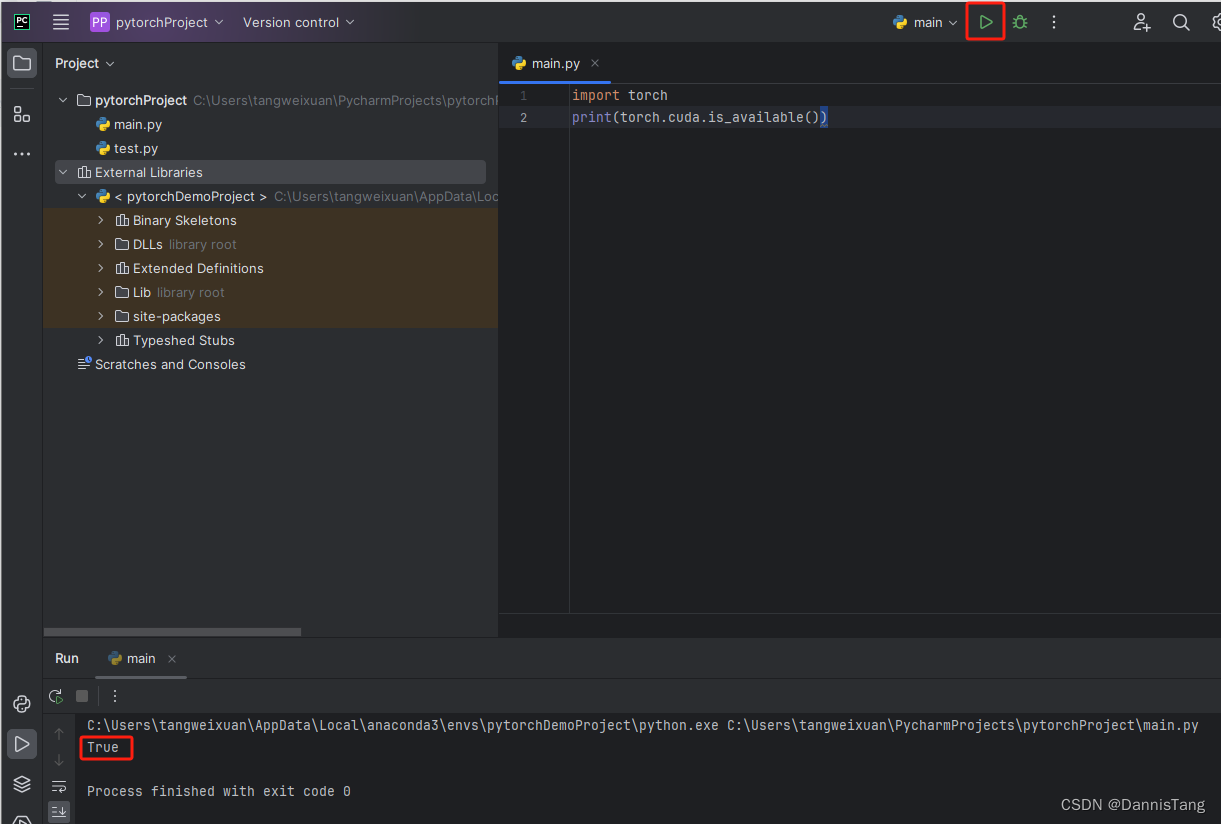
如上图,在下方控制台上打印出了True,表示成功了。
2、小试牛刀
在刚刚的pycharm中,使用和尝试一些基本的pytorch语法来小试牛刀吧!
# 创建一个未初始化的5x3矩阵
x1 = torch.empty(5, 3)
print('x1的结果是:')
print(x1)

# 创建一个随机初始化的5x3矩阵
x2 = torch.rand(5, 3)
print('x2的结果是:')
print(x2)

# 创建一个5x3的零矩阵,类型为long
x3 = torch.zeros(5, 3, dtype=torch.long)
print('x3的结果是:')
print(x3)

# 直接从数据创建tensor
x4 = torch.tensor([5.5, 3])
print('x4的结果是:')
print(x4)
这时输入到main.py中(注意,import torch这句话需要一直保留,即使在后面的开发中也需要保留),可以在下方的控制台看到输出的结果
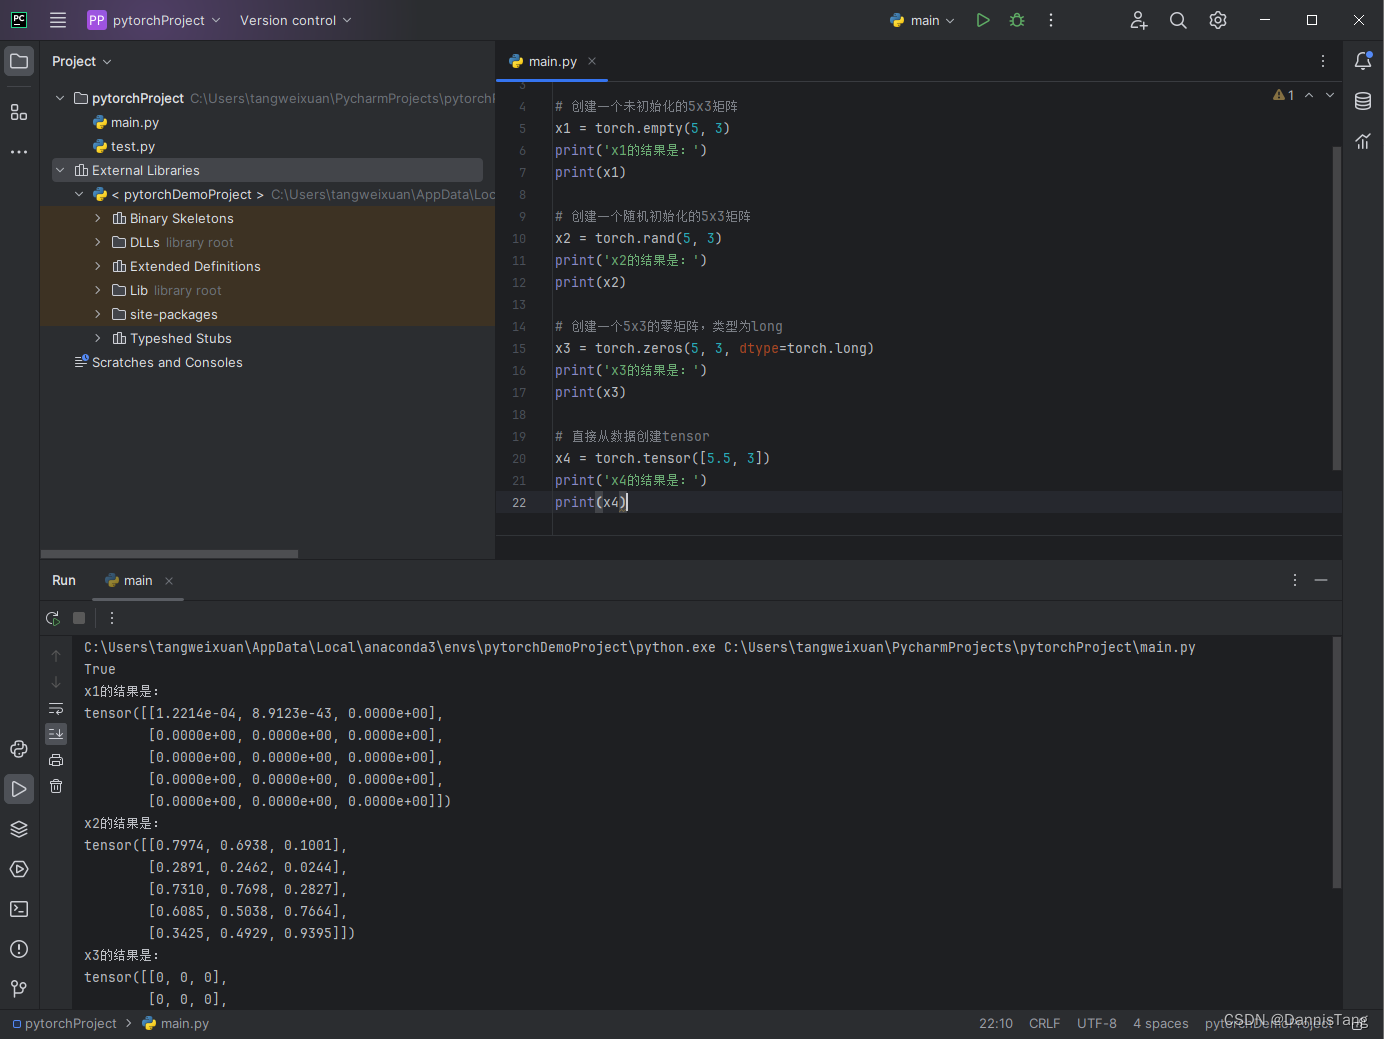
控制台的具体结果如下图

到这里,你就基本完成pytorch的安装与配置了,接下来,可以大展拳脚了,你也来试试看吧(完结撒花)。
本文完全免费且公开,如果你觉得不错的话,请扫描下方二维码进行赞赏吧,你的支持就是我最大的动力,感谢!
请支持原创,认准DannisTang(tangweixuan1995@foxmail.com)
