【android开发-14】android中fragment用法详细介绍
1,fragment是什么?
Fragment是Android中的一种组件,它在Android 3.0(API级别11)及以后的版本中引入。Fragment可以用来在Activity中添加一个或多个具有自己的用户界面的片段。它们可以与Activity进行交互,并且可以在运行时动态添加或删除。
Fragment具有自己的生命周期,可以接收属于它自己的输入事件,并且可以在Activity运行期间独立地操作每一个Fragment。例如,可以在一个Activity中重用多个Fragment,也可以在一个Fragment中使用多个Fragment。
Fragment必须被嵌入到一个Activity中,并且它们的生命周期直接受其宿主Activity的生命周期的影响。当一个Activity正在运行时,可以独立地操作每一个Fragment,例如添加或删除它们。
总的来说,Fragment提供了一种在Activity中添加具有自己用户界面的片段的机制,使得应用程序可以更好地适应不同的屏幕尺寸和设备类型,并且提供了更灵活的用户界面设计选项。
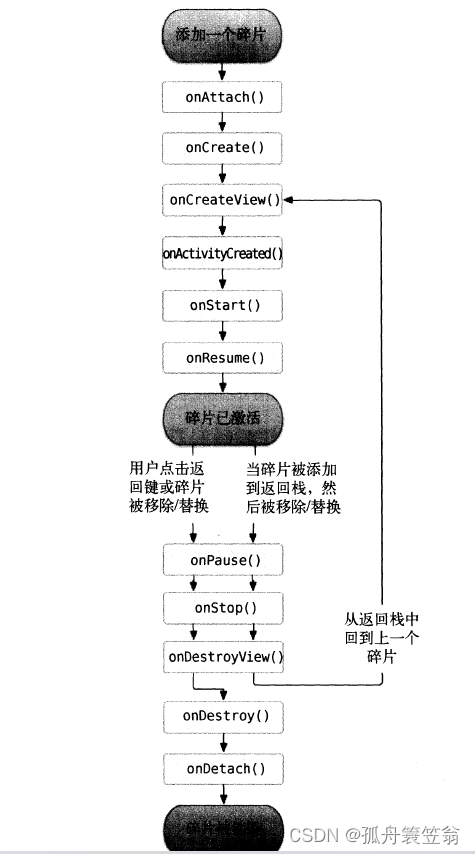
2,fragment的状态和生命周期
在Android中,Fragment具有自己的状态和生命周期,与Activity的状态和生命周期类似,但也有一些区别。
Fragment的状态主要包括以下几种:
1,活动状态(Active):当Fragment被宿主Activity所需要并且被添加到Activity中时,处于活动状态。此时,Fragment会获得焦点,并可以与用户进行交互。
2,非活动状态(Inactive):当Fragment被添加到Activity中,但宿主Activity处于暂停状态时,Fragment会处于非活动状态。此时,Fragment不会获得焦点,并且不会与用户进行交互。
3,已暂停状态(Paused):当宿主Activity处于暂停状态时,所有处于活动状态的Fragment都会进入已暂停状态。此时,Fragment不会获得焦点,但仍然可以执行某些后台任务。
4,已销毁状态(Destroyed):当Fragment从Activity中移除并且被销毁时,会进入已销毁状态。此时,Fragment的所有实例变量都将变为null,并且不能再被使用。
Fragment的生命周期主要包括以下几种:
1,onAttach():当Fragment被附加到Activity时调用。
2,onCreate():在Fragment创建后立即调用。在此方法中可以进行一些初始化操作。
3,onCreateView():在Fragment创建其布局后调用。在此方法中需要返回Fragment的布局视图。
4,onViewCreated():在Fragment创建其布局后立即调用。在此方法中可以对视图进行进一步的初始化操作。
5,onActivityCreated():在Activity的onCreate()方法完成后立即调用。在此方法中可以进行一些依赖于Activity的操作。
6,onStart():在Fragment将要出现在屏幕上时调用。
7,onResume():在Fragment准备好与用户交互时调用。
8,onPause():在Fragment将要离开前台并暂停时调用。
9,onStop():在Fragment将要从屏幕上消失时调用。
10,onDestroyView():在销毁Fragment的视图和相关资源时调用。
11,onDestroy():在销毁Fragment实例时调用。在此方法中可以进行一些清理操作。

3,fragment的简单参考用例
在Android中,Fragment的使用可以帮助我们实现更加丰富和动态的用户界面设计。以下是一个简单的例子,展示了如何在代码中使用Fragment。
首先,我们需要创建一个新的Fragment类。在这个例子中,我们将创建一个简单的Fragment,它包含一个TextView,用于显示一段文本。
import android.os.Bundle;
import android.view.LayoutInflater;
import android.view.View;
import android.view.ViewGroup;
import android.widget.TextView;

import androidx.annotation.NonNull;
import androidx.annotation.Nullable;
import androidx.fragment.app.Fragment;

public class MyFragment extends Fragment {
    private static final String ARG_TEXT = "text";

    public MyFragment() {
        // Required empty public constructor
    }

    @Override
    public void onCreate(Bundle savedInstanceState) {
        super.onCreate(savedInstanceState);
    }

    @Override
    public View onCreateView(LayoutInflater inflater, ViewGroup container,
                             Bundle savedInstanceState) {
        // Inflate the layout for this fragment
        return inflater.inflate(R.layout.fragment_my, container, false);
    }
}
然后,我们需要在布局文件(例如fragment_my.xml)中定义这个Fragment的视图。在这个例子中,我们定义了一个TextView,用于显示一段文本。
<TextView xmlns:android="http://schemas.android.com/apk/res/android"
    android:id="@+id/textView"
    android:layout_width="match_parent"
    android:layout_height="match_parent"
    android:text="Hello, I'm Fragment!" />
现在,我们可以在Activity的代码中使用这个Fragment。在这个例子中,我们将在一个按钮的点击事件中创建一个新的Fragment实例,并将其添加到Activity中。
import android.os.Bundle;
import android.view.View;
import android.widget.Button;
import androidx.appcompat.app.AppCompatActivity;
import androidx.fragment.app.FragmentActivity;
import androidx.fragment.app.FragmentTransaction;

public class MainActivity extends AppCompatActivity {
    private Button mButton;

    @Override
    protected void onCreate(Bundle savedInstanceState) {
        super.onCreate(savedInstanceState);
        setContentView(R.layout.activity_main);
        mButton = findViewById(R.id.button);
        mButton.setOnClickListener(new View.OnClickListener() {
            @Override
            public void onClick(View v) {
                FragmentTransaction ft = getSupportFragmentManager().beginTransaction();
                MyFragment myFragment = new MyFragment(); // 创建新的Fragment实例。
                ft.add(myFragment, null); // 将Fragment添加到Activity中。注意,第一个参数是容器的id(在这个例子中,我们没有定义一个特定的容器),第二个参数是Fragment的名字(在这个例子中,我们没有指定一个名字)。如果你想在之后引用这个Fragment,你可能需要指定一个名字。
                ft.commit(); // 提交事务。这是必须的,否则Fragment不会被添加到Activity中。你可以使用ft.commitAllowingStateLoss()来提交事务,即使在Activity被杀死后也允许状态丢失。这在一些情况下是有用的,例如在Activity被系统杀死后仍然显示通知。但是请注意,这可能会导致数据丢失。因此,在你提交事务之前,确保你已经保存了所有必要的数据。
注意:
1,创建待添加的fragment实例
2,获取fragmentManager,在活动中直接调用getSupportFragmentManager方法得到。
3,开启一个事务,通过调用beginTransaction方法开启。
4,提交事务,通过commit方法来完成。
4,fragment和activity通讯的方式
在Android中,Activity和Fragment之间的通信可以通过以下几种方式实现:
1,使用回调(Callback):你可以在Activity中创建一个接口,然后将该接口的实现传递给Fragment。这样,Fragment就可以调用该接口的方法来与Activity进行通信。
这是一个使用回调的简单例子:
首先,定义一个回调接口:
public interface MyCallback {
    void onButtonClicked();
}
然后,在Activity中实现这个接口:
public class MyActivity extends AppCompatActivity implements MyCallback {
    // ...

    @Override
    public void onButtonClicked() {
        // 这里处理按钮点击事件
    }
}
在Fragment中,你可以通过onAttach方法获取Activity的实例,然后调用该实例的方法:
public class MyFragment extends Fragment {
    private MyCallback mCallback;

    @Override
    public void onAttach(Context context) {
        super.onAttach(context);
        try {
            mCallback = (MyCallback) context;
        } catch (ClassCastException e) {
            throw new ClassCastException(getActivity().toString() + " must implement MyCallback");
        }
    }

    @Override
    public View onCreateView(LayoutInflater inflater, ViewGroup container, Bundle savedInstanceState) {
        View view = inflater.inflate(R.layout.fragment_my, container, false);
        Button button = view.findViewById(R.id.button);
        button.setOnClickListener(new View.OnClickListener() {
            @Override
            public void onClick(View v) {
                mCallback.onButtonClicked(); // 调用回调方法通知Activity按钮被点击了
            }
        });
        return view;
    }
}
2,使用setArguments和getArgument:你可以在创建Fragment时,通过setArguments方法传递参数,然后在Fragment加载时,通过getArguments方法获取这些参数。但是这种方式主要用于传递数据,而不是用于通信。
3,使用findFragmentById和findFragmentByTag:你可以在Activity中使用findFragmentById和findFragmentByTag方法获取Fragment的实例,然后直接调用该实例的方法。但是这种方式需要在Activity的布局文件中为Fragment定义一个id或者tag。这种方式主要用于已经存在的Fragment之间的通信。
