Vue3.0(五):Vue-Router 4.x详解
Vue-Router详解
vue-router教程
认识前端路由
- 路由实际上是网络工程中的一个术语
- 在架构一个网络的时候,常用到两个很重要的设备—路由器和交换机
- 路由器实际上就是分配ip地址,并且维护着ip地址与电脑mac地址的映射关系
- 通过映射关系,路由器才知道要把数据发送给哪台电脑
- 而 路由在软件工程中出现,最早是由后端实现的,同时随着web的发展,路由也经历了一些阶段
- 后端路由阶段
- 前后端分离
- 单页面富应用
- 其核心就是改变URL整个页面不进行刷新
- 可以通过改变hash进行操作
- 可以通过HTML的history进行操作
认识vue-router
是Vue.js的官方路由
- vue-router与Vue.js核心深度集成 ,让Vue.js构建 单页面应用变得很容易
- vue-router是基于路由和组件的
- 路由用于设定 访问路径,将路径与组件映射起来
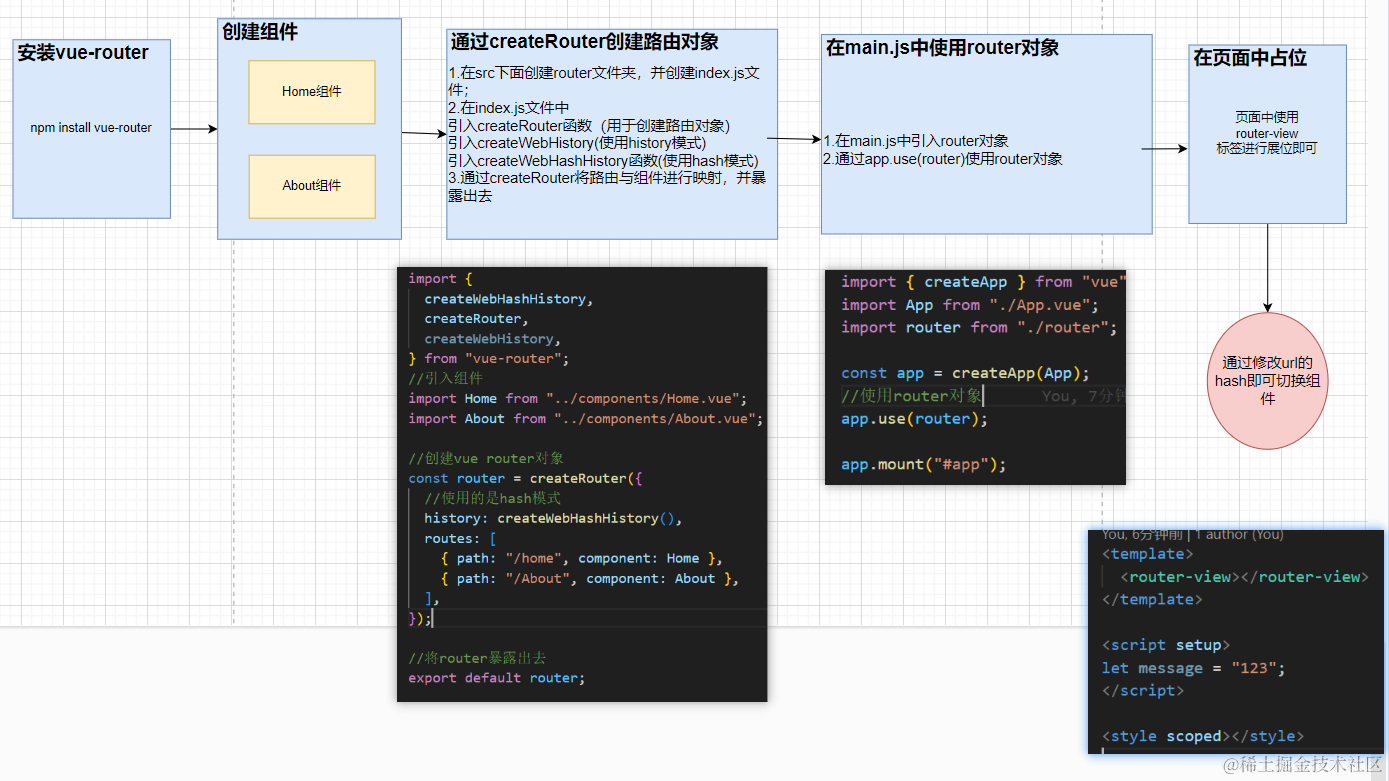
- 安装 Vue Router
基本使用

- router代码
import {
  createWebHashHistory,
  createRouter,
  createWebHistory,
} from "vue-router";
//引入组件
import Home from "../components/Home.vue";
import About from "../components/About.vue";

//创建vue router对象
const router = createRouter({
  //使用的是hash模式
  history: createWebHashHistory(),
  routes: [
    { path: "/home", component: Home },
    { path: "/About", component: About },
  ],
});

//将router暴露出去
export default router;
路由的默认路径
通过以上的步骤,我们会发现浏览器中会报警告
- 大概意思就是说,/路径没有匹配

- 这时候我们需要在创建router对象的时候,对默认路径进行配置
- 方式一,将路径 /,与组件Home对应
- 方式二,将路径 /,通过 redirect 重定向成 /home路径(项目开发中常用)
const router = createRouter({
  //使用的是hash模式
  history: createWebHashHistory(),
  routes: [
    { path: "/", redirect: "/home" },
    { path: "/home", component: Home },
    { path: "/About", component: About },
  ],
});
history模式
- 如果不想在url中有#,就可以用createWebHistory模式,采用history模式
const router = createRouter({
  //使用的是hash模式
  history: createWebHistory(),
  routes: [
    { path: "/", redirect: "/home" },
    { path: "/home", component: Home },
    { path: "/About", component: About },
  ],
});
router-link
- router-link是vue-router中提供的一个标签
- 默认是一个a连接,可以指定其跳转路由
- 跳转到 about路由
 <router-link to="/about">123</router-link>
同下
 <router-link to={path:"/about"}>123</router-link>
- active-class属性
- 设置点击a元素后应用的class,默认是router-link-active
- 可以设置别名,可以使用默认的
 <router-link to="/about">123</router-link>//此时设置router-link-active样式
 <router-link to="/about" active-class="active">123</router-link>//此时设置active的样式
路由懒加载
前面的文章中,提到过当项目体量过大,打包的时候,默认会将项目打包到app.js文件中,此时,我们可以用import函数,进行分包处理
而vue-router也可以进行分包操作
- 在创建vue-router对象的时候进行操作
- 同时我们可以使用魔法命名:
webpackChunkName:'about',这是将打包的文件名写一个名称 - 可以增加 name属性:该属性是独一无二的,可以通过path跳转,也可以通过name进行跳转
- 可以使用meta属性:该属性是自定义属性的
- 同时我们可以使用魔法命名:
import {
  createWebHashHistory,
  createRouter,
  createWebHistory,
} from "vue-router";

//使用import引入组件
const About = () =>
  import(/*webpackChunkName:'about'*/ "../components/About.vue");

//创建vue router对象
const router = createRouter({
  //使用的是hash模式
  history: createWebHashHistory(),
  routes: [
    {
      path: "/",
      redirect: "/home",
      meta:{
          zc:"zhangcheng"
      }
    },
    {
       name:"Home",
      path: "/home",
      component: () =>
        import(/*webpackChunkName:'home'*/ "../components/Home.vue"),
    },
    {
  	  name:"About",
      path: "/About",
      component: About,
    },
  ],
});

//将router暴露出去
export default router;
动态路由基本匹配
- 在实际开发中,路由后面经常会跟着一些参数
- 比如用户界面,后面经常会跟着用户的id
- 在创建router对象的时候,需要进行动态路由的设置
- /路由名称/:参数名称
import {
  createWebHashHistory,
  createRouter,
  createWebHistory,
} from "vue-router";

//使用import引入组件
const About = () =>
  import(/*webpackChunkName:'about'*/ "../components/About.vue");

//创建vue router对象
const router = createRouter({
  //使用的是hash模式
  history: createWebHashHistory(),
  routes: [
    {
      //此为动态路由
      path: "/home/:id",
      component: () =>
        import(/*webpackChunkName:'home'*/ "../components/Home.vue"),
    },
  ],
});

//将router暴露出去
export default router;
-
在template模板中直接获取
$route.param.id获取- 注意是 $route
<template>Home:{{ $route.params.id }}</template>
-
在 scrpit通过代码获取
- options API中
//在 created生命周期中,获取 created(){ this.$route.params.id }- 在composition API中获取
//导入useRoute函数,该方法仅会在组件创建的时候执行一次,组件不销毁的情况下,不会再执行 import { useRoute } from "vue-router"; const route = useRoute(); console.log(route.params.id);- 若要在同一组件中进行切换
- 比如现在我用id为123用户访问了该组件
- 没有退出该组件,切换了456用户
import { onBeforeRouteUpdate, useRoute } from "vue-router";

const route = useRoute();
console.log(route.params.id);

//在同一组件中,切换用户会触发
onBeforeRouteUpdate((to, from) => {
  console.log(to.params.id);
  console.log(from.params.id);
});
Not Found
如果匹配到不存在的路径,需要显示的组件 NotFound组件
- 在创建vue-router对象时候
- **/:pathMatch(.*)**会直接返回路径 :abc/cba
- **/:pathMatch(.*)***会返回以 **/**分隔成的数组 [“abc”,“cba”]
//创建vue router对象
const router = createRouter({
  //使用的是hash模式
  history: createWebHashHistory(),
  routes: [
    {
      //当访问的路径,不属于上面的路由
      path: "/:pathMatch(.*)",
      component: () =>
        import(/*webpackChunkName:'NotFound'*/ "../components/NotFound.vue"),
    },
  ],
});
嵌套路由
比如在个人中心页面中,我们会有多个页面,资料设置,头像设置等等,这时候就需要用到嵌套路由
- 首先在vue-router对象中添加嵌套路由
- 比如在home路由下面,有person组件
- 就需要在home路由中添加children属性,添加peoson路由
const router = createRouter({
  //使用的是hash模式
  history: createWebHashHistory(),
  routes: [
    {
      path: "/home/:id",
      component: () =>
        import(/*webpackChunkName:'home'*/ "../components/Home.vue"),
      //配置嵌套路由
      children: [
        {
          //直接写子路由名称
          path: "person",
          component: () => import("../components/Person.vue"),
        },
      ],
    },
  ],
});
- 在home组件中添加相应的 router-view标签
<template>
  Home:{{ $route.params.id }}
  <router-view></router-view>
</template>
编程式路由跳转
前面进行路由跳转的方式都是通过标签进行跳转,如果是通过js代码跳转,该怎么操作
- 在options API中
//直接传入路径
this.$router.push("/home")

//传入对象,可以携带查询内容
this.$router.push({
    path:"/home",
    query:{name:"zhangcheng"}
})

//获取传入的参数
$route.query即可获取
- 在composition API中
//首先引入函数
import {useRouter} from 'vue-router'

const router = useRouter()

//向前一步
router.forward()

//返回上一步
router.back()

//前进两步
router.go(2)
//后退两步
router.go(-2)

//直接传入路径
router.push("/home")

//传入对象,可以携带查询内容
router.push({
    path:"/home",
    query:{name:"zhangcheng"}
})

//获取传入的参数
$route.query即可获取
动态添加路由
在实际开发中,我们会根据不同的角色,去注册一些该角色特有的路由
- 在创建vue-router对象的时候,去添加路由
- 比如现在有一个home路由
//创建vue router对象
const router = createRouter({
  //使用的是hash模式
  history: createWebHashHistory(),
  routes: [
    {
      name:"home",
      path: "/home/:id",
      component: () =>
        import(/*webpackChunkName:'home'*/ "../components/Home.vue"),
    },
  ],
});
- 现在要添加一个person路由
router.addRoute({
    path: "/person",
    component:xxx
})
- 要在home路由下添加一个子路由homevip
- 首先要给home路由,用name属性添加一个名称
- 之后在 调用addRoute函数的时候,以一个参数传入home路由的name,第二个参数传入子路由的配置
router.addRoute("home",{
    path: "/homevip",
    component:xxx
})
动态路由管理的其他方法
- 删除路由方式一
- 通过添加一个与已有name相同的路由
- 比如现在有一个home路由,name也为home
- 此时再添加一个路由,name依旧为home,就会进行覆盖
//创建vue router对象
const router = createRouter({
  //使用的是hash模式
  history: createWebHashHistory(),
  routes: [
    {
      name:"home",
      path: "/home/:id",
      component: () =>
        import(/*webpackChunkName:'home'*/ "../components/Home.vue"),
    },
  ],
});

//会覆盖上面的路由
router.addRoute({name:"home",path:"/home/parent",component:xxx})
- 删除路由方式二
- 通过调用 removeRoute方法进行删除
- 传入路由的name即可
router.removeRoute("home")
- 获取所有路由
router.getRoutes()//返回的是一个数组
路由导航守卫
在跳转到特定的路由前,需要有一些特定的条件,才可以成功跳转
比如,现在用户想访问订单页面,但是该用户没有登录,所以不会直接跳转到订单页面,而是跳转到登录页面进行登录
- 我们可以通过 全局前置守卫进行设置
- 在每次完成页面跳转前,都会触发传入的回调函数
- 会有两个参数
to: 即将要进入的目标from: 当前导航正要离开的路由
- 返回值
return false会取消当前的导航return str跳转到与str对应的路由return {name:'home'}返回一个对象,对象中可以有name,path属性- 若什么都不
return就会跳转自动跳转
const router = createRouter({
  //使用的是hash模式
  history: createWebHashHistory(),
  routes: [
    {
      name:"home",
      path: "/home/:id",
      component: () =>
        import(/*webpackChunkName:'home'*/ "../components/Home.vue"),
    },
  ],
});

router.beforeEach((to,form)=>{
    //填写逻辑

    //都会跳转到home路由
    return "/home"
})
完整的导航解析流程
完整的导航解析流程
- 导航被触发。
- 在失活的组件里调用
beforeRouteLeave守卫。 - 调用全局的
beforeEach守卫。 - 在重用的组件里调用
beforeRouteUpdate守卫(2.2+)。 - 在路由配置里调用
beforeEnter。 - 解析异步路由组件。
- 在被激活的组件里调用
beforeRouteEnter。 - 调用全局的
beforeResolve守卫(2.5+)。 - 导航被确认。
- 调用全局的
afterEach钩子。 - 触发 DOM 更新。
- 调用
beforeRouteEnter守卫中传给next的回调函数,创建好的组件实例会作为回调函数的参数传入。
