vue3 之 商城项目—home
home—整体结构搭建
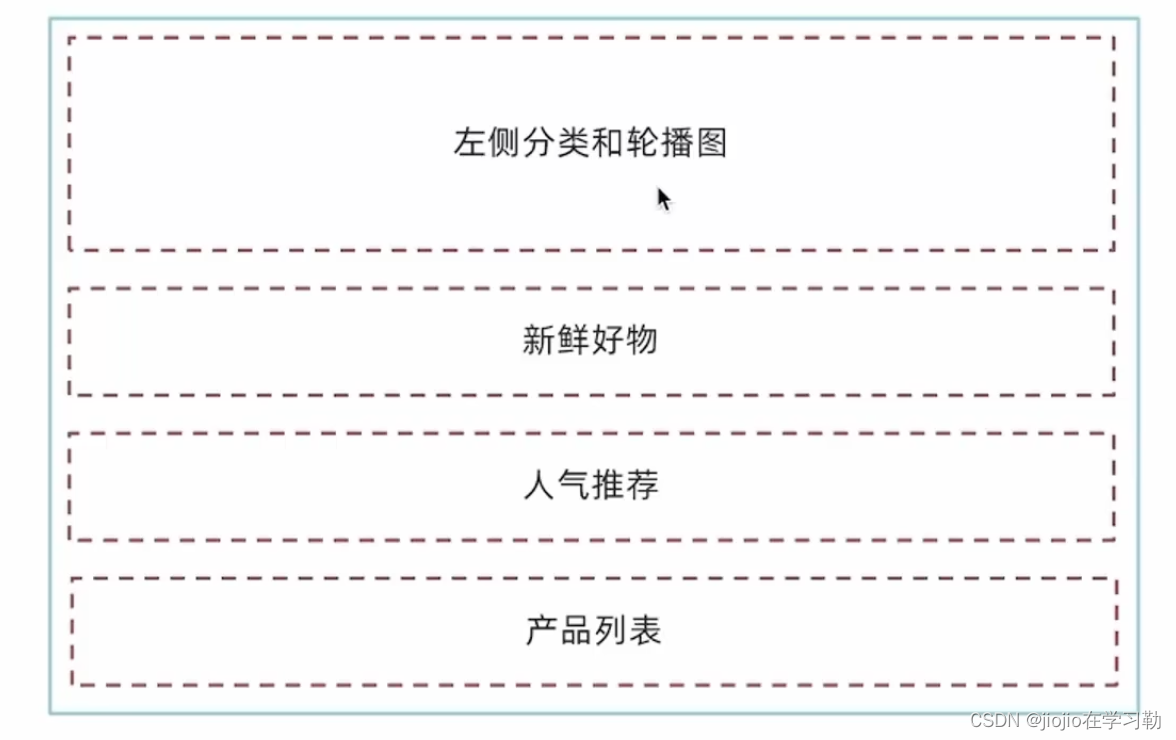
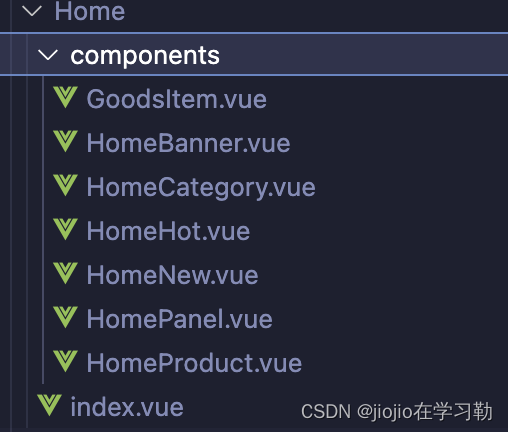
根据上面五个模块建目录图如下:
home/index.vue
<script setup>
import HomeCategory from './components/HomeCategory.vue'
import HomeBanner from './components/HomeBanner.vue'
import HomeNew from './components/HomeNew.vue'
import HomeHot from './components/HomeHot.vue'
import HomeProduct from './components/HomeProduct.vue'
</script>

<template>
  <div class="container">
    <HomeCategory />
    <HomeBanner />
  </div>
  <HomeNew />
  <HomeHot />
  <HomeProduct />
</template>
分类实现
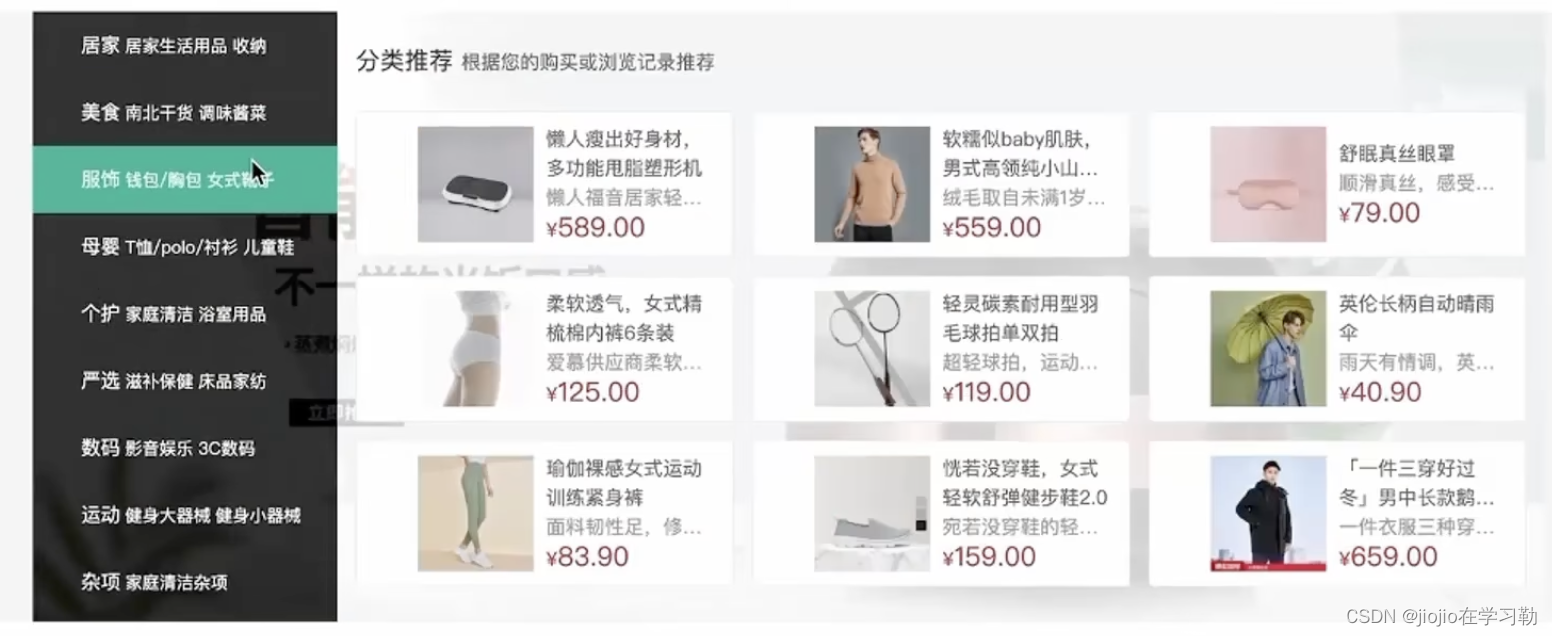
home/HomeCategory
<script setup>
import { useCategoryStore } from '@/stores/categoryStore'
const categoryStore = useCategoryStore()
</script>

<template>
  <div class="home-category">
    <ul class="menu">
      <li v-for="item in categoryStore.categoryList" :key="item.id">
        <RouterLink to="/">{{ item.name }}</RouterLink>
        <RouterLink v-for="i in item.children.slice(0, 2)" :key="i" to="/">{{ i.name }}</RouterLink>
        <!-- 弹层layer位置 -->
        <div class="layer">
          <h4>分类推荐 <small>根据您的购买或浏览记录推荐</small></h4>
          <ul>
            <li v-for="i in item.goods" :key="i.id">
              <RouterLink to="/">
                <img :src="i.picture" alt="" />
                <div class="info">
                  <p class="name ellipsis-2">
                    {{ i.name }}
                  </p>
                  <p class="desc ellipsis">{{ i.desc }}</p>
                  <p class="price"><i>¥</i>{{ i.price }}</p>
                </div>
              </RouterLink>
            </li>
          </ul>
        </div>
      </li>
    </ul>
  </div>
</template>


<style scoped lang='scss'>
.home-category {
  width: 250px;
  height: 500px;
  background: rgba(0, 0, 0, 0.8);
  position: relative;
  z-index: 99;

  .menu {
    li {
      padding-left: 40px;
      height: 55px;
      line-height: 55px;

      &:hover {
        background: $xtxColor;
      }

      a {
        margin-right: 4px;
        color: #fff;

        &:first-child {
          font-size: 16px;
        }
      }

      .layer {
        width: 990px;
        height: 500px;
        background: rgba(255, 255, 255, 0.8);
        position: absolute;
        left: 250px;
        top: 0;
        display: none;
        padding: 0 15px;

        h4 {
          font-size: 20px;
          font-weight: normal;
          line-height: 80px;

          small {
            font-size: 16px;
            color: #666;
          }
        }

        ul {
          display: flex;
          flex-wrap: wrap;

          li {
            width: 310px;
            height: 120px;
            margin-right: 15px;
            margin-bottom: 15px;
            border: 1px solid #eee;
            border-radius: 4px;
            background: #fff;

            &:nth-child(3n) {
              margin-right: 0;
            }

            a {
              display: flex;
              width: 100%;
              height: 100%;
              align-items: center;
              padding: 10px;

              &:hover {
                background: #e3f9f4;
              }

              img {
                width: 95px;
                height: 95px;
              }

              .info {
                padding-left: 10px;
                line-height: 24px;
                overflow: hidden;

                .name {
                  font-size: 16px;
                  color: #666;
                }

                .desc {
                  color: #999;
                }

                .price {
                  font-size: 22px;
                  color: $priceColor;

                  i {
                    font-size: 16px;
                  }
                }
              }
            }
          }
        }
      }

      // 关键样式  hover状态下的layer盒子变成block
      &:hover {
        .layer {
          display: block;
        }
      }
    }
  }
}
</style>
banner轮播功能实现
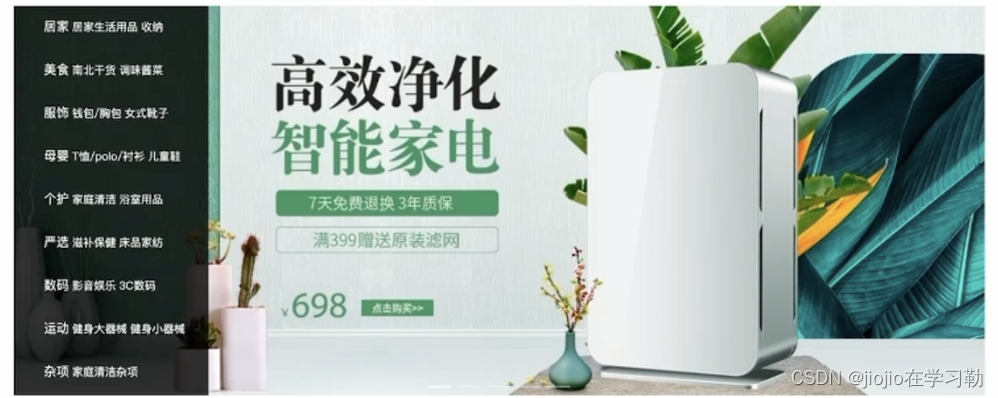
home/components/homeBanner
<script setup>
import { getBannerAPI } from '@/apis/home'
import { onMounted, ref } from 'vue'

const bannerList = ref([])

const getBanner = async () => {
  const res = await getBannerAPI()
  console.log(res)
  bannerList.value = res.result
}

onMounted(() => getBanner())

</script>


<template>
  <div class="home-banner">
    <el-carousel height="500px">
      <el-carousel-item v-for="item in bannerList" :key="item.id">
        <img :src="item.imgUrl" alt="">
      </el-carousel-item>
    </el-carousel>
  </div>
</template>


<style scoped lang='scss'>
.home-banner {
  width: 1240px;
  height: 500px;
  position: absolute;
  left: 0;
  top: 0;
  z-index: 98;

  img {
    width: 100%;
    height: 500px;
  }
}
</style>
apis/home.js
import httpInstance from '@/utils/http'
// 获取banner
export function getBannerAPI (params = {}) {
  // 默认为1 商品为2
  const { distributionSite = '1' } = params
  return httpInstance({
    url: '/home/banner',
    params: {
      distributionSite
    }
  })
}
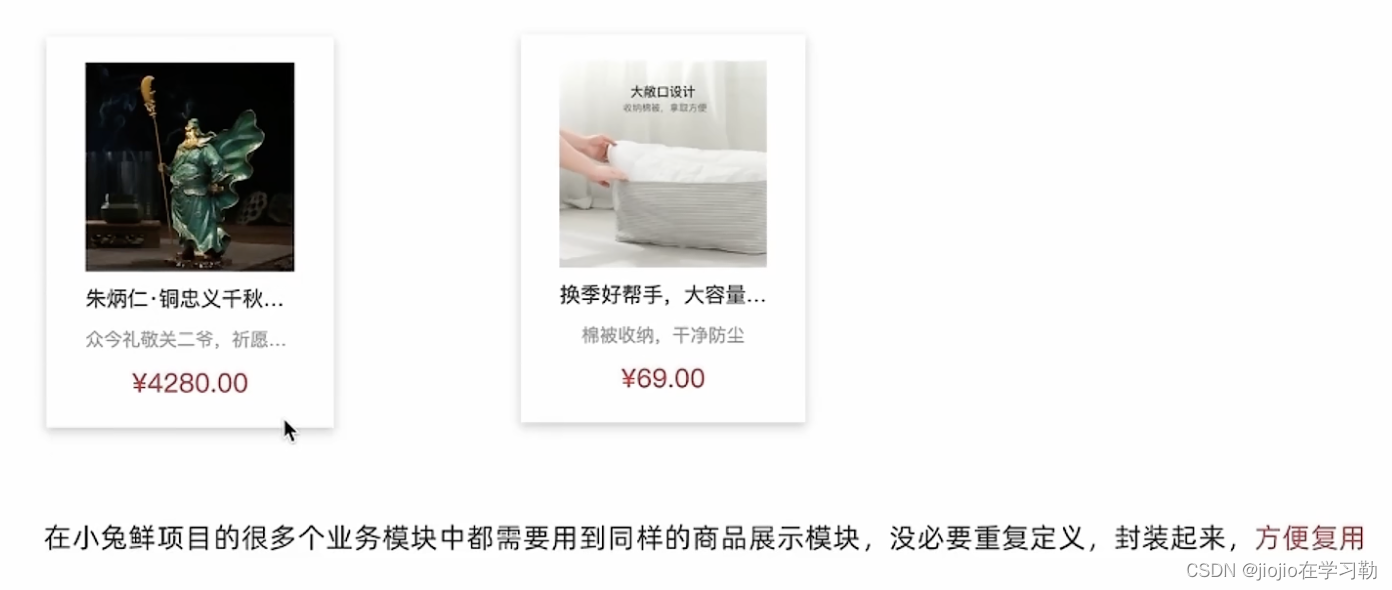
面板组件封装
场景说明
组件封装解决什么问题?
1️⃣复用问题
2️⃣业务维护问题
新鲜好物和人气推荐模块,在结构上非常相似,只是内容不同,通过组件封装可以实现复用结构的效果
组件封装
核心思路:把可复用的结构只写一次,把可能发生变化的部分抽象成组件参数(props/插槽)
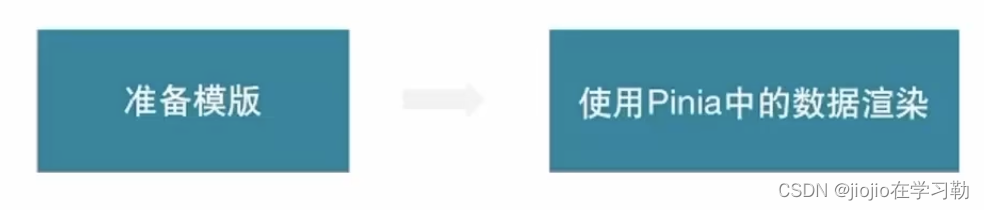
实现步骤
1️⃣不做任何抽象,准备静态模版
2️⃣抽象可变的部分
主标题和副标题是纯文本,可以抽象成prop传入
主题内容是复杂的模版,抽象成插槽传入
Home/components/HomePanel.vue
<script setup>
// 定义props
defineProps({
  // 主标题
  title: {
    type: String
  },
  // 副标题
  subTitle: {
    type: String
  }
})

</script>


<template>
  <div class="home-panel">
    <div class="container">
      <div class="head">
        <!-- 主标题和副标题 -->
        <h3>
          {{ title }}<small>{{ subTitle }}</small>
        </h3>
      </div>
      <!-- 主体内容区域 -->
      <slot />
    </div>
  </div>
</template>

<style scoped lang='scss'>
.home-panel {
  background-color: #fff;

  .head {
    padding: 40px 0;
    display: flex;
    align-items: flex-end;

    h3 {
      flex: 1;
      font-size: 32px;
      font-weight: normal;
      margin-left: 6px;
      height: 35px;
      line-height: 35px;

      small {
        font-size: 16px;
        color: #999;
        margin-left: 20px;
      }
    }
  }
}
</style>
总结
非复杂的模版抽象成props,复杂的结构模版抽象为插槽
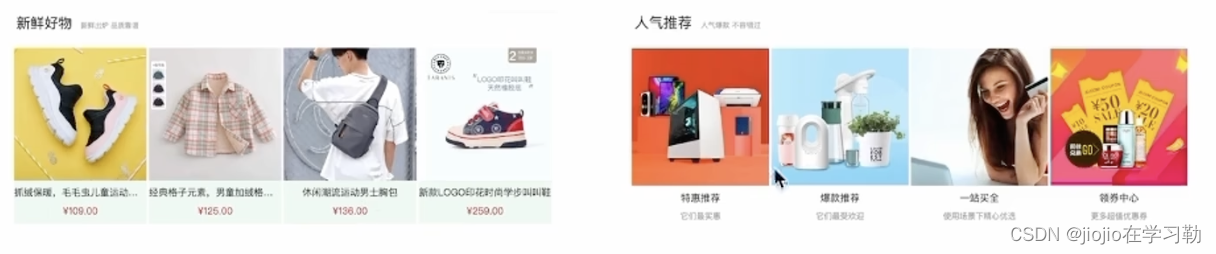
实现新鲜好物
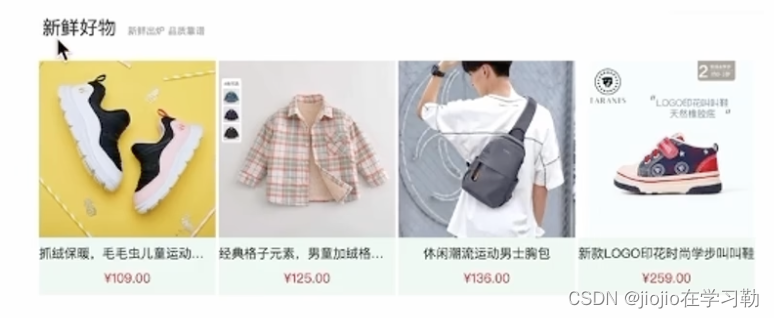

Home/components/HomeNew.vue
//引入上面封装好的homePanel组件
<script setup>
import HomePanel from './HomePanel.vue'
import { findNewAPI } from '@/apis/home' //接口
import { onMounted, ref } from 'vue'
// 获取数据
const newList = ref([])
const getNewList = async () => {
const res = await findNewAPI()
newList.value = res.result
}
onMounted(() => getNewList())
</script>
<template>
<HomePanel title="新鲜好物" sub-title="新鲜出炉 品质靠谱">
//插槽内容
<ul class="goods-list">
<li v-for="item in newList" :key="item.id">
<RouterLink :to="`/detail/${item.id}`">
<img :src="item.picture" alt="" />
<p class="name">{{ item.name }}</p>
<p class="price">¥{{ item.price }}</p>
</RouterLink>
</li>
</ul>
</HomePanel>
<!-- 下面是插槽主体内容模版
<ul class="goods-list">
<li v-for="item in newList" :key="item.id">
<RouterLink to="/">
<img :src="item.picture" alt="" />
<p class="name">{{ item.name }}</p>
<p class="price">¥{{ item.price }}</p>
</RouterLink>
</li>
</ul>
-->
</template>
<style scoped lang='scss'>
.goods-list {
display: flex;
justify-content: space-between;
height: 406px;
li {
width: 306px;
height: 406px;
background: #f0f9f4;
transition: all .5s;
&:hover {
transform: translate3d(0, -3px, 0);
box-shadow: 0 3px 8px rgb(0 0 0 / 20%);
}
img {
width: 306px;
height: 306px;
}
p {
font-size: 22px;
padding-top: 12px;
text-align: center;
text-overflow: ellipsis;
overflow: hidden;
white-space: nowrap;
}
.price {
color: $priceColor;
}
}
}
</style>
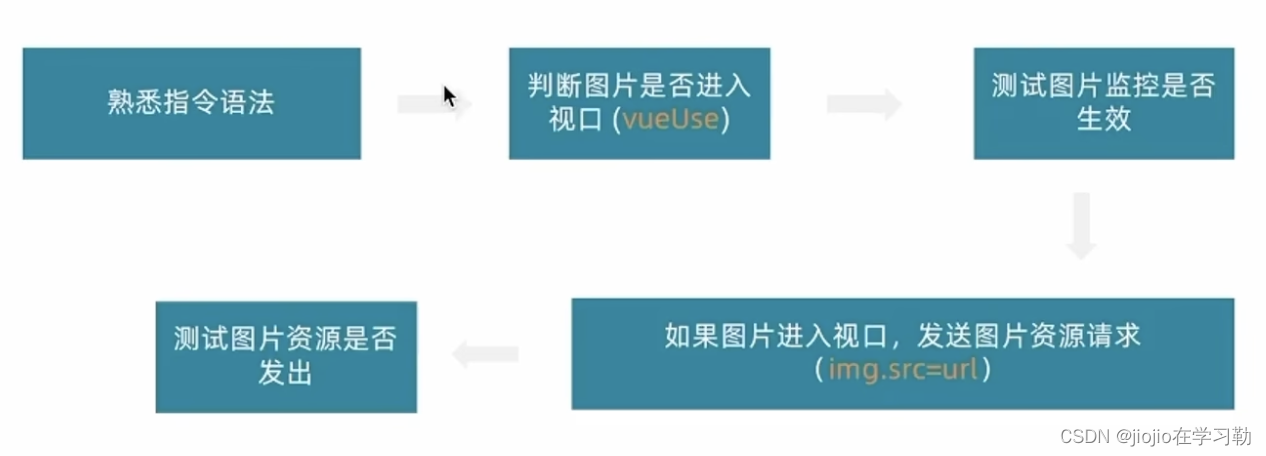
图片懒加载指令是实现
场景
电商网站的首页通常会很长,用户不一定访问到页面靠下面的图片,这类图片通过懒加载优化手段可以做到只有进入视口区域才发送图片请求
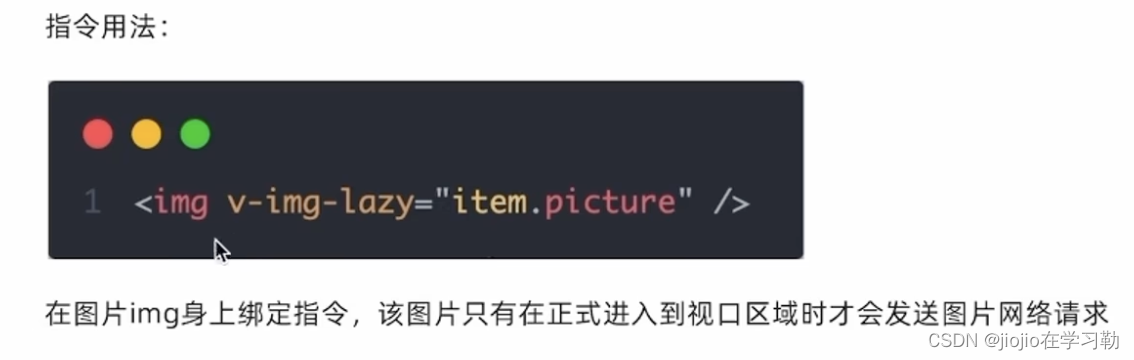
实现思路和步骤
核心原理:图片进入视口才发送资源请求
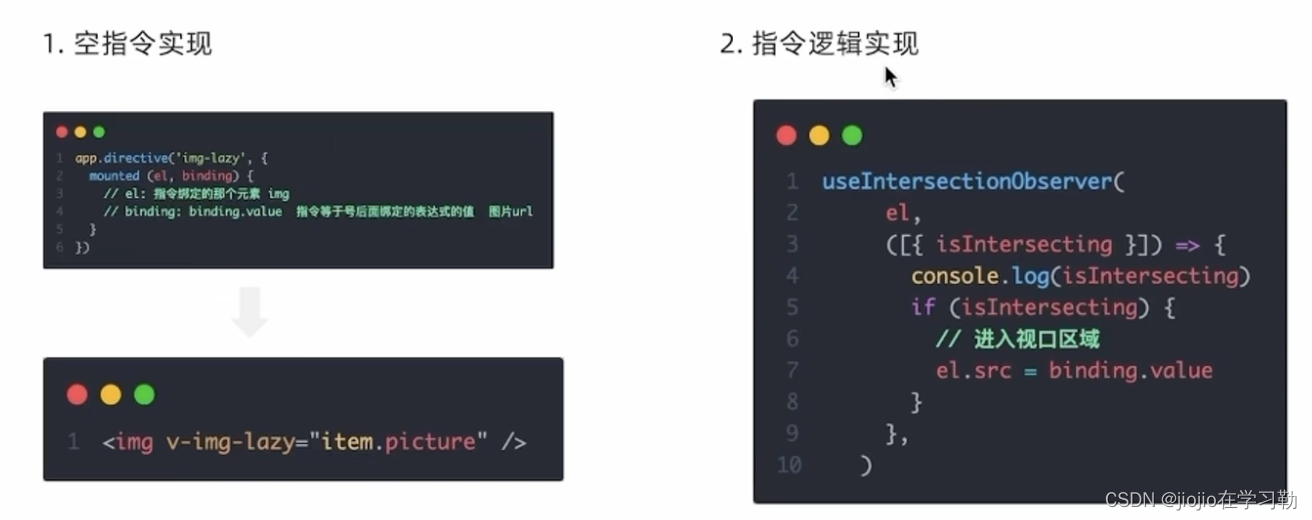
directives/index.js
// 定义懒加载插件
import { useIntersectionObserver } from '@vueuse/core'
export const lazyPlugin = {
  install (app) {
  //install固定写法
    // 懒加载指令逻辑
    app.directive('img-lazy', {
      mounted (el, binding) {
        // el: 指令绑定的那个元素 img
        // binding: binding.value  指令等于号后面绑定的表达式的值  图片url
        // console.log(el, binding.value)
        const { stop } = useIntersectionObserver(
          el,
          ([{ isIntersecting }]) => {
            console.log(isIntersecting)
            if (isIntersecting) {
              // 进入视口区域
              el.src = binding.value
              //useIntersectionObserver对于元素的监听是一直存在的,除非手动停止监听,存在内存浪费
             // 解决思路:在监听的图片第一次完成加载之后就停止监听
              stop()
            }
          },
        )
      }
    })
  }
}
main.js
// 引入懒加载指令插件并且注册
import { lazyPlugin } from '@/directives'
app.use(lazyPlugin)
app.mount('#app')
product产品列表实现

Home/components/HomeProduct
<script setup>
import HomePanel from './HomePanel.vue'
import { getGoodsAPI } from '@/apis/home'
import { onMounted, ref } from 'vue'
import GoodsItem from './GoodsItem.vue'
// 获取数据列表
const goodsProduct = ref([])
const getGoods = async () => {
const res = await getGoodsAPI()
goodsProduct.value = res.result
}
onMounted(() => getGoods())
</script>
<template>
<div class="home-product">
<HomePanel :title="cate.name" v-for="cate in goodsProduct" :key="cate.id">
<div class="box">
<RouterLink class="cover" to="/">
<img :src="cate.picture" />
<strong class="label">
<span>{{ cate.name }}馆</span>
<span>{{ cate.saleInfo }}</span>
</strong>
</RouterLink>
<ul class="goods-list">
<li v-for="goods in cate.goods" :key="good.id">
<RouterLink to="/" class="goods-item">
<img :src="goods.picture" alt="" />
<p class="name ellipsis">{{ goods.name }}</p>
<p class="desc ellipsis">{{ goods.desc }}</p>
<p class="price">¥{{ goods.price }}</p>
</RouterLink>
</li>
</ul>
</div>
</HomePanel>
</div>
</template>
<style scoped lang='scss'>
.home-product {
background: #fff;
margin-top: 20px;
.sub {
margin-bottom: 2px;
a {
padding: 2px 12px;
font-size: 16px;
border-radius: 4px;
&:hover {
background: $xtxColor;
color: #fff;
}
&:last-child {
margin-right: 80px;
}
}
}
.box {
display: flex;
.cover {
width: 240px;
height: 610px;
margin-right: 10px;
position: relative;
img {
width: 100%;
height: 100%;
}
.label {
width: 188px;
height: 66px;
display: flex;
font-size: 18px;
color: #fff;
line-height: 66px;
font-weight: normal;
position: absolute;
left: 0;
top: 50%;
transform: translate3d(0, -50%, 0);
span {
text-align: center;
&:first-child {
width: 76px;
background: rgba(0, 0, 0, 0.9);
}
&:last-child {
flex: 1;
background: rgba(0, 0, 0, 0.7);
}
}
}
}
.goods-list {
width: 990px;
display: flex;
flex-wrap: wrap;
li {
width: 240px;
height: 300px;
margin-right: 10px;
margin-bottom: 10px;
&:nth-last-child(-n + 4) {
margin-bottom: 0;
}
&:nth-child(4n) {
margin-right: 0;
}
}
}
}
}
</style>
GoodsItem组件封装
为什么封装goodsItem
如何封装
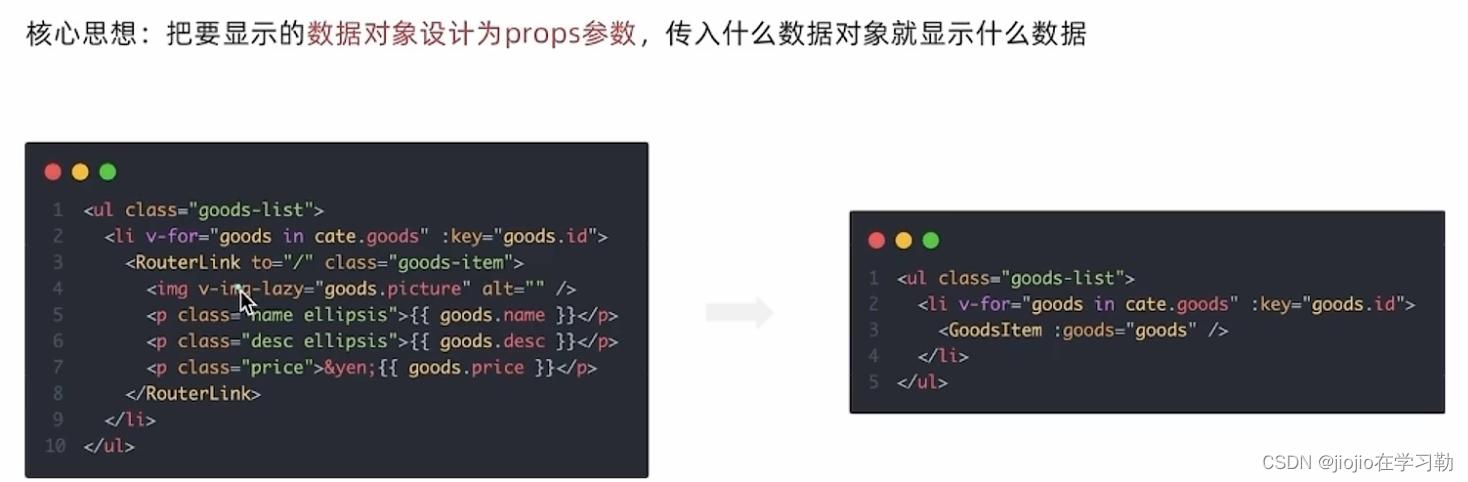
Home/components/GoodItems
<script setup>
defineProps({
goods: {
tppe: Object,
default: () => { }
}
})
</script>
<template>
<RouterLink to="/" class="goods-item">
<img v-img-lazy="goods.picture" alt="" />
<p class="name ellipsis">{{ goods.name }}</p>
<p class="desc ellipsis">{{ goods.desc }}</p>
<p class="price">¥{{ goods.price }}</p>
</RouterLink>
</template>
<style lang="scss" scoped>
.goods-item {
display: block;
width: 220px;
padding: 20px 30px;
text-align: center;
transition: all .5s;
&:hover {
transform: translate3d(0, -3px, 0);
box-shadow: 0 3px 8px rgb(0 0 0 / 20%);
}
img {
width: 160px;
height: 160px;
}
p {
padding-top: 10px;
}
.name {
font-size: 16px;
}
.desc {
color: #999;
height: 29px;
}
.price {
color: $priceColor;
font-size: 20px;
}
}
</style>
Home/components/HomeProduct
<script setup>
import HomePanel from './HomePanel.vue'
import { getGoodsAPI } from '@/apis/home'
import { onMounted, ref } from 'vue'
import GoodsItem from './GoodsItem.vue'
// 获取数据列表
const goodsProduct = ref([])
const getGoods = async () => {
  const res = await getGoodsAPI()
  goodsProduct.value = res.result
}
onMounted(() => getGoods())
</script>

<template>
  <div class="home-product">
    <HomePanel :title="cate.name" v-for="cate in goodsProduct" :key="cate.id">
      <div class="box">
        <RouterLink class="cover" to="/">
          <img v-img-lazy="cate.picture" />
          <strong class="label">
            <span>{{ cate.name }}馆</span>
            <span>{{ cate.saleInfo }}</span>
          </strong>
        </RouterLink>
        <ul class="goods-list">
          <li v-for="goods in cate.goods" :key="goods.id">
            <GoodsItem :goods="goods" />
          </li>
        </ul>
      </div>
    </HomePanel>
  </div>
</template>

<style scoped lang='scss'>
.home-product {
  background: #fff;
  margin-top: 20px;

  .sub {
    margin-bottom: 2px;

    a {
      padding: 2px 12px;
      font-size: 16px;
      border-radius: 4px;

      &:hover {
        background: $xtxColor;
        color: #fff;
      }

      &:last-child {
        margin-right: 80px;
      }
    }
  }

  .box {
    display: flex;

    .cover {
      width: 240px;
      height: 610px;
      margin-right: 10px;
      position: relative;

      img {
        width: 100%;
        height: 100%;
      }

      .label {
        width: 188px;
        height: 66px;
        display: flex;
        font-size: 18px;
        color: #fff;
        line-height: 66px;
        font-weight: normal;
        position: absolute;
        left: 0;
        top: 50%;
        transform: translate3d(0, -50%, 0);

        span {
          text-align: center;

          &:first-child {
            width: 76px;
            background: rgba(0, 0, 0, 0.9);
          }

          &:last-child {
            flex: 1;
            background: rgba(0, 0, 0, 0.7);
          }
        }
      }
    }

    .goods-list {
      width: 990px;
      display: flex;
      flex-wrap: wrap;

      li {
        width: 240px;
        height: 300px;
        margin-right: 10px;
        margin-bottom: 10px;

        &:nth-last-child(-n + 4) {
          margin-bottom: 0;
        }

        &:nth-child(4n) {
          margin-right: 0;
        }
      }
    }


  }
}
</style>