2024年度十余爆款爱心表白代码,还不进来瞅瞅?(一)

个人名片:
🐼作者简介:一名大三在校生,喜欢AI编程🎋
🐻❄️个人主页🥇:落798.
🐼个人WeChat:hmmwx53
🕊️系列专栏:🖼️
- 零基础学Java——小白入门必备
- 重识C语言——复习回顾
- 计算机网络体系———深度详讲
- HCIP数通工程师-刷题与实战
- 微信小程序开发——实战开发
- HarmonyOS 4.0 应用开发实战——实战开发
🐓每日一句:🍭我很忙,但我要忙的有意义!
欢迎评论 💬点赞👍🏻 收藏 📂加关注+
文章目录
- 2024年度十余爆款爱心表白代码,还不进来瞅瞅?
- 前言
- 第一弹:
- 代码如下:
- 第二弹
- 代码如下:
- 特效三:
- 代码如下:
- 特效四
- 代码如下:
- 特效五
- 代码如下:
- 欢迎添加微信,加入我的核心小队,请备注来意
2024年度十余爆款爱心表白代码,还不进来瞅瞅?
前言
“月色暗淡还有星辰—山河失色你还有我”
——《告白文案》

人们对于程序员的描述:格子衫,不浪漫,直男,人傻钱多……一点都不懂得浪漫! 谁说我们不懂浪漫的? 不会制造惊喜的?真的是这样么?不不不 你错了 程序员一旦浪漫起来,真没其他人啥事了!!!
写了这么多年代码的程序员也是时候该展现一下自己的技术啦!
话不多说今天就用十余种方法带大家手把手绘制爱心代码,送给你喜欢的哪个他,也祝你们2024年表白成功,幸福美满~
第一弹:
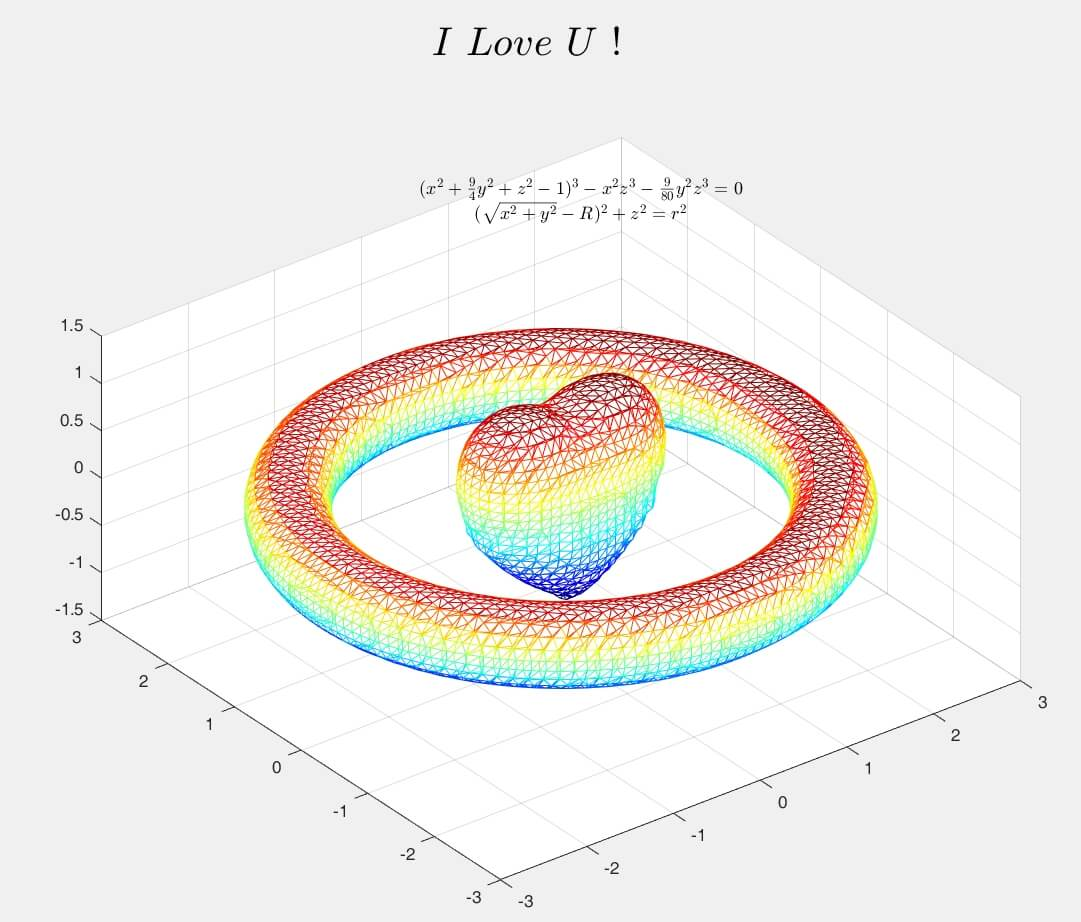
代码如下:
f=@(x,y,z)(x.^2+ (9./4).*y.^2 + z.^2 - 1).^3 - x.^2.*z.^3 - (9./80).*y.^2.*z.^3;
[x,y,z]=meshgrid(linspace(-3,3));
val=f(x,y,z);
[p,v]=isosurface(x,y,z,val,0);
patch('faces',p,'vertices',v,'facevertexcdata',jet(size(v,1)),'facecolor','w','edgecolor','flat');
view(3);grid on;axis equal;
第二弹

代码如下:
#include<graphics.h>
#include<conio.h>
#include<time.h>
#include<math.h>
#include<stdlib.h>


//爱心点结构体
struct Point {
	double x, y;     //坐标
	COLORREF color;  //颜色
};

//颜色数组
COLORREF colors[7] = { RGB(255,32,83),RGB(252,222,250) ,RGB(255,0,0) ,RGB(255,0,0) ,RGB(255,2,2) ,RGB(255,0,8) ,RGB(255,5,5) };
//COLORREF colors[7] = { RGB(55,132,83),RGB(252,222,250) ,RGB(25,120,130) ,RGB(25,230,40) ,RGB(25,24,112) ,RGB(255,230,128) ,RGB(25,5,215) };


const int xScreen = 1200;				  //屏幕宽度
const int yScreen = 800;				  //屏幕高度
const double PI = 3.1426535159;         //圆周率
const double e = 2.71828;				  //自然数e
const double averag_distance = 0.162;    //弧度以0.01增长时,原始参数方程每个点的平均距离
const int quantity = 506;				  //一个完整爱心所需点的数量
const int circles = 210;				  //组成爱心主体的爱心个数(每个爱心会乘以不同系数)
const int frames = 20;					  //爱心扩张一次的帧数
Point  origin_points[quantity];			  //创建一个保存原始爱心数据的数组
Point  points[circles * quantity];      //创建一个保存所有爱心数据的数组
IMAGE images[frames];					  //创建图片数组

//坐标转换函数
double screen_x(double x)
{
	x += xScreen / 2;
	return x;
}
//坐标转换函数
double screen_y(double y)
{
	y = -y + yScreen / 2;
	return y;
}

//创建x1-x2的随机数的函数
int creat_random(int x1, int x2)
{
	if (x2 > x1)
		return  rand() % (x2 - x1 + 1) + x1;
	else
		return 0;
}

//创建爱心扩张一次的全部数据,并绘制成20张图片保存
// 1 用参数方程计算出一个爱心的所有坐标并保存在 origin_points 中
// 2 重复对 origin_points 的所有坐标乘上不同的系数获得一个完整的爱心坐标数据,并保存在 points 中
// 3 通过一些数学逻辑计算 points 中所有点扩张后的坐标并绘制,并覆盖掉原来的数据(循环20次)
// 4 计算圆的外层那些闪动的点,不保存这些点的数据(循环20次)
void creat_data()
{

	int index = 0;

	//保存相邻的坐标信息以便用于计算距离
	double x1 = 0, y1 = 0, x2 = 0, y2 = 0;
	for (double radian = 0.1; radian <= 2 * PI; radian += 0.005)
	{
		//爱心的参数方程
		x2 = 16 * pow(sin(radian), 3);
		y2 = 13 * cos(radian) - 5 * cos(2 * radian) - 2 * cos(3 * radian) - cos(4 * radian);

		//计算两点之间的距离 开根号((x1-x2)平方 + (y1-y1)平方)
		double distance = sqrt(pow(x2 - x1, 2) + pow(y2 - y1, 2));

		//只有当两点之间的距离大于平均距离才保存这个点,否则跳过这个点
		if (distance > averag_distance)
		{
			//x1和y1保留当前数据
			//x2和y2将在下一次迭代获得下一个点的坐标
			x1 = x2, y1 = y2;
			origin_points[index].x = x2;
			origin_points[index++].y = y2;
		}
	}

	index = 0;
	for (double size = 0.1; size <= 20; size += 0.1)
	{
		//用sigmoid函数计算当前系数的成功概率
		//用个例子说明一下,假设有100个点成功概率为 90%,那么就可能会有90个点经过筛选保留下来
		//					假设有100个点成功概率为 20%,那么就可能会有20个点经过筛选保留下来
		double success_p = 1 / (1 + pow(e, 8 - size / 2));

		//遍历所有原始数据
		for (int i = 0; i < quantity; ++i)
		{
			//用概率进行筛选
			if (success_p > creat_random(0, 100) / 100.0)
			{
				//从颜色数组随机获得一个颜色
				points[index].color = colors[creat_random(0, 6)];

				//对原始数据乘上系数保存在points中
				points[index].x = size * origin_points[i].x + creat_random(-4, 4);
				points[index++].y = size * origin_points[i].y + creat_random(-4, 4);
			}
		}
	}

	//index当前值就是points中保存了结构体的数量
	int points_size = index;

	for (int frame = 0; frame < frames; ++frame)
	{
		//初始化每张图片宽xScreen,高yScreen
		images[frame] = IMAGE(xScreen, yScreen);

		//把第frame张图像设为当前工作图片
		SetWorkingImage(&images[frame]);

		//计算爱心跳动的坐标
		for (index = 0; index < points_size; ++index)
		{

			double x = points[index].x, y = points[index].y;                              //把当前值赋值给x和y
			double distance = sqrt(pow(x, 2) + pow(y, 2));										//计算当前点与原点的距离
			double diatance_increase = -0.0009 * distance * distance + 0.35714 * distance + 5;	//把当前距离代入方程获得该点的增长距离

			//根据增长距离计算x轴方向的增长距离 x_increase = diatance_increase * cos(当前角度)
			//cos(当前角度)= x / distance
			double x_increase = diatance_increase * x / distance / frames;
			//根据增长距离计算x轴方向的增长距离 x_increase = diatance_increase * sin(当前角度)
			//sin(当前角度)= y / distance
			double y_increase = diatance_increase * y / distance / frames;

			//因为以上计算得到的是一整个过程的增长距离,而整个过程持续20帧,因此要除20


			//用新的数据覆盖原来的数据
			points[index].x += x_increase;
			points[index].y += y_increase;

			//提取当前点的颜色设置为绘画颜色
			setfillcolor(points[index].color);
			//注意,因为以上所有坐标是基于数学坐标的
			//因此绘制到屏幕是就要转换为屏幕坐标
			solidcircle(screen_x(points[index].x), screen_y(points[index].y), 1);
		}

		//产生外围闪动的点
		for (double size = 17; size < 23; size += 0.3)
		{
			for (index = 0; index < quantity; ++index)
			{
				//当系数大于等于20,通过概率为百分之四十,当系数小于20,通过概率为百分之五
				//20作为关键值是因为爱心主体的最大系数就是20
				if ((creat_random(0, 100) / 100.0 > 0.6 && size >= 20) || (size < 20 && creat_random(0, 100) / 100.0 > 0.95))
				{
					double x, y;
					if (size >= 20)
					{
						//用frame的平方的正负值作为上下限并加减15产生随机数
						//用frame的平方的好处是frame越大,外围闪动的点运动范围越大
						x = origin_points[index].x * size + creat_random(-frame * frame / 5 - 15, frame * frame / 5 + 15);
						y = origin_points[index].y * size + creat_random(-frame * frame / 5 - 15, frame * frame / 5 + 15);
					}
					else
					{
						//对于系数小于20的处理与爱心点一样
						x = origin_points[index].x * size + creat_random(-5, 5);
						y = origin_points[index].y * size + creat_random(-5, 5);
					}


					//随机获取颜色并设置为当前绘图颜色
					setfillcolor(colors[creat_random(0, 6)]);
					//把数学坐标转换为屏幕坐标再进行绘制
					solidcircle(screen_x(x), screen_y(y), 1);
					//需要注意的是,我并没有保存这些点,因为这些点不需要前一帧的坐标数据
					//只需要当前系数就可绘制出来,因此没 必要保存
				}
			}
		}
	}
}

int main()
{
	initgraph(xScreen, yScreen);  //创建屏幕
	BeginBatchDraw();			  //开始批量绘图
	srand(time(0));				  //初始化随机种子
	creat_data();				  //调用函数产生20张图片
	SetWorkingImage();			  //调用函数把工作图像恢复为窗口,没有添加参数默认为窗口
	//因为接下是用窗口播放图片,因此要把绘图效果设置为窗口

	bool extend = true, shrink = false;
	for (int frame = 0; !_kbhit();)     //退出条件为检测到按键信息
	{
		putimage(0, 0, &images[frame]); //播放第frame张图片
		FlushBatchDraw();				//刷新批量绘图
		Sleep(20);						//延时20毫秒
		cleardevice();					//清除屏幕,用来播放下一帧图片


		//注意 creat data 产生的只是爱心扩张的20张图片,并没有产生爱心收缩的图片
		//但是把扩张的图片倒着播放就产生的收缩的效果
		//所以下面这个 if else 语句就是决定图片是正常播放还是倒着播放

		if (extend)  //扩张时, ++frame,正常播放
			frame == 19 ? (shrink = true, extend = false) : ++frame;
		else         //收缩时, --frame,倒着播放
			frame == 0 ? (shrink = false, extend = true) : --frame;
	}

	EndBatchDraw(); //关闭批量绘图
	closegraph();	//关闭绘图窗口
	return 0;		//结束程序
}
特效三:

代码如下:
<!DOCTYPE html>
<html lang="en"><script id="allow-copy_script">(function agent() {
    let unlock = false
    document.addEventListener('allow_copy', (event) => {
      unlock = event.detail.unlock
    })

    const copyEvents = [
      'copy',
      'cut',
      'contextmenu',
      'selectstart',
      'mousedown',
      'mouseup',
      'mousemove',
      'keydown',
      'keypress',
      'keyup',
    ]
    const rejectOtherHandlers = (e) => {
      if (unlock) {
        e.stopPropagation()
        if (e.stopImmediatePropagation) e.stopImmediatePropagation()
      }
    }
    copyEvents.forEach((evt) => {
      document.documentElement.addEventListener(evt, rejectOtherHandlers, {
        capture: true,
      })
    })
  })()</script><head><meta http-equiv="Content-Type" content="text/html; charset=UTF-8">

    <title>我爱你</title>
    <meta name="language" content="zh-CN">
    <meta name="github" content="https://github.com/sun0225SUN/Awesome-Love-Code">
    <meta name="describe" content="收集不易,您的star是我坚持的动力,同时也欢迎各位PR哦! ">
    <link rel="icon" type="image/x-icon" href="https://cdn.jsdelivr.net/gh/sun0225SUN/photos/img/20210715233345.png">
    <link rel="stylesheet" href="./我爱你_files/demo.css">
</head>

<body>
    <img src="./我爱你_files/xx.png" class="gb">
    <!--灰色的遮罩层-->
    <!--Tz_gray start-->
    <div id="Tz_gray">
        <!--内容发表区-->
        <div class="Con">
            <span class="col">颜色 <font></font> </span>
            <p class="txt" contenteditable="true"></p>
            <span class="but">清空再写</span>
            <ul>
                <li data-color="#FF8CDE">颜色 <font style="background-color:#ff8cde"></font>
                </li>
                <li data-color="#C59FFF" class="xz">颜色 <font style="background-color:#c59fff"></font>
                </li>
                <li data-color="#89ACFF">颜色 <font style="background-color:#89acff"></font>
                </li>
                <li data-color="#92FFC1">颜色 <font style="background-color:#92ffc1"></font>
                </li>
                <li data-color="#FFCC94">颜色 <font style="background-color:#ffcc94"></font>
                </li>
                <li data-color="#FFFFFF">颜色 <font style="background-color:#ffffff"></font>
                </li>
            </ul>
        </div>
        <!--内容发表区-->
        <div class="Text">
            <span class="say">我知道你是一个天真善良温柔的女孩</span><br>
            <span class="say">真的希望自己能够配上你</span><br>
            <span class="say">如果你能给我机会让我好好的爱你</span><br>
            <span class="say">真的只想真心真意对你说</span><br>
            <span class="say">我爱你一定爱到花都开了 鸟儿把歌唱</span><br>
            <span class="say">爱到牛郎织女为我们点头</span><br>
            <span class="say">爱到花儿绽放鸟儿成群把我们环绕</span><br>
            <span class="say">爱到每道彩虹映出你的美</span><br>
            <span class="say">我爱你一定爱到海枯石烂永远不后悔</span><br>
            <span class="say">爱到来生来世也会说无悔</span><br>
            <span class="say">就把这首动听的歌唱给心爱的女孩</span><br>
            <span class="say">真的希望你能给我个机会</span><br>
            <span class="say">让我去爱你</span><br>
        </div>
    </div>
    <!--Tz_gray end-->
    <audio src="MP3/2.mp3" id="Music"></audio>
    <!--music end-->
    <script type="text/javascript" src="./我爱你_files/jquery-1.11.1.min.js.下载"></script>
    <script src="./我爱你_files/snowfall.jquery.js.下载"></script>
    <script src="./我爱你_files/demo.js.下载"></script>
<div class="snowfall-flakes" id="flake-0" style="background: transparent; width: 1.01px; height: 1.01px; position: absolute; top: 0px; left: -20px; font-size: 0px; z-index: 999999;"></div>
<div class="snowfall-flakes" id="flake-1" style="background: transparent; width: 1.87px; height: 1.87px; position: absolute; top: 0px; left: 19px; font-size: 0px; z-index: 999999;"></div>
<div class="snowfall-flakes" id="flake-2" style="background: transparent; width: 1.66px; height: 1.66px; position: absolute; top: 0px; left: -23px; font-size: 0px; z-index: 999999;"></div>
<div class="snowfall-flakes" id="flake-3" style="background: transparent; width: 1.25px; height: 1.25px; position: absolute; top: 0px; left: 13px; font-size: 0px; z-index: 999999;"></div>
<div class="snowfall-flakes" id="flake-4" style="background: transparent; width: 1.68px; height: 1.68px; position: absolute; top: 0px; left: 23px; font-size: 0px; z-index: 999999;"></div><div class="snowfall-flakes" id="flake-5" style="background: transparent; width: 1.22px; height: 1.22px; position: absolute; top: 0px; left: 19px; font-size: 0px; z-index: 999999;"></div>
<div class="snowfall-flakes" id="flake-6" style="background: transparent; width: 1.06px; height: 1.06px; position: absolute; top: 0px; left: -23px; font-size: 0px; z-index: 999999;"></div>
<div class="snowfall-flakes" id="flake-7" style="background: transparent; width: 1.74px; height: 1.74px; position: absolute; top: 0px; left: 5px; font-size: 0px; z-index: 999999;"></div>
<div class="snowfall-flakes" id="flake-8" style="background: transparent; width: 1.57px; height: 1.57px; position: absolute; top: 0px; left: -23px; font-size: 0px; z-index: 999999;"></div>
<div class="snowfall-flakes" id="flake-9" style="background: transparent; width: 1.11px; height: 1.11px; position: absolute; top: 0px; left: -8px; font-size: 0px; z-index: 999999;"></div>
<div class="snowfall-flakes" id="flake-10" style="background: transparent; width: 1.56px; height: 1.56px; position: absolute; top: 0px; left: 20px; font-size: 0px; z-index: 999999;"></div>
<div class="snowfall-flakes" id="flake-11" style="background: transparent; width: 1.15px; height: 1.15px; position: absolute; top: 0px; left: 21px; font-size: 0px; z-index: 999999;"></div>
<div class="snowfall-flakes" id="flake-12" style="background: transparent; width: 1.87px; height: 1.87px; position: absolute; top: 0px; left: 19px; font-size: 0px; z-index: 999999;"></div>
<div class="snowfall-flakes" id="flake-13" style="background: transparent; width: 1.1px; height: 1.1px; position: absolute; top: 0px; left: 4px; font-size: 0px; z-index: 999999;"></div><div class="snowfall-flakes" id="flake-14" style="background: transparent; width: 1.84px; height: 1.84px; position: absolute; top: 0px; left: 7px; font-size: 0px; z-index: 999999;"></div>
<div class="snowfall-flakes" id="flake-15" style="background: transparent; width: 1.62px; height: 1.62px; position: absolute; top: 0px; left: -25px; font-size: 0px; z-index: 999999;"></div>
<div class="snowfall-flakes" id="flake-16" style="background: transparent; width: 1.32px; height: 1.32px; position: absolute; top: 0px; left: -20px; font-size: 0px; z-index: 999999;"></div>
<div class="snowfall-flakes" id="flake-17" style="background: transparent; width: 1.48px; height: 1.48px; position: absolute; top: 0px; left: -12px; font-size: 0px; z-index: 999999;"></div>
<div class="snowfall-flakes" id="flake-18" style="background: transparent; width: 1.12px; height: 1.12px; position: absolute; top: 0px; left: -5px; font-size: 0px; z-index: 999999;"></div>
<div class="snowfall-flakes" id="flake-19" style="background: transparent; width: 1.78px; height: 1.78px; position: absolute; top: 0px; left: -14px; font-size: 0px; z-index: 999999;"></div>
<div class="snowfall-flakes" id="flake-20" style="background: transparent; width: 1.87px; height: 1.87px; position: absolute; top: 0px; left: 22px; font-size: 0px; z-index: 999999;"></div>
<div class="snowfall-flakes" id="flake-21" style="background: transparent; width: 1.89px; height: 1.89px; position: absolute; top: 0px; left: -10px; font-size: 0px; z-index: 999999;"></div>
<div class="snowfall-flakes" id="flake-22" style="background: transparent; width: 1.07px; height: 1.07px; position: absolute; top: 0px; left: 22px; font-size: 0px; z-index: 999999;"></div><div class="snowfall-flakes" id="flake-23" style="background: transparent; width: 1.63px; height: 1.63px; position: absolute; top: 0px; left: 20px; font-size: 0px; z-index: 999999;"></div><div class="snowfall-flakes" id="flake-24" style="background: transparent; width: 1.88px; height: 1.88px; position: absolute; top: 0px; left: -14px; font-size: 0px; z-index: 999999;"></div><div class="snowfall-flakes" id="flake-25" style="background: transparent; width: 1.69px; height: 1.69px; position: absolute; top: 0px; left: 22px; font-size: 0px; z-index: 999999;"></div><div class="snowfall-flakes" id="flake-26" style="background: transparent; width: 1.47px; height: 1.47px; position: absolute; top: 0px; left: -4px; font-size: 0px; z-index: 999999;"></div><div class="snowfall-flakes" id="flake-27" style="background: transparent; width: 1.46px; height: 1.46px; position: absolute; top: 0px; left: 1px; font-size: 0px; z-index: 999999;"></div><div class="snowfall-flakes" id="flake-28" style="background: transparent; width: 1.01px; height: 1.01px; position: absolute; top: 0px; left: -6px; font-size: 0px; z-index: 999999;"></div><div class="snowfall-flakes" id="flake-29" style="background: transparent; width: 1.03px; height: 1.03px; position: absolute; top: 0px; left: 0px; font-size: 0px; z-index: 999999;"></div><div class="snowfall-flakes" id="flake-30" style="background: transparent; width: 1.53px; height: 1.53px; position: absolute; top: 0px; left: -22px; font-size: 0px; z-index: 999999;"></div><div class="snowfall-flakes" id="flake-31" style="background: transparent; width: 2px; height: 2px; position: absolute; top: 0px; left: 19px; font-size: 0px; z-index: 999999;"></div><div class="snowfall-flakes" id="flake-32" style="background: transparent; width: 1.53px; height: 1.53px; position: absolute; top: 0px; left: 17px; font-size: 0px; z-index: 999999;"></div><div class="snowfall-flakes" id="flake-33" style="background: transparent; width: 1.5px; height: 1.5px; position: absolute; top: 0px; left: -20px; font-size: 0px; z-index: 999999;"></div><div class="snowfall-flakes" id="flake-34" style="background: transparent; width: 1.75px; height: 1.75px; position: absolute; top: 0px; left: 20px; font-size: 0px; z-index: 999999;"></div><div class="snowfall-flakes" id="flake-35" style="background: transparent; width: 1.85px; height: 1.85px; position: absolute; top: 0px; left: 10px; font-size: 0px; z-index: 999999;"></div><div class="snowfall-flakes" id="flake-36" style="background: transparent; width: 1.41px; height: 1.41px; position: absolute; top: 0px; left: -17px; font-size: 0px; z-index: 999999;"></div><div class="snowfall-flakes" id="flake-37" style="background: transparent; width: 1.33px; height: 1.33px; position: absolute; top: 0px; left: 5px; font-size: 0px; z-index: 999999;"></div><div class="snowfall-flakes" id="flake-38" style="background: transparent; width: 1.98px; height: 1.98px; position: absolute; top: 0px; left: -12px; font-size: 0px; z-index: 999999;"></div><div class="snowfall-flakes" id="flake-39" style="background: transparent; width: 1.82px; height: 1.82px; position: absolute; top: 0px; left: 14px; font-size: 0px; z-index: 999999;"></div><div class="snowfall-flakes" id="flake-40" style="background: transparent; width: 1.72px; height: 1.72px; position: absolute; top: 0px; left: -12px; font-size: 0px; z-index: 999999;"></div><div class="snowfall-flakes" id="flake-41" style="background: transparent; width: 1.77px; height: 1.77px; position: absolute; top: 0px; left: -21px; font-size: 0px; z-index: 999999;"></div><div class="snowfall-flakes" id="flake-42" style="background: transparent; width: 1.66px; height: 1.66px; position: absolute; top: 0px; left: 7px; font-size: 0px; z-index: 999999;"></div><div class="snowfall-flakes" id="flake-43" style="background: transparent; width: 1.31px; height: 1.31px; position: absolute; top: 0px; left: -15px; font-size: 0px; z-index: 999999;"></div><div class="snowfall-flakes" id="flake-44" style="background: transparent; width: 1.71px; height: 1.71px; position: absolute; top: 0px; left: 6px; font-size: 0px; z-index: 999999;"></div>
<div class="snowfall-flakes" id="flake-45" style="background: transparent; width: 1.49px; height: 1.49px; position: absolute; top: 0px; left: 17px; font-size: 0px; z-index: 999999;"></div>
<div class="snowfall-flakes" id="flake-46" style="background: transparent; width: 1.57px; height: 1.57px; position: absolute; top: 0px; left: -18px; font-size: 0px; z-index: 999999;"></div>
<div class="snowfall-flakes" id="flake-47" style="background: transparent; width: 1.79px; height: 1.79px; position: absolute; top: 0px; left: -24px; font-size: 0px; z-index: 999999;"></div>
<div class="snowfall-flakes" id="flake-48" style="background: transparent; width: 1.13px; height: 1.13px; position: absolute; top: 0px; left: -24px; font-size: 0px; z-index: 999999;"></div>
<div class="snowfall-flakes" id="flake-49" style="background: transparent; width: 1.96px; height: 1.96px; position: absolute; top: 0px; left: -7px; font-size: 0px; z-index: 999999;"></div>

</body></html>
特效四

代码如下:
<!DOCTYPE html>
<html lang="en">

<head>
    <meta charset="UTF-8">
    <title>小景同学</title>
    <meta name="language" content="zh-CN">
    <meta name="title" content="小景同学">
    <link rel="icon" type="image/x-icon" href="https://cdn.jsdelivr.net/gh/sun0225SUN/photos/img/20210715233345.png">
    <style>
        * {
            padding: 0;
            margin: 0;
        }

        body {
            background-color: pink;

        }

        #frame {
            position: relative;
            width: 400px;
            height: 300px;
            margin: 250px auto;
        }

        .left,
        .right {
            top: 0;
            width: 200px;
            height: 200px;
            border-radius: 50%;
        }

        .left {
            left: 35px;

        }

        .right {
            right: 35px;
            z-index: -1;
        }

        .bottom {
            bottom: 36px;
            left: 100px;
            width: 200px;
            height: 200px;
            transform: rotate(45deg);
            z-index: -1;

        }

        .heart {
            position: absolute;
            box-shadow: 0 0 40px #d5093c;
            animation: beat .4s ease infinite normal;
            background: linear-gradient(-90deg, #F50A45 0%, #d5093c 40%);
        }

        @keyframes beat {
            0% {
                transform: scale(1) rotate(225deg);
                box-shadow: 0 0 40px #d5093c;
            }

            50% {
                transform: scale(1.1) rotate(225deg);
                box-shadow: 0 0 70px #d5093c;
            }

            100% {
                transform: scale(1) rotate(225deg);
                box-shadow: 0 0 40px #d5093c;
                ;
            }
        }

        .word {
            position: absolute;
            width: 50%;
            top: 75%;
            left: 25%;
            text-align: center;
            transform: translateY(-50%);
            font-family: 'Love Ya Like A Sister', cursive;
            font-size: 40px;
            color: #c70012;
            padding: 0 20px;
        }
    </style>
</head>

<body>

    <div id="frame">
        <div class="heart left"></div>
        <div class="heart right"></div>
        <div class="heart bottom"></div>
    </div>

    <b class="word">每次遇见你都心跳加速!</b>

    <audio autoplay="autopaly" loop="loop" id="audios" preload="auto">
        <source src="http://music.163.com/song/media/outer/url?id=526464145.mp3" />
    </audio>

    <script>
        var b = document.body;
        var c = document.getElementsByTagName('canvas')[0];
        var a = c.getContext('2d');
        document.body.clientWidth;
        with (m = Math) C = cos, S = sin, P = pow, R = random; c.width = c.height = f = 600; h = -250; function p(a, b, c) { if (c > 60) return [S(a * 7) * (13 + 5 / (.2 + P(b * 4, 4))) - S(b) * 50, b * f + 50, 625 + C(a * 7) * (13 + 5 / (.2 + P(b * 4, 4))) + b * 400, a * 1 - b / 2, a]; A = a * 2 - 1; B = b * 2 - 1; if (A * A + B * B < 1) { if (c > 37) { n = (j = c & 1) ? 6 : 4; o = .5 / (a + .01) + C(b * 125) * 3 - a * 300; w = b * h; return [o * C(n) + w * S(n) + j * 610 - 390, o * S(n) - w * C(n) + 550 - j * 350, 1180 + C(B + A) * 99 - j * 300, .4 - a * .1 + P(1 - B * B, -h * 6) * .15 - a * b * .4 + C(a + b) / 5 + P(C((o * (a + 1) + (B > 0 ? w : -w)) / 25), 30) * .1 * (1 - B * B), o / 1e3 + .7 - o * w * 3e-6] } if (c > 32) { c = c * 1.16 - .15; o = a * 45 - 20; w = b * b * h; z = o * S(c) + w * C(c) + 620; return [o * C(c) - w * S(c), 28 + C(B * .5) * 99 - b * b * b * 60 - z / 2 - h, z, (b * b * .3 + P((1 - (A * A)), 7) * .15 + .3) * b, b * .7] } o = A * (2 - b) * (80 - c * 2); w = 99 - C(A) * 120 - C(b) * (-h - c * 4.9) + C(P(1 - b, 7)) * 50 + c * 2; z = o * S(c) + w * C(c) + 700; return [o * C(c) - w * S(c), B * 99 - C(P(b, 7)) * 50 - c / 3 - z / 1.35 + 450, z, (1 - b / 1.2) * .9 + a * .1, P((1 - b), 20) / 4 + .05] } } setInterval('for(i=0;i<1e4;i++)if(s=p(R(),R(),i%46/.74)){z=s[2];x=~~(s[0]*f/z-h);y=~~(s[1]*f/z-h);if(!m[q=y*f+x]|m[q]>z)m[q]=z,a.fillStyle="rgb("+~(s[3]*h)+","+~(s[4]*h)+","+~(s[3]*s[3]*-80)+")",a.fillRect(x,y,1,1)}', 0)
    </script>
</body>

</html>
特效五

代码如下:
import random
from math import sin, cos, pi, log
from tkinter import *

CANVAS_WIDTH = 640  # 画布的宽
CANVAS_HEIGHT = 640  # 画布的高
CANVAS_CENTER_X = CANVAS_WIDTH / 2  # 画布中心的X轴坐标
CANVAS_CENTER_Y = CANVAS_HEIGHT / 2  # 画布中心的Y轴坐标
IMAGE_ENLARGE = 11  # 放大比例
HEART_COLOR = "#e77c8e"  # 心的颜色#ff7171


def heart_function(t, shrink_ratio: float = IMAGE_ENLARGE):
    """
    “爱心函数生成器”
    :param shrink_ratio: 放大比例
    :param t: 参数
    :return: 坐标
    """
    # 基础函数
    x = 16 * (sin(t) ** 3)
    y = -(13 * cos(t) - 5 * cos(2 * t) - 2 * cos(3 * t) - cos(4 * t))

    # 放大
    x *= shrink_ratio
    y *= shrink_ratio

    # 移到画布中央
    x += CANVAS_CENTER_X
    y += CANVAS_CENTER_Y

    return int(x), int(y)


def scatter_inside(x, y, beta=0.15):
    """
    随机内部扩散
    :param x: 原x
    :param y: 原y
    :param beta: 强度
    :return: 新坐标
    """
    ratio_x = - beta * log(random.random())
    ratio_y = - beta * log(random.random())

    dx = ratio_x * (x - CANVAS_CENTER_X)
    dy = ratio_y * (y - CANVAS_CENTER_Y)

    return x - dx, y - dy


def shrink(x, y, ratio):
    """
    抖动
    :param x: 原x
    :param y: 原y
    :param ratio: 比例
    :return: 新坐标
    """
    force = -1 / (((x - CANVAS_CENTER_X) ** 2 + (y - CANVAS_CENTER_Y) ** 2) ** 0.6)  # 这个参数...
    dx = ratio * force * (x - CANVAS_CENTER_X)
    dy = ratio * force * (y - CANVAS_CENTER_Y)
    return x - dx, y - dy


def curve(p):
    """
    自定义曲线函数,调整跳动周期
    :param p: 参数
    :return: 正弦
    """
    # 可以尝试换其他的动态函数,达到更有力量的效果(贝塞尔?)
    return 2 * (3 * sin(4 * p)) / (2 * pi)


class Heart:
    """
    爱心类
    """

    def __init__(self, generate_frame=20):
        self._points = set()  # 原始爱心坐标集合
        self._edge_diffusion_points = set()  # 边缘扩散效果点坐标集合
        self._center_diffusion_points = set()  # 中心扩散效果点坐标集合
        self.all_points = {}  # 每帧动态点坐标
        self.build(2000)

        self.random_halo = 1000

        self.generate_frame = generate_frame
        for frame in range(generate_frame):
            self.calc(frame)

    def build(self, number):
        # 爱心
        for _ in range(number):
            t = random.uniform(0, 2 * pi)  # 随机不到的地方造成爱心有缺口
            x, y = heart_function(t)
            self._points.add((x, y))

        # 爱心内扩散
        for _x, _y in list(self._points):
            for _ in range(3):
                x, y = scatter_inside(_x, _y, 0.05)
                self._edge_diffusion_points.add((x, y))

        # 爱心内再次扩散
        point_list = list(self._points)
        for _ in range(4000):
            x, y = random.choice(point_list)
            x, y = scatter_inside(x, y, 0.17)
            self._center_diffusion_points.add((x, y))

    @staticmethod
    def calc_position(x, y, ratio):
        # 调整缩放比例
        force = 1 / (((x - CANVAS_CENTER_X) ** 2 + (y - CANVAS_CENTER_Y) ** 2) ** 0.520)  # 魔法参数

        dx = ratio * force * (x - CANVAS_CENTER_X) + random.randint(-1, 1)
        dy = ratio * force * (y - CANVAS_CENTER_Y) + random.randint(-1, 1)

        return x - dx, y - dy

    def calc(self, generate_frame):
        ratio = 10 * curve(generate_frame / 10 * pi)  # 圆滑的周期的缩放比例

        halo_radius = int(4 + 6 * (1 + curve(generate_frame / 10 * pi)))
        halo_number = int(3000 + 4000 * abs(curve(generate_frame / 10 * pi) ** 2))

        all_points = []

        # 光环
        heart_halo_point = set()  # 光环的点坐标集合
        for _ in range(halo_number):
            t = random.uniform(0, 2 * pi)  # 随机不到的地方造成爱心有缺口
            x, y = heart_function(t, shrink_ratio=11.6)  # 魔法参数
            x, y = shrink(x, y, halo_radius)
            if (x, y) not in heart_halo_point:
                # 处理新的点
                heart_halo_point.add((x, y))
                x += random.randint(-14, 14)
                y += random.randint(-14, 14)
                size = random.choice((1, 2, 2))
                all_points.append((x, y, size))

        # 轮廓
        for x, y in self._points:
            x, y = self.calc_position(x, y, ratio)
            size = random.randint(1, 3)
            all_points.append((x, y, size))

        # 内容
        for x, y in self._edge_diffusion_points:
            x, y = self.calc_position(x, y, ratio)
            size = random.randint(1, 2)
            all_points.append((x, y, size))

        for x, y in self._center_diffusion_points:
            x, y = self.calc_position(x, y, ratio)
            size = random.randint(1, 2)
            all_points.append((x, y, size))

        self.all_points[generate_frame] = all_points

    def render(self, render_canvas, render_frame):
        for x, y, size in self.all_points[render_frame % self.generate_frame]:
            render_canvas.create_rectangle(x, y, x + size, y + size, width=0, fill=HEART_COLOR)


def draw(main: Tk, render_canvas: Canvas, render_heart: Heart, render_frame=0):
    render_canvas.delete('all')
    render_heart.render(render_canvas, render_frame)
    main.after(160, draw, main, render_canvas, render_heart, render_frame + 1)


if __name__ == '__main__':
    root = Tk()  # 一个Tk
    root.title('宝贝爱你哟')#将标题设置为'tkinter'
    canvas = Canvas(root, bg='black', height=CANVAS_HEIGHT, width=CANVAS_WIDTH)
    canvas.pack()
    heart = Heart()  # 心
    draw(root, canvas, heart)  # 开始画
    root.mainloop()
本期分享就到这里结束啦,期待下期,点赞收藏,激发博主更新动力!!!


欢迎添加微信,加入我的核心小队,请备注来意
👇👇👇👇👇👇👇👇👇👇👇👇👇👇👇