迎国庆-为祖国庆生python、Java、C各显神通
" 金秋送爽,丹桂飘香“,我们即将即将迎来祖国母亲的华诞!!
七十余载风雨兼程,无数先辈以热血铸就辉煌,换来了今日的繁荣昌盛。从东方破晓的第一缕曙光,到星辰大海的无限探索,中国以坚韧不拔的意志和日新月异的成就,屹立于世界东方,绽放出耀眼的光芒。
值此国庆佳节,让我们共同祝福伟大的祖国繁荣昌盛,国泰民安;愿山河无恙,人间皆安。不论身在何方,心向祖国,让我们携手并进,在新时代的征程上续写华章,为实现中华民族伟大复兴的中国梦贡献自己的力量。
为了融入这浓厚的节日氛围,表达一下自己的爱国情怀,我掏出了我尘封已久的,Pycharm,idea以及 VScode,分别画了一个国旗。大家也来评评,哪一种编程语言最善!
Java 版国旗
首先登场的是 Java,我采用的是 Swing 编程绘制的国旗。

完整代码如下:
package com.moxuan;

import javax.swing.*;
import java.awt.geom.*;
import java.awt.*;


public class FiveStarFlag extends JPanel {

    /**
     * 主函数
     * @param args
     */
    public static void main(String[] args) {
        // 创建窗体
        JFrame jFrame = new JFrame("五星红旗");
        // 添加面板
        jFrame.getContentPane().add(new FiveStarFlag(600));
        jFrame.pack();
        // 设置默认的关闭选项,关闭的时候退出程序
        jFrame.setDefaultCloseOperation(JFrame.EXIT_ON_CLOSE);
        // 设置位置居中
        jFrame.setLocationRelativeTo(null);
        // 设置可见性
        jFrame.setVisible(true);
    }

    /**
     * 创建一个五角星形状.
     * 该五角星的中心坐标为(sx,sy),中心到顶点的距离为radius,其中某个顶点与中心的连线的偏移角度为theta(弧度)
     *
     * @return pentacle 一个☆
     */
    public static Shape createPentacle(double sx, double sy, double radius, double theta) {
        final double arc = Math.PI / 5;
        final double rad = Math.sin(Math.PI / 10) / Math.sin(3 * Math.PI / 10);
        GeneralPath path = new GeneralPath();
        path.moveTo(1, 0);
        for (int i = 0; i < 5; i++) {
            path.lineTo(rad * Math.cos((1 + 2 * i) * arc), rad * Math.sin((1 + 2 * i) * arc));
            path.lineTo(Math.cos(2 * (i + 1) * arc), Math.sin(2 * (i + 1) * arc));
        }
        path.closePath();
        AffineTransform atf = AffineTransform.getScaleInstance(radius, radius);
        atf.translate(sx / radius, sy / radius);
        atf.rotate(theta);
        return atf.createTransformedShape(path);
    }

    private int width, height;
    private double maxR = 0.15, minR = 0.05;
    private double maxX = 0.25, maxY = 0.25;
    private double[] minX = {0.50, 0.60, 0.60, 0.50};
    private double[] minY = {0.10, 0.20, 0.35, 0.45};

    /**
     * 创建一个宽度为width的国旗
     */
    public FiveStarFlag(int width) {
        this.width = width / 3 * 3;
        this.height = width / 3 * 2;
        setPreferredSize(new Dimension(this.width, this.height));
    }

    @Override
    protected void paintComponent(Graphics g) {
        Graphics2D graphics2D = (Graphics2D) g;

        //画旗面
        graphics2D.setPaint(Color.RED);
        graphics2D.fillRect(0, 0, width, height);

        //画大☆
        double ox = height * maxX, oy = height * maxY;
        graphics2D.setPaint(Color.YELLOW);
        graphics2D.fill(createPentacle(ox, oy, height * maxR, -Math.PI / 2));

        //画小★
        for (int i = 0; i < 4; i++) {
            double sx = minX[i] * height, sy = minY[i] * height;
            double theta = Math.atan2(oy - sy, ox - sx);
            graphics2D.fill(createPentacle(sx, sy, height * minR, theta));
        }
    }
}
Python 版国旗
接下来我们再看看 Python 绘图,我在小海龟和 pygame 之间我选择了小海龟,毕竟小海龟那么可爱!
运行效果:

完整代码如下:
import turtle

# 将画笔的形状设置为海归
turtle.shape('turtle')
# 设置旗面大小
turtle.setup(600,400,0,0)

# 设置背景
turtle.bgcolor("red")

# 设置五角星填充颜色
turtle.fillcolor("yellow")

# 设置线条颜色
turtle.color('yellow')

# 设置绘制速度 0是最快,1-10逐渐加快
turtle.speed(1)  # 这里开始开不清绘制轨迹,可以设成1,画慢一些

# 主星
# 开始填充颜色
turtle.begin_fill()
# 抬笔
turtle.up()
# 设置画笔的坐标
turtle.goto(-280,100)
# 落笔
turtle.down()
# 循环5
for i in range (5):
    # 前进150像素点
    turtle.forward(150)
    # 向右旋转144度
    turtle.right(144)
# 结束填充
turtle.end_fill()

# 副星1 ,绘制副星,和绘制主星的原理一样,只是小一点
turtle.begin_fill()
turtle.up()
turtle.goto(-100,180)
# 旋转角度
turtle.setheading(305)
turtle.down()
for i in range (5):
    turtle.forward(50)
    turtle.left(144)
turtle.end_fill()


# 副星2 ,绘制副星,和绘制主星的原理一样,只是小一点
turtle.begin_fill()
turtle.up()
turtle.goto(-50,110)
turtle.setheading(30)
turtle.down()
for i in range (5):
    turtle.forward(50)
    turtle.right(144)
turtle.end_fill()

# 副星3 ,绘制副星,和绘制主星的原理一样,只是小一点
turtle.begin_fill()
turtle.up()
turtle.goto(-40,50)
turtle.setheading(5)
turtle.down()
for i in range (5):
    turtle.forward(50)
    turtle.right(144)
turtle.end_fill()

# 副星4 ,绘制副星,和绘制主星的原理一样,只是小一点
turtle.begin_fill()
turtle.up()
turtle.goto(-100,10)
turtle.setheading(300)
turtle.down()
for i in range (5):
    turtle.forward(50)
    turtle.left(144)
turtle.end_fill()

# 隐藏海龟
turtle.hideturtle()
turtle.done()
C语言版国旗
接下来是我们的老大哥,C 语言,我这里用了 easyx 和 graphics 图形库
演示效果如下:

#include <stdio.h>
#include <easyx.h>
#include <math.h>
#include <graphics.h>        // 引用图形库头文件
#include <conio.h>
#include<time.h>
#define PI 3.14
void fivePointedStar(int radius, double startAngle)//  角星的外接圆半径和起始角度作为参数,由调用者决定
{
    double delta = 2 * PI / 5;      //  增量为一个圆的5分之一
    POINT points[5];                //  长度为5的POINT数组,用于存储5个点
    for (int i = 0; i < 5; i++)
    {
        points[i].x = cos(startAngle + i * delta * 2) * radius;   //  计算x坐标
        points[i].y = sin(startAngle + i * delta * 2) * radius;   //  计算y坐标
    }
    solidpolygon(points, 5);
}
int main(void)
{
    int width = 900;
    int height = width / 3 * 2;    //  高度为宽度的2/3
    int grid = width / 3 / 15;    //  网格宽度
    initgraph(800, 420);    //  创建窗体设置背景色
    setbkcolor(BLACK);
    cleardevice();
    setcolor(YELLOW);  //  文本颜色
    setbkcolor(BLACK);  //  文本背景色
    settextstyle(100, 0, "楷体");  //  文本高度和字体
    outtextxy(600, 10, "喜");  //  文本位置和内容
    outtextxy(600, 110, "迎");  //  文本位置和内容
    outtextxy(600, 210, "国");  //  文本位置和内容
    outtextxy(600, 310, "庆");  //  文本位置和内容
    outtextxy(700, 10, "举");  //  文本位置和内容
    outtextxy(700, 110, "国");  //  文本位置和内容
    outtextxy(700, 210, "欢");  //  文本位置和内容
    outtextxy(700, 310, "庆");  //  文本位置和内容
    setcolor(YELLOW);
    setbkcolor(BLACK);
    settextstyle(20, 0, "楷体");
    setfillcolor(RED);
    solidrectangle(10, 10, 600, 400);
    setaspectratio(1, -1);    //  翻转坐标轴,设置填充颜色为黄色
    setfillcolor(YELLOW);
    setpolyfillmode(WINDING);
    setorigin(grid * 5, grid * 5);    //  大五角星
    fivePointedStar(grid * 3, PI / 2);
    setorigin(grid * 10, grid * 2);    //  小五角星1
    double startAngle = atan(3.0 / 5.0) + PI;
    fivePointedStar(grid, startAngle);
    setorigin(grid * 12, grid * 4);    //  小五角星2
    startAngle = atan(1.0 / 7.0) + PI;
    fivePointedStar(grid, startAngle);
    setorigin(grid * 12, grid * 7);    //  小五角星3
    startAngle = -atan(2.0 / 7.0) + PI;
    fivePointedStar(grid, startAngle);
    setorigin(grid * 10, grid * 9);    //  小五角星4
    startAngle = -atan(4.0 / 5.0) + PI;
    fivePointedStar(grid, startAngle);
    getchar();
    closegraph();
    return 0;
}
烟花庆祝
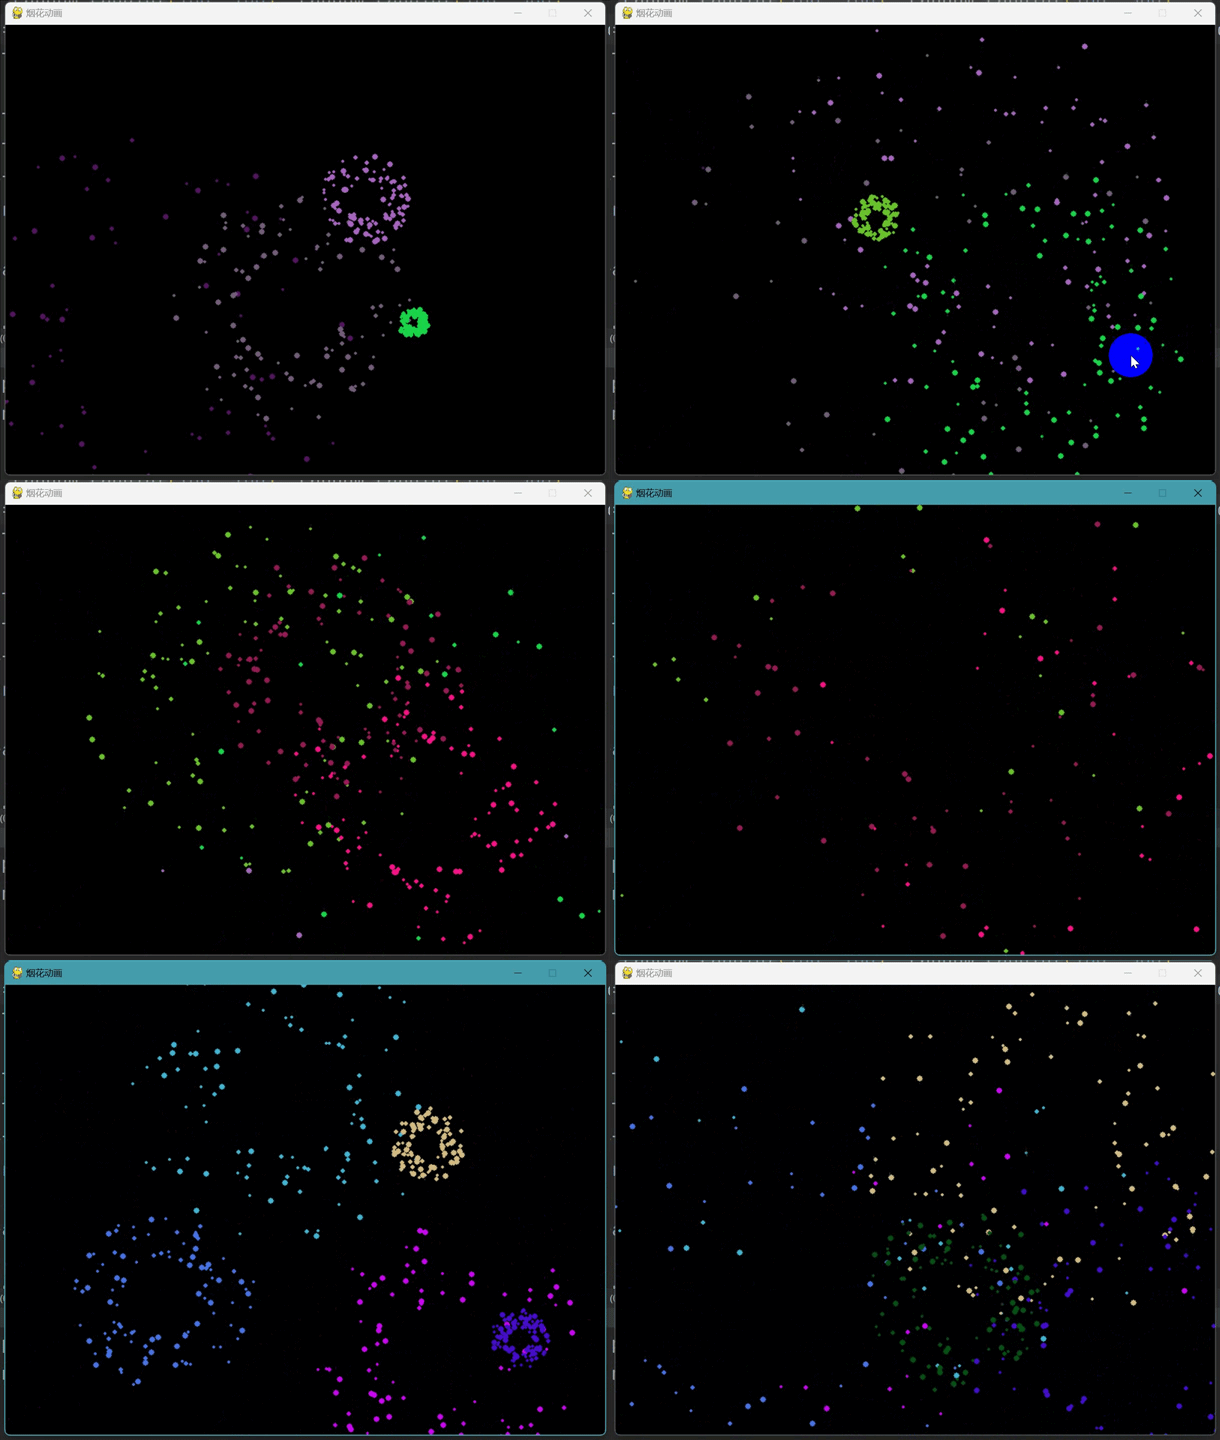
接下来,我们一起来放个烟花庆祝一下吧,祝祖国繁荣昌盛,祝人民安居乐业,祝父母身体健康,祝大家前程似锦!

完整代码:
import pygame
import random
import math

# 初始化Pygame
pygame.init()
screen = pygame.display.set_mode((800, 600))
pygame.display.set_caption("烟花动画")
clock = pygame.time.Clock()

# 烟花粒子类定义
class Particle:
    def __init__(self, x, y, color):
        self.x = x
        self.y = y
        self.color = color
        self.angle = random.uniform(0, 2 * math.pi)
        self.speed = random.uniform(2, 5)
        self.radius = random.randint(2, 4)
        self.lifetime = random.randint(50, 100)

    def update(self):
        self.x += self.speed * math.cos(self.angle)
        self.y += self.speed * math.sin(self.angle)
        self.lifetime -= 1

# 创建烟花
def create_firework(x, y, color):
    particles = [Particle(x, y, color) for _ in range(100)]
    return particles

# 绘制粒子
def draw_particle(screen, particle):
    pygame.draw.circle(screen, particle.color, (int(particle.x), int(particle.y)), particle.radius)

# 主循环
particles = []
running = True
while running:
    for event in pygame.event.get():
        if event.type == pygame.QUIT:
            running = False

    screen.fill((0, 0, 0))

    if random.randint(0, 20) == 0:
        x, y = random.randint(100, 700), random.randint(100, 500)
        color = (random.randint(0, 255), random.randint(0, 255), random.randint(0, 255))
        particles.extend(create_firework(x, y, color))

    for particle in particles[:]:
        particle.update()
        if particle.lifetime <= 0:
            particles.remove(particle)
        else:
            draw_particle(screen, particle)

    pygame.display.flip()
    clock.tick(30)

pygame.quit()
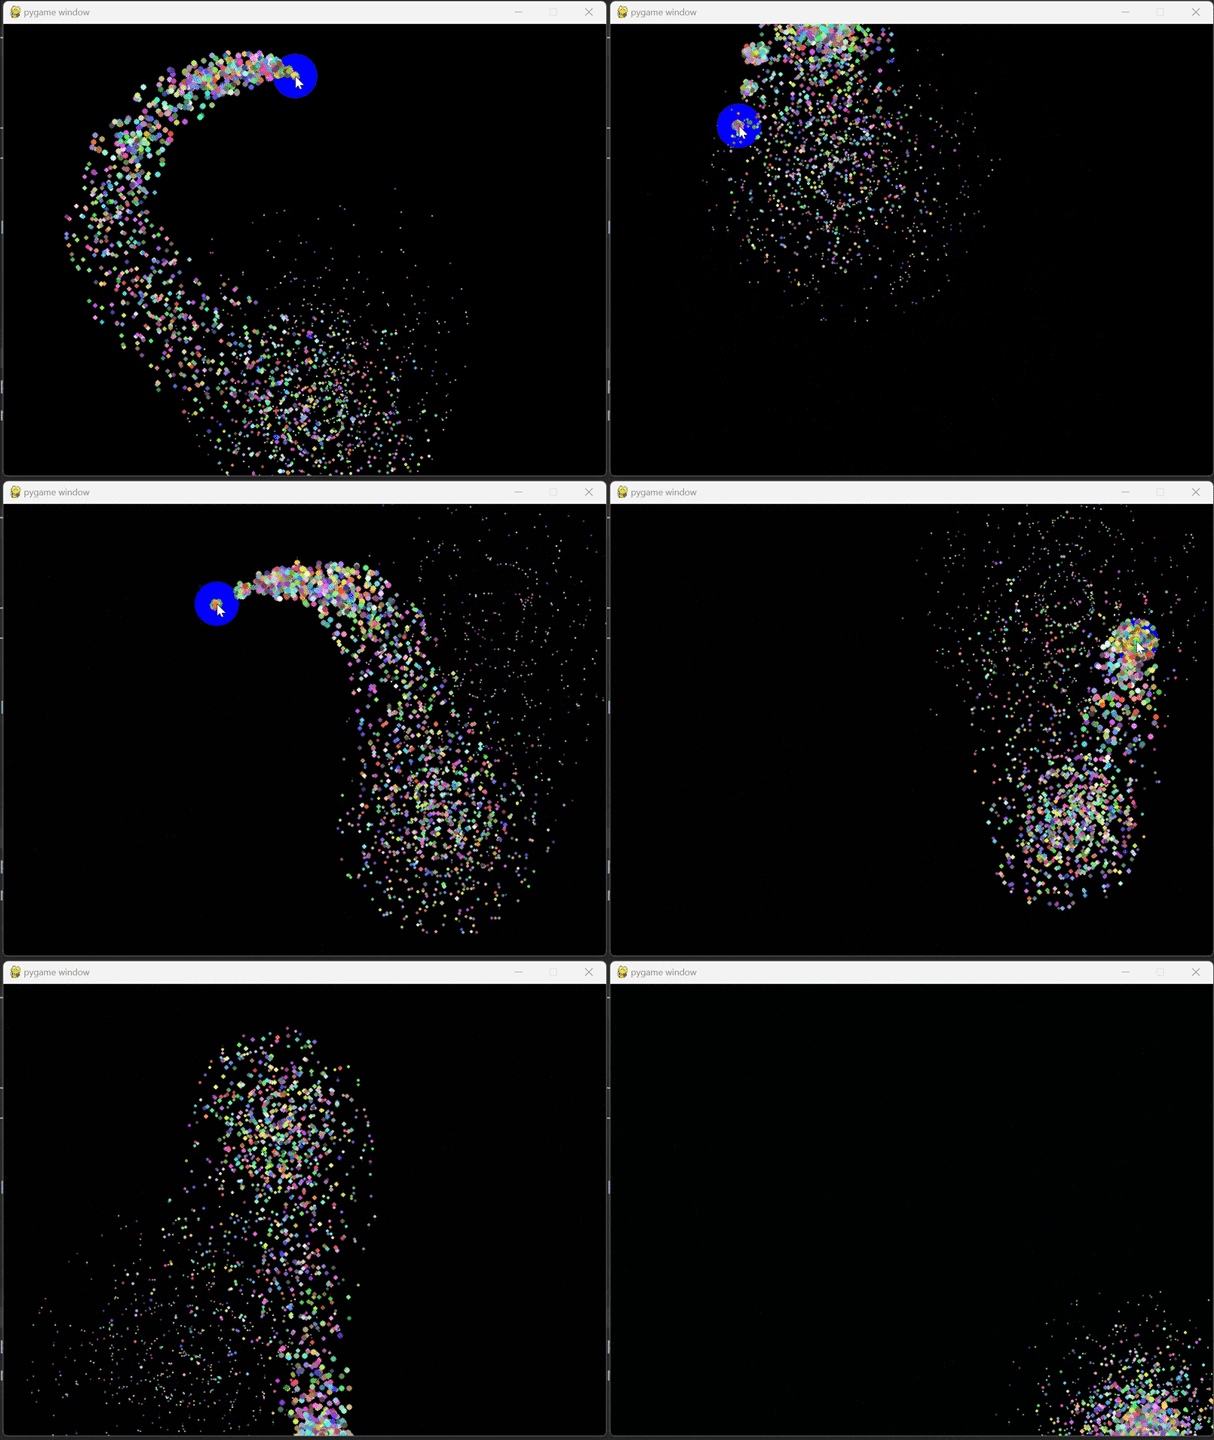
鼠标烟花效果:

完整代码:
from math import cos, sin

import pygame
import random

# 初始化Pygame
pygame.init()

# 屏幕大小
width, height = 800, 600
screen = pygame.display.set_mode((width, height))


# 烟花粒子类
class Particle:
    def __init__(self, x, y):
        self.x = x
        self.y = y
        self.color = (random.randint(50, 255), random.randint(50, 255), random.randint(50, 255))
        self.size = 5
        self.speed = random.randint(1, 5)
        self.angle = random.uniform(0, 2 * 3.14159)

    def move(self):
        self.x += self.speed * 0.5 * cos(self.angle)
        self.y += self.speed * 0.5 * sin(self.angle)
        self.size -= 0.05

    def draw(self):
        pygame.draw.circle(screen, self.color, (int(self.x), int(self.y)), int(self.size))


particles = []

running = True
while running:
    for event in pygame.event.get():
        if event.type == pygame.QUIT:
            running = False

    x, y = pygame.mouse.get_pos()

    for i in range(30):
        particles.append(Particle(x, y))

    for particle in particles:
        particle.move()
        if particle.size <= 0:
            particles.remove(particle)

    # 清屏
    screen.fill((0, 0, 0))

    # 绘制粒子
    for particle in particles:
        particle.draw()

    pygame.display.flip()

pygame.quit()好辣,完毕啦,大家写的时候有问题记得回来私信我呦,码了这么多字,给个关注和赞不过分吧,O(∩_∩)O哈哈~
最后的最后,预祝大家国庆假期愉快!!

