Git 分支管理全攻略:一篇博客带你玩转代码分支!
什么是分支?在 Git 里,分支其实就有点像一个树的枝杈,每个分支上可以有不同的文件的版本,并且不会互相干扰。

分支功能有什么用?在工作中,我们经常是需要和别人一起开发一个项目的,此时可能你开发 A 功能,别人开发 B 功能;如果只有一个分支的话,那么所有人都得在这个分支上干活;如果你开发完了功能,但是别人没有开发完,那么还得等其他人开发完(不然开发到一半的功能,怎么给别人使用,是吧)。
现在有了分支,完全可以创建多个分支,想提交就提交,开发完后再合并到原来的分支上,这样就不会影响(或者被影响)别人工作。
其他版本控制系统如 SVN 等都有分支管理,但是用过之后你会发现,这些版本控制系统创建和切换分支比蜗牛还慢,简直让人无法忍受,结果分支功能成了摆设,大家都不去用。
但 Git 的分支是与众不同的,无论创建、切换和删除分支,Git 在 1 秒钟之内就能完成!无论你的版本库是 1 个文件还是 1 万个文件。
图示分支的概念
我们之前说过,每提交一个新版本,Git 就会把它们自动串成一条时间线,这条时间线就是一个分支。截止到目前,只有一条时间线,在 Git 里,这个分支叫主分支,即 master 分支。
一开始的时候,master 分支是一条线,Git 用 master 指向最新的提交,再用 HEAD 指向 master,就能确定当前分支,以及当前分支的提交点:
                  HEAD
                    │
                    │
                    ▼
                 master
                    │
                    │
                    ▼
┌───┐    ┌───┐    ┌───┐
│   │───→│   │───→│   │
└───┘    └───┘    └───┘
当我们创建新的分支,例如 dev 时,Git 新建了一个指针叫 dev,指向 master 相同的提交,再把 HEAD 指向 dev,就表示当前分支在 dev 上:
                 master
                    │
                    │
                    ▼
┌───┐    ┌───┐    ┌───┐
│   │───→│   │───→│   │
└───┘    └───┘    └───┘
                    ▲
                    │
                    │
                   dev
                    ▲
                    │
                    │
                  HEAD
Git 创建一个分支很快,因为除了增加一个 dev 指针,改改 HEAD 的指向,工作区的文件都没有任何变化!
从现在开始,对工作区的修改和提交就是针对 dev 分支了,比如新提交一次后,dev 指针往前移动一步,而 master 指针不变:
                 master
                    │
                    │
                    ▼
┌───┐    ┌───┐    ┌───┐    ┌───┐
│   │───→│   │───→│   │───→│   │
└───┘    └───┘    └───┘    └───┘
                             ▲
                             │
                             │
                            dev
                             ▲
                             │
                             │
                           HEAD
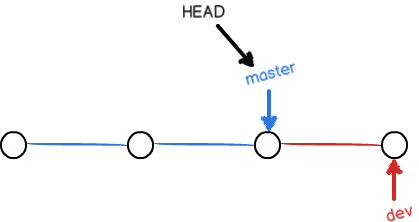
假如我们在 dev 上的工作完成了,就可以把 dev 合并到 master 上。Git 怎么合并呢?最简单的方法,就是直接把 master 指向 dev 的当前提交,就完成了合并:
                           HEAD
                             │
                             │
                             ▼
                          master
                             │
                             │
                             ▼
┌───┐    ┌───┐    ┌───┐    ┌───┐
│   │───→│   │───→│   │───→│   │
└───┘    └───┘    └───┘    └───┘
                             ▲
                             │
                             │
                            dev
所以 Git 合并分支也很快!就改改指针,工作区内容也不变!
合并完分支后,甚至可以删除 dev 分支。删除 dev 分支就是把 dev 指针给删掉,删掉后,我们就剩下了一条 master 分支:
                           HEAD
                             │
                             │
                             ▼
                          master
                             │
                             │
                             ▼
┌───┐    ┌───┐    ┌───┐    ┌───┐
│   │───→│   │───→│   │───→│   │
└───┘    └───┘    └───┘    └───┘
在实际开发中,我们应该按照几个基本原则进行分支管理:
master分支应该是非常稳定的,用作主分支(就像一棵树总得有个树干,不能光有树枝),也就是仅用来发布新版本,平时不能在上面干活;- 干活都在
dev分支上,也就是说,dev分支是不稳定的,到某个时候,比如 1.0 版本开发完并测试完了,准备发布时,再把dev分支合并到master上 - 你和你的小伙伴们每个人都有自己的分支,时不时地往
dev分支上合并就可以了。
所以,团队合作的分支看起来就像这样:

创建分支
请读者务必也动手实践!
我们使用 git branch 分支名 来创建分支:
$ git branch dev
我们可以使用 git branch 来查看当前分支的创建情况:
$ git branch
  dev
* master
git branch 命令会列出所有分支,当前分支前面会标一个 * 号,可以看到现在有两个分支,一个是 dev,一个是 master。
然后我们就可以用 git switch 分支名 切换分支了:
$ git switch dev
Switched to branch 'dev'

$ git branch
* dev
  master
也可以一条命令创建并切换分支:
$ git switch -c dev
如果需要频繁切换分支,可以简写:
$ git switch -
管理分支
删除分支
如果我们要删除分支,使用 git branch -d 分支名 即可。注意,不能删除当前分支。例如我们当前在 dev 分支,如果删除就回报错:
$ git branch -d dev
error: Cannot delete branch 'dev' checked out at 'D:/Projects/LearnGit'
得切换到其他分支后,才能删除
$ git switch master
Switched to branch 'master'
Your branch is ahead of 'gitee/master' by 8 commits.
  (use "git push" to publish your local commits)

$ git branch -d dev
Deleted branch dev (was 0066f6d).
查看分支创建时间
git reflog show --date=iso <branch name> 命令可以查看到指定分支的历次更改记录,最下面一条的时间即是分支创建时间。
$ git reflog show --date=iso dev
0066f6d (HEAD -> dev, master) dev@{2023-01-14 15:40:45 +0800}: branch: Created from HEAD
重命名分支
有时候发现创建的分支名字搞错了,要改名,怎么办?使用如下命令:
$ git branch -m <old_branch_name> <new_branch_name>
当你要重命名的分支恰好是当前分支时,就不需要指定旧的分支名称。
$ git branch -m <new_branch_name>
查询分支
之前我们说了查看本地分支可以:
$ git branch
  bug
  feature
* master
如果要列出所有分支(本地和远程),假设 -a 参数:
$ git branch -a
  bug
  feature
* master
  remotes/gitee/feature
  remotes/gitee/master
  remotes/github/feature
  remotes/github/master
合并分支
接下来我们演示下,在其他分支上编写代码,然后合并到 master 分支。
首先还是得创建分支
$ git switch -c dev
Switched to a new branch 'dev'
我们创建一个新的文件夹,用来存放我们演示的文件。
$ mkdir 3-branch
$ echo "Creating a new branch is quick" > 3-branch/branch.txt
$ git add .
$ git commit -m "branch test"
现在,dev 分支的工作完成,我们就可以切换回 master 分支:
$ git checkout master
切换回 master 分支后,我们可以看到刚刚创建的文件夹不见了:
$ ll
total 5
drwxr-xr-x 1 peterjxl 197121  0  1月 11 07:37 1-diffAndPath/
drwxr-xr-x 1 peterjxl 197121  0  1月 14 07:19 2-versionControl/
-rw-r--r-- 1 peterjxl 197121 33  1月 13 22:53 readme.md
因为那个提交是在 dev 分支上,而 master 分支此刻的提交点并没有变:

现在,我们来合并分支:
$ git merge dev
Updating 0066f6d..5a512b7
Fast-forward
 3-branch/branch.txt | 1 +
 1 file changed, 1 insertion(+)
 create mode 100644 3-branch/branch.txt
注意 Git 的提示:Fast-forward,指的是本次合并是“快进模式”,也就是直接把 master 指向 dev 的当前提交,所以合并速度非常快。当然,也不是每次合并都能 Fast-forward,我们后面会讲其他方式的合并。
可以看到现在 master 分支上,已经 dev 分支开发的内容了:
$ ll
total 5
drwxr-xr-x 1 peterjxl 197121  0  1月 11 07:37 1-diffAndPath/
drwxr-xr-x 1 peterjxl 197121  0  1月 14 07:19 2-versionControl/
drwxr-xr-x 1 peterjxl 197121  0  1月 14 15:54 3-branch/
-rw-r--r-- 1 peterjxl 197121 33  1月 13 22:53 readme.md

$ cat 3-branch/branch.txt
Creating a new branch is quick
如果要丢弃一个没有被合并过的分支,可以通过 git branch -D <name> 强行删除,否则会报错:
$ git branch -d feature-vulcan
error: The branch 'feature-vulcan' is not fully merged.
If you are sure you want to delete it, run 'git branch -D feature-vulcan'.
解决冲突
合并分支也不是那么一帆风顺,经常会遇到冲突:当多个人在不同分支上修改同一个文件,这样合并的时候大概率会发生冲突,我们来实践下。
首先创建一个新的分支:
$ git switch -c feature1
Switched to a new branch 'feature1'
修改下 branch.txt 内容如下,并提交:
$ vim 3-branch/branch.txt

$ cat 3-branch/branch.txt
Creating a new branch is quick And simple

$ git add  3-branch/branch.txt
$ git commit -m "And simple"
切换为 master 分支,并且同样修改 branch.txt:
$ git switch master
$ vim 3-branch/branch.txt
$ cat 3-branch/branch.txt
Creating a new branch is quick & simple

$ git add 3-branch/branch.txt
$ git commit -m "&simple"
现在,master 分支和 feature1 分支各自都分别有新的提交,变成了这样:
                            HEAD
                              │
                              │
                              ▼
                           master
                              │
                              │
                              ▼
                            ┌───┐
                         ┌─→│   │
┌───┐    ┌───┐    ┌───┐  │  └───┘
│   │───→│   │───→│   │──┤
└───┘    └───┘    └───┘  │  ┌───┐
                         └─→│   │
                            └───┘
                              ▲
                              │
                              │
                          feature1
这种情况下,Git 无法执行“快速合并”,只能试图把各自的修改合并起来,但这种合并就可能会有冲突,我们试试看:
$ git merge feature1
Auto-merging 3-branch/branch.txt
CONFLICT (content): Merge conflict in 3-branch/branch.txt
Automatic merge failed; fix conflicts and then commit the result.
Git 告诉我们,branch.txt 文件存在冲突,必须手动解决冲突后再提交。
git status 也可以告诉我们冲突的文件:
$ git status
On branch master
Your branch is ahead of 'gitee/master' by 10 commits.
  (use "git push" to publish your local commits)

You have unmerged paths.
  (fix conflicts and run "git commit")
  (use "git merge --abort" to abort the merge)

Unmerged paths:
  (use "git add <file>..." to mark resolution)
        both modified:   3-branch/branch.txt

no changes added to commit (use "git add" and/or "git commit -a")
我们现在看看 branch.txt 的内容:
$ cat 3-branch/branch.txt
<<<<<<< HEAD
Creating a new branch is quick & simple
=======
Creating a new branch is quick And simple
>>>>>>> feature1
Git 用 <<<<<<<,=======,>>>>>>> 标记出不同分支的内容。我们修改如下后保存:
$ cat 3-branch/branch.txt
Creating a new branch is quick and simple
再提交:
$ git add 3-branch/branch.txt
$ git commit -m "conflict fixed"
[master dd140df] conflict fixed
现在,master 分支和 feature1 分支变成了下图所示:
                                     HEAD
                                       │
                                       │
                                       ▼
                                    master
                                       │
                                       │
                                       ▼
                            ┌───┐    ┌───┐
                         ┌─→│   │───→│   │
┌───┐    ┌───┐    ┌───┐  │  └───┘    └───┘
│   │───→│   │───→│   │──┤             ▲
└───┘    └───┘    └───┘  │  ┌───┐      │
                         └─→│   │──────┘
                            └───┘
                              ▲
                              │
                              │
                          feature1
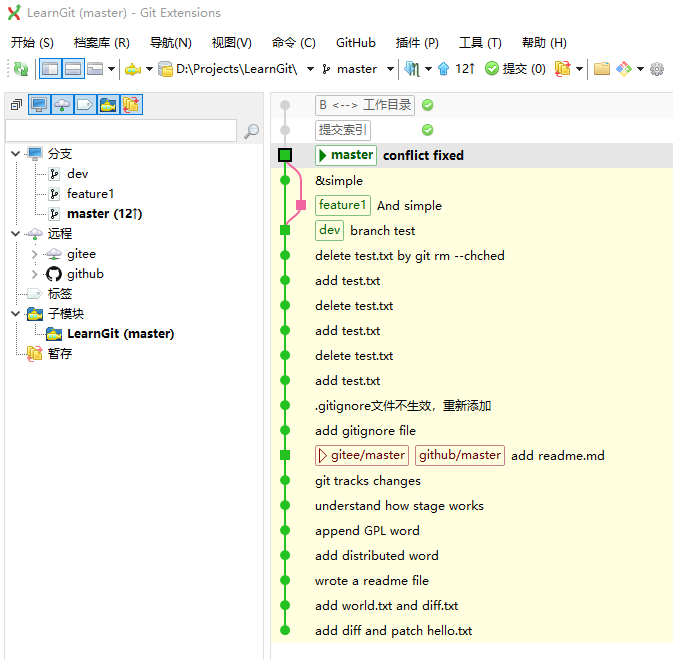
用带参数的 git log 也可以看到分支的合并情况:
$ git log --graph  --pretty=oneline --abbrev-commit
*   dd140df (HEAD -> master) conflict fixed
|\
| * bbf0307 (feature1) And simple
* | 668f226 &simple
|/
* 5a512b7 (dev) branch test
* 0066f6d delete test.txt by git rm --chched
* 3ce9df0 add test.txt
* 8a6d94d delete test.txt
* 42c477d add test.txt
* b391595 delete test.txt
* 8889d50 add test.txt
* 643c5ef .gitignore文件不生效,重新添加
* 3d04684 add gitignore file
* 39d7f12 (github/master, gitee/master) add readme.md
* aeb06f4 git tracks changes
* 8f5bb58 understand how stage works
* efc9138 append GPL word
* 750360e add distributed word
* 0282c44 wrote a readme file
* 0b3cfef add world.txt and diff.txt
* abf2051 add diff and patch hello.txt
如果你用可视化图形界面,看到的结果也是类似的:

其他合并方式
合并分支时,Git 会默认用 Fast forward 模式,但这种模式下,删除分支后,会丢掉分支信息。
如果禁用了 Fast forward 模式,Git 就会在 merge 时生成一个新的 commit,这样,从分支历史上就可以看出分支信息。
下面我们实战一下 --no-ff 方式的 git merge。
我们创建一个新的分支 feature02,并修改内容后提交:
$ git switch -c feature02
Switched to a new branch 'feature02'

$ vim 3-branch/branch.txt
$ cat 3-branch/branch.txt
Creating a new branch is quick and simple
test no fast forward


$ git add 3-branch/branch.txt
$ git commit -m "test"
现在,我们切换回 master,并合并分支:
$ git switch master

$ git merge --no-ff -m "merge with no-ff" feature02
Merge made by the 'recursive' strategy.
 3-branch/branch.txt | 1 +
 1 file changed, 1 insertion(+)
因为本次合并要创建一个新的 commit,所以加上 -m 参数,把 commit 描述写进去。
合并后,我们用 git log 看看分支历史:
$ git log --graph --pretty=oneline --abbrev-commit
*   f564208 (HEAD -> master) merge with no-ff
|\
| * 8f87605 (feature02) test
|/
*   dd140df conflict fixed
|\
| * bbf0307 And simple
* | 668f226 &simple
|/
* 5a512b7 branch test
* 0066f6d delete test.txt by git rm --chched
* 3ce9df0 add test.txt
* 8a6d94d delete test.txt
* 42c477d add test.txt
* b391595 delete test.txt
* 8889d50 add test.txt
* 643c5ef .gitignore文件不生效,重新添加
* 3d04684 add gitignore file
* 39d7f12 (github/master, gitee/master) add readme.md
* aeb06f4 git tracks changes
* 8f5bb58 understand how stage works
* efc9138 append GPL word
* 750360e add distributed word
* 0282c44 wrote a readme file
* 0b3cfef add world.txt and diff.txt
* abf2051 add diff and patch hello.tx
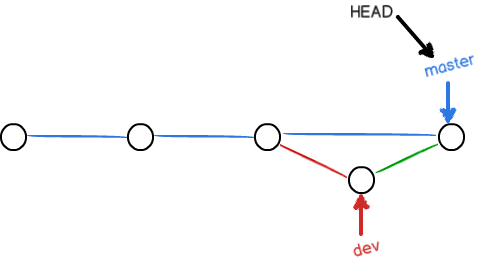
可以看到,不使用 Fast forward 模式,merge 后就像这样:

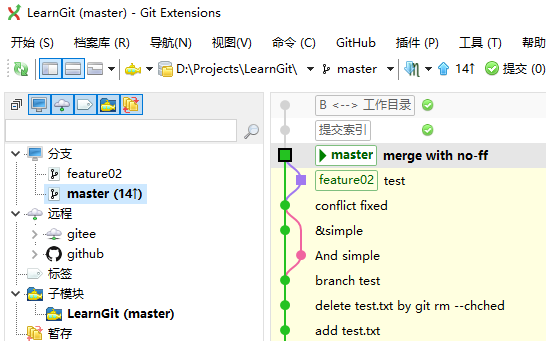
或者用 GitExtensions 查看,结果类似:

合并分支时,加上 --no-ff 参数就可以用普通模式合并,合并后的历史有分支,能看出来曾经做过合并,而 fast forward 合并就看不出来曾经做过合并。
比较分支的差异
有时候我们需要ascii比较两个分支的差异,可以使用如下命令:
$ git diff branch1 branch2 --stat   //显示出所有有差异的文件列表
$ git diff branch1 branch2 文件名(带路径)   //显示指定文件的详细差异
$ git diff branch1 branch2                   //显示出所有有差异的文件的详细差异
(未完待续…)
