[数据结构] 用两个栈实现队列详解

文章目录
一、栈实现队列的特点分析
1、1 具体分析
1、2 整体概括
二、用栈模拟队列代码的实现
2、1 手撕 栈 代码
2、1、1 stack.h
2、1、2 stack.c
2、2 用栈实现队列代码
🙋♂️ 作者:@Ggggggtm 🙋♂️
👀 专栏:数据结构与算法、高频面试问题 👀
💥 标题:用栈模拟队列 💥
❣️ 寄语:与其忙着诉苦,不如低头赶路,奋路前行,终将遇到一番好风景 ❣️
在数据结构中,栈和队列是较为常见的两种数据结构。他们各有自己的特点:栈是后进先出原则,队列是先进先出原则。那怎么用栈去实现队列呢?此问题在面试中也是高频出现的问题。本篇文章会给出详细解释。
一、栈实现队列的特点分析
1、1 具体分析
队列和栈在插入数据时,队列是从队尾进行插入,栈是从栈顶插入。但是他们的删除数据是不同的。我们知道队列的特点是:先新先出 ,删除数据是在对头进行删除,栈的特点是:先进后出,也就是在栈顶进行删除。
当我们用栈实现队列时,最根本的也是最重要的是需要解决删除的问题。我们用栈实现队列时,在栈中的删除就不是删除栈顶的元素了,我们需要根据队列的特点进行删除,也就是我们需要删除的是栈底的元素。
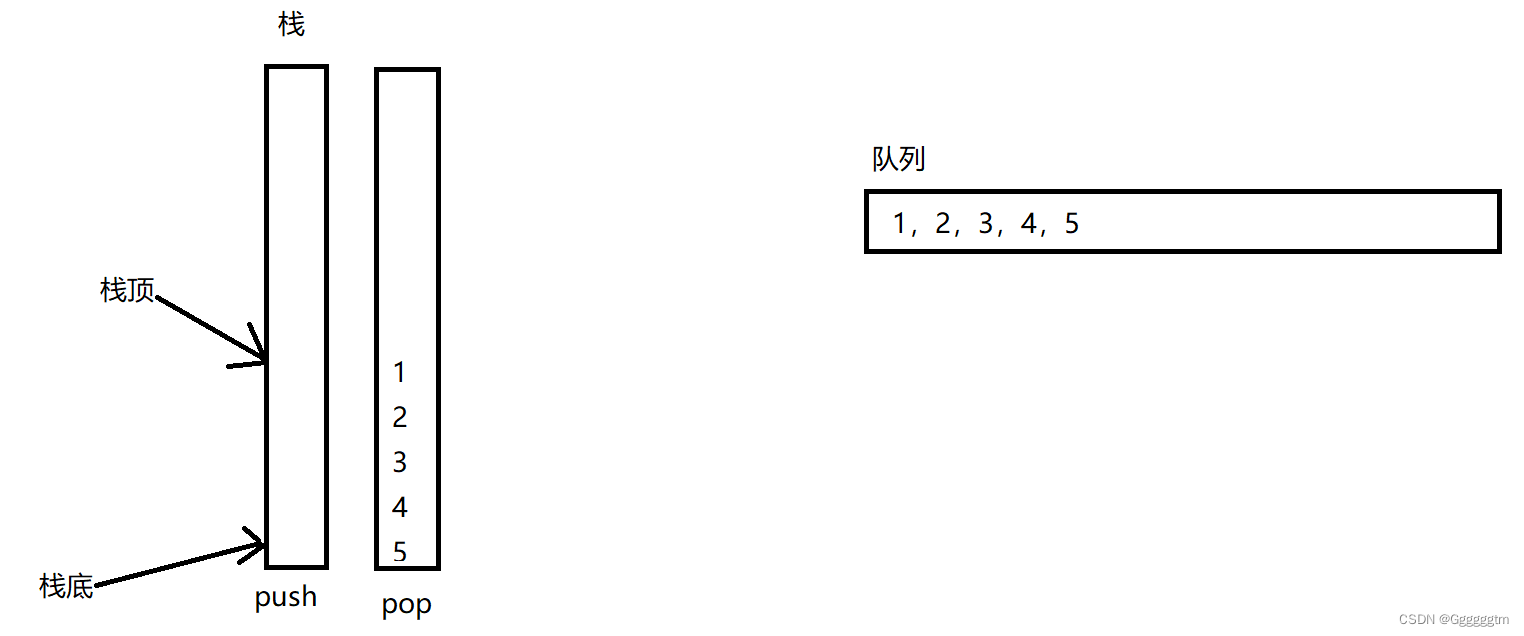
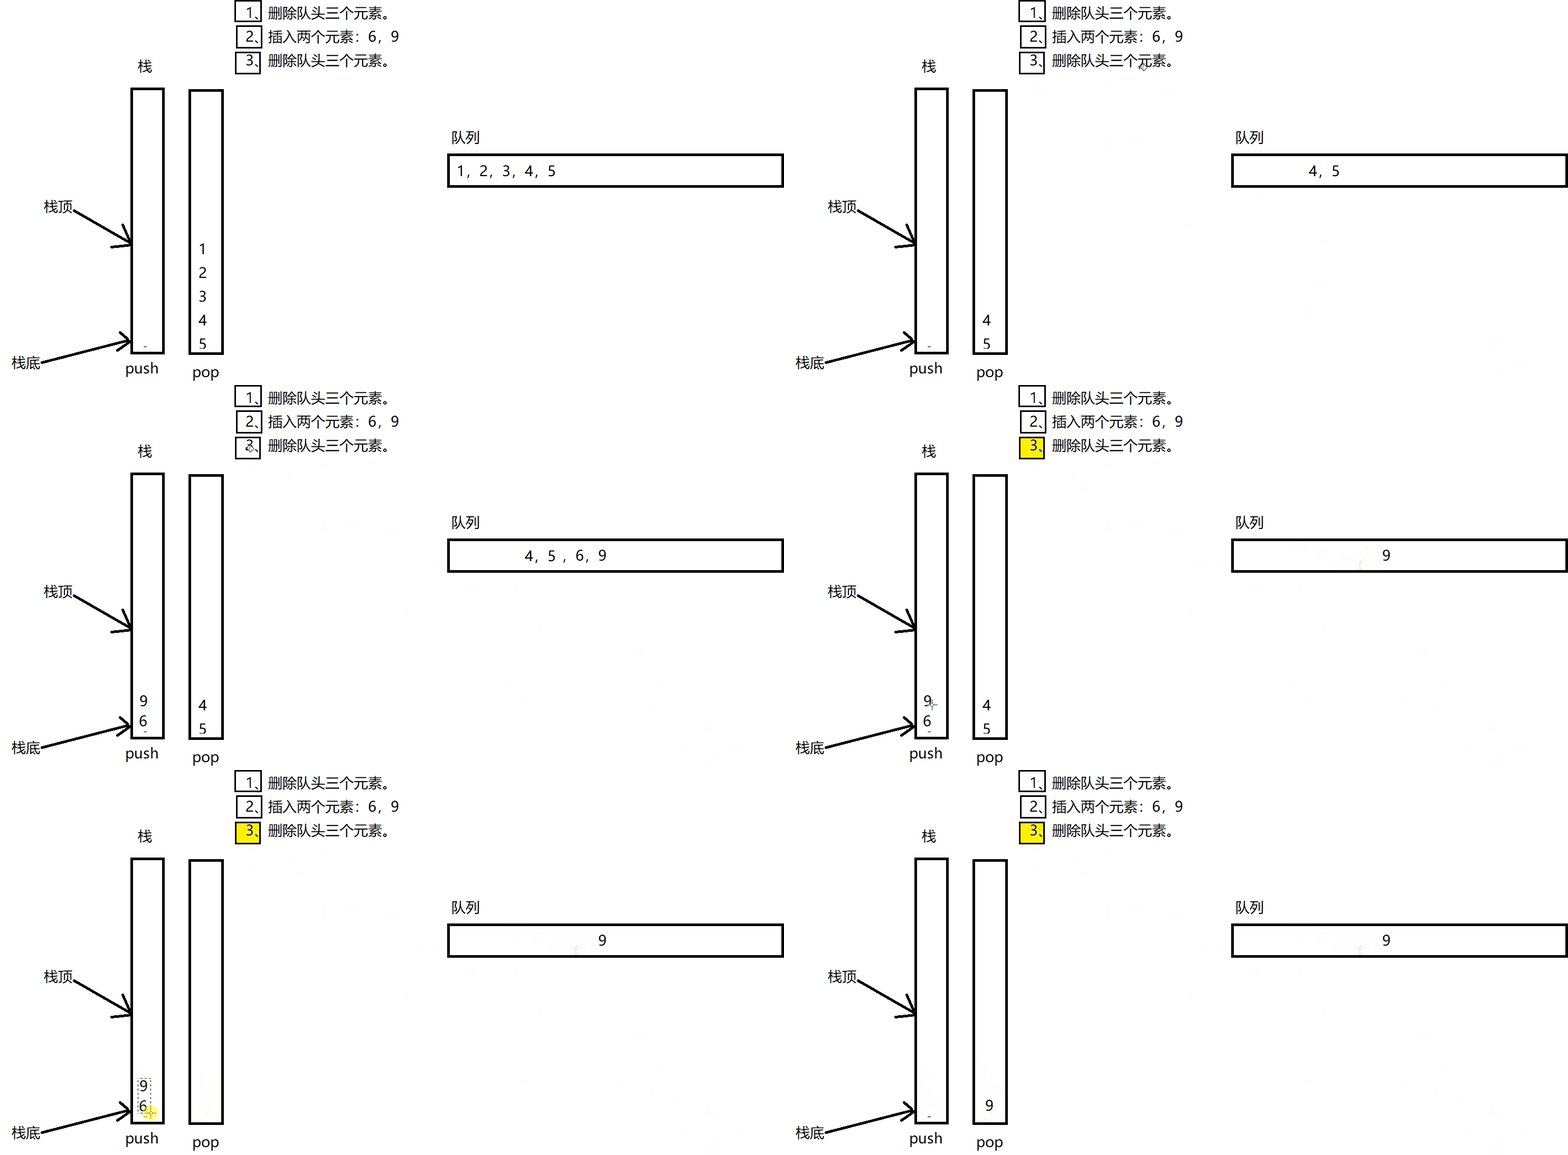
怎么删除栈底的元素呢?在这里我们需要两个栈,分别命名为push栈和pop栈。我们先把元素的插入全部插入到push栈中,当需要删除时,我们首先把push栈中的元素全部导入到pop栈中,此时的pop栈中的栈顶元素,相当于我们要删除的对头元素了。
那如果我们想要接着插入呢?我们接着往push栈中插入即可。删除的话我们看pop栈中是否有元素,如果pop栈不为空,就接着删除,如果pop栈为空,我们需要把push栈的元素再次导入到pop栈中删除即可。具体流程我们可以结合下图(gif)理解:
1、2 整体概括
用栈模拟队列我们整体的思路分为以下几步:
- 我们需要先定义两个栈,分别为push栈和pop栈;
- 插入数据到往push栈中;
- 删除数据时,需要先判断pop栈是否为空。如果为空,需要将push栈的所有数据导入到pop栈中。如果不为空,就直接在pop栈删除即可。
- 再插入数据时,就往push栈中插入即可。
以上即为用栈模拟队列的全过程,那我们来看代码的实现。
二、用栈模拟队列代码的实现
这里我们用c语言进行实现。所以我们这里需要先手撕出一个栈。
2、1 手撕 栈 代码
2、1、1 stack.h
#define INT_CAPACITY 4
typedef int STDataType;

typedef struct stack
{
	STDataType* a;
	int top;
	int capacity;
}ST;

void STInit(ST* ps);
void STDestory(ST* ps);

bool STIsEmpty(ST* ps);
void STPush(ST* ps, STDataType x);
void STPop(ST* ps);
int STSize(ST* ps);

STDataType STTop(ST* ps);
2、1、2 stack.c
void STInit(ST* ps)
{
	assert(ps);

	ps->a = (STDataType*)malloc(sizeof(STDataType)* INT_CAPACITY);
	if (ps->a == NULL)
	{
		perror("malloc fail");
		exit(-1);
	}

	ps->top = 0;
	ps->capacity = INT_CAPACITY;
}
void STDestory(ST* ps)
{
	assert(ps);

	free(ps->a);
	ps->capacity = 0;
	ps->top = 0;
}

bool STIsEmpty(ST* ps)
{
	assert(ps);

	return ps->top==0;
}
void STPush(ST* ps, STDataType x)
{
	assert(ps);

	if (ps->top == ps->capacity)
	{
		STDataType* tmp = (STDataType*)realloc(ps->a, sizeof(STDataType) * ps->capacity * 2);
		if (tmp == NULL)
		{
			perror("realloc fail");
			exit(-1);
		}
		ps->a = tmp;
		ps->capacity *= 2;
	}
	ps->a[ps->top++] = x;
}
void STPop(ST* ps)
{
	assert(ps);
	assert(!STIsEmpty(ps));

	ps->top--;
}
int STSize(ST* ps)
{
	assert(ps);

	return ps->top;

}

STDataType STTop(ST* ps)
{
	assert(ps);
	assert(!STIsEmpty(ps));

	return ps->a[ps->top - 1];
}
2、2 用栈实现队列代码
这个是OJ链接( 用栈实现队列 - OJ链接(力扣)),大家可以直接点开链接用其他语言做一下。我们看C语言的代码实现。
#define INT_CAPACITY 4
typedef int STDataType;

typedef struct stack
{
	STDataType* a;
	int top;
	int capacity;
}ST;

void STInit(ST* ps);
void STDestory(ST* ps);

bool STIsEmpty(ST* ps);
void STPush(ST* ps, STDataType x);
void STPop(ST* ps);
int STSize(ST* ps);

STDataType STTop(ST* ps);

void STInit(ST* ps)
{
	assert(ps);

	ps->a = (STDataType*)malloc(sizeof(STDataType)* INT_CAPACITY);
	if (ps->a == NULL)
	{
		perror("malloc fail");
		exit(-1);
	}

	ps->top = 0;
	ps->capacity = INT_CAPACITY;
}
void STDestory(ST* ps)
{
	assert(ps);

	free(ps->a);
	ps->capacity = 0;
	ps->top = 0;
}

bool STIsEmpty(ST* ps)
{
	assert(ps);

	return ps->top==0;
}
void STPush(ST* ps, STDataType x)
{
	assert(ps);

	if (ps->top == ps->capacity)
	{
		STDataType* tmp = (STDataType*)realloc(ps->a, sizeof(STDataType) * ps->capacity * 2);
		if (tmp == NULL)
		{
			perror("realloc fail");
			exit(-1);
		}
		ps->a = tmp;
		ps->capacity *= 2;
	}
	ps->a[ps->top++] = x;
}
void STPop(ST* ps)
{
	assert(ps);
	assert(!STIsEmpty(ps));

	ps->top--;
}
int STSize(ST* ps)
{
	assert(ps);

	return ps->top;

}

STDataType STTop(ST* ps)
{
	assert(ps);
	assert(!STIsEmpty(ps));

	return ps->a[ps->top - 1];
}

typedef struct
{
    ST StackPop;
    ST StackPush;
} MyQueue;


MyQueue* myQueueCreate()
{
    MyQueue* obj=(MyQueue*)malloc(sizeof(MyQueue));

    STInit(&obj->StackPop);
    STInit(&obj->StackPush);

    return obj;
}

void myQueuePush(MyQueue* obj, int x)
{
    STPush(&obj->StackPush,x);
}

int myQueuePeek(MyQueue* obj)
{
    if(STSize(&obj->StackPop)==0)
    {
        while(STSize(&obj->StackPush)!=0)
        {
            STPush(&obj->StackPop,STTop(&obj->StackPush));
            STPop(&obj->StackPush);
        }
    }
    return STTop(&obj->StackPop);
}

int myQueuePop(MyQueue* obj)
{
    int ret=myQueuePeek(obj);
    STPop(&obj->StackPop);
    return ret;
}

bool myQueueEmpty(MyQueue* obj)
{
    return STSize(&obj->StackPop)==0 && STSize(&obj->StackPush)==0;
}

void myQueueFree(MyQueue* obj)
{
    STDestory(&obj->StackPop);
    STDestory(&obj->StackPush);

    free(obj);
}


