android开发
文章目录
- android开发 类微信界面
- 整体框架展示:
- 主页Fragment_MainActivity2:
- 1. 聊天界面
- 2. 用户界面
- 用户界面的跳转
- 3. 朋友圈界面
- 4. 我的界面
android开发 类微信界面
整体效果展示:

整体框架展示:
-
4个主要的fragment页面,聊天、用户、朋友圈、我的 ,如下:
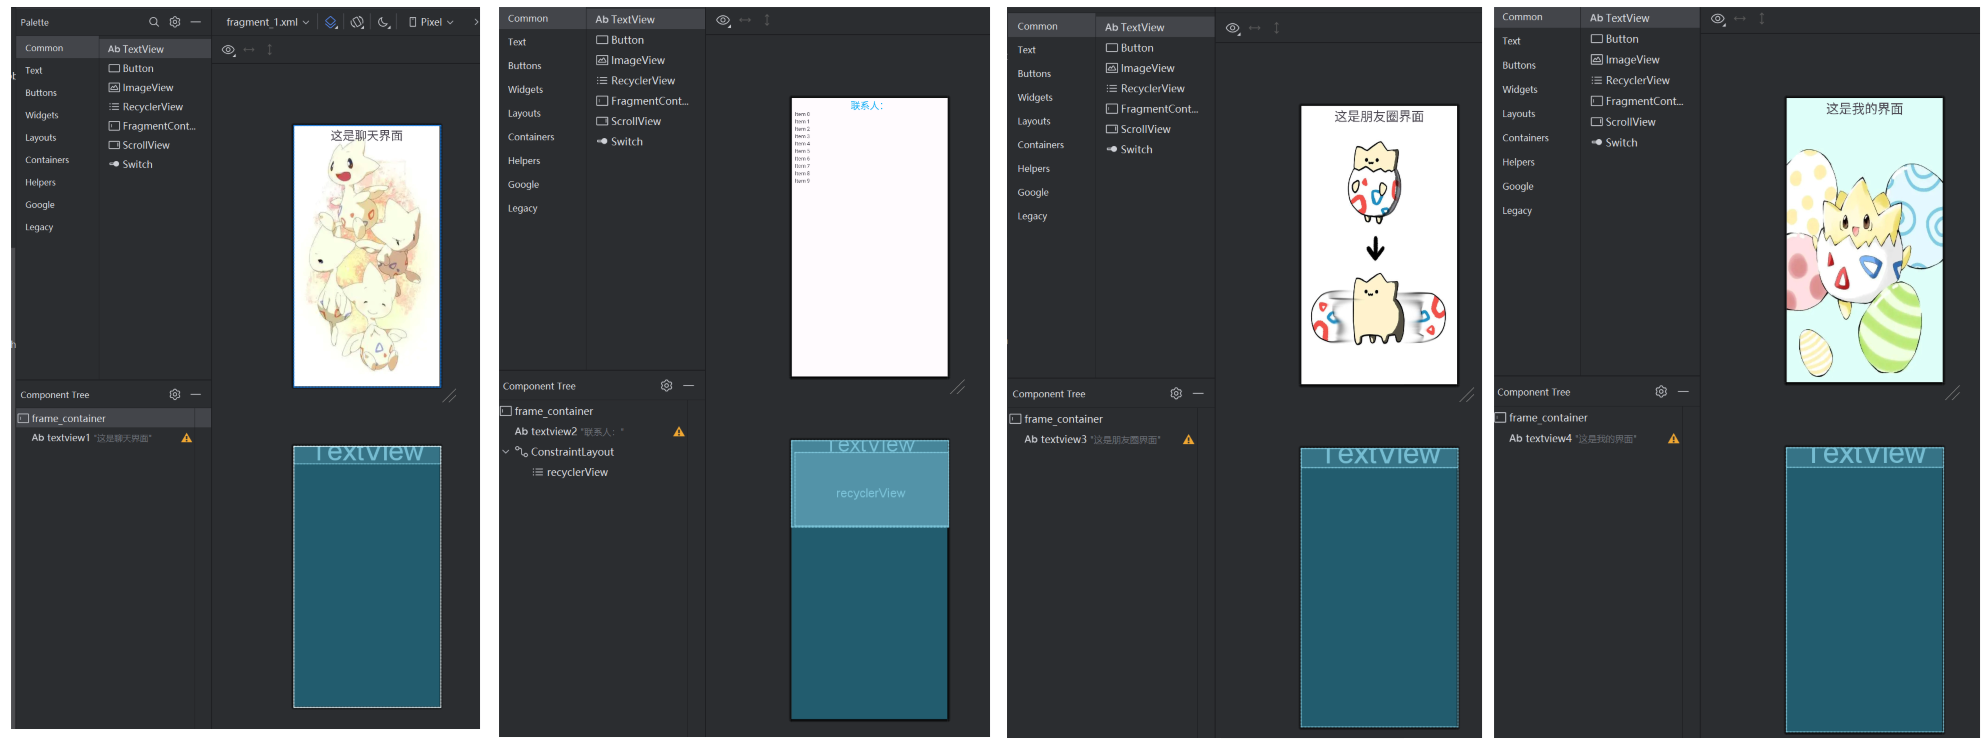
-
配置代码如下:
fragment1
<?xml version="1.0" encoding="utf-8"?>
<FrameLayout xmlns:android="http://schemas.android.com/apk/res/android"
    xmlns:app="http://schemas.android.com/apk/res-auto"
    xmlns:tools="http://schemas.android.com/tools"
    android:id="@+id/frame_container"
    android:layout_width="match_parent"
    android:layout_height="wrap_content"
    tools:context=".Fragment_1"
    android:background="@drawable/backgroud2">

    <!-- TODO: Update blank fragment layout -->
    <TextView
        android:id="@+id/textview1"
        android:layout_width="match_parent"
        android:layout_height="wrap_content"
        android:text="这是聊天界面"
        android:textAlignment="center"
        android:textSize="34sp" />

</FrameLayout>

fragment2:
<?xml version="1.0" encoding="utf-8"?>
<FrameLayout xmlns:android="http://schemas.android.com/apk/res/android"
    xmlns:app="http://schemas.android.com/apk/res-auto"
    xmlns:tools="http://schemas.android.com/tools"
    android:id="@+id/frame_container"
    android:layout_width="match_parent"
    android:layout_height="wrap_content"
    tools:context=".Fragment_1">

    <!-- TODO: Update blank fragment layout -->
    <TextView
        android:id="@+id/textview2"
        android:layout_width="match_parent"
        android:layout_height="match_parent"
        android:text="联系人:"
        android:textAlignment="center"
        android:textColor="#03A9F4"
        android:textColorLink="#2196F3"
        android:textSize="25sp" />

    <androidx.constraintlayout.widget.ConstraintLayout
        android:layout_width="match_parent"
        android:layout_height="match_parent">

        <androidx.recyclerview.widget.RecyclerView
            android:id="@+id/recyclerView"
            android:layout_width="match_parent"
            android:layout_height="match_parent"
            android:layout_marginStart="8dp"
            android:layout_marginTop="32dp"
            app:layout_constraintStart_toStartOf="parent"
            app:layout_constraintTop_toTopOf="parent" />
    </androidx.constraintlayout.widget.ConstraintLayout>
</FrameLayout>

fragment3:
<?xml version="1.0" encoding="utf-8"?>
<FrameLayout xmlns:android="http://schemas.android.com/apk/res/android"
    xmlns:app="http://schemas.android.com/apk/res-auto"
    xmlns:tools="http://schemas.android.com/tools"
    android:id="@+id/frame_container"
    android:layout_width="match_parent"
    android:layout_height="wrap_content"
    tools:context=".Fragment_1"
    android:background="@drawable/backgroud">

    <!-- TODO: Update blank fragment layout -->
    <TextView
        android:id="@+id/textview3"
        android:layout_width="match_parent"
        android:layout_height="wrap_content"
        android:text="这是朋友圈界面"
        android:textAlignment="center"
        android:textSize="34sp" />

</FrameLayout>

fragment4:
<?xml version="1.0" encoding="utf-8"?>
<FrameLayout xmlns:android="http://schemas.android.com/apk/res/android"
    xmlns:app="http://schemas.android.com/apk/res-auto"
    xmlns:tools="http://schemas.android.com/tools"
    android:id="@+id/frame_container"
    android:layout_width="match_parent"
    android:layout_height="wrap_content"
    tools:context=".Fragment_1"
    android:background="@drawable/backgroud3">

    <!-- TODO: Update blank fragment layout -->
    <TextView
        android:id="@+id/textview4"
        android:layout_width="match_parent"
        android:layout_height="wrap_content"
        android:text="这是我的界面"
        android:textAlignment="center"
        android:textSize="34sp" />

</FrameLayout>
主页Fragment_MainActivity2:
-
要在一个Activity中根据不同的按键,分别显示不同的fragmentUI界面。先设计一个主页面,其中用 FrameLayout 来引入4个不同的fragment界面。主页面和两个top、bottomUI设计如下:
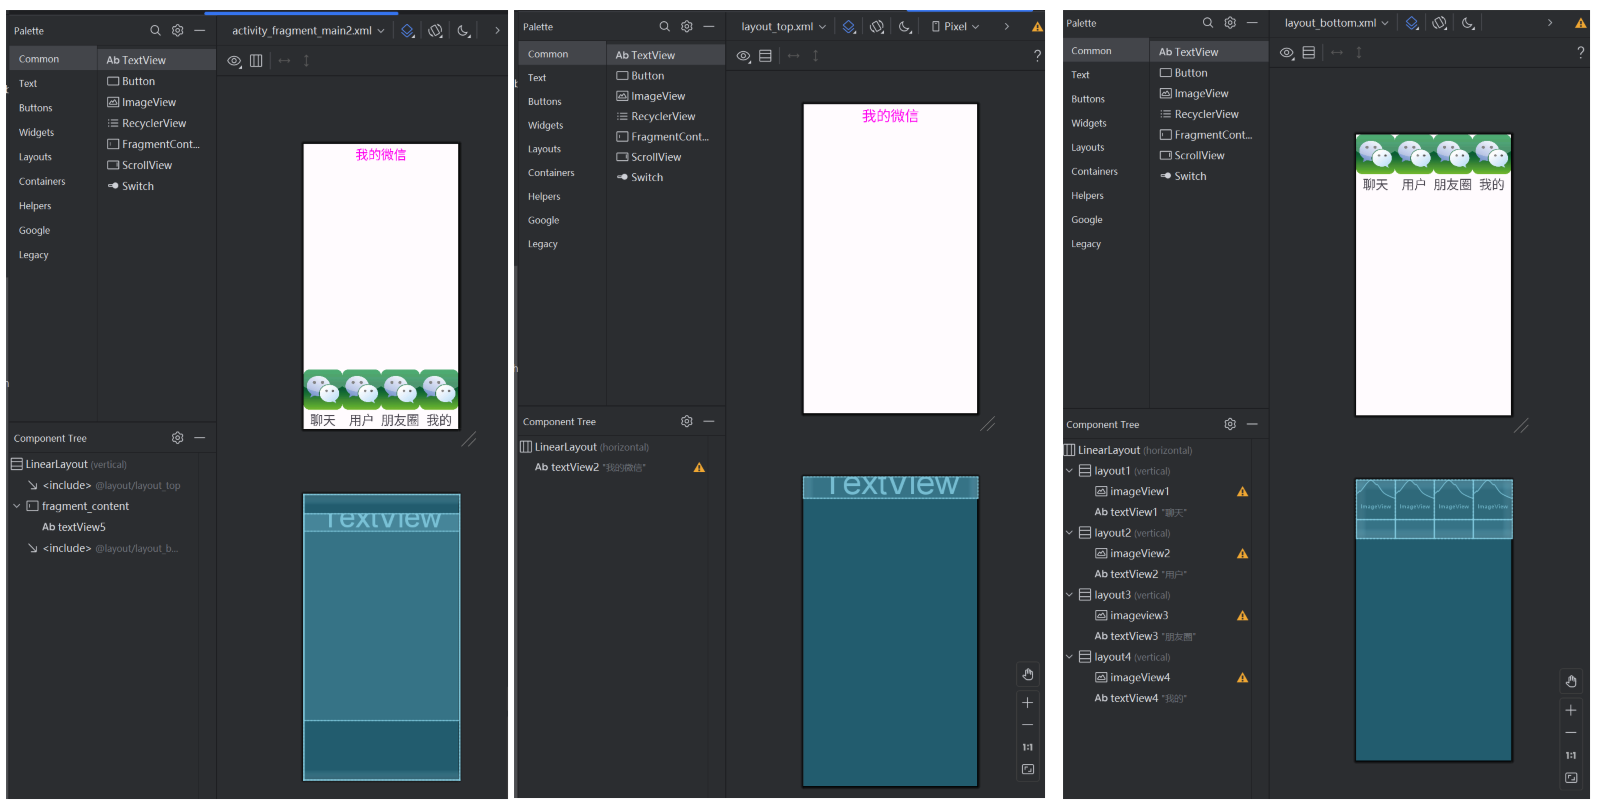
主页面activity_fragment_main2中通过include来引入 top 、 bottom 两个页面,主页面设计如下,中间用FrameLayout组件进行填充,为后面显示的fragment页面留空间:
<?xml version="1.0" encoding="utf-8"?> <LinearLayout xmlns:android="http://schemas.android.com/apk/res/android" xmlns:app="http://schemas.android.com/apk/res-auto" xmlns:tools="http://schemas.android.com/tools" android:layout_width="match_parent" android:layout_height="match_parent" android:orientation="vertical" tools:context=".Fragment_MainActivity2"> <include layout="@layout/layout_top" /> <FrameLayout android:id="@+id/fragment_content" android:layout_width="match_parent" android:layout_height="0dp" android:layout_weight="1"> <TextView android:id="@+id/textView5" android:layout_width="match_parent" android:layout_height="wrap_content" android:textAlignment="textStart" android:textSize="34sp" /> </FrameLayout> <include layout="@layout/layout_bottom" /> </LinearLayout> -
Fragment_MainActivity2代码解释:
首先是4个fragment.java代码,通过继承Fragment类,重写其中的onCreateView方法来显示自己定义的UI界面 ,准备4个fragment.java文件,分别引入上面设计的4个fragment.xml文件:

在Fragment_MainActivity2中通过 manager.beginTransaction() 开始一个事务transaction,并new 4个Fragment对象作为transaction 的操作对象:
// 4个底部按钮 后面通过监听这4个按钮 来显示不同的fragment layout1 = findViewById(R.id.layout1); layout2 = findViewById(R.id.layout2); layout3 = findViewById(R.id.layout3); layout4 = findViewById(R.id.layout4); // 获取 当前Activity的 FragmentManager实例 用于管理Fragment事务 manager = getSupportFragmentManager(); // 开始一个新的Fragment事务 transaction = manager.beginTransaction(); // 在Activity 中添加一个 Fragment // 创建一个 Fragment 实例 fragment_1 = new Fragment_1(); fragment_2 = new Fragment_2(); fragment_3 = new Fragment_3(); fragment_4 = new Fragment_4(); // 初始化 transaction 中的事件 intial(); // app开始时显示fragment_1 fragment_hide(fragment_1); // 点击事件的监听器 layout1.setOnClickListener(this); layout2.setOnClickListener(this); layout3.setOnClickListener(this); layout4.setOnClickListener(this);为了让4个fragment页面不重复显示,在transaction事务中将add进的四个fragment全部隐藏,然后通过 定义接口 来显示指定的fragment页面,在Fragment_MainActivity2中定义OnClickListener接口中的 onClick方法 ,这样通过点击不同的layout,触发不同的监听、就能显示不同fragment:

// 将所有fragment添加到一个容器视图中
private void intial() {
    // fragment_1添加到一个容器视图中 ==> 当前资源文件activity_fragment_main2的 fragment_content中
    // ==> fragment_1的内容将显示在fragmentlayout指定的位置。
    transaction.add(R.id.fragment_content,fragment_1);
    transaction.add(R.id.fragment_content,fragment_2);
    transaction.add(R.id.fragment_content,fragment_3);
    transaction.add(R.id.fragment_content,fragment_4);
}

// 一个fragment封装 用来显示指定的fragment页面 传入的参数即为要显示的页面
protected void fragment_hide(Fragment fragment){
    // 隐藏所有 fragment
    transaction.hide(fragment_1);
    transaction.hide(fragment_2);
    transaction.hide(fragment_3);
    transaction.hide(fragment_4);
    // 显示指定的 fragment页面
    transaction.show(fragment);
    // 提交事务
    transaction.commit();
}
// 重写 View.OnClickListener 接口中定义的onClick方法
@Override
public void onClick(View v) {
    if (v.getId() == R.id.layout1) {
        // 处理 layout1 的点击事件
        transaction = manager.beginTransaction();
        fragment_hide(fragment_1);
    } else if (v.getId() == R.id.layout2) {
        // 处理 layout2 的点击事件
        transaction = manager.beginTransaction();
        fragment_hide(fragment_2);
    } else if (v.getId() == R.id.layout3) {
        // 处理 layout3 的点击事件
        transaction = manager.beginTransaction();
        fragment_hide(fragment_3);
    } else if (v.getId() == R.id.layout4) {
        // 处理 layout4 的点击事件
        transaction = manager.beginTransaction();
        fragment_hide(fragment_4);
    }
}
1. 聊天界面
-
因为可能的聊天会比较多,所以采用 recyclerView组件 搭配adpter来显示,并用Intent来进行跳转至进入聊天界面:
[!NOTE]
这里我直接将聊天记录写死在程序中,但是聊天记录是可以从文件(或者数据库)中读取。
fragment设计修改如下,主要是添加一个recyclerView组件(左),再给recyclerView的每一行做一个item(中),以及群聊内部的详细页面(右):
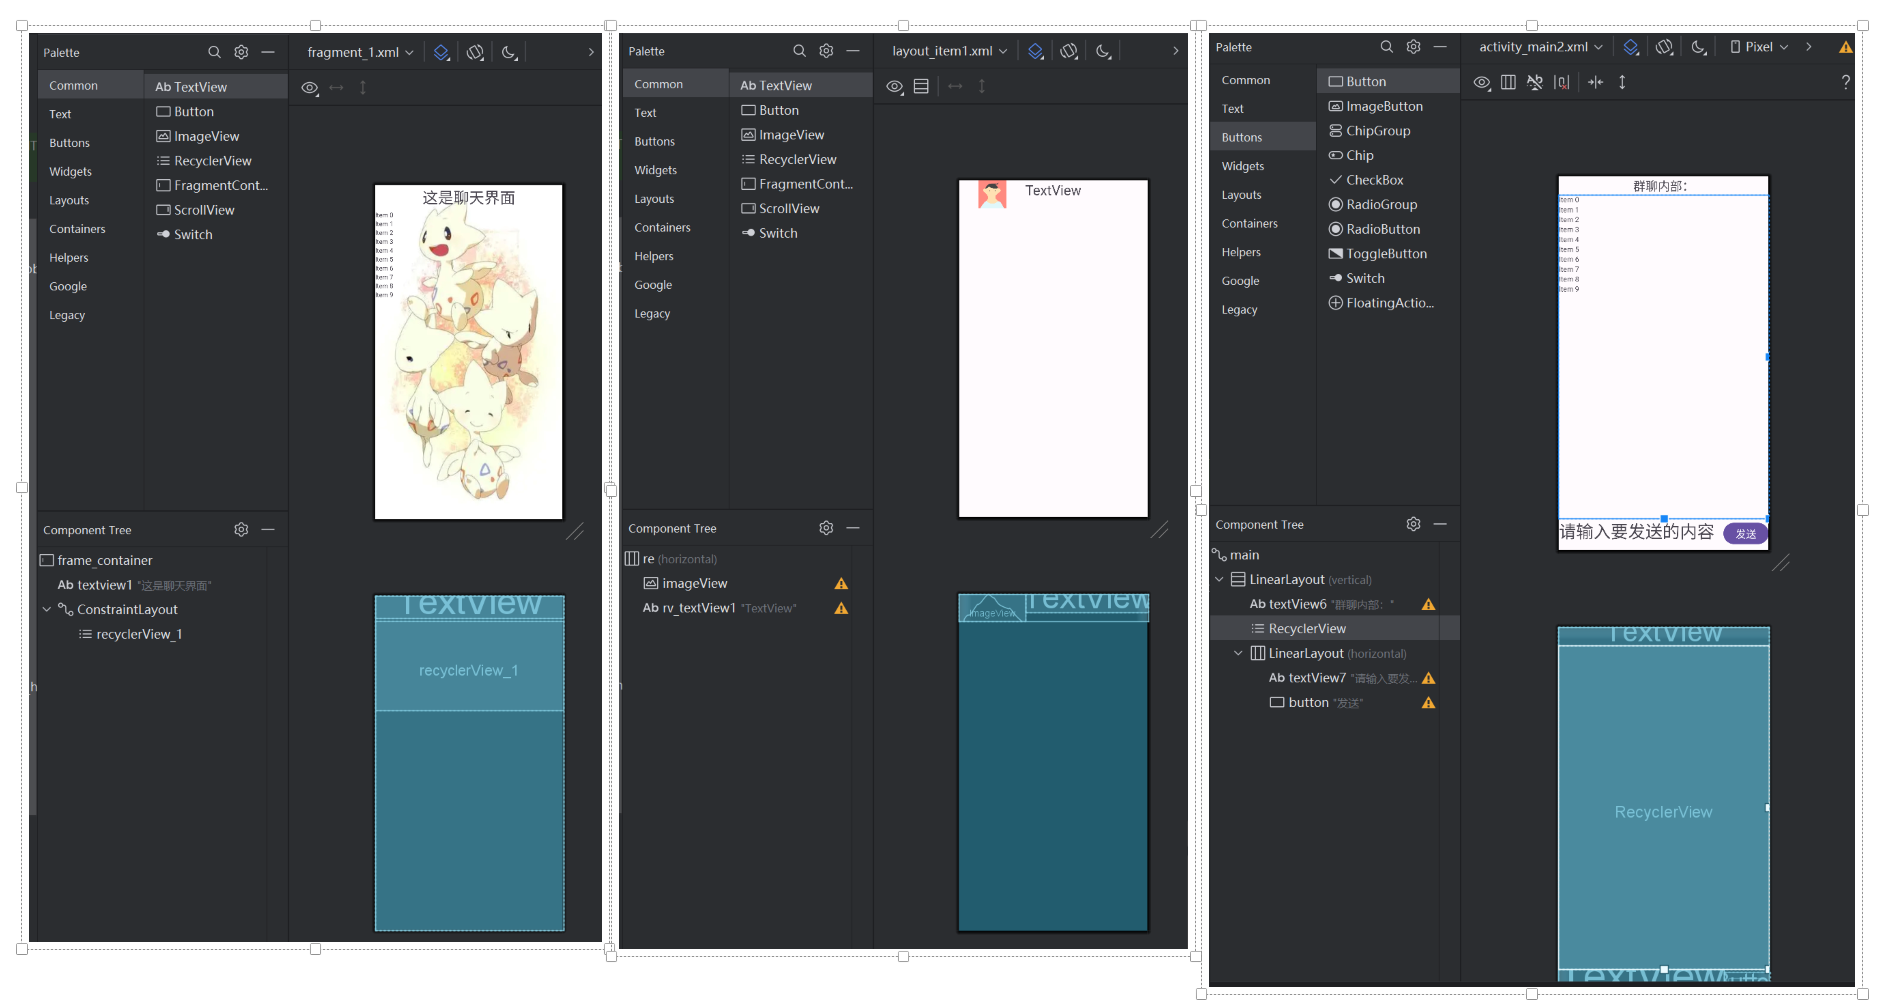
配置文件如下:
<?xml version="1.0" encoding="utf-8"?> <androidx.constraintlayout.widget.ConstraintLayout xmlns:android="http://schemas.android.com/apk/res/android" xmlns:app="http://schemas.android.com/apk/res-auto" xmlns:tools="http://schemas.android.com/tools" android:id="@+id/main" android:layout_width="match_parent" android:layout_height="match_parent" tools:context=".MainActivity"> <LinearLayout android:layout_width="match_parent" android:layout_height="wrap_content" android:orientation="vertical" tools:ignore="MissingConstraints"> <TextView android:id="@+id/textView" android:layout_width="match_parent" android:layout_height="81dp" android:text="联系人" android:textAlignment="center" android:textSize="48sp" /> <ImageView android:id="@+id/imageView_people" android:layout_width="match_parent" android:layout_height="wrap_content" tools:srcCompat="@tools:sample/avatars" /> </LinearLayout> </androidx.constraintlayout.widget.ConstraintLayout> <?xml version="1.0" encoding="utf-8"?> <LinearLayout xmlns:android="http://schemas.android.com/apk/res/android" xmlns:app="http://schemas.android.com/apk/res-auto" xmlns:tools="http://schemas.android.com/tools" android:id="@+id/re" android:layout_width="match_parent" android:layout_height="wrap_content" android:orientation="horizontal"> <ImageView android:id="@+id/imageView" android:layout_width="0dp" android:layout_height="60dp" android:layout_weight="1" tools:srcCompat="@tools:sample/avatars" /> <TextView android:id="@+id/rv_textView1" android:layout_width="wrap_content" android:layout_height="wrap_content" android:layout_weight="1" android:text="TextView" android:textSize="30dp" /> </LinearLayout> -
fragment1中代码涉及如下,主要是给adpter2传入参数,来显示指定行:
// 引入自己的UI界面 // 引入资源 View view = inflater.inflate(R.layout.fragment_1, container, false); recyclerView = view.findViewById(R.id.recyclerView_1); recyclerView.setLayoutManager(new LinearLayoutManager(getContext())); // 为每一行添加元素 list = new ArrayList<>(); list2 = new ArrayList<>(); // 传入群聊图片id int[] name = {R.drawable.group_chats1,R.drawable.group_chats2,R.drawable.group_chats3,R.drawable.people_4}; for (int i = 0; i < 10 ; i++){ // 为每一行添加一个元素 list2.add(name[i%4]); list.add("这是第" + i + "个群聊"); } // 用 list来实例化一个 adpter对象 adpter = new adpter2(getContext(),list,list2); // 设置recyclerView recyclerView.setAdapter(adpter); Log.d("lzl","fragment...."); -
adpter2主要代码解释:
@Override // 使用自己定义的 MyViewHolder类 来设置每一行的内容 public void onBindViewHolder(@NonNull adpter2.MyViewHolder holder, @SuppressLint("RecyclerView") int position) { // 显示群聊的名字 holder.textView.setText(list.get(position).toString()); // 显示群聊的图片 holder.imageView.setImageResource((Integer) list2.get(position)); // 给text设置监听 ==> 点击进入群聊内部 holder.textView.setOnClickListener(new View.OnClickListener() { @Override public void onClick(View v) { // 跳转到群聊详细页面(群聊内部) Intent intent = new Intent(mcontext, MainActivity2.class); // 传参 传入textview的内容 intent.putExtra("key1",holder.textView.getText()); mcontext.startActivity(intent); } }); } -
MainActivity2代码如下,主要导入了设计的UI界面,以及接收adpter传入的参数:
textView = findViewById(R.id.textView6);
// 获取一个intent对象 其他的activity 传参过来
Intent intent = getIntent();

// 获取传递的参数 通过设置的变量名 --> key1 字符串参数
String string1 = intent.getStringExtra("key1");

if (string1 != null)
{
    // 在text中显示
    // 设置textview的内容
    textView.setText("群聊:" + string1);
}
2. 用户界面
-
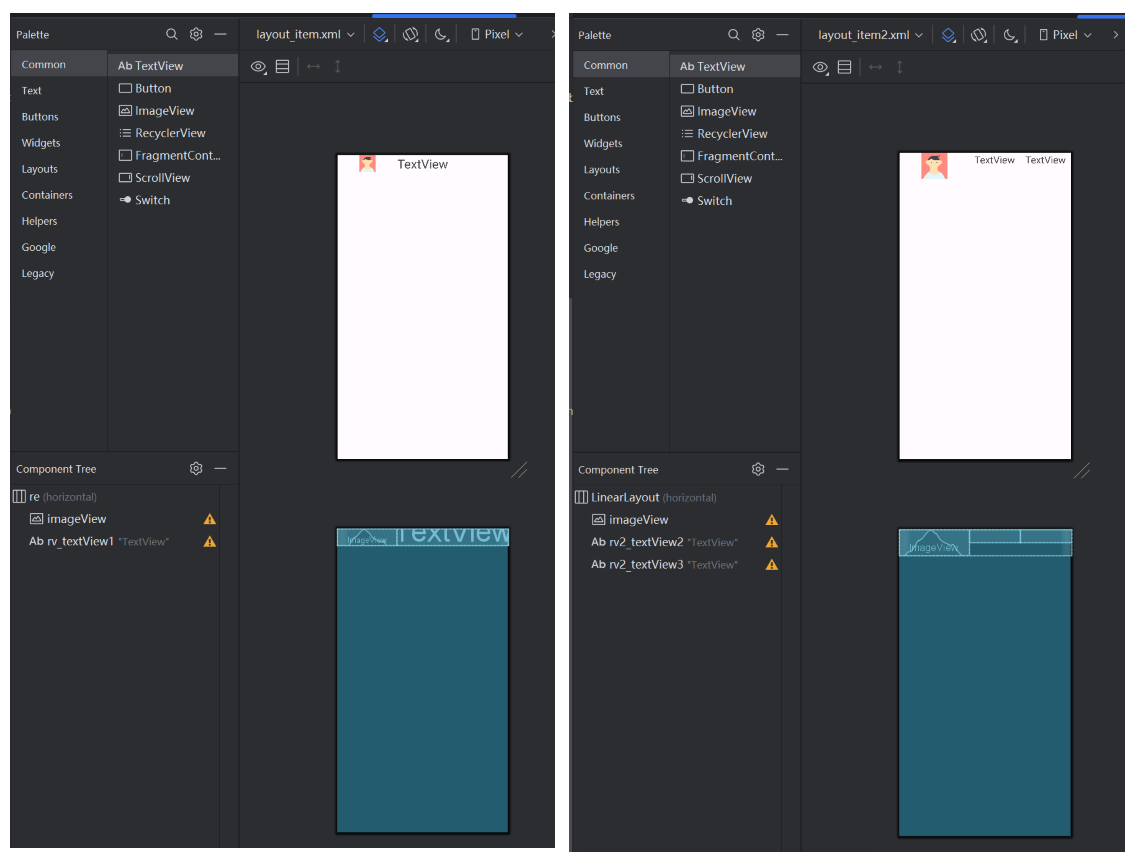
由于用户界面中连续人众多,所以考虑使用 recyclerView组件 搭配adpter来显示。下面看adpter设计:
recyclerView设计(左),recyclerView中的每一行设计(右)
-
然后在fragment_2中引用左边这个资源,并新建一个adpter.java文件,用来设置列表中的每一行:
fragment中的主要代码是onCreateView方法 中传递参数,并用adpter来设置recyclerView
@Override
    public View onCreateView(LayoutInflater inflater, ViewGroup container,
                             Bundle savedInstanceState) {
        // 引入资源
        View view = inflater.inflate(R.layout.fragment_2, container, false);
        // 找到recyclerView组件
        recyclerView = view.findViewById(R.id.recyclerView);
        recyclerView.setLayoutManager(new LinearLayoutManager(getContext()));

        // 为每一行添加元素 列表传参
        list = new ArrayList<>();
        list2 = new ArrayList<>();

        // 传入图片id
        int[] name = {R.drawable.people_1,R.drawable.people_2,R.drawable.people_3,R.drawable.people_4};
        for (int i = 0; i < 100 ; i++){
            // 为每一行添加一个元素
            list2.add(name[i%4]);
            list.add("这是第" + i + "个联系人");
        }

        // 用 list来实例化一个 adpter对象
        adpter = new adpter(getContext(),list,list2);
        // 设置recyclerView
        recyclerView.setAdapter(adpter);
        Log.d("lzl","fragment....");
        // 返回界面
        return  view;
    }
adpter文件设计如下:
其中要声明adpter的构造方法,方便new的时候传参。其次定义一个自己的内部类MyViewHolder,用来定义每一行的元素,因为后续**public MyViewHolder onCreateViewHolder(@NonNull ViewGroup parent, int viewType)**会给每一行返回一个parent,用来设置每一行。
然后在**public void onBindViewHolder(@NonNull MyViewHolder holder, @SuppressLint(“RecyclerView”) int position)**中接收上面返回的holder,然后根据fragment传入的参数设置每一行的每一个组件。
[!NOTE]
这里fragment给adpter传参是在程序中写死了的,也可以从文件中(或者数据库中)读出需要的内容,再传递给adpter进行显示
// adpter构造函数 可以接收两个list类型的参数
public adpter(Context context, List list, List list2) {
    this.list = list;
    this.list2 = list2;
    this.mcontext = context;
}

// 定义内部类 自己的 ViewHolder 继承自 RecyclerView.ViewHolder 用于onCreateViewHolder创建
// 定义ViewHolder 每一行有什么
 class MyViewHolder extends RecyclerView.ViewHolder{
    // 成员变量
    TextView textView;
    ImageView imageView;
    // 自己类的构方法 表示 recyclerView每行有哪些属性
    public MyViewHolder(@NonNull View itemView) {
        super(itemView);
        // 拿到 layout_item中的rv_textView1
        textView = itemView.findViewById(R.id.rv_textView1);
        // 设置图片
        imageView = itemView.findViewById(R.id.imageView);
    }
}

@NonNull    // 该方法不能返回空
@Override
// 返回一个 MyViewHolder 实例 holder
public MyViewHolder onCreateViewHolder(@NonNull ViewGroup parent, int viewType) {

    Context context = parent.getContext();
    // 返回一个 View 定义每一行 layout_item压入
    View view = LayoutInflater.from(context).inflate(R.layout.layout_item,parent,false);
    // 返回一个 MyViewHolder实例 holder为每一行的初始对象
    MyViewHolder holder = new MyViewHolder(view);
    return holder;
}

@Override
// 使用自己定义的 MyViewHolder类 来设置每一行的内容
public void onBindViewHolder(@NonNull MyViewHolder holder, @SuppressLint("RecyclerView") int position) {

    // position 表示list中的第几个元素 即用list来设置 recyclerView 中每行的内容
    holder.textView.setText(list.get(position).toString());
    // 显示图片
    holder.imageView.setImageResource((Integer) list2.get(position));
    // 给text设置监听
    holder.textView.setOnClickListener(new View.OnClickListener() {
        @Override
        public void onClick(View v) {
            // 这里给每一个 textView设置监听,跳转到另外一个页面(用来表示点击列表项 --> 跳转到详细页面)
            Intent intent = new Intent(mcontext, MainActivity.class);
            // 传参 给跳转到的MainActivity 传入参数、便于定向显示每一行的详细页面
            intent.putExtra("key1",holder.textView.getText());
            mcontext.startActivity(intent);
        }
    });
}

@Override
// 返回 RecyclerView 中的项数。这是告诉 RecyclerView 需要显示多少项
public int getItemCount() {
    // 返回 list的大小 即 recyclerView能显示的总行数
    return list.size();
}
用户界面的跳转
-
前面在adpter中监听textView组件,进而跳转到详细页面,下面看跳转的目标Activity中如何显示详细信息:
详细页面的UI设计如下:

在目标Activity中完成的两个任务:1. 接收源Activity的参数、进而显示指定的联系人详细页面。2. 设计一个service,采用bind方法在启动Activity时自动服务启动。
接收参数如下:
// 获取一个intent对象 其他的activity 传参过来
Intent intent = getIntent();

// 获取传递的参数 通过设置的变量名 --> key1 字符串参数
String string1 = intent.getStringExtra("key1");
if (string1 != null)
{
    // 在text中显示
    // 设置textview的内容
    textView.setText(string1);
}
// 接收传入的图像信息
int image = intent.getIntExtra("key2",0);
if (image != 0)
{
    // 显示联系人的图片
    imageView.setImageResource((Integer) image);
}
bind启动服务,这里额外需要一个 MyService.java文件 来继承Service类:
Intent serviceIntent = new Intent(MainActivity.this, MyService.class);

// 使用bindservice方法
ServiceConnection connection = new ServiceConnection() {
    @Override
    public void onServiceConnected(ComponentName name, IBinder service) {
        Log.d("lzl","onServiceConnected .....");
        // 接收Myservice与服务进行通信。 Activity开始时就启动服务
        mybinder = (MyService.Mybinder) service;
        mybinder.todo();
    }
    @Override
    public void onServiceDisconnected(ComponentName name) {
        Log.d("lzl","onServiceDisconnected .....");
        // 当服务与客户端的连接意外断开时 清空对象 解绑
        mybinder = null;
    }
};
this.bindService(serviceIntent,connection, Context.BIND_AUTO_CREATE);
Myservice.java文件设置如下,其中要重写onBind方法和onDestroy方法,以及定义一个内部类Mybinder:
public MyService() { //context = this; //Log.d("lzl","MyService create......"); } @Override public IBinder onBind(Intent intent) { // TODO: Return the communication channel to the service. Log.d("lzl","MyService onBind ......"); Mybinder binder = new Mybinder(); return binder; } // 继承Binder 来定义子类 添加一个额外的方法 来启动 public class Mybinder extends Binder{ public Mybinder() { } // 定义启动服务的方法 public void todo(){ Log.d("lzl","Mybinder todo() ......"); // 初始化 mediaplayer 对象 mediaplayer = MediaPlayer.create(getApplicationContext(),R.raw.wu_zhu_x_zhi_er); // 启动服务 mediaplayer.start(); } } @Override public void onDestroy() { Log.d("lzl","onDestroy......"); // 销毁时释放资源 mediaplayer.stop(); super.onDestroy(); } -
如何给不同的列设置不同的音乐服务?难道给每个列都写一个serivce.java文件?肯定不显示。这里分析一下音乐服务如何启动:
无论是非绑定式服务还是绑定式服务,都主要是在Service.java文件中来设置的音乐,所以如果能动态选择音乐(根据列的跳转信息),那么就值需要这一个Service.java文件即可。修改后的代码如下:
这里暂时只改bind服务:
fragment增加传入music资源

在adpter接收参数,传递给MainActivity启动服务:
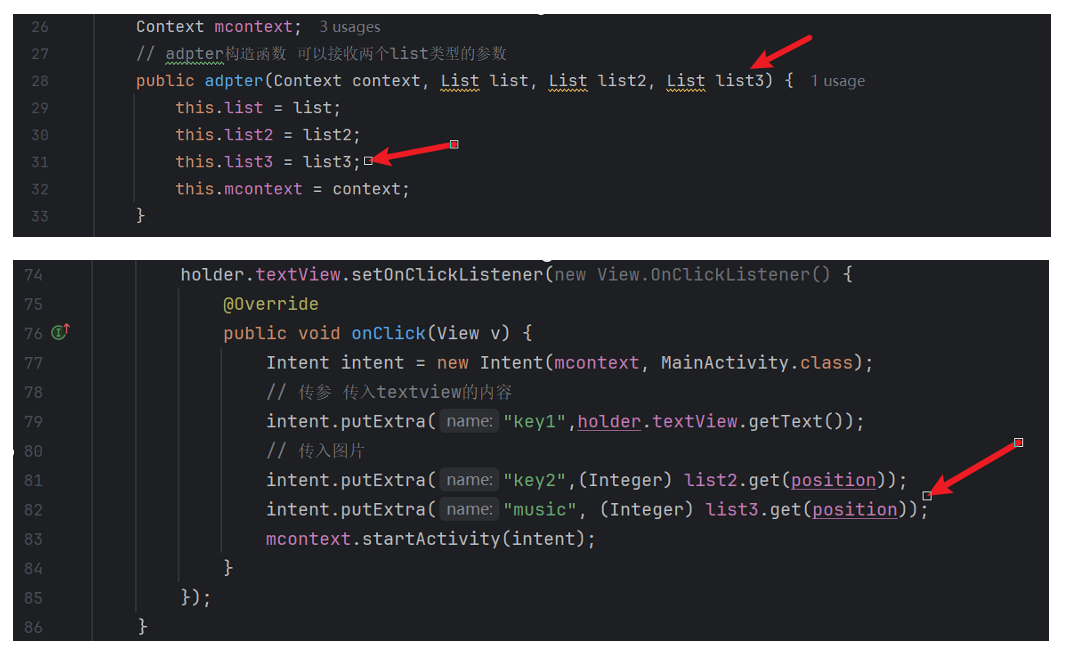
MainActivity中接收music参数,在传递给service来自定义选择音乐文件,service中给todo方法增加一个参数,在绑定到音乐式选择指定音乐。代码如下,上面是MainActivity文件,下面是service文件:
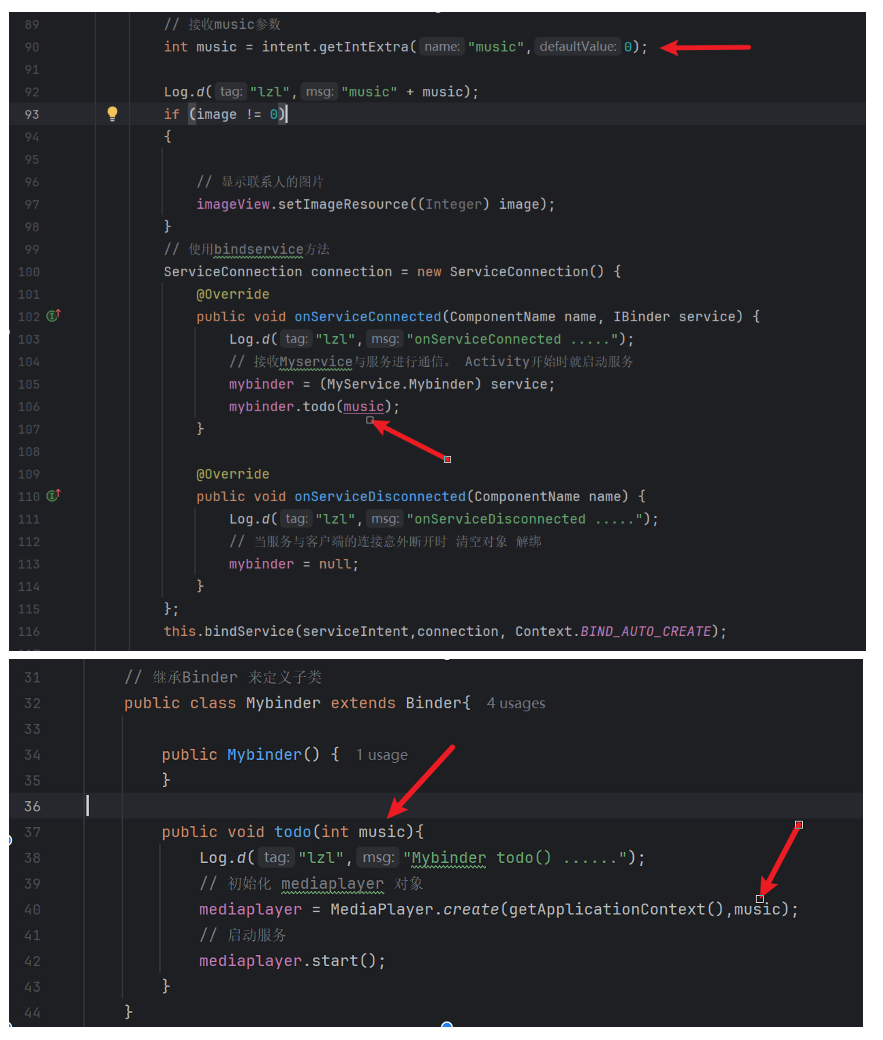
这样就能根据不同的列进而选择不同的service音乐启动了!!!
3. 朋友圈界面
4. 我的界面
这两个界面不做额外描述。
项目源码位于:https://gitee.com/poppy-qwq/
