SpringSSM整合
SSM整合
(一) SSM框架整合思路的介绍和分析
介绍
SSM(Spring+SpringMVC+MyBatis)整合,就是三个框架协同开发。
Spring整合Mybatis 就是将Mybatis核心配置文件当中数据源的配置,事务的管理,以及工厂的配置,Mapper接口的实现类等交给Spring管理。
Spring整合SpringMVC,就是在web.xml当中添加监听器,当服务器启动,监听器触发,监听器执行了Spring的核心配置文件,核心配置文件被加载。
整合核心步骤:
Spring 基础框架单独运行
SpringMVC 框架单独运行
Spring 整合SpringMVC 框架
Spring 整合Mybatis 框架
测试SSM 整合结果
(二)准备SSM整合环境
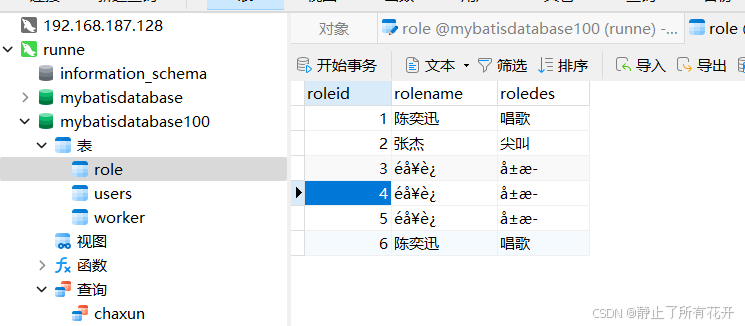
1 创建数据库和表结构

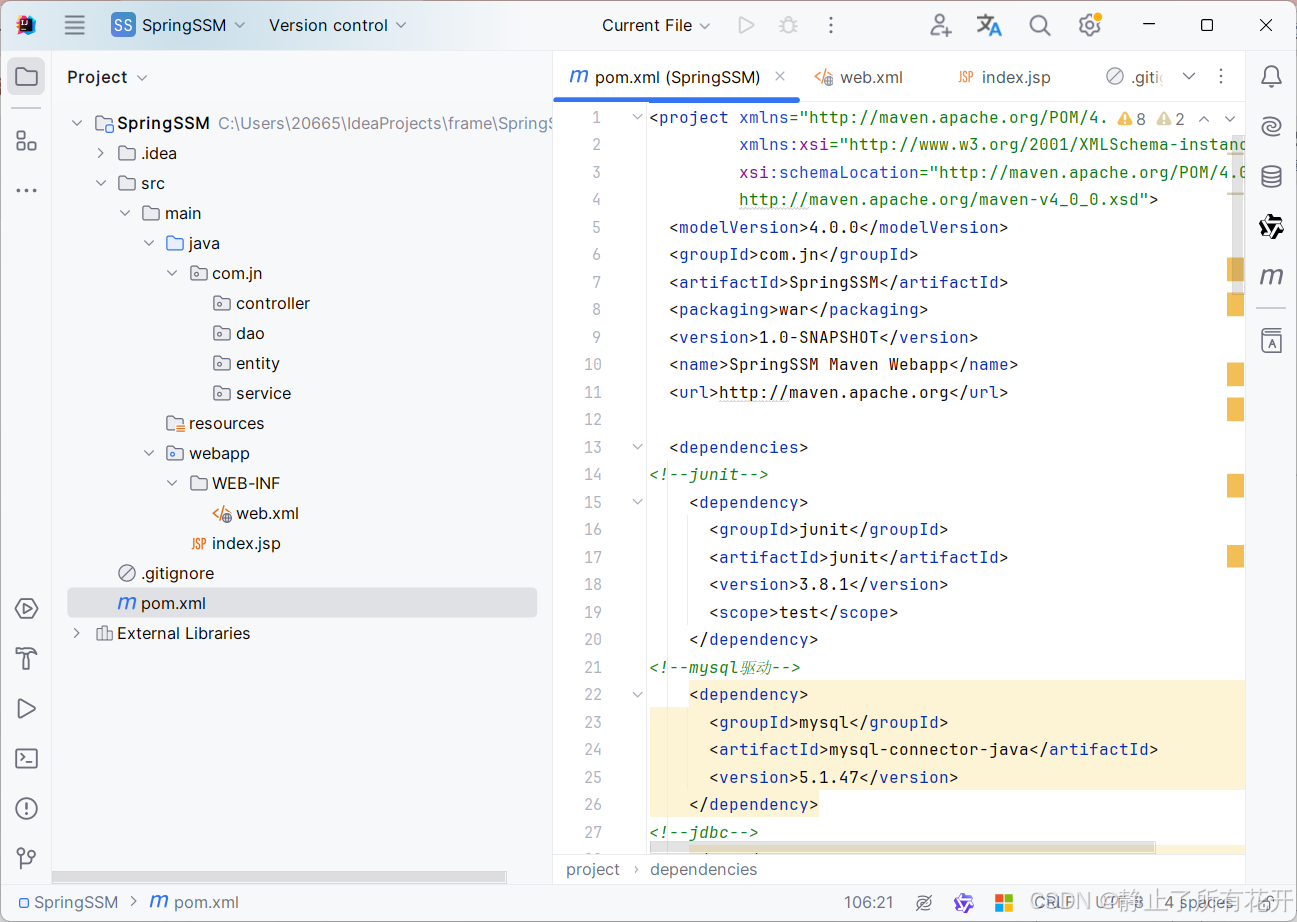
2 创建 Maven 工程
3 导入核心坐标
<project xmlns="http://maven.apache.org/POM/4.0.0"
         xmlns:xsi="http://www.w3.org/2001/XMLSchema-instance"
         xsi:schemaLocation="http://maven.apache.org/POM/4.0.0
         http://maven.apache.org/maven-v4_0_0.xsd">
  <modelVersion>4.0.0</modelVersion>
  <groupId>com.jn</groupId>
  <artifactId>SpringSSM</artifactId>
  <packaging>war</packaging>
  <version>1.0-SNAPSHOT</version>
  <name>SpringSSM Maven Webapp</name>
  <url>http://maven.apache.org</url>

  <dependencies>
<!--junit-->
    <dependency>
      <groupId>junit</groupId>
      <artifactId>junit</artifactId>
        <version>4.13.2</version>
        <scope>test</scope>
    </dependency>
<!--mysql驱动-->
      <!--mysql-->
      <dependency>
          <groupId>mysql</groupId>
          <artifactId>mysql-connector-java</artifactId>
          <version>8.0.29</version>
      </dependency>
<!--jdbc-->
    <dependency>
      <groupId>org.springframework</groupId>
      <artifactId>spring-jdbc</artifactId>
      <version>5.3.18</version>
    </dependency>
<!--c3p0的连接依赖-->
    <dependency>
      <groupId>com.mchange</groupId>
      <artifactId>c3p0</artifactId>
      <version>0.9.5.4</version>
    </dependency>
<!--mybatis核心-->
    <dependency>
      <groupId>org.mybatis</groupId>
      <artifactId>mybatis</artifactId>
      <version>3.4.6</version>
    </dependency>
<!--日志-->
    <dependency>
      <groupId>log4j</groupId>
      <artifactId>log4j</artifactId>
      <version>1.2.17</version>
    </dependency>
<!--分页插件-->
    <dependency>
      <groupId>com.github.pagehelper</groupId>
      <artifactId>pagehelper</artifactId>
      <version>5.3.2</version>
    </dependency>

<!--SpringIOC-->
    <dependency>
      <groupId>org.springframework</groupId>
      <artifactId>spring-context</artifactId>
      <version>5.3.18</version>
    </dependency>
<!--aspect-->
    <dependency>
      <groupId>org.aspectj</groupId>
      <artifactId>aspectjweaver</artifactId>
      <version>1.9.7</version>
    </dependency>
<!--springmvc-->
    <dependency>
      <groupId>org.springframework</groupId>
      <artifactId>spring-webmvc</artifactId>
      <version>5.3.18</version>
    </dependency>
<!--jackson-->
    <dependency>
      <groupId>com.fasterxml.jackson.core</groupId>
      <artifactId>jackson-databind</artifactId>
      <version>2.15.2</version>
    </dependency>
<!--servlet-->
      <dependency>
          <groupId>javax.servlet</groupId>
          <artifactId>javax.servlet-api</artifactId>
          <version>4.0.1</version>
      </dependency>
<!--jsp-api-->
      <dependency>
          <groupId>javax.servlet.jsp</groupId>
          <artifactId>jsp-api</artifactId>
          <version>2.2</version>
      </dependency>
<!--jstl-->
      <dependency>
          <groupId>javax.servlet</groupId>
          <artifactId>jstl</artifactId>
          <version>1.2</version>
      </dependency>
<!--spring整合mybatis-->
      <dependency>
          <groupId>org.mybatis</groupId>
          <artifactId>mybatis-spring</artifactId>
          <version>2.0.6</version>
      </dependency>
<!--spring整合Junit-->
      <dependency>
          <groupId>org.springframework</groupId>
          <artifactId>spring-test</artifactId>
          <version>5.3.18</version>
      </dependency>
      <dependency>
          <groupId>junit</groupId>
          <artifactId>junit</artifactId>
          <version>RELEASE</version>
          <scope>test</scope>
      </dependency>
  </dependencies>
    <build>
        <resources>
            <resource>
                <directory>src/main/resources</directory>
                <includes>
                    <include>**/*.properties</include>
                    <include>**/*.xml</include>
                </includes>
                <filtering>true</filtering>
            </resource>
            <resource>
                <directory>src/main/java</directory>
                <includes>
                    <include>**/*.properties</include>
                    <include>**/*.xml</include>
                </includes>
                <filtering>true</filtering>
            </resource>
        </resources>
    </build>
</project>
4 编写数据模型实体类
package com.jn.entity;

import java.io.Serializable;

public class Role implements Serializable {
    private Integer roleid;
    private String rolename;
    private String roledes;

    public Integer getRoleid() {
        return roleid;
    }

    public void setRoleid(Integer roleid) {
        this.roleid = roleid;
    }

    public String getRolename() {
        return rolename;
    }

    public void setRolename(String rolename) {
        this.rolename = rolename;
    }

    public String getRoledes() {
        return roledes;
    }

    public void setRoledes(String roledes) {
        this.roledes = roledes;
    }

    @Override
    public String toString() {
        return "Role{" +
                "roleid=" + roleid +
                ", rolename='" + rolename + '\'' +
                ", roledes='" + roledes + '\'' +
                '}';
    }
}
5 编写持久层接口
package com.jn.entity;

import java.util.List;

public interface RoleMapper {
    Role findById(Integer id);
    List<Role> findAll();
    void insert(Role role);
    void update(Role role);
    void delete(Integer id);
}
6 编写持久层接口对应的sql配置文件
<?xml version="1.0" encoding="UTF-8" ?>
<!DOCTYPE mapper
        PUBLIC "-//mybatis.org//DTD Mapper 3.0//EN"
        "http://mybatis.org/dtd/mybatis-3-mapper.dtd">
<mapper namespace="com.jn.mapper.RoleMapper">

    <resultMap id="BaseResultMap" type="com.jn.entity.Role">
        <id column="roleid" property="roleid" jdbcType="INTEGER"/>
        <result column="rolename" property="rolename" jdbcType="VARCHAR"/>
        <result column="roledes" property="roledes" jdbcType="VARCHAR"/>
    </resultMap>

    <select id="findById" parameterType="int" resultMap="BaseResultMap">
        select * from role where roleid = #{id}
    </select>

    <select id="findAll" resultMap="BaseResultMap">
        select * from role
    </select>

     <insert id="insert" parameterType="com.jn.entity.Role">
        insert into role(rolename,roledes) values(#{rolename},#{roledes})
      </insert>

     <update id="update" parameterType="com.jn.entity.Role">
        update role set rolename = #{rolename},roledes = #{roledes} where roleid = #{roleid}
      </update>

    <delete id="delete" parameterType="int">
        delete from role where roleid = #{id}
    </delete>

</mapper>
7 编写业务层接口
package com.jn.service;

import com.jn.entity.Role;

import java.util.List;

public interface RolrService {
    Role findById(Integer id);
    List<Role> findAll();
    void insert(Role role);
    void update(Role role);
    void delete(Integer id);

}
8 编写业务层接口实现类
package com.jn.service.impl;

import com.jn.entity.Role;
import com.jn.service.RolrService;

import java.util.List;

public class RoleServiceImpl implements RolrService {
    @Override
    public Role findById(Integer id) {
        return null;
    }

    @Override
    public List<Role> findAll() {
        return null;
    }

    @Override
    public void insert(Role role) {

    }

    @Override
    public void update(Role role) {

    }

    @Override
    public void delete(Integer id) {

    }
}
(三)SSM整合步骤
1、Spring 框架在 web 工程中独立运行
1.1 创建 Spring 配置文件applicationContext.xml并导入约束
<?xml version="1.0" encoding="UTF-8"?>
<beans xmlns="http://www.springframework.org/schema/beans"
       xmlns:xsi="http://www.w3.org/2001/XMLSchema-instance"
       xmlns:context="http://www.springframework.org/schema/context"
       xsi:schemaLocation="http://www.springframework.org/schema/beans
       http://www.springframework.org/schema/beans/spring-beans.xsd
       http://www.springframework.org/schema/context
       https://www.springframework.org/schema/context/spring-context.xsd">

<!--开启注解扫描包-->
    <!--创建容器时扫描的包-->
    <context:component-scan base-package="com.jn"></context:component-scan>

</beans>
1.2 使用注解配置业务层
package com.jn.service.impl;

import com.jn.entity.Role;
import com.jn.service.RolrService;
import org.springframework.stereotype.Service;

import java.util.List;
@Service("roleService")
public class RoleServiceImpl implements RolrService {
    @Override
    public Role findById(Integer id) {
        return null;
    }

    @Override
    public List<Role> findAll() {
        return null;
    }

    @Override
    public void insert(Role role) {

    }

    @Override
    public void update(Role role) {

    }

    @Override
    public void delete(Integer id) {

    }
}
1.3 测试 Spring 独立运行
package com.jn;
import com.jn.service.impl.RoleServiceImpl;
import org.junit.Test;
import org.junit.runner.RunWith;
import org.springframework.beans.factory.annotation.Autowired;
import org.springframework.test.context.ContextConfiguration;
import org.springframework.test.context.junit4.SpringJUnit4ClassRunner;

@RunWith(SpringJUnit4ClassRunner.class)
@ContextConfiguration(locations = "classpath:applicationContext.xml")
public class MyTest {
    @Autowired
    private RoleServiceImpl roleService;
    @Test
    public void testIOC(){
        System.out.println(roleService);
    }
}

2、SpringMVC 在 web 工程中运行
2.1 在 web.xml 中配置核心控制器(DispatcherServlet)
<?xml version="1.0" encoding="UTF-8"?>
<web-app id="WebApp_9" version="2.4" xmlns="http://java.sun.com/xml/ns/j2ee"
         xmlns:xsi="http://www.w3.org/2001/XMLSchema-instance"
         xsi:schemaLocation="http://java.sun.com/xml/ns/j2ee
         http://java.sun.com/xml/ns/j2ee/web-app_2_4.xsd">
  <display-name>Archetype Created Web Application</display-name>

<!--前端控制器-->
  <servlet>
    <servlet-name>springmvc</servlet-name>
    <servlet-class>org.springframework.web.servlet.DispatcherServlet</servlet-class>
    <!--加载springmvc的配置文件-->
    <init-param>
      <param-name>contextConfigLocation</param-name>
      <param-value>classpath:springmvcConfig.xml</param-value>
    </init-param>
  </servlet>

  <servlet-mapping>
    <servlet-name>springmvc</servlet-name>
    <url-pattern>/</url-pattern>
  </servlet-mapping>

<!--整合Spring和SpringMVC-->
  <context-param>
    <param-name>contextConfigLocation</param-name>
    <param-value>classpath:applicationContext.xml</param-value>
  </context-param>
  <listener>
    <listener-class>org.springframework.web.context.ContextLoaderListener</listener-class>
  </listener>


  <!--配置post请求时的编码过滤器-->
  <filter>
    <filter-name>encodingFilter</filter-name>
    <filter-class>org.springframework.web.filter.CharacterEncodingFilter</filter-class>
    <init-param>
      <param-name>encoding</param-name>
      <param-value>UTF-8</param-value>
    </init-param>
  </filter>
  <filter-mapping>
    <filter-name>encodingFilter</filter-name>
    <url-pattern>/*</url-pattern>
  </filter-mapping>

</web-app>
2.2 编写 SpringMVC 的配置文件
<?xml version="1.0" encoding="UTF-8"?>
<beans xmlns="http://www.springframework.org/schema/beans"
       xmlns:xsi="http://www.w3.org/2001/XMLSchema-instance"
       xmlns:context="http://www.springframework.org/schema/context"
       xmlns:mvc="http://www.springframework.org/schema/mvc"
       xsi:schemaLocation="http://www.springframework.org/schema/beans
       http://www.springframework.org/schema/beans/spring-beans.xsd
       http://www.springframework.org/schema/context
       https://www.springframework.org/schema/context/spring-context.xsd
       http://www.springframework.org/schema/mvc
       https://www.springframework.org/schema/mvc/spring-mvc.xsd">

<!--配置注解扫描器-->
    <context:component-scan base-package="com.jn"></context:component-scan>

<!--视图解析器配置-->
    <bean  class="org.springframework.web.servlet.view.InternalResourceViewResolver">
        <property name="prefix" value="/"/>
        <property name="suffix" value=".jsp"/>
    </bean>

<!--配置json转换器-->
    <mvc:annotation-driven conversion-service="conversionService">
        <mvc:message-converters>
            <bean class="org.springframework.http.converter.json.MappingJackson2HttpMessageConverter"/>
        </mvc:message-converters>
    </mvc:annotation-driven>

<!--配置类型转换器-->
    <bean id="conversionService" class="org.springframework.format.support.FormattingConversionServiceFactoryBean">
    </bean>


</beans>
2.3 编写 Controller
package com.jn.controller;

import com.jn.entity.Role;
import org.springframework.stereotype.Controller;
import org.springframework.web.bind.annotation.RequestMapping;
import org.springframework.web.bind.annotation.ResponseBody;

@Controller
public class RoleController {

    //测试SpringMVC配置是否成功
    @RequestMapping("testSpringMVC")
    @ResponseBody
    public Role testRole(){
        Role role = new Role();
        role.setRoleid(1);
        role.setRolename("admin");
        role.setRoledes("轻功水上漂");
        return role;
    }
}
2.4 编写index.jsp测试
<%@ page language="java" contentType="text/html; charset=UTF-8" %>
<html>
<body>
<h2>测试SpringMVC</h2>
<br>
<form action="testSpringMVC" method="post">
    <input type="text" name="id"><br>
    <input type="submit" value="点击测试">
</form>

</body>
</html>

3、整合 Spring 和 SpringMVC:web.xml中添加监听器
<!--整合Spring和SpringMVC-->
  <context-param>
    <param-name>contextConfigLocation</param-name>
    <param-value>classpath:applicationContext.xml</param-value>
  </context-param>
  <listener>
    <listener-class>org.springframework.web.context.ContextLoaderListener</listener-class>
  </listener>
4、Spring整合MyBatis配置
4.1 Spring 接管 MyBatis 的 Session 工厂
jdbc.driver=com.mysql.cj.jdbc.Driver
jdbc.url=jdbc:mysql://localhost:3306/mybatisdatabase100
jdbc.username=root
jdbc.password=123456
<!--加载properties文件-->
<context:property-placeholder location="classpath:dbconfig.properties"></context:property-placeholder>
<!--配置数据源-->
<!-- 连接数据库的核心配置文件 以及数据源-->
<bean id="dataSource" class="com.mchange.v2.c3p0.ComboPooledDataSource">
<property name="driverClass" value="${jdbc.driver}" />
<property name="jdbcUrl" value="${jdbc.url}" />
<property name="user" value="${jdbc.username}" />
<property name="password" value="${jdbc.password}" />
</bean>
<!--Mybatis核心工厂对象-->
<bean id="sqlSessionFactory" class="org.mybatis.spring.SqlSessionFactoryBean">
<!--注入数据源-->
<property name="dataSource" ref="dataSource"></property>
<!--别名-->
<property name="typeAliasesPackage" value="com.jn.entity"></property>
<!--mapper文件位置-->
<property name="mapperLocations" value="com/jn/mapper/RoleMapper.xml"></property>
<!--进行分页插件的配置
<property name="plugins">
<array>
</array>
</property> -->
</bean>4.2 配置自动扫描所有 Mapper 接口和文件
<!--配置接口扫描的包-->
    <bean id="mapper" class="org.mybatis.spring.mapper.MapperScannerConfigurer">
        <property name="basePackage" value="com.jn.mapper"></property>
    </bean>
4.3 配置 Spring 的事务
 <!--配置平台管理器-->
    <bean id="transactionManager" class="org.springframework.jdbc.datasource.DataSourceTransactionManager">
        <!--注入数据源-->
        <property name="dataSource" ref="dataSource"></property>
    </bean>
    <tx:annotation-driven transaction-manager="transactionManager"></tx:annotation-driven>
(四)测试 SSM 整合结果
1、编写测试jsp文件
<%@ page language="java" contentType="text/html; charset=UTF-8" %>
<html>
<body>
<h2>测试SpringMVC</h2>
<br>
<form action="testSpringMVC" method="post">
    <input type="text" name="id"><br>
    <input type="submit" value="点击测试">
</form>

<h2>测试SSM整合结果</h2>
<h3>添加</h3>
    <form action="insert" method="post">
        Name:<input type="text" name="rolename"><br>
        Describe:<input type="text" name="roledes"><br>
        <input type="submit" value="点击添加">
    </form>

<h3>修改</h3>
<form action="update" method="post">
    Id:<input type="text" name="roleid"><br>
    Name:<input type="text" name="rolename"><br>
    Describe:<input type="text" name="roledes"><br>
    <input type="submit" value="点击修改">
</form>

<h3>删除</h3>
<form action="delete" method="post">
    Id:<input type="text" name="id"><br>
    <input type="submit" value="点击删除">
</form>

<h3>根据Id查询</h3>
<form action="findById" method="post">
    Id:<input type="text" name="id" value="输入id进行查询"><br>
    <input type="submit" value="点击查询">
</form>

<h3>查询所有</h3>
    <a href="findAll">点击查询所有</a>
</body>
</html>
2、修改控制器中的方法
package com.jn.controller;

import com.jn.entity.Role;
import com.jn.service.RolrService;
import com.jn.service.impl.RoleServiceImpl;
import org.springframework.beans.factory.annotation.Autowired;
import org.springframework.stereotype.Controller;
import org.springframework.web.bind.annotation.RequestMapping;
import org.springframework.web.bind.annotation.ResponseBody;

import java.util.List;

@Controller
public class RoleController {

    //测试SpringMVC配置是否成功
    @RequestMapping("testSpringMVC")
    @ResponseBody
    public Role findRole(Integer id){
        Role role = new Role();
        role.setRoleid(id);
        role.setRolename("admin");
        role.setRoledes("轻功水上漂");
        System.out.println(role);
        return role;
    }
    @Autowired
    private RoleServiceImpl rolrService;

    //insert
    @RequestMapping("insert")
    @ResponseBody
    public String insert(Role role){
        try {
            rolrService.insert(role);
            return "ok";
        } catch (Exception e) {
            e.printStackTrace();
        }
        return "error";
    }

    //delete
    @RequestMapping("delete")
    @ResponseBody
    public String delete(Integer id){
        try {
            rolrService.delete(id);
            return "ok";
        } catch (Exception e) {
            e.printStackTrace();
        }
        return "error";
    }

    //update
    @RequestMapping("update")
    @ResponseBody
    public String update(Role role){
        try {
            rolrService.update(role);
            return "ok";
        } catch (Exception e) {
            e.printStackTrace();
        }
        return "error";
    }

    //select
    @RequestMapping("findById")
    @ResponseBody
    public Role findById(Integer id){
        return rolrService.findById(id);
    }

    //select all
    @RequestMapping("findAll")
    @ResponseBody
    public List<Role> findAll(){
        return rolrService.findAll();
    }
}
3、修改业务层当中方法
package com.jn.service.impl;

import com.jn.entity.Role;
import com.jn.mapper.RoleMapper;
import com.jn.service.RolrService;
import org.springframework.beans.factory.annotation.Autowired;
import org.springframework.stereotype.Service;

import java.util.List;
@Service("roleService")
public class RoleServiceImpl implements RolrService {
    @Autowired
    private RoleMapper roleMapper;
    @Override
    public Role findById(Integer id) {
        return roleMapper.findById(id);
    }

    @Override
    public List<Role> findAll() {
        return roleMapper.findAll();
    }

    @Override
    public void insert(Role role) {
        roleMapper.insert(role);
    }

    @Override
    public void update(Role role) {
        roleMapper.update(role);
    }

    @Override
    public void delete(Integer id) {
        roleMapper.delete(id);
    }
}
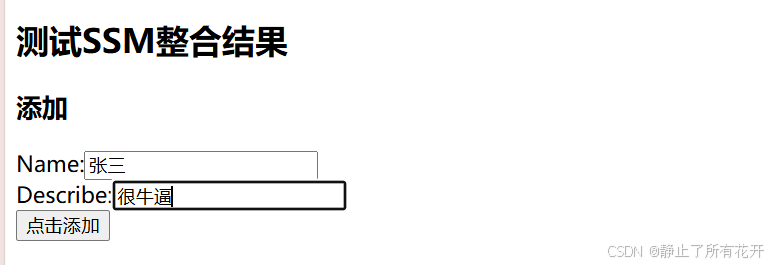
4、测试运行并展示运行结果
4.1添加

4.2修改


4.3删除


4.4查询单个数据


