RT-DETR:替代YOLO的更快实时目标检测模型及其Pytorch实现【附源码】
《------往期经典推荐------》
一、AI应用软件开发实战专栏【链接】
| 项目名称 | 项目名称 |
|---|---|
| 1.【人脸识别与管理系统开发】 | 2.【车牌识别与自动收费管理系统开发】 |
| 3.【手势识别系统开发】 | 4.【人脸面部活体检测系统开发】 |
| 5.【图片风格快速迁移软件开发】 | 6.【人脸表表情识别系统】 |
| 7.【YOLOv8多目标识别与自动标注软件开发】 | 8.【基于YOLOv8深度学习的行人跌倒检测系统】 |
| 9.【基于YOLOv8深度学习的PCB板缺陷检测系统】 | 10.【基于YOLOv8深度学习的生活垃圾分类目标检测系统】 |
| 11.【基于YOLOv8深度学习的安全帽目标检测系统】 | 12.【基于YOLOv8深度学习的120种犬类检测与识别系统】 |
| 13.【基于YOLOv8深度学习的路面坑洞检测系统】 | 14.【基于YOLOv8深度学习的火焰烟雾检测系统】 |
| 15.【基于YOLOv8深度学习的钢材表面缺陷检测系统】 | 16.【基于YOLOv8深度学习的舰船目标分类检测系统】 |
| 17.【基于YOLOv8深度学习的西红柿成熟度检测系统】 | 18.【基于YOLOv8深度学习的血细胞检测与计数系统】 |
| 19.【基于YOLOv8深度学习的吸烟/抽烟行为检测系统】 | 20.【基于YOLOv8深度学习的水稻害虫检测与识别系统】 |
| 21.【基于YOLOv8深度学习的高精度车辆行人检测与计数系统】 | 22.【基于YOLOv8深度学习的路面标志线检测与识别系统】 |
| 23.【基于YOLOv8深度学习的智能小麦害虫检测识别系统】 | 24.【基于YOLOv8深度学习的智能玉米害虫检测识别系统】 |
| 25.【基于YOLOv8深度学习的200种鸟类智能检测与识别系统】 | 26.【基于YOLOv8深度学习的45种交通标志智能检测与识别系统】 |
| 27.【基于YOLOv8深度学习的人脸面部表情识别系统】 | 28.【基于YOLOv8深度学习的苹果叶片病害智能诊断系统】 |
| 29.【基于YOLOv8深度学习的智能肺炎诊断系统】 | 30.【基于YOLOv8深度学习的葡萄簇目标检测系统】 |
| 31.【基于YOLOv8深度学习的100种中草药智能识别系统】 | 32.【基于YOLOv8深度学习的102种花卉智能识别系统】 |
| 33.【基于YOLOv8深度学习的100种蝴蝶智能识别系统】 | 34.【基于YOLOv8深度学习的水稻叶片病害智能诊断系统】 |
| 35.【基于YOLOv8与ByteTrack的车辆行人多目标检测与追踪系统】 | 36.【基于YOLOv8深度学习的智能草莓病害检测与分割系统】 |
| 37.【基于YOLOv8深度学习的复杂场景下船舶目标检测系统】 | 38.【基于YOLOv8深度学习的农作物幼苗与杂草检测系统】 |
| 39.【基于YOLOv8深度学习的智能道路裂缝检测与分析系统】 | 40.【基于YOLOv8深度学习的葡萄病害智能诊断与防治系统】 |
| 41.【基于YOLOv8深度学习的遥感地理空间物体检测系统】 | 42.【基于YOLOv8深度学习的无人机视角地面物体检测系统】 |
| 43.【基于YOLOv8深度学习的木薯病害智能诊断与防治系统】 | 44.【基于YOLOv8深度学习的野外火焰烟雾检测系统】 |
| 45.【基于YOLOv8深度学习的脑肿瘤智能检测系统】 | 46.【基于YOLOv8深度学习的玉米叶片病害智能诊断与防治系统】 |
| 47.【基于YOLOv8深度学习的橙子病害智能诊断与防治系统】 | 48.【基于深度学习的车辆检测追踪与流量计数系统】 |
| 49.【基于深度学习的行人检测追踪与双向流量计数系统】 | 50.【基于深度学习的反光衣检测与预警系统】 |
| 51.【基于深度学习的危险区域人员闯入检测与报警系统】 | 52.【基于深度学习的高密度人脸智能检测与统计系统】 |
| 53.【基于深度学习的CT扫描图像肾结石智能检测系统】 | 54.【基于深度学习的水果智能检测系统】 |
| 55.【基于深度学习的水果质量好坏智能检测系统】 | 56.【基于深度学习的蔬菜目标检测与识别系统】 |
| 57.【基于深度学习的非机动车驾驶员头盔检测系统】 | 58.【太基于深度学习的阳能电池板检测与分析系统】 |
| 59.【基于深度学习的工业螺栓螺母检测】 | 60.【基于深度学习的金属焊缝缺陷检测系统】 |
| 61.【基于深度学习的链条缺陷检测与识别系统】 | 62.【基于深度学习的交通信号灯检测识别】 |
| 63.【基于深度学习的草莓成熟度检测与识别系统】 | 64.【基于深度学习的水下海生物检测识别系统】 |
| 65.【基于深度学习的道路交通事故检测识别系统】 | 66.【基于深度学习的安检X光危险品检测与识别系统】 |
| 67.【基于深度学习的农作物类别检测与识别系统】 | 68.【基于深度学习的危险驾驶行为检测识别系统】 |
| 69.【基于深度学习的维修工具检测识别系统】 | 70.【基于深度学习的维修工具检测识别系统】 |
| 71.【基于深度学习的建筑墙面损伤检测系统】 | 72.【基于深度学习的煤矿传送带异物检测系统】 |
| 73.【基于深度学习的老鼠智能检测系统】 |
二、机器学习实战专栏【链接】,已更新31期,欢迎关注,持续更新中~~
三、深度学习【Pytorch】专栏【链接】
四、【Stable Diffusion绘画系列】专栏【链接】
五、YOLOv8改进专栏【链接】,持续更新中~~
六、YOLO性能对比专栏【链接】,持续更新中~
《------正文------》
目录
- 引言
- RT-DETR架构的关键组成
- 结论
引言
目标检测一直面临着一个重大挑战-平衡速度和准确性。像YOLO这样的传统模型速度很快,但需要一个名为非极大值抑制(NMS)的后处理步骤,这会减慢检测速度。NMS过滤重叠的边界框,但这会引入额外的计算时间,影响整体速度。这就是DETR(https://arxiv.org/pdf/2005.12872)(检测Transformer)的用武之地。
RT-DETR是基于DETR架构的端到端对象检测器,完全消除了对NMS的需求。通过这样做,RT-DETR显着减少了之前基于卷积神经网络(CNN)的对象检测器(如YOLO系列)的延迟。它结合了强大的主干、混合编码器和独特的查询选择器,可以快速准确地处理特征。
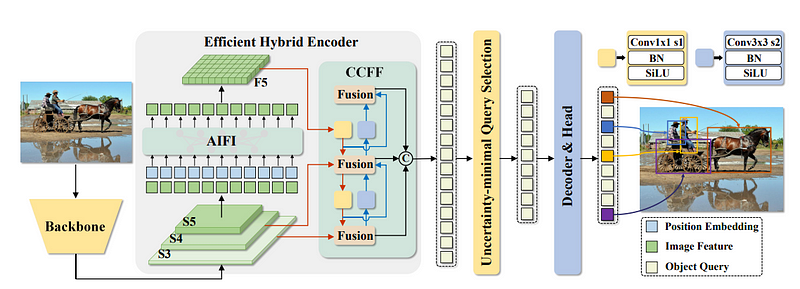 RT-DETR架构概述,来源:https://arxiv.org/pdf/2304.08069
RT-DETR架构的关键组成
- 主干:主干从输入图像中提取特征,最常见的配置是使用ResNet-50或ResNet-101。从主干,RT-DETR提取三个级别的特征- S3,S4和S5。这些多尺度特征有助于模型理解图像的高级和细粒度细节。
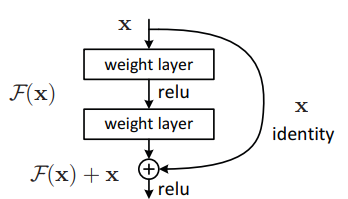
残差构建块,来源:https://arxiv.org/pdf/1512.03385
2.混合编码器:
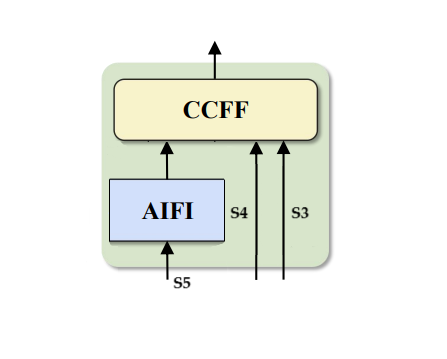
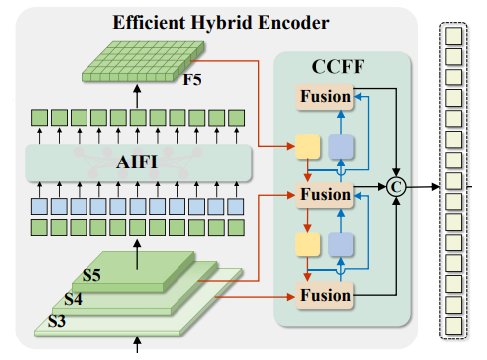
混合编码器
该混合编码器包括两个主要部分:基于注意力的尺度内特征交互(AIFI)和跨尺度特征融合(CCFF)。
以下是每个部分的工作原理:
- AIFI:这一层只处理主干中的S5特征图。由于S5代表最深的层,因此它包含关于图像中完整对象及其上下文的最丰富的语义信息-这使得它非常适合基于变换的注意力来捕捉对象之间有意义的关系。虽然S3和S4包含有用的低级别特征,如边缘和对象部分,但对这些层施加注意力将在计算上昂贵且效率较低,因为它们尚未表示需要彼此相关的完整对象。
以下是AIFI的PyTorch实现。代码分为三个主要部分:
- 处理关注后要素的前馈层(*FFLayer*)
- 实现多头自关注的Transformer编码器层
- 主要的AIFI模块,通过适当的特征投影和位置编码将所有内容联系在一起
import torch
import torch.nn as nn

class FFLayer(nn.Module):
    '''
    Feed-forward network: two linear layers with a non-linear activation
    in between
    '''
    def __init__(self,
                 embedd_dim:int,
                 ffn_dim:int,
                 dropout:float,
                 activation:str) -> nn.Module:
        super().__init__()
        self.feed_forward = nn.Sequential(
                nn.Linear(embedd_dim, ffn_dim),
                getattr(nn, activation)(),
                nn.Dropout(dropout),
                nn.Linear(ffn_dim, embedd_dim)
            )

        self.norm = nn.LayerNorm(embedd_dim)

    def forward(self,x:torch.Tensor)->torch.Tensor:
        residual = x
        x = self.feed_forward(x)
        out = self.norm(residual + x)
        return out

class TransformerEncoderLayer(nn.Module):

    def __init__(self,
                 hidden_dim:int,
                 n_head:int,
                 ffn_dim:int,
                 dropout:float,
                 activation:str = "ReLU"):

        super().__init__()
        self.mh_self_attn = nn.MultiheadAttention(hidden_dim, n_head, dropout, batch_first=True)
        self.feed_foward_nn = FFLayer(hidden_dim,ffn_dim,dropout,activation)
        self.dropout = nn.Dropout(dropout)
        self.norm = nn.LayerNorm(hidden_dim)

    def forward(self,x:torch.Tensor,mask:torch.Tensor=None,pos_emb:torch.Tensor=None) -> torch.Tensor:
        # Save the input as the residual for the skip connection
        residual = x

        # Add positional embeddings (if provided) to the input for spatial encoding
        q = k = x + pos_emb if pos_emb is not None else x

        # Apply multi-head self-attention
        x, attn_score = self.mh_self_attn(q, k, value=x, attn_mask=mask)

        # Add residual connection and apply dropout
        x= residual + self.dropout(x)
        # Normalize the result to avoid distribution shift during training
        x = self.norm(x)

        x = self.feed_foward_nn(x)

        return x

class AIFI(nn.Module):

  def __init__(self):
      super().__init__()
      # Configuration
      self.hidden_dim = 256
      self.num_layers = 1
      self.num_heads = 8
      self.dropout = 0.0
      self.eval_spatial_size = [640,640]
      self.pe_temperature = 10000

      # Projection layer
      self.projection = nn.Linear(config.input_dim, self.hidden_dim)

      #position embedding
      pos_embed = self.build_2d_sincos_position_embedding(
          self.eval_spatial_size[1] // 32, self.eval_spatial_size[0] // 32,
          self.hidden_dim, self.pe_temperature)
      setattr(self, 'pos_embed', pos_embed)

      # Transformer encoder layer
      self.transformer_encoder= TransformerEncoderLayer(
          hidden_dim = self.hidden_dim,
          n_head = self.num_heads,
          ffn_dim = 1024,
          dropout = self.dropout,
          activation = 'GELU'
      )

  @staticmethod
  def build_2d_sincos_position_embedding(w, h, embed_dim=256, temperature=10000.):
      '''
      source code from: https://github.com/lyuwenyu/RT-DETR/blob/main/rtdetr_pytorch/src/zoo/rtdetr/hybrid_encoder.py
      Build 2D sinusoidal positional embeddings.
      Args:
          w, h: spatial dimensions of the position embedding
          embed_dim: dimension of the position embeddings
          temperature: scaling factor for the position encoding
      Returns:
          pos_embed: [1, H*W, embed_dim] position embedding
      '''

      grid_w = torch.arange(int(w), dtype=torch.float32)
      grid_h = torch.arange(int(h), dtype=torch.float32)
      grid_w, grid_h = torch.meshgrid(grid_w, grid_h, indexing='ij')
      assert embed_dim % 4 == 0, \
          'Embed dimension must be divisible by 4 for 2D sin-cos position embedding'
      pos_dim = embed_dim // 4
      omega = torch.arange(pos_dim, dtype=torch.float32) / pos_dim
      omega = 1. / (temperature ** omega)
      out_w = grid_w.flatten()[..., None] @ omega[None]
      out_h = grid_h.flatten()[..., None] @ omega[None]
      return torch.concat([out_w.sin(), out_w.cos(), out_h.sin(), out_h.cos()], dim=1)[None, :, :]

  def forward(self, s5:torch.Tensor):
      # s5: Input tensor of shape [batch_size, C, H, W] from S5 feature map
      B,_,H,W = s5.size()
      # Flatten the feature map to [batch_size, H*W, C] for processing by the transformer
      s5 = s5.flatten(2).permute(0, 2, 1)
      # Project input to hidden dimension
      x = self.projection(s5)

      # Add positional embeddings to the input features
      if self.training:
          pos_embed = self.build_2d_sincos_position_embedding(
              w=W,
              h=H,
              embed_dim=self.hidden_dim
          ).to(x.device)
      else:
          pos_embed = getattr(self, 'pos_embed', None).to(x.device)

      # Apply transformer encoder
      x = self.transformer_encoder(x, pos_emb = pos_embed)

      return x
- CCFF:这部分基于CNN层,负责组合S3,S4和AIFI(S5)特征图。它的工作是融合不同尺度的特征,确保最终的特征图具有多种分辨率的信息。CCFF的核心是一个名为RepBlock的特殊块,它使用一个名为RepConv的结构**。RepConv(https://arxiv.org/pdf/2101.03697)允许网络在训练和推理过程中在不同形式的卷积运算之间进行转换,从而在不牺牲性能的情况下提高效率。
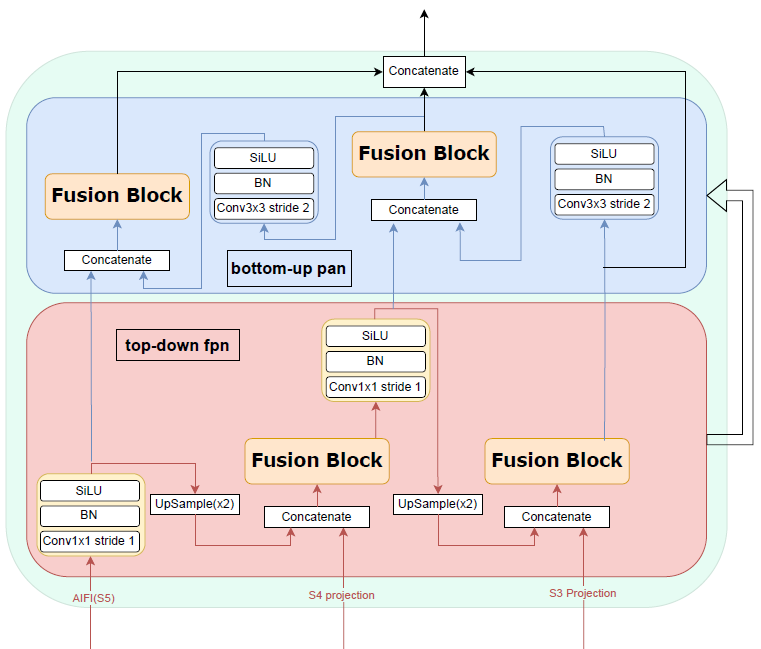
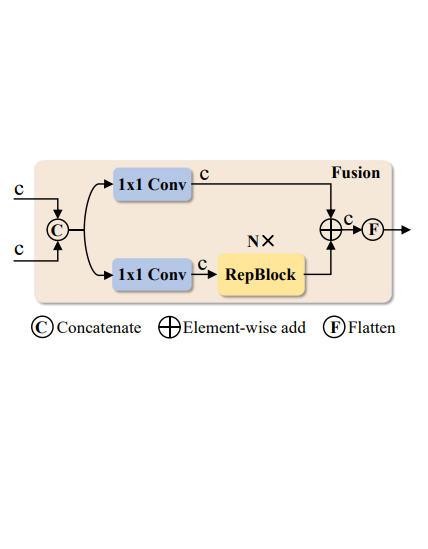
左侧为CCFF,右侧为CCFF中的融合块(来源:https://arxiv.org/pdf/2304.08069)
以下是CCFF的PyTorch实现。该代码分为四个主要部分:
- 基于原始实现的RepVGG块。
- 一个FusionBlock负责合并不同尺度的要素
- FPNBlock和PANBlock分别用于自顶向下和自底向上的多尺度特征处理
- 主要的CCFF(跨通道特征融合) 将自上而下的FPN和自下而上的PAN来聚合特征。
import torch
import torch.nn as nn
import torch.nn.functional as F

class ConvBlock(nn.Module):
    def __init__(self,
                 in_channels:int,
                 out_channels:int,
                 kernel_size:int,
                 stride:int):
        super().__init__()
        self.convblock = nn.Sequential(
            nn.Conv2d(in_channels,out_channels,kernel_size,stride,bias=False),
            nn.BatchNorm2d(out_channels),
            nn.SiLU()
        )

    def forward(self,x):
        return self.convblock(x)

class RepVggBlock(nn.Module):
    def __init__(self, ch_in, ch_out, activation='ReLU'):
        super().__init__()
        self.ch_in = ch_in
        self.ch_out = ch_out
        self.conv1 = nn.Sequential(
            nn.Conv2d(ch_in, ch_out, 3, 1, padding=1),nn.BatchNorm2d(ch_out)
            )
        self.conv2 = nn.Sequential(
            nn.Conv2d(ch_in, ch_out, 1, 1, padding=0),nn.BatchNorm2d(ch_out)
            )
        self.act = nn.Identity() if activation is None else getattr(nn,activation)

    def forward(self, x):
        if hasattr(self, 'conv'):
            y = self.conv(x)
        else:
            y = self.conv1(x) + self.conv2(x)

        return self.act(y)

    def convert_to_deploy(self):
        if not hasattr(self, 'conv'):
            self.conv = nn.Conv2d(self.ch_in, self.ch_out, 3, 1, padding=1)

        kernel, bias = self.get_equivalent_kernel_bias()
        self.conv.weight.data = kernel
        self.conv.bias.data = bias

    def get_equivalent_kernel_bias(self):
        kernel3x3, bias3x3 = self._fuse_bn_tensor(self.conv1)
        kernel1x1, bias1x1 = self._fuse_bn_tensor(self.conv2)

        return kernel3x3 + self._pad_1x1_to_3x3_tensor(kernel1x1), bias3x3 + bias1x1

    def _pad_1x1_to_3x3_tensor(self, kernel1x1):
        if kernel1x1 is None:
            return 0
        else:
            return F.pad(kernel1x1, [1, 1, 1, 1])

    def _fuse_bn_tensor(self, branch: ConvBlock):
        if branch is None:
            return 0, 0
        kernel = branch.conv.weight
        running_mean = branch.norm.running_mean
        running_var = branch.norm.running_var
        gamma = branch.norm.weight
        beta = branch.norm.bias
        eps = branch.norm.eps
        std = (running_var + eps).sqrt()
        t = (gamma / std).reshape(-1, 1, 1, 1)
        return kernel * t, beta - running_mean * gamma / std

class FunsionBlock(nn.Module):
    def __init__(self,
                 in_channels:int,
                 out_channels:int,
                 num_blocks:int,
                 expansion:float):

        super().__init__()
        hidden_channels = int(out_channels*expansion)
        self.conv1 = ConvBlock(in_channels, hidden_channels, 1, 1)
        self.conv2 = ConvBlock(in_channels, hidden_channels, 1, 1)
        self.rep_blocks = nn.Sequential(*[
            RepVggBlock(hidden_channels, hidden_channels, activation="SiLU") for _ in range(num_blocks)
        ])
        if hidden_channels != out_channels:
            self.conv3 = ConvBlock(hidden_channels, out_channels, 1, 1)
        else:
            self.conv3 = nn.Identity()

    def forward(self,x):
        out = self.conv1(x)
        out = self.rep_blocks(out)
        x = self.conv2(x)
        return self.conv3(out + x)


class FPNBlock(nn.Module):
    '''
      FPNBlock performs top-down processing of features with upsampling and fusion
    '''
    def __init__(self,
                 hidden_dim:int,
                 in_channels:list[int],
                 depth_mult:float,
                 expansion:float):
        super().__init__()
        self.hidden_dim = hidden_dim
        self.in_channels = in_channels

        self.top_down_blocks = nn.ModuleList()
        for _ in range(len(self.in_channels)-1,0,-1):
            self.top_down_blocks.append(
                ConvBlock(self.hidden_dim,self.hidden_dim,1,1)
            )
            self.top_down_blocks.append(
                FunsionBlock(hidden_dim * 2, hidden_dim, num_blocks= round(3 * depth_mult), expansion=expansion)
            )

    def forward(self,features:list[torch.Tensor]) -> list[torch.Tensor]:
        # features = [aifi_s5,s4,s3]
        outputs = [features[0]]
        for n,m in enumerate(self.top_down_blocks):
            if n % 2 != 0: # FusionBlock
                # Upsample previous feature map and concatenate with the next layer's features
                fusion_out = m(torch.concat([F.interpolate(out, scale_factor=2., mode='nearest'),features[n // 2 + 1]],dim=1))
                outputs.insert(0,fusion_out)
            else: # ConvBlock
                out = m(outputs[0])
                outputs[0] = out
        '''
        outputs = [
            FusionBlock( concat[ Upsample( ConvBlock(FusionBlock( concat[ Upsample(ConvBlock(aifi_s5)), S4] )), S3] ),
            ConvBlock(FusionBlock( concat[ Upsample(ConvBlock(aifi_s5)), S4] ),
            ConvBlock(aifi_s5)
            ]
        '''
        return outputs

class PANBlock(nn.Module):
    '''
      PANBlock processes features in a bottom-up manner to refine them
    '''
    def __init__(self,
                 hidden_dim:int,
                 in_channels:list[int],
                 depth_mult:float,
                 expansion:float):
        super().__init__()

        self.hidden_dim = hidden_dim
        self.in_channels = in_channels

        self.bottom_up_blocks = nn.ModuleList()
        for _ in range(len(self.in_channels)-1,0,-1):
            self.bottom_up_blocks.append(
                ConvBlock(self.hidden_dim,self.hidden_dim,3,2)
            )
            self.bottom_up_blocks.append(
                FunsionBlock(hidden_dim * 2, hidden_dim, num_blocks= round(3 * depth_mult), expansion=expansion)
            )

    def forward(self,fpn_features:list[torch.Tensor]) -> list[torch.Tensor]:

        outputs = [fpn_features[0]]
        for n,m in enumerate(self.bottom_up_blocks):
            if n % 2 != 0: # FusionBlock
                fusion_out = m(torch.concat([out,fpn_features[n // 2 + 1]],dim=1))
                outputs.append(fusion_out)
            else: # ConvBlock
                out = m(outputs[-1])

        '''
        outputs = [
            fpn_feature[0],
            FusionBlock( concat[ ConvBlock(fpn_feature[0]), fpn_feature[1] ] ),
            FusionBlock( concat[ ConvBlock(FusionBlock( concat[ ConvBlock(fpn_feature[0]), fpn_feature[1] ] )), fpn_feature[2] ] ),
            ]
        '''

class CCFF(nn.Module):
    def __init__(self,
                 hidden_dim:int,
                 in_channels:list[int],
                 depth_mult:float,
                 expansion:float):
        super().__init__()

        self.hidden_dim = hidden_dim
        self.in_channels = in_channels #channels of AIFI(S5),S4,S3
        self.depth_mult = depth_mult
        self.expansion = expansion
        # top-down fpn
        self.top_down_fpn = FPNBlock(self.hidden_dim,self.in_channels,self.depth_mult,self.expansion)
        # bottom-up pan
        self.bottom_up_pan = PANBlock(self.hidden_dim,self.in_channels,self.depth_mult,self.expansion)

    def forward(self,aifi_s5,s4_proj,s3_proj):

        top_down_out = self.top_down_fpn([aifi_s5,s4_proj,s3_proj])
        bottom_up_out = self.bottom_up_pan(top_down_out)

        return torch.concat(bottom_up_out,dim=1)
3.不确定性-最小查询查询:
在传统的DETR模型中,基于置信度分数来选择对象查询以确定潜在的前景对象。RT-DETR论文提出了一个不确定性最小查询模型,理论上应该明确地构建和优化分类和定位预测之间的认知不确定性。
本文将这种不确定性定义为


然而,实际的实施采取了更实际的方法:
查询选择:
- 在训练和推断期间,查询最初基于分类置信度分数来选择。
- 选择使用topk操作来选择最有希望的查询。
_, topk_ind = torch.topk(enc_outputs_class.max(-1).values, num_queries, dim=1)
不确定性感知训练:
通过训练期间的变焦距损失实现不确定性最小化,其中:
- 计算预测框和地面实况框之间的IoU以测量定位精度。
- 根据IoU得分对分类目标进行加权
- 考虑预测置信度和定位质量的动态加权。
这种设计创建了一个隐式的不确定性最小选择,其中:
在训练期间:
模型仅在以下情况下学习分配高置信度分数:
- 分类准确
- 本地化IoU高
- 总体预测不确定性较低
在推理过程中:
基于信心的选择变得内在地具有不确定性,因为:
- 该模型已学会将本地化质量纳入其置信度预测
- 高置信度分数自然表明良好的分类和准确的定位
- 不需要显式的不确定性计算,使推理更有效
这种实现与传统的DETR和RT-DETR论文中的理论方法不同,它通过训练创建了一个端到端的学习不确定性意识,而不是在查询选择过程中使用显式的不确定性计算。
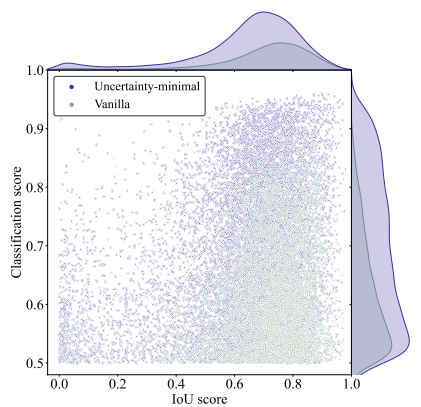 所选编码器功能的分类和IoU分数。紫色和绿色点分别表示从使用不确定性最小查询选择和普通查询选择训练的模型中选择的特征。(来源:https://arxiv.org/pdf/2304.08069)
散点图显示了与普通选择(绿色)相比,不确定性最小查询选择(紫色)如何挑选更高质量的特征。紫色点聚集在右上方,表示具有准确分类和定位的特征,而绿色点则向右下方扩散。这个视觉证据证明了为什么不确定性最小的选择会导致更好的检测性能。
4.解码器:
在选择最有信心的查询后,RT-DETR使用具有多尺度可变形注意力的Transformer解码器来预测对象位置和类别。解码器架构专为高效处理多尺度特征图而设计,同时保持高精度。
默认情况下,解码器由六个相同的层组成。每一层都经过精心设计,通过三个主要操作来处理和完善对象检测:
- 查询之间的定期自我关注
- 多尺度可变形交叉注意
- 前馈网络
为了确保稳定的训练和有效的特征转换,这些操作中的每一个都辅以dropout和层归一化。
多尺度可变形注意力
视觉Transformer变形注意(https://arxiv.org/pdf/2201.00520)
RT-DETR在其解码器中引入了多尺度可变形注意力,这显著改进了标准Transformer架构中的传统自注意力机制。传统的自我关注通过计算整个特征图中所有查询对之间的关系来操作。虽然这种方法可以捕获全局依赖关系,但它的计算成本很高,特别是在处理具有大型特征图的高分辨率图像时。这可能导致效率低下,因为模型必须关注每个位置,甚至与手头的任务无关的区域。
相比之下,多尺度可变形注意力集中在多个特征尺度上的一组稀疏的关键点上,而不是关注所有空间位置。这种选择性注意机制允许模型集中在最相关的区域进行对象检测,大大降低了计算复杂度。通过在不同尺度下对几个重要点进行采样,该模型保持了检测不同大小物体的能力,同时跳过了不太关键区域的不必要计算。
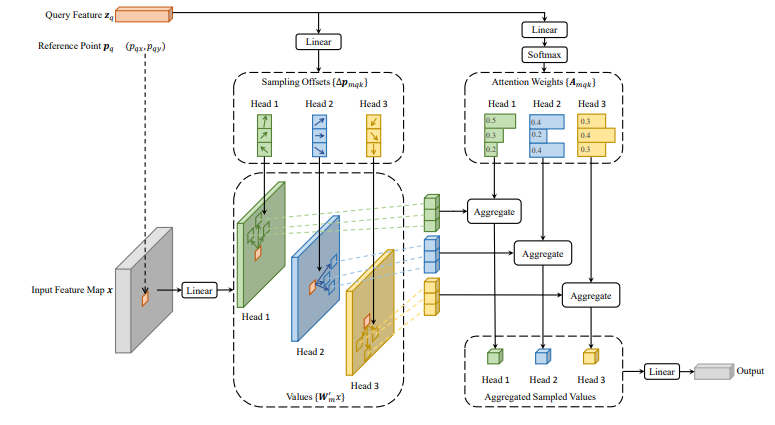 来源:https://arxiv.org/pdf/2010.04159
结论
 资料来源:https://arxiv.org/pdf/2304.08069
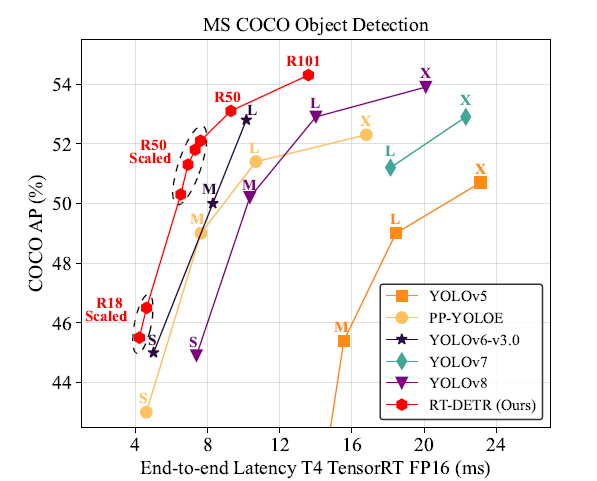
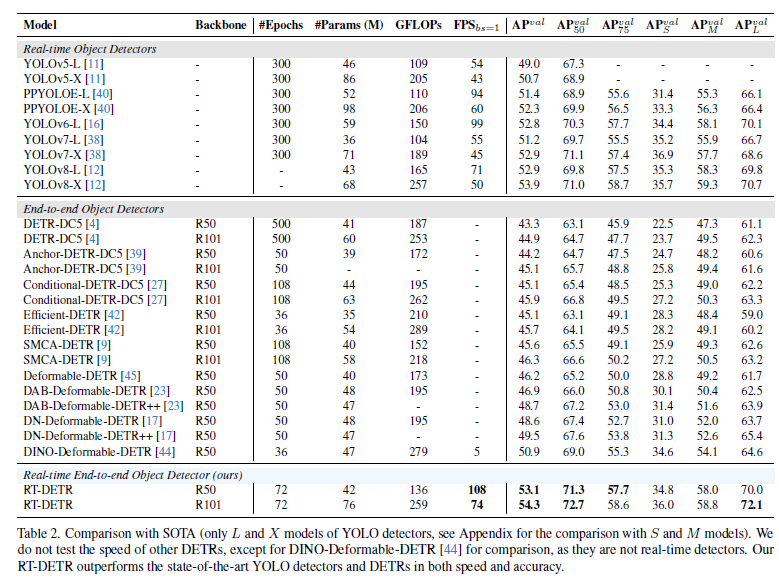
RT-DETR的优势在于它将基于transformer的注意力与基于CNN的融合相结合,以处理多尺度信息。这种组合不仅使RT-DETR快速,而且高度准确。在基准测试中,RT-DETR在COCO上使用ResNet-50实现了53.1%的平均精度(AP),使用ResNet-101实现了54.3%的AP,显著优于之前的实时检测器,如YOLO。
 资料来源:https://arxiv.org/pdf/2304.08069
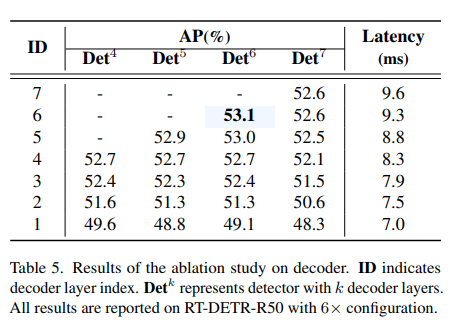
此外,RT-DETR是高度可定制的。通过调整解码器层的数量,您可以针对不同的速度和精度要求微调模型,而无需重新训练。这种灵活性使RT-DETR适用于从监控到自动驾驶的各种实时应用。
 资料来源:https://arxiv.org/pdf/2304.08069
总之,RT-DETR是实时目标检测的一个突破。它消除了对NMS的需求,减少了延迟,并通过使用创新的混合架构实现了高精度。凭借其快速高效的设计,RT-DETR为实时目标检测设定了新标准。
好了,这篇文章就介绍到这里,喜欢的小伙伴感谢给点个赞和关注,更多精彩内容持续更新~~
关于本篇文章大家有任何建议或意见,欢迎在评论区留言交流!
